How to add custom link in header links and top links in Magento 2?

In this post, I will be guiding you on how to add our custom link in header links and top links.
Header link will be displayed for both guest and logged in customer. But top links will only display if the customer is logged in.
To add custom link in the header and top links, I will create default.xml file in app/code/Aureatelabs/ModuleName/view/frontend/layout directory.
<?xml version="1.0"?>
<page xmlns:xsi="http://www.w3.org/2001/XMLSchema-instance" xsi:noNamespaceSchemaLocation="urn:magento:framework:View/Layout/etc/page_configuration.xsd">
	<body>
    	<referenceBlock name="header.links">
        	<block class="Magento\Framework\View\Element\Html\Link" name="custom-header-link">
            	<arguments>
                	<argument name="label" xsi:type="string" translate="true">Custom Header Link</argument>
                	<argument name="path" xsi:type="string">*/*/*</argument>
            	</arguments>
        	</block>
    	</referenceBlock>
    	<referenceBlock name="top.links">
        	<block class="Magento\Framework\View\Element\Html\Link" name="custom-top-link">
            	<arguments>
                	<argument name="label" xsi:type="string" translate="true">Custom Top Link</argument>
                	<argument name="path" xsi:type="string">*/*/*</argument>
            	</arguments>
        	</block>
    	</referenceBlock>
	</body>
</page>
In the default.xml file, there is two referenceBlock we have defined
- Header.links: To add custom link in header links
- Top.links: To add custom link in Top links.
Here, we have passed two arguments
- label: The label for anchor link that will display in frontend
- path: The path of the anchor link. Here you can define the path of your page i.e: route/controller/index
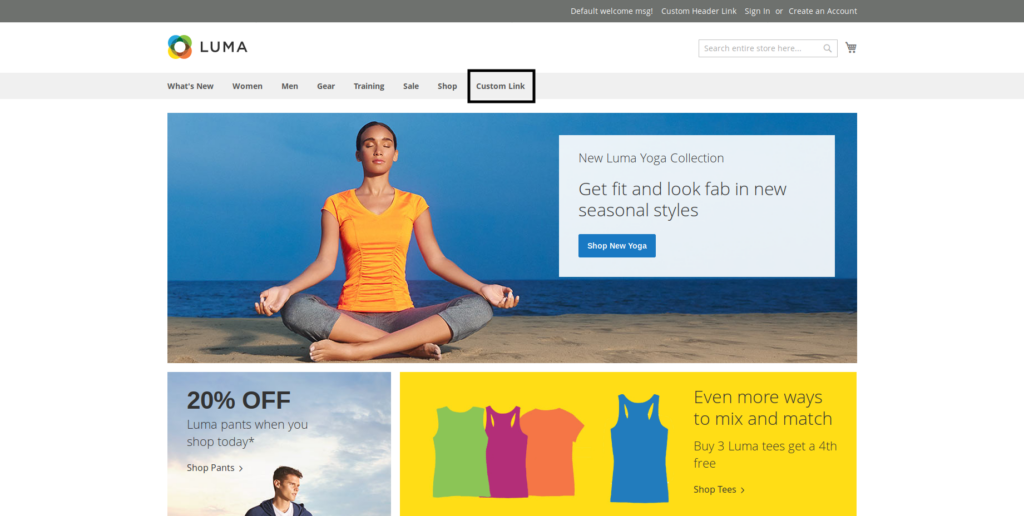
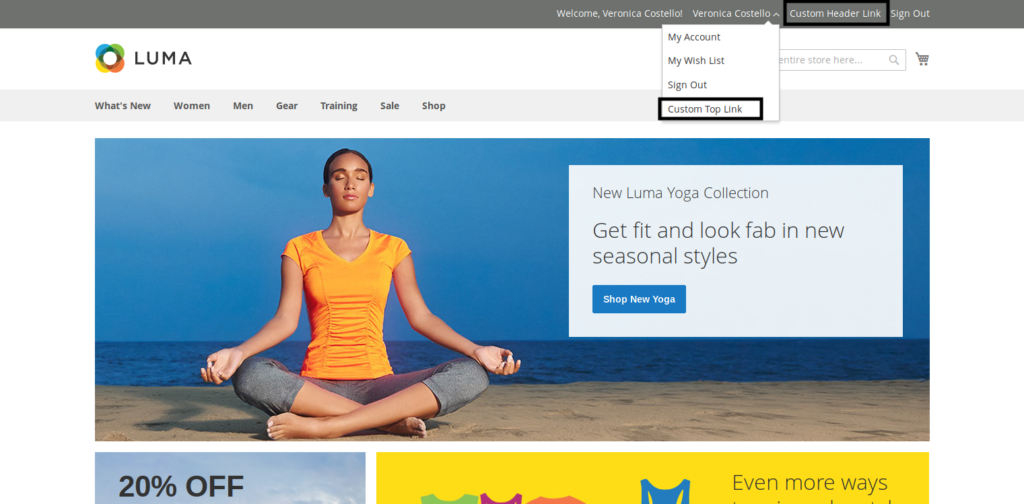
After cache flush, you can see custom link in header links and top links.
If the customer is not logged in means for the guest user only custom header link will be shown.
If the customer is logged in then both custom header link and the top link will be shown.
Additional Information
Here, Magento\Framework\View\Element\Html\Link is core Magento block that is used to create a link. If you open Link.php file you will find these two functions
protected function _toHtml()
	{
    	if (false != $this->getTemplate()) {
        	return parent::_toHtml();
    	}

    	return '<li><a ' . $this->getLinkAttributes() . ' >' . $this->escapeHtml($this->getLabel()) . '</a></li>';
	}

	public function getHref()
	{
    	return $this->getUrl($this->getPath());
	}
If you want to add an external website link in your custom header or top link with path argument, it will be not possible.
So for the external website link, you have to create one custom block that extends \Magento\Framework\View\Element\Html\Link and define this block in default.xml file.
In default.xml file update the block name.
<referenceBlock name="header.links">
	<block class="Aureatelabs\ModuleName\Block\CustomLink" name="custom-header-link">
    	<arguments>
        	<argument name="label" xsi:type="string" translate="true">Custom Header Link</argument>
    	</arguments>
	</block>
</referenceBlock>
Next create CustomLink.php file.
<?php
namespace Aureatelabs\ModuleName\Block;

class CustomLink extends \Magento\Framework\View\Element\Html\Link
{
	public function getHref()
	{
    	return 'https://www.google.com/';
	}

	public function getTarget()
	{
    	return '_blank';
	}
}
Here we have created two function named getHref() and getTarget().
- getHref(): define external link here
- getTarget(): I have added target=”_blank” attribute
So now when clicking on header link it will open Google in a new page. You can use different attribute too.
If you refer \Magento\Framework\View\Element\Html\Link file you will find $allowedAttributes array variable.
protected $allowedAttributes = [
    	'href',
    	'title',
    	'charset',
    	'name',
    	'target',
    	'hreflang',
    	'rel',
    	'rev',
    	'accesskey',
    	'shape',
    	'coords',
    	'tabindex',
    	'onfocus',
    	'onblur', // %attrs
    	'id',
    	'class',
    	'style', // %coreattrs
    	'lang',
    	'dir', // %i18n
    	'onclick',
    	'ondblclick',
    	'onmousedown',
    	'onmouseup',
    	'onmouseover',
    	'onmousemove',
    	'onmouseout',
    	'onkeypress',
    	'onkeydown',
    	'onkeyup', // %events
	];
You can use these attribute add prefix get and first letter capital from above attribute
Ex. getHref(), getTitle(), getOnclick() etc.
FAQs
To customize Magento 2 header, follow these ways:
1. Create a new layout XML file in your theme’s app/design/frontend/{Vendor}/{theme}/Magento_Theme/layout folder and add the required changes to the header block.
2. Create a new template file in your theme’s app/design/frontend/{Vendor}/{theme}/Magento_Theme/templates folder and use it to override the default header template.
3. Use Custom Extension that allows header customization.
To add a custom footer link in Magento 2, first create a new module as app/code/CustomFooterLink/. Next, create a new file in this folder as app/code/CustomFooterLink/registration.php and place the below code –<?php
\Magento\Framework\Component\ComponentRegistrar::register(
\Magento\Framework\Component\ComponentRegistrar::MODULE,
'CustomFooterLink',
__DIR__
);
Further, create a new XML file as app/code/CustomFooterLink/etc/module.xml and add the code –<?xml version="1.0"?>
<config xmlns:xsi="http://www.w3.org/2001/XMLSchema-instance" xsi:noNamespaceSchemaLocation="urn:magento:framework:Module/etc/module.xsd">
<module name="CustomFooterLink" setup_version="1.0.0"></module>
</config>
Now, create a new template file as app/code/CustomFooterLink/view/frontend/templates/link.phtml and add –<li><a href="<?= $block->getLink() ?>"><?= $block->getLabel() ?></a></li>
After that, create a new file as app/code/CustomFooterLink/Block/Link.php and place the below code:
<?phpnamespace CustomFooterLink\Block;
use Magento\Framework\View\Element\Template;
class Link extends Template
{
public function getLink()
{
return 'http://www.example.com';
}
public function getLabel()
{
return 'Example Link';
}
}
Then create a new di.xml file as app/code/CustomFooterLink/etc/di.xml and use the following code:<?xml version="1.0"?>
<config xmlns:xsi="http://www.w3.org/2001/XMLSchema-instance" xsi:noNamespaceSchemaLocation="urn:magento:framework:ObjectManager/etc/config.xsd">
<type name="Magento\Theme\Block\Html\Footer">
<block class="CustomFooterLink\Block\Link" name="custom.footer.link" template="CustomFooterLink::link.phtml" before="-" />
</type>
</config>
At last, enable the module using php bin/magento module:enable CustomFooterLink. And refresh the cache + run the setup:upgrade command.
To remove header top links in Magento 2, follow the below-mentioned steps –
1. Create a new layout XML file as app/design/frontend/{Vendor}/{theme}/Magento_Theme/layout/ default.xml.
2. Use the <referenceBlock> element to remove the header top links block using the code:
<referenceBlock name=”header.links” remove=”true” />
3. Now, deploy the static content by running the command:
php bin/magento setup:static-content:deploy
4. Refresh the cache and check the changes.
To add custom header in Magento 2, follow the below-mentioned steps –
1. Copy Magento/blank or Magento/luma theme and create a new one in the app/design/frontend/{Vendor}/{theme} directory.
2. Create an XML file as app/design/frontend/{Vendor}/{theme}/Magento_Theme/layout/default.xml.
3. Use the <referenceBlock> or <referenceContainer> to add blocks in the header –
<referenceContainer name=”header.container”>
<block class=”Magento\Framework\View\Element\Template” name=”custom-block” template=”path/to/template.phtml”/>
</referenceContainer>
4. Create a new template file as app/design/frontend/{Vendor}/{theme}/Magento_Theme/templates/html/customheader.phtml. And use it to override the default header template.
5. Customize it as required, and thereafter, add the below code –
<?php echo $this->getChildHtml(“store_language”); ?>
6. Now, deploy the static content by running the command:
php bin/magento setup:static-content:deploy
7. Refresh the cache and check the changes.


Post a Comment
Got a question? Have a feedback? Please feel free to leave your ideas, opinions, and questions in the comments section of our post! ❤️