How to Configure Magento 2 Sitemap?

Configuring the sitemap.xml in Magento 2 Admin allows you to create an awesome Magento tool with a document file which contains all of website’s URL and possibly direct people to any page on Magento stores quickly.
Magento 2 sitemap is also an easy way to point which pages are ready for crawling to any search engines.
Step 1: Configure the Frequency of Content Updates
After login into magento 2 admin panel go to Stores > Settings > Configuration > Catalog > XML Sitemap.
Now, Open Categories options section and change the frequency and priority as per your store needs.
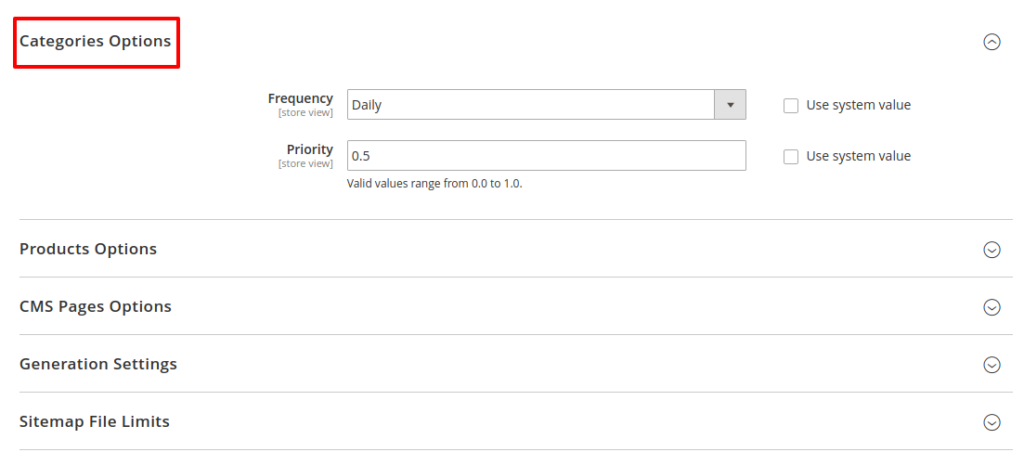
In the Frequency field, select one of the following:
- Always
- Hourly
- Daily
- Weekly
- Monthly
- Yearly
- Never
In the Priority field, enter a value between 0.0 and 1.0. Set Zero if the priority is the least.
Next Open the Products Options section.
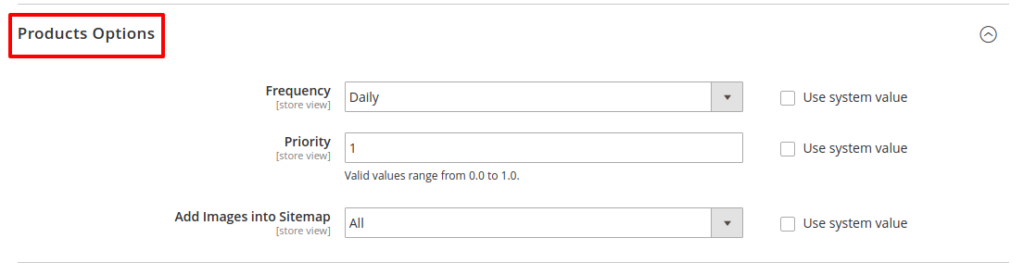
In the first two fields: complete the Frequency and Priority settings as stated above.
In the Add images into Sitemap field, select one of the following to determine the extent at which the images are included in the sitemap
- None
- Base Only
- All
Same way open CMS Pages Options section, complete the Frequency and Priority settings as mentioned above.
Step 2: Configure the Generation Settings
Open the Generation Settings section.
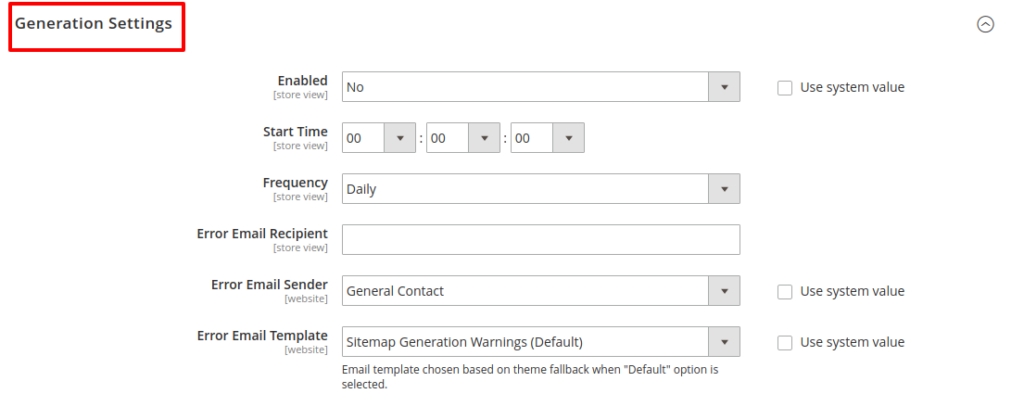
- Set Enabled to Yes .
- In the Start Time field, choose the hour, minute and second that updates the sitemap
- In the Frequency field, choose one of the following
- Daily
- Weekly
- Monthly
- In the Error Email Recipient field, enter the email address of the person who will receive the notification whenever an error occurs during a sitemap update.
- In the Error Email Sender field, choose one of the following:
- General Contact
- Sales representative
- Customer support
- Custom email
- In the Error Email Sender field, choose the template used for the error notification.
Step 3: Configure the Sitemap File Limits
Open the Sitemap File Limits section.
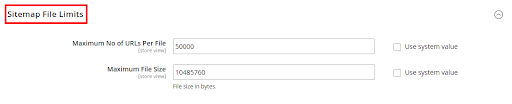
- In the Maximum No of URLs Per File field, enter the maximum number of URLs per file. The default limit is 50,000.
- In the Maximum File Size field, enter the maximum file size in bytes. The default size is 10,485,760 bytes that’s approx. 10 Mb.
Step 4: Complete the Search Engine Submission Settings

- Open the Search Engine Submission Settings section.
- In the Enable Submission to Robots.txt field, select Yes to provide instructions to search engines that crawl your site by using a robots.txt file.


Post a Comment
Got a question? Have a feedback? Please feel free to leave your ideas, opinions, and questions in the comments section of our post! ❤️