How to Add Google Analytics 4 to Your Magento 2 Store

You have added Google Analytics 4 (GA4) to your Magento 2 store, but you feel something is not correct. The data isn’t showing up, conversions aren’t tracking, or visitor numbers look low.
While there could be several reasons for these issues, the chief reason is misconfiguration. This can throw off your reports and stop you from tracking your store’s performance. Without timely, reliable data, you won’t understand what’s happening in your store and how it’s performing. This is why setting up GA correctly in your Magento 2 store is vital.
However, many businesses fail to do it correctly, and if you are trying to learn how to do it the right way, let us help you.
In this blog post, we discuss:
- How to add GA4 to your Magento 2 store
- Its benefits
- & the best practices to follow
Let’s start.
How to Add Google Analytics to Your Magento 2?
According to Business Dasher, over 44 million websites use Google Analytics to track their traffic and user data on their website.
Using Google Analytics helps you gain deeper insights into who visits your websites, what they do on your store, what actions they take, etc. While the benefits of using Google Analytics are plenty, not many businesses know how to add it to their Magento website.
Let’s address that issue with this step-by-step guide for adding GA 4 to your Magento 2 store.
Step #1: Set up Google Analytics property for your business
Go to Google Marketing Platform and click Get started today.

If you already have a Google Analytics account, sign into your account. After creating/signing up for the GA account, you must set it up.
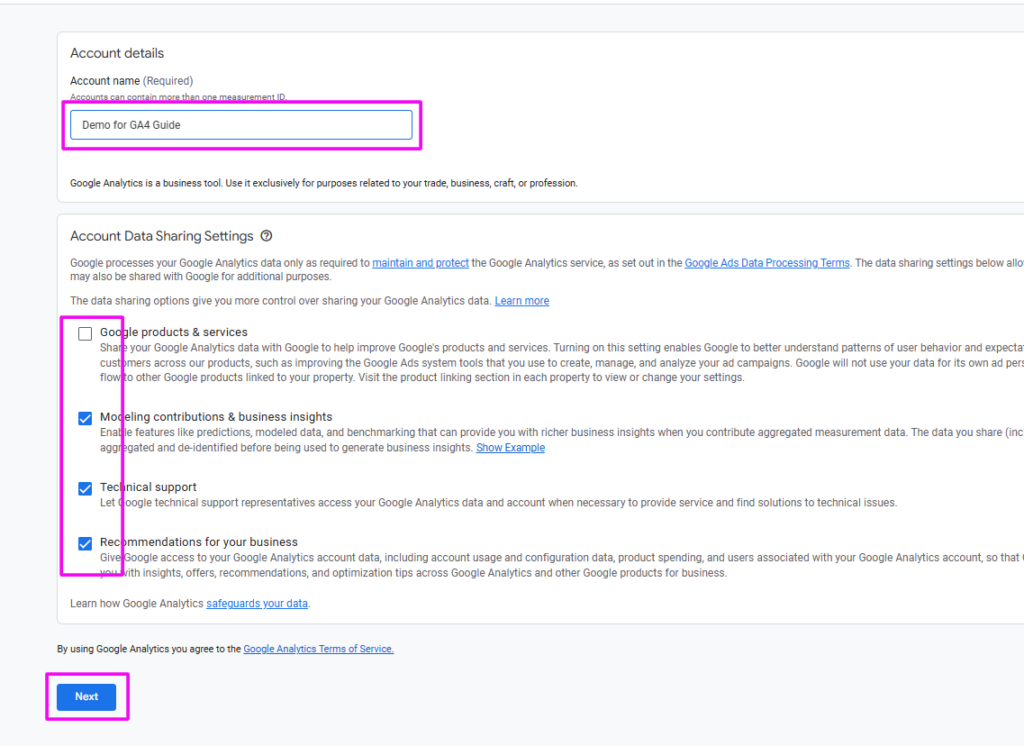
Give the account a name to differentiate it from others in the future. You can also control the type of data Google can view from your account. So check or uncheck the boxes as you prefer.
Now, click Next.
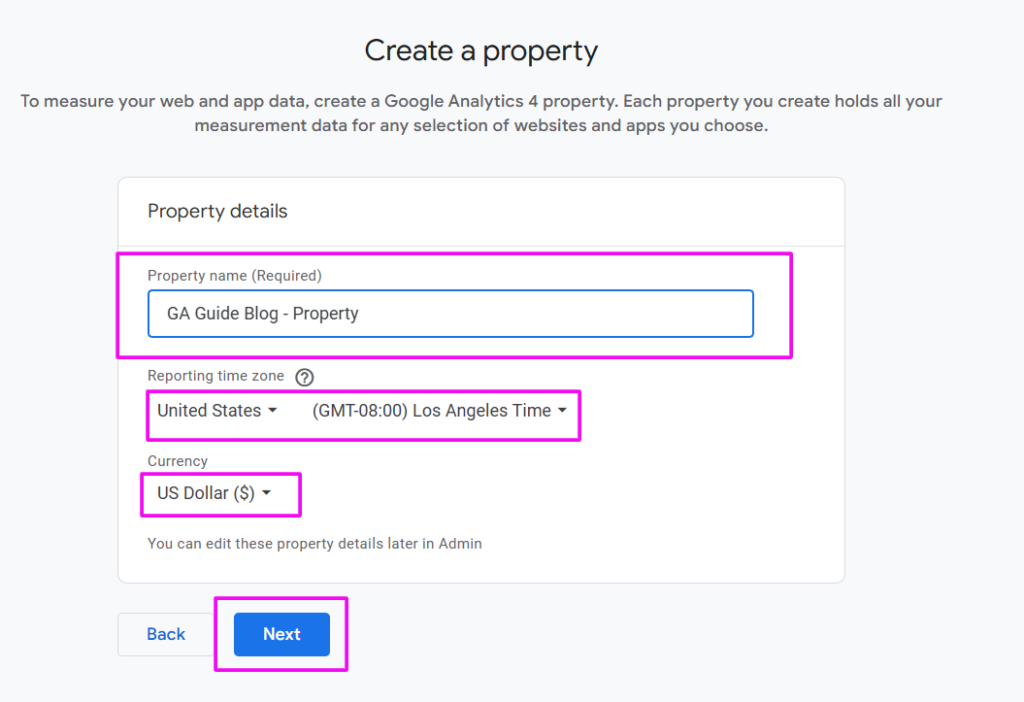
In the next section, you need to set up your property. Give the property a name and pick up a timezone for reporting. Pick a currency that fits your market or preferences and click Next to proceed to the next section.
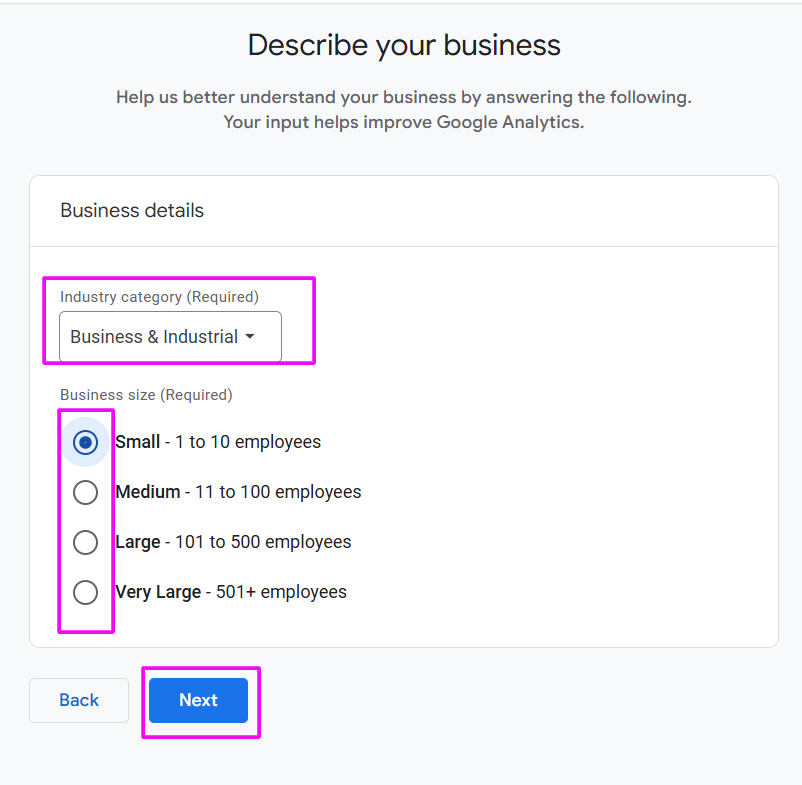
In this section, add your industry category and choose the business size. Click Next to proceed.
Here, you need to choose your business objectives.
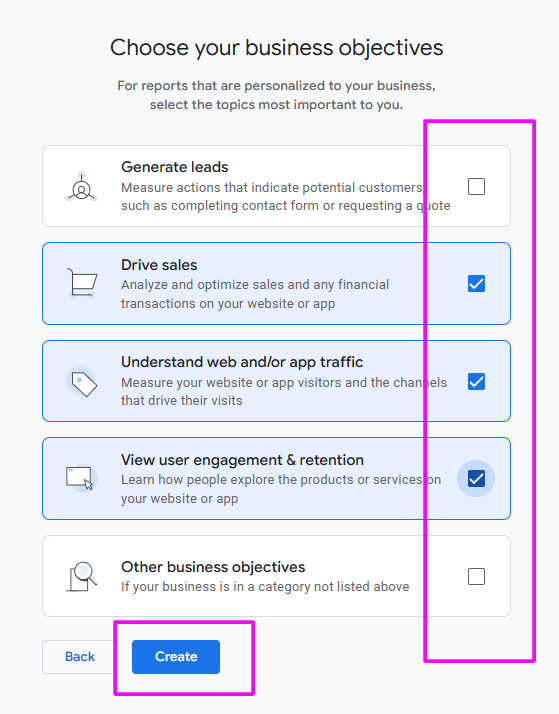
Pick the applicable goals by checking the box based on what you are trying to achieve.
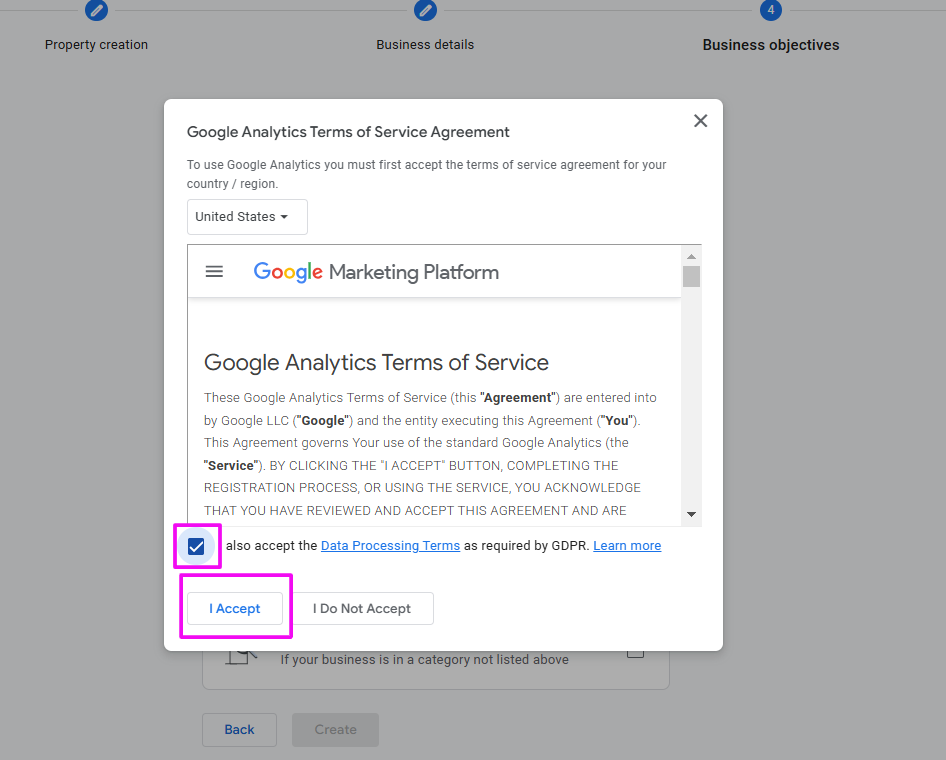
Click Create and accept the Google Analytics Terms of Service.
Now, you get the option to add your website to the analytics. You can use it for both Android and iOS apps.
Let’s choose Web from the options since we focus on a Magento 2 store.
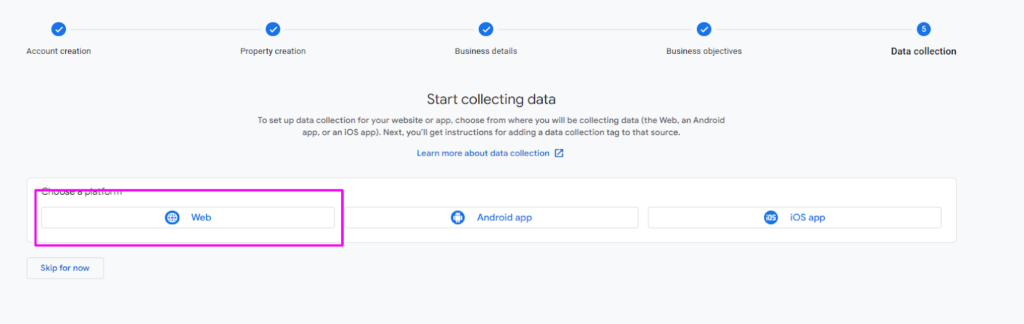
You also have the option to skip this step for now. However, we are doing it for demo purposes.
Add your store’s URL and update the stream name.
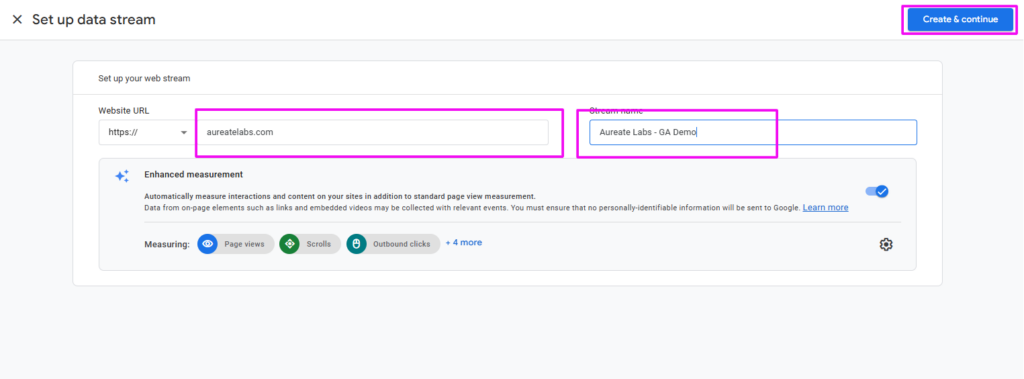
Click Create and continue. With this, you will have created a Google Analytics property for your website.
Step #2: Get Measurement ID
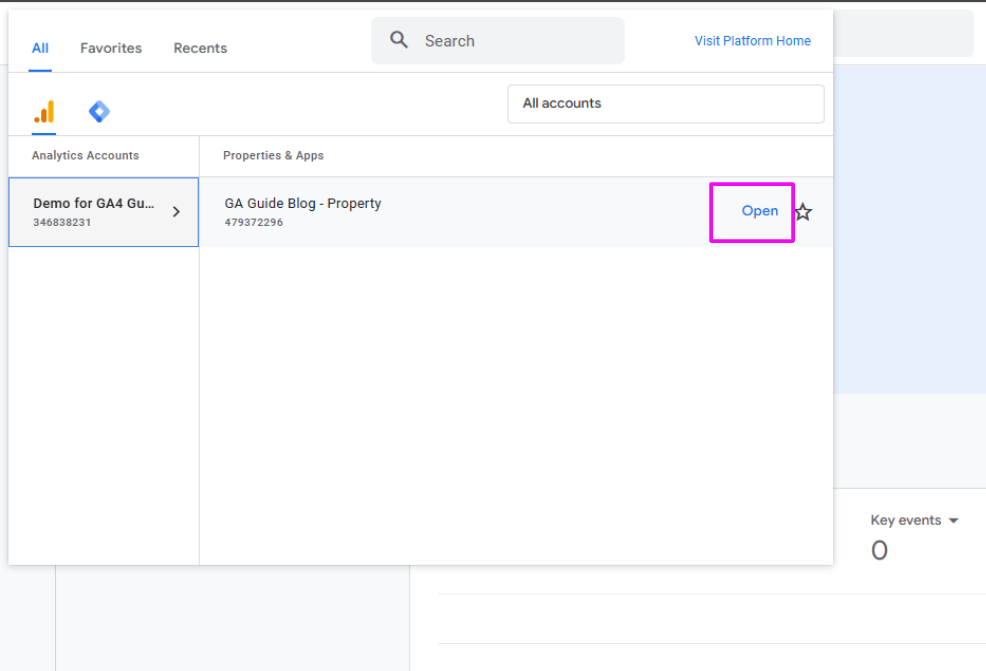
In this step, you need to copy the Measurement ID, which you will need later. For this, from the Google Analytics homepage, go to All accounts.
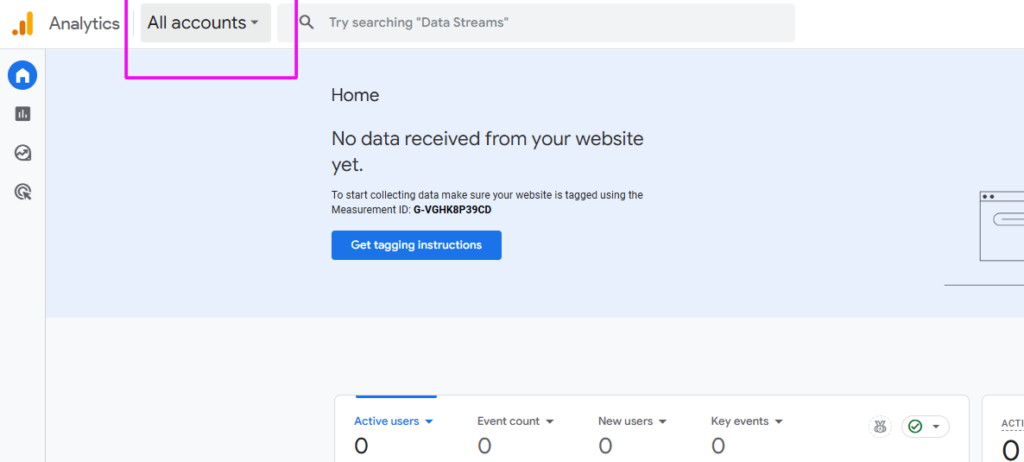
Click All accounts for a drop-down menu with all your accounts. You can choose the Data stream we created—GA Guide Blog – Property. Click Open.
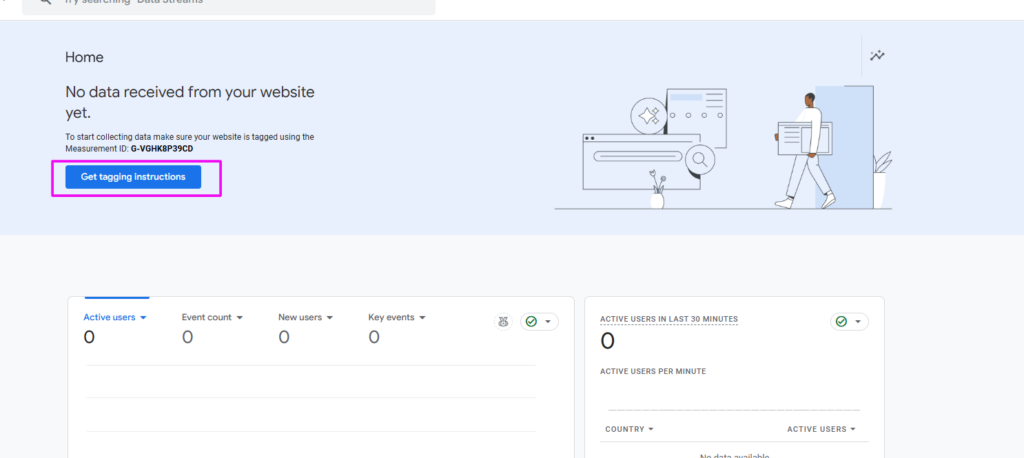
Click Get tagging instructions.
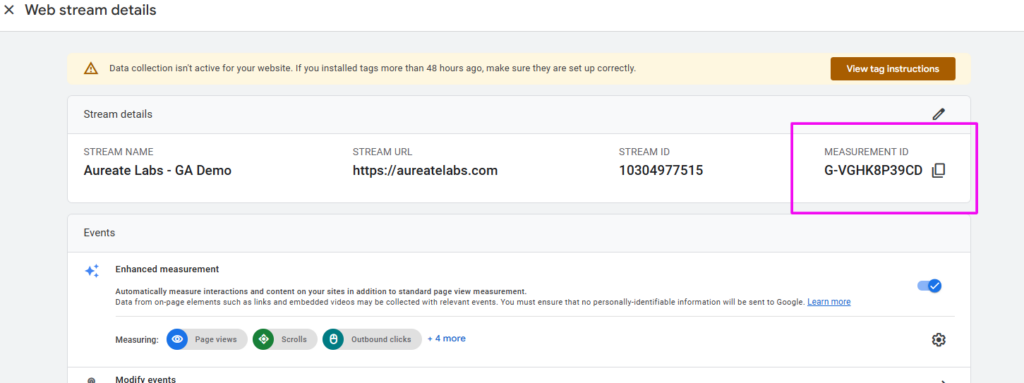
Now, copy the Measurement ID from the Web stream details window.
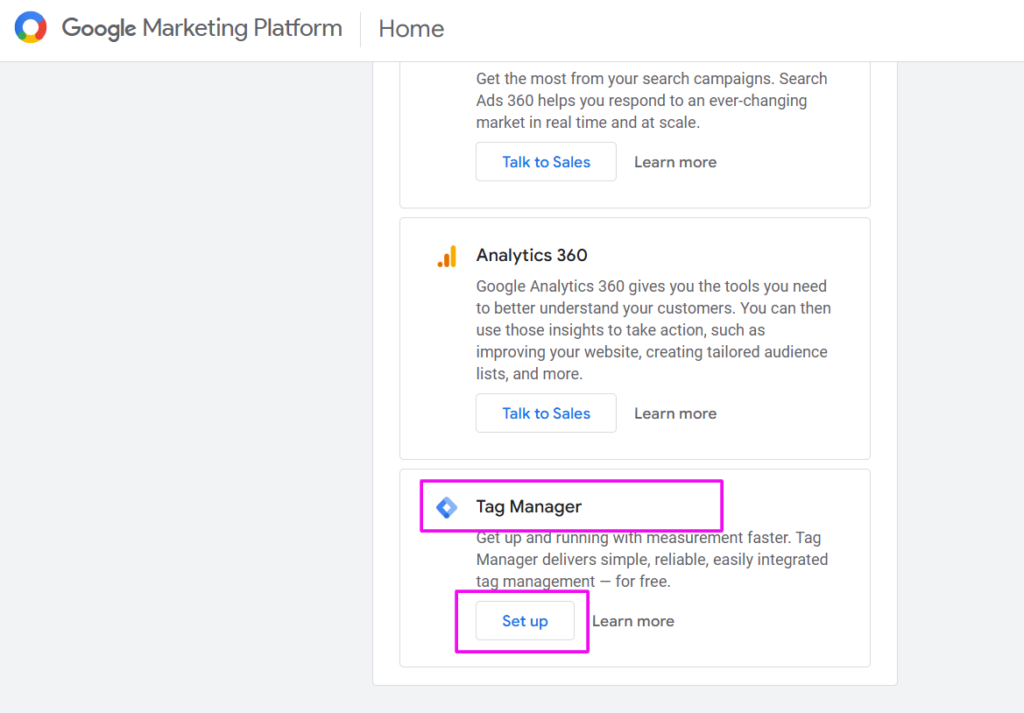
Step #3: Create a Google Tag Manager Account
Sign in to your Google Analytics account and go to the Google Marketing Platform homepage.
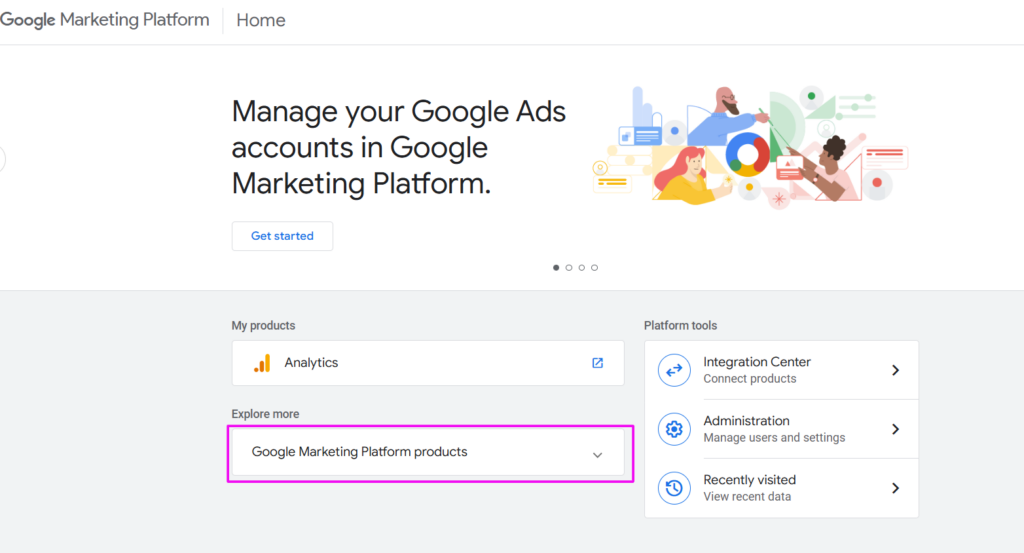
Click Google Marketing Platform products under Explore more. Choose Tag Manager and click Setup.
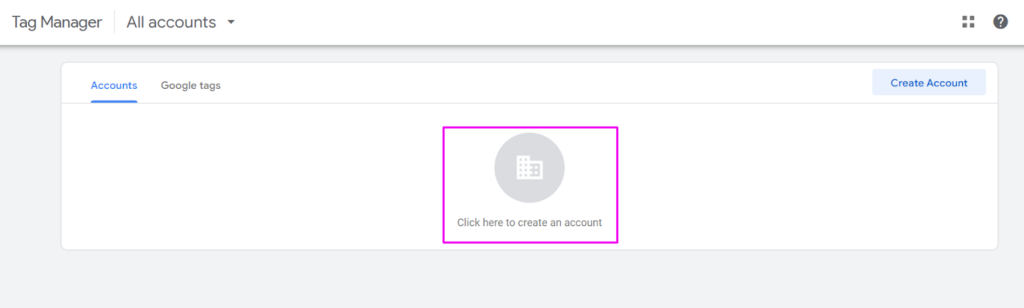
Now, click Create account.
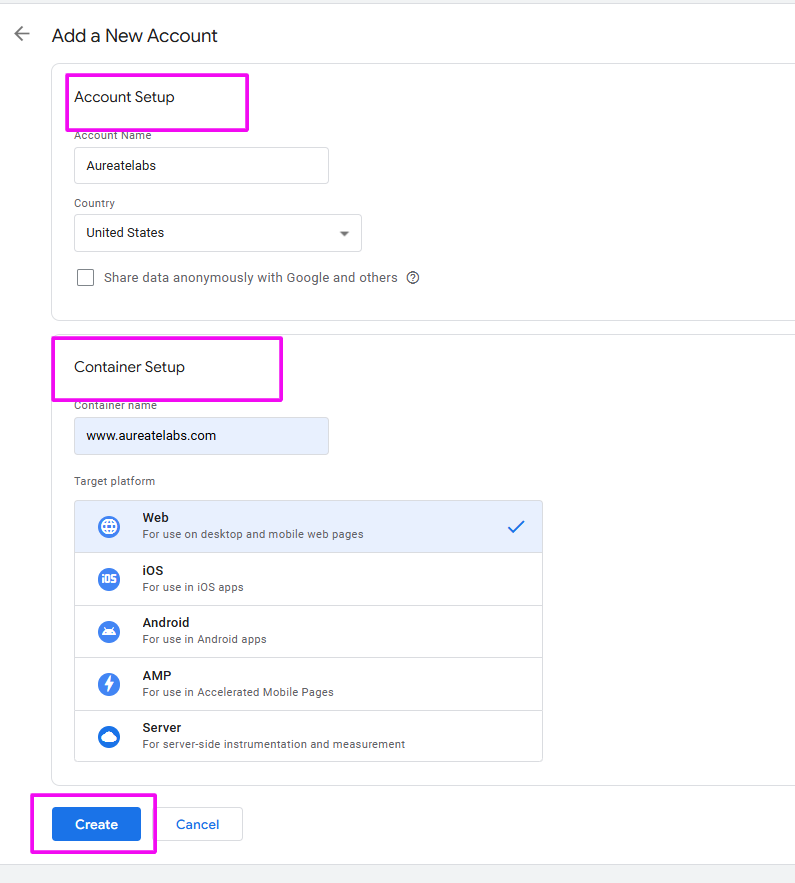
Add the details to the fields under Account setup and Container setup. Click Create to proceed.
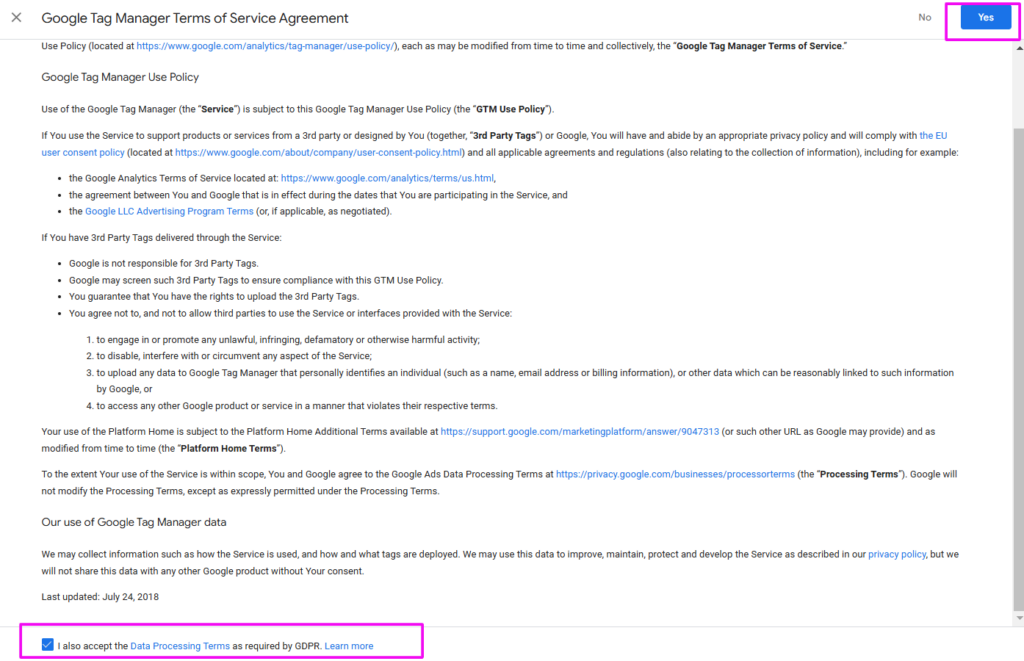
Accept the Terms of Service Agreement by checking the box at the bottom corner and clicking Yes.
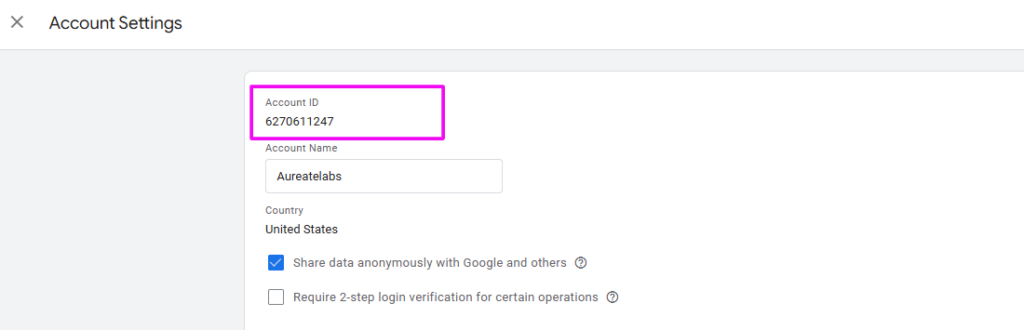
Apart from the Measurement ID we copied previously, you need two more IDs to use GA4 effectively—Account ID and Container ID.
You can find these details from the URL of your account on the browser. The first set of digits you see on the URL after accounts is the Account ID.

In this case, it is 6270611247. You can also get this information by going to Admin > Account Settings on your GTM account. It will be displayed under Account Settings.
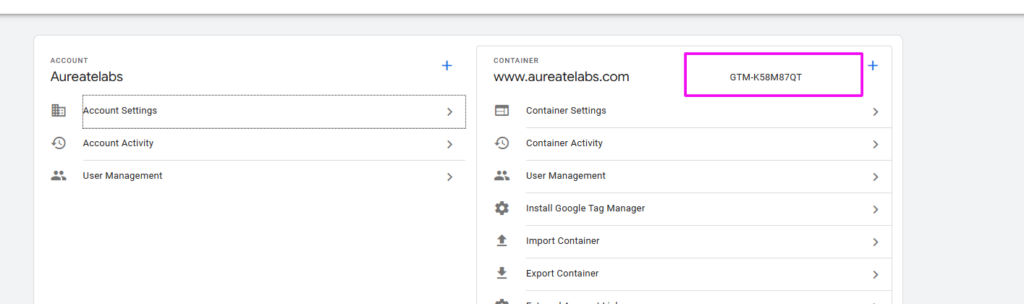
Now, we need to get the container ID displayed on the GTM account’s homepage.
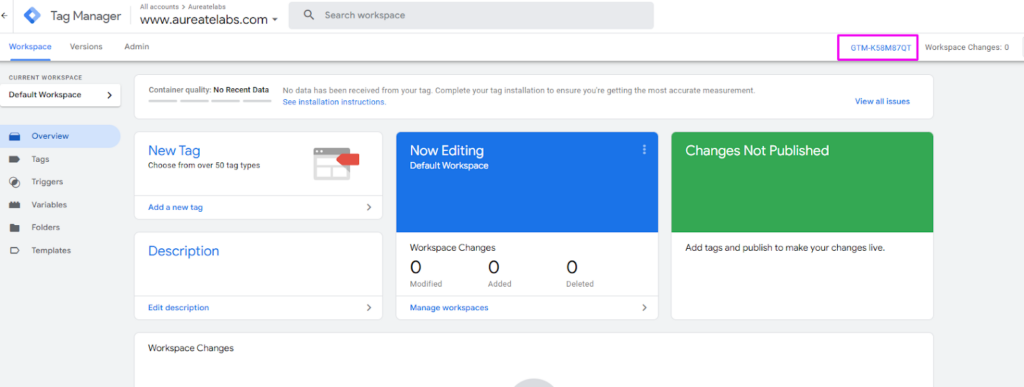
In our case, it is GTM-K58M87QT. You can also get this information by going to Admin > Account Settings on your GTM account. The ID will be displayed near the Container name.
Apart from these details, you will also need the code to add to your Magento store. These codes are available in the Install Google Tag Manager on the Admin tab.
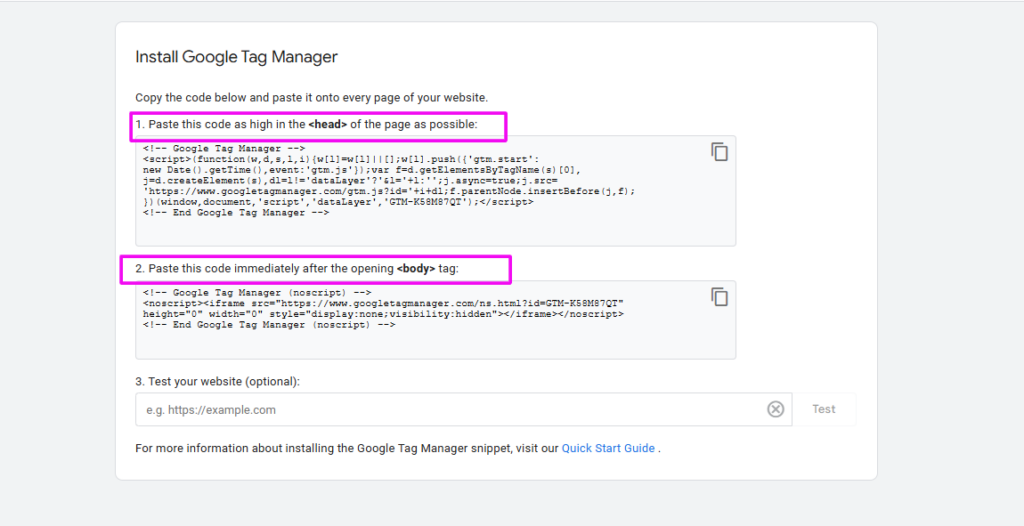
They also have instructions on where to add them. Keep the window open for now.
Step #4: Add GA 4 to Your Magento Store
Log into your Magento 2 account and install any GTM extension to install the same effectively and efficiently. After enabling the extension, go to its configuration page and enter the Container ID we have copied previously from the GTM account.
Now, save the configuration.
Step #5: Install and Configure the Google Analytics 4
From your Magento admin panel, access System and navigate to Web Setup Wizard. Access Extension Manager from the same.
Search for a Google Analytics extension and install it on your GA 4 as well as your Magento 2 version.
Now, go to Stores > Configuration from your store’s Admin panel and click Google API in the Sales section from the menu.
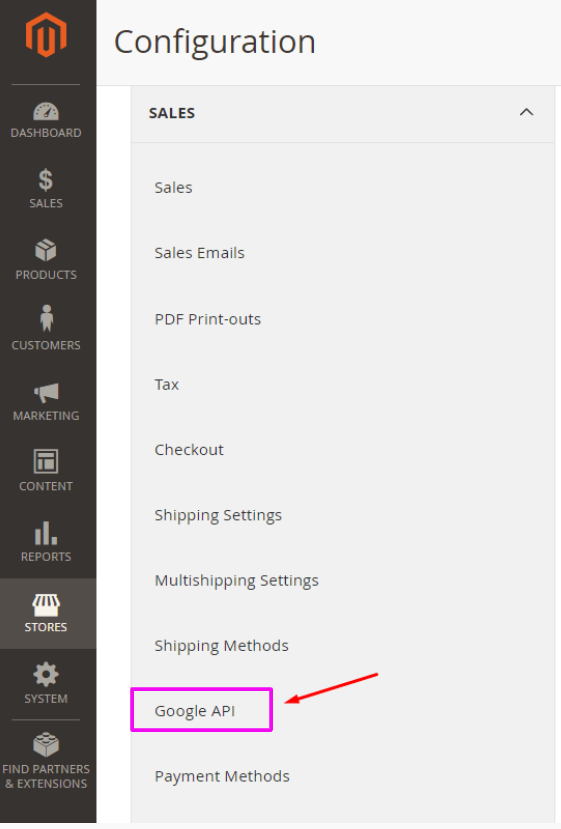
Expand Google Analytics 4.
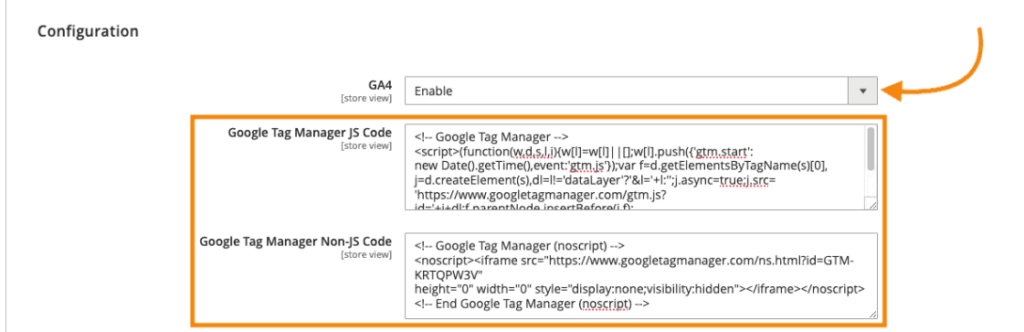
Enable the extension and enter the Measurement ID you obtained when setting up the Google Analytics account.
You also need to add the JS and non-JS codes in the appropriate fields.
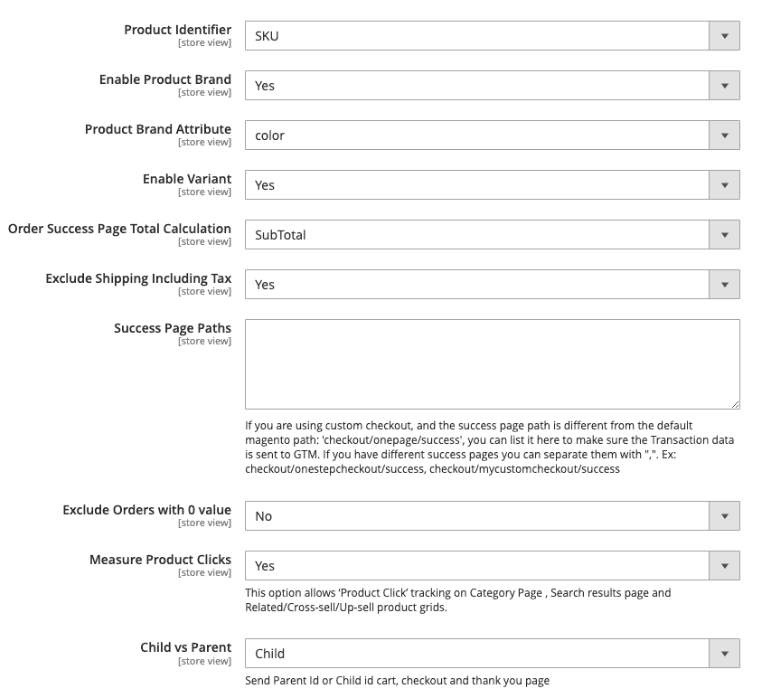
There are several additional settings and preferences on the extension, depending on what extension you use.
Adjust them as per your needs.
Now that you have made the effort to install GA4 and configure it for your account, let’s discuss the benefits it will bring to your business in the next section.
Adjust any additional settings or preferences as desired.
Save the configuration to complete adding Google Analytics to your Magento 2 store successfully.
;
And that’s it. With that, you’ve added GA4 to your Magento store.
Benefits of Adding Google Analytics to Your Magento 2
Adding GA4 to your Magento 2 store helps you track your store’s performance and understand trends to make informed decisions. Let’s check each of these benefits in detail here.
1. Better tracking of your store performance
Adding GA4 to your store lets you track your store’s performance better. You can understand where the traffic comes from—organic, social media, direct, or paid ads.
These insights allow you to focus more on what’s working for your store. For example, if most of your converting traffic comes from organic traffic, you can improve your SEO efforts.
It will enable you to invest your hard-earned money where it matters the most for your store and sales.
2. Get better insights into user behavior
GA4 allows you to get better insights into user behavior in your store. Using its event-driven model, GA4 tracks diverse store interactions, such as page views, button clicks, add-to-cart actions, and purchases.
This lets you know how different segments of users behave once they are on your site.
In addition, GA4 also lets you track users across multiple devices to help you understand how customers use different devices in their purchase journey.
Using G44, you can also get AI-powered user insights, such as:
- The likelihood of a user buying from you within the next 7 days.
- Identifying users likely to stop engaging with your store.
- Estimates potential revenue from different user segments.
All these allow you to plan and optimize your marketing efforts.
3. Create personalized customer experiences
GA4 offers AI-driven insights, real-time tracking, advanced segmentation, etc., to understand how visitors behave on your Magento 2 store. It also shows how your customers access your store, like from a desktop or phone.
You can create and optimize content based on these insights based on user journeys. Customer segmentation lets you run specific campaigns for segments with a higher probability of conversion.
Without GA4 providing these details, you won’t be able to do this. Instead, you need to use a cookie-cutter approach and deliver the same types of emails, content, and ads to every visitor, regardless of their preferences.
4. Finetune your marketing efforts with GA insights
Adding GA4 to your Magento 2 store helps you understand whether your marketing efforts are paying off.
It can tell you where your traffic is coming from and how the marketing efforts impact your revenue. For example, if GA4 indicates a substantial increase in revenue after marketing, you can increase your ad spend.
On the other hand, if the revenue does not correlate to your marketing, something is wrong with your marketing.
Going granular into Google Analytics will tell you where your customers are coming from, where they drop off in the sales funnel, and where you must focus more.
It will also help you finetune your marketing and create new strategies, all based on actionable insights from GA4.
5. Optimize your conversion rates
Conversion rate is one of the most important metrics you can track with GA4.
The tool allows you to check how users interact with your site or app using Exploration Reports, Funnel Analysis, etc.
You can understand where the visitors drop off and which touchpoints contribute most to conversions and make data-driven CRO decisions.
GA4 also lets you with advanced audience creation based on their behaviors and interactions. You can retarget and personalize their experience using these audiences for better conversion rates.
;
All these benefits emphasize how important adding GA to your website is to make informed decisions.
But having GA in your store isn’t enough. You must use it effectively. In the next section, we’ll share the best practices you can follow to stay ahead of your competition.
Best Practices to Use GA on Your Magento Store
Here are 7 best practices to help you use GA 4 better in your Magento 2 store and make the most of its capabilities for informed decision-making.
1. Create Key Events According to Business Goals
Not all website interactions are equally valuable to your business or decision-making process.
Hence, you should track key events that align with your business objectives to get the most out of Google Analytics.
For example, product views, add-to-cart actions, checkout initiations, and completed purchases are key events in an e-commerce store, as its prime objective is sales. But if your goal is lead generation, you should track form submissions, newsletter sign-ups, account registrations, etc.
You can gain deeper insights into user behavior by defining and setting up these key events in Google Analytics. Creating key events based on your business goals helps you measure conversions effectively and optimize your store’s performance based on actual data.
2. Define custom events for unique user interactions
Custom events let you track unique user actions that aren’t captured by default in GA. Defining them helps you get deeper insights into unique user interactions in your store.
Every Magento store operates differently, and standard Google Analytics tracking may not cover all the interactions that matter to your business.
For instance, you can use a product configurator to track clicks on your CTAs, video engagements, scroll depth, coupon code usage, or interactions with a product configurator.
By defining these custom events, you can gain a more granular understanding of user behavior. This insight can help you refine your marketing strategies and optimize the shopping experience based on actual user engagement data.
3. Set up and use enhanced measurement in GA
Google Analytics offers Enhanced Measurement to automatically track key interactions on your Magento store without needing manual event setup.
This feature lets you capture actions like scrolling, outbound clicks, site searches, video engagement, file downloads, etc.
They help you understand:
- What terms do they search on your site
- Which pages keep them engaged
- How users navigate your store
- Where they drop off
By looking at these insights, you can refine your site’s layout and improve product pages.
For example, if your visitors drop off on your checkout page, it indicates that you need to optimize the checkout process—change the design, remove unwanted fields, allow more payment options, etc.
These will also lead to fewer cart abandonments and more conversions.
4. Use event tracking in stages of the sales funnel
Tracking user interactions at different stages of the sales funnel is crucial to learning customer behaviors.
You can use event tracking to gain deep insights into how users move through the funnel and where they drop off.
Here is a table to help you understand how to implement Event Tracking at different funnel stages.
| Sales Funnel Stage | What to Track | Example GA4 Events |
| Awareness(TOFU) | Page views, scroll depth, and video engagement to see user interaction. | page_view (Homepage, blog posts, category pages) scroll (Tracking how far users scroll on pages), etc. |
| Consideration(MOFU) | Product interactions include viewing product details, adding items to the cart, and applying filters. | view_item (Product detail pages), add_to_wishlist (Interest in products), add_to_cart (Tracking serious purchase intent), etc. |
| Decision(BOFU) | Checkout behavior, payment method selection, and coupon usage. | begin_checkout (Users starting the checkout process), add_payment_info (Checking preferred payment methods), etc. |
The report helps analyze user behavior within the funnel, aligning perfectly with the section’s focus on optimizing each stage through data-driven insights.
5. Utilize event data and create custom audiences
Event data in Google Analytics 4 (GA4) offers deep insights to help you segment your users. It also lets you capture user interactions beyond basic page views, such as product views, add-to-cart events, purchases, checkout steps, etc.
These events provide rich behavioral insights and help you understand how users engage with your store.
You can also use the data to create custom audiences in GA4 under categories like:
- Users who abandoned carts
- Users who browsed specific categories
- Users who made repeat purchases
These tailored groups help refine your marketing efforts. Smart audience segmentation also enables you to run targeted ad campaigns, personalized promotions, and more.
You can deliver relevant ads to users based on their history of interaction with your store. These ads are customized and dynamic based on user behavior, so conversion rates are usually much higher.
6. Implement conversion tracking for critical events
Conversion tracking in GA4 helps you measure the effectiveness of key actions, like purchases, add-to-cart actions, checkout completions, sign-ups, etc.
These actions indicate user intent and the success of your promotional campaign–organic or paid.
Marking these events as conversions can help you:
—Gain insights into customer behavior
—Identify what drives sales
—Figure where users drop off
These elements allow you to refine your marketing strategy and optimize ad spending. You can also improve user experience on your store and ad campaigns.
Let’s take an example to understand it better. You notice a high checkout abandonment rate in your store.
With conversion tracking for checkout completions, you can analyze the drop-off point and understand what’s making customers abandon carts.
Addressing these issues can improve your sales without spending more to compensate for art abandonment.
7. Regularly test and validate events in GA
Event tracking issues, like missing data, duplicate events, etc., lead to flawed insights and poor decision-making. That’s why regularly testing and validating GA4 events is vital.
You can use Google Tag Assistant and GA4 DebugView to track real-time events in GA4. It also helps ensure accurate tracking and data integrity in your Magento 2 store. This allows you to check if key actions fire accurately and solve issues if you come across any.
The advantages of event validation in GA4 are crucial for various reasons:
—Accurately prevent data inconsistencies
—Ensuring reliable analytics for strategic decisions
—Help comply with data privacy regulations
—Avoid incorrect data collection
As you proactively test GA4 events, you can trust the analytics better and build your growth strategy based on accurate, real-time data.
Add Google Analytics 4 to Your Magento Store for Better Decision-making!
Your Magento 2 store can generate vast amounts of data from user visits.
However, without the right tools to collect, analyze, and use the data, you may be shooting in the dark. This is where Google Analytics 4 makes all the difference with extensive tracking and analytics capabilities. It also lets you configure and customize the platform in diverse ways to use every single bit of data.
However, accurately adding and integrating the tool to your Magento 2 store is equally necessary. Without proper configuration, you may not be able to use the data generated on your store effectively for decision-making and other promotional campaigns.
We hope our guide on adding Google Analytics to your Magento 2 store helps you quickly do it.
If you still need help, let our Magento 2 expert help you with it. Book a free consultation call to see how we can help configure GA4 for your store.


Post a Comment
Got a question? Have a feedback? Please feel free to leave your ideas, opinions, and questions in the comments section of our post! ❤️