eCommerce Checkout Flow: How to Optimize Checkout Process?

An eCommerce site can gain a 35.26% increase in conversion rate through better checkout flow & design! — Baymard Institute.
So, if you’re thinking 70%, the average cart abandonment rate is normal then, you’re losing a big chunk of your store revenue (i.e. 35.26%).
That’s right. For many online merchants, optimizing your eCommerce checkout flow isn’t just about reducing friction. But actually, it’s about creating a seamless experience that builds trust and makes it easier for your customers to follow through on their purchases.
To simplify things for you, we’ve prepared this comprehensive guide on how to optimize the eCommerce checkout flow that not only highlights the customer pain areas but also shares—
- metrics table to evaluate the checkout performance, and
- actionable strategies to ensure that your checkout is working to convert.
So first, let’s go through the ideal checkout process an eCommerce store should have.
What is the Standard eCommerce Checkout Flow?
The standard e-commerce checkout flow is the series of steps a customer takes to purchase an item from an online store. While every store may have slight variations, most follow a standard set of steps that guide the buyer from shopping cart to order confirmation.
Here’s how the typical eCommerce checkout flow looks like:
Step 1: Shopping Cart Review
Many merchants mistakenly believe that the checkout process begins only when customers land on the checkout page. But in reality, it starts much earlier—in the shopping cart itself. This is where customers decide if they want to proceed with their purchase or not.
Don’t believe me?? According to Baymard Institute (UX research authority), the checkout process includes the shopping cart and even the “Added to Cart” behavior.
We can say that here the customers prepare their virtual shopping bags for the final step. This may include verifying the items they’ve added to their cart, checking quantities, and making last-minute adjustments.
Some customers may also take the opportunity to leave notes for special requests regarding their orders or mark it as a gift (to opt for wrapping service).
Step 2: Discount Coupon / Gift Card (optional)
If customers have a discount code or gift card, this is the point where they can apply it. Shoppers love a good deal, and providing an easy way to apply discounts can significantly enhance their checkout experience.
It’s good to have the discount field right on the cart page. Why? Because here, customers aren’t just reviewing their items; they’re also calculating the total amount they need to spend—including taxes, shipping, and any other fees.
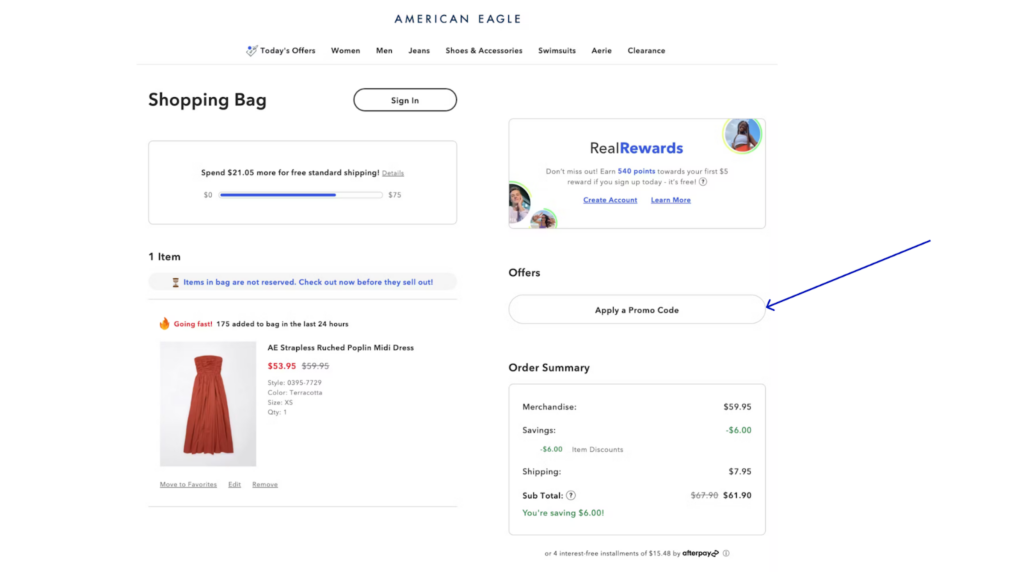
So, when they can see how a discount affects their overall cost right away, it not only makes them feel savvy but also encourages them to finalize their purchase.
Step 3: Initiate Checkout
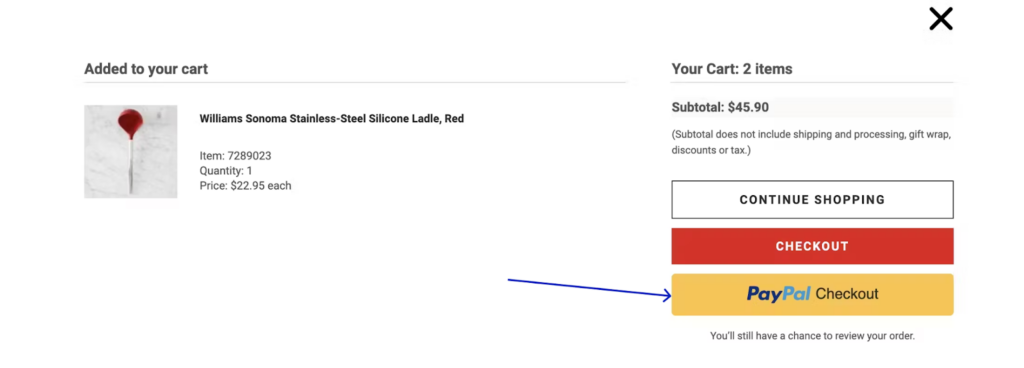
Now comes the moment when shoppers are ready to take the plunge—they hit the checkout button. This signals that they’re satisfied with the items in their cart and comfortable with the total cost, including any discounts, shipping fees, or taxes.
At this point, the customer is highly motivated to complete the purchase, but this is also where many drop-offs can happen if the next steps are too complicated.
Some eCommerce store offers express checkout using third-party payment providers as shown in the example below:
Step 4: Login or Registration (optional)
After initiating checkout, customers are often prompted to log in or create an account. But beware—forcing them to register can be a major turnoff. If they’re in a rush or just want to make a quick purchase, this extra step may cause them to leave.
Instead, you can give them the option to ‘checkout as a guest’. Let them select how they want to proceed further with checkout.
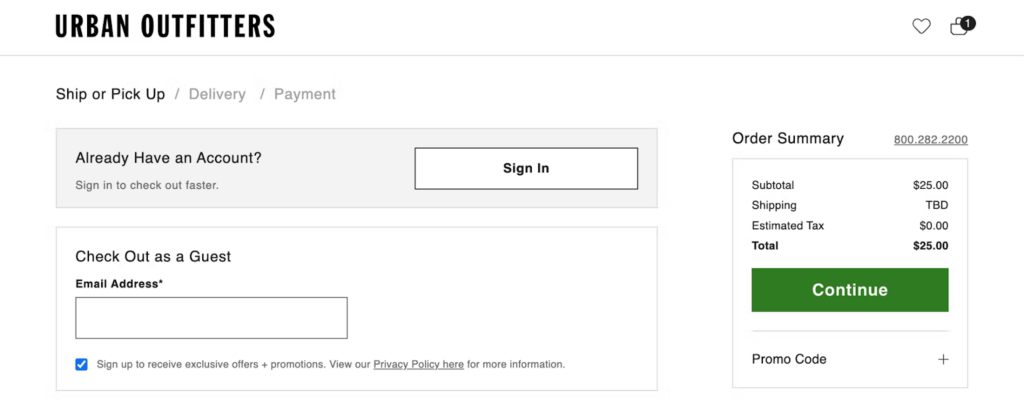
Offering flexibility here minimizes friction and respects the customer’s time.
For those willing to log in, brands smartly highlight the benefits: faster checkouts, order tracking, or exclusive offers. This approach ensures a smoother flow and makes the process feel accommodating rather than demanding.
Step 5: Customer & Address Information
At this step, customers are required to provide the necessary information for shipping and billing. The purpose is to ensure that the order reaches the correct destination and that the payment can be processed correctly.
Typically, this form will have fields for:
- Full Name
- Contact Information (email, phone number)
- Shipping Address (street, city, state, zip code)
- Billing Address (which can be the same as the shipping address or different)
Many eCommerce sites now offer convenient features like auto-fill and address suggestions to make this process faster and more accurate. Additionally, this information is being saved for future purchases, making it easier for returning customers.
Some merchants also offer options like in-store pickup or curbside delivery.
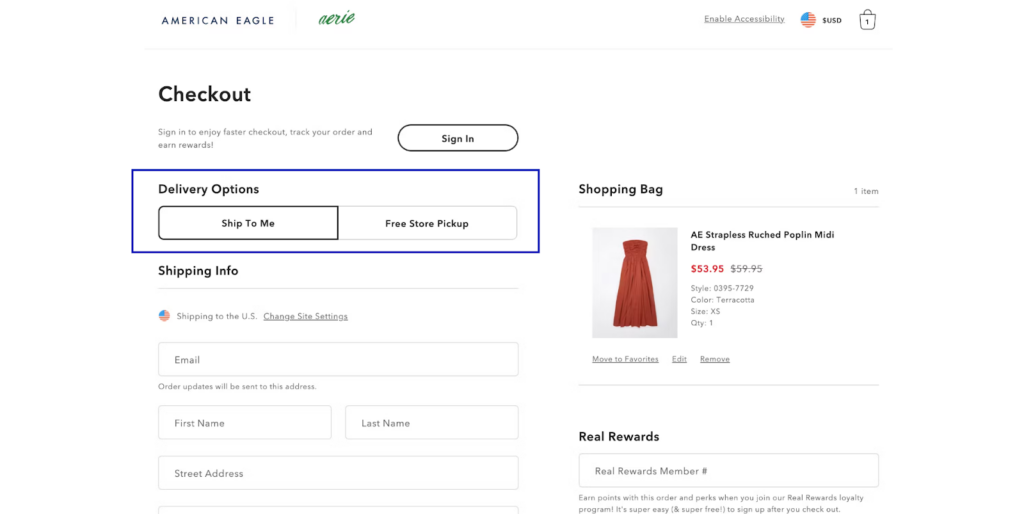
In such cases, the shipping address is not required, instead, they have to select from the available locations.
Step 6: Shipping Method
Once customers have entered their shipping address, it’s time to select how they want their order delivered. It’s a smart move to present shipping options at this point while the shipping details are still fresh.
Offering a variety of delivery methods (like standard, expedited, or even same-day shipping) gives customers the flexibility to choose the speed and cost that best fits their needs.
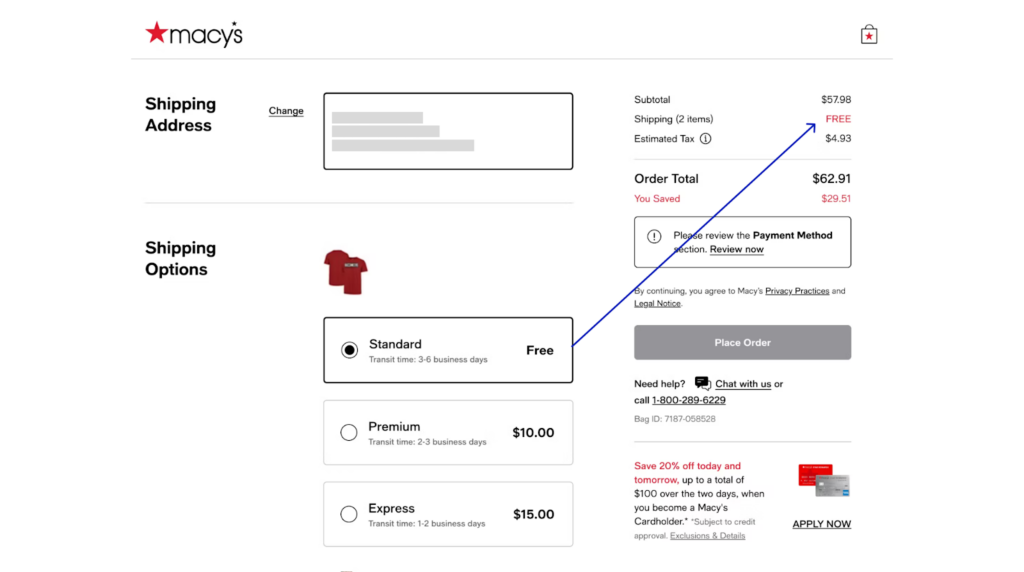
This step ensures that customers know when they can expect their order and how much it will cost to ship (which will be added to their order value).
Step 7: Make the Payment
The payment process begins with customers selecting their preferred payment method. Whether it’s through a credit card, digital wallet, or a “buy now, pay later” service, they input the necessary details based on their choice.
Once they’ve chosen their method, they enter the required payment information—such as card details, PayPal credentials, or bank information—and then proceed to complete the transaction.
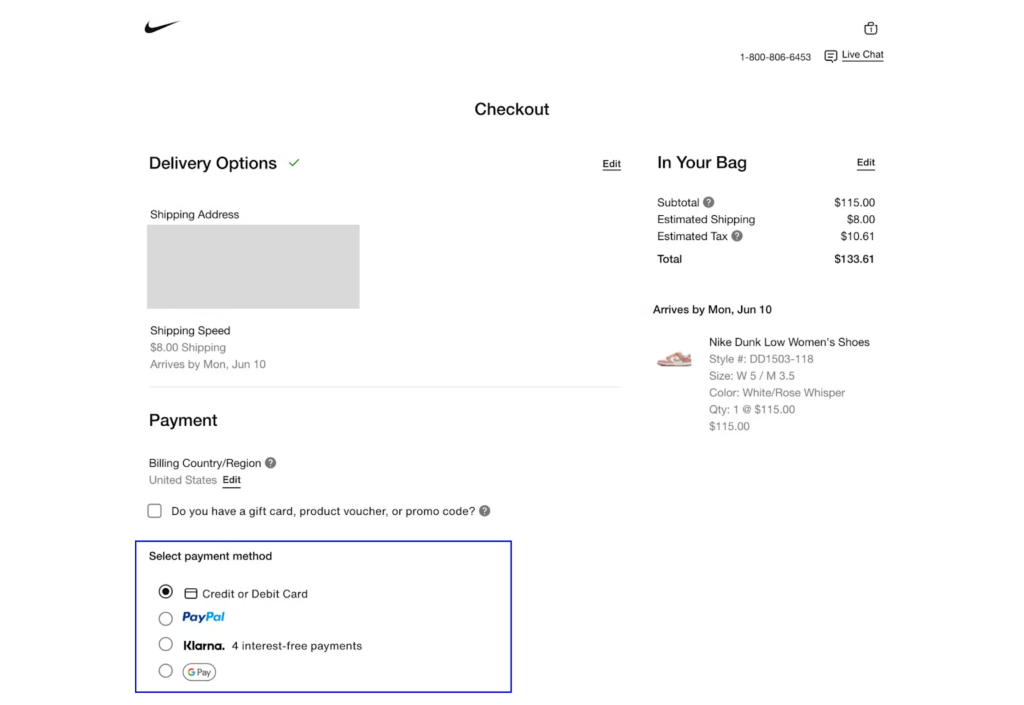
At this point, security measures like encryption and secure payment gateways play a vital role in assuring customers that their financial data is protected.
Step 8: Order Confirmation
After completing the payment, customers are redirected to the Order Confirmation or Thank you page. This is the final step in the checkout process, where they receive a summary of their order, confirming that their purchase was successful.
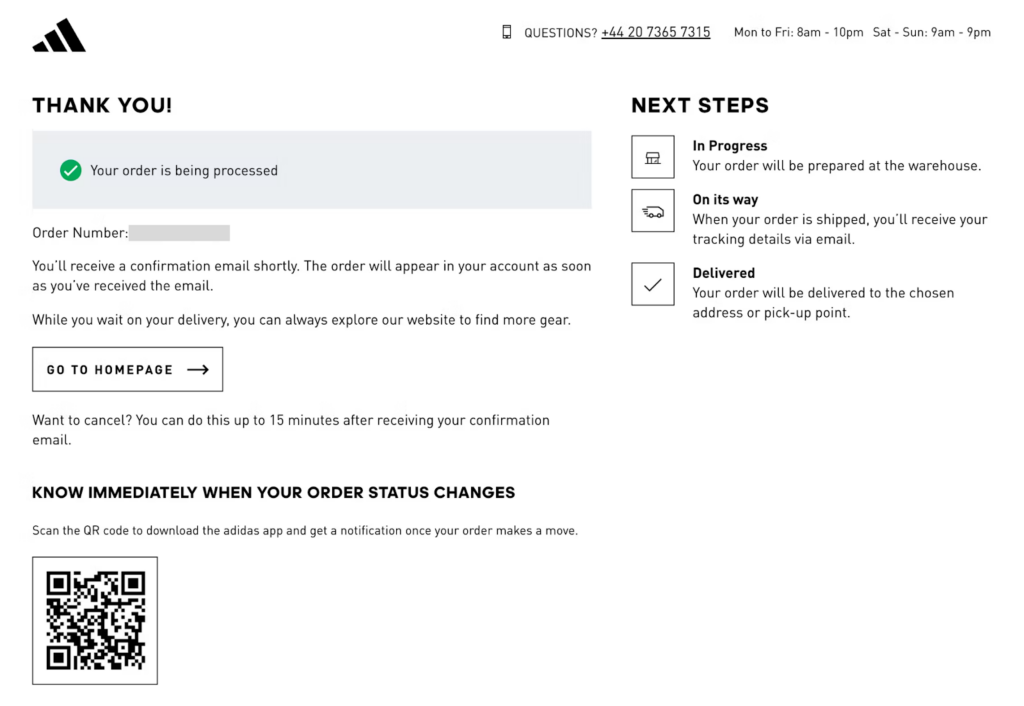
At the same time, customers are notified that a confirmation email has been sent to the email address they provided. This email serves as a receipt and includes all the relevant details of the order for future reference.
Some confirmation pages also offer tracking information, the option to create an account (if the customer checked out as a guest), or the ability to contact customer support if there are any issues.
While an optimized checkout flow is designed to guide users seamlessly to complete their purchases, the reality is that many customers still face significant hurdles.
In the next section, we’ll explore the common obstacles that shoppers encounter during checkout. By understanding these pain points, you’ll be better equipped to identify and resolve issues in your own checkout flow.
What are the Common Obstacles Users Face during Checkout?
Customers often face difficulties when completing the checkout process but have no one to ask. And finally, they decide to leave the store without making the purchase.
Understanding these pain points is necessary to optimize your checkout process and keep your customers happy. Here are some common obstacles that users frequently encounter during checkout:
1. Difficulty in navigating back to the cart
Many times shoppers want to go back to the cart page to check their bag but can’t find a way out. Again, hitting the back button clears all the filled information in the form, which is literally disappointing.
2. Lengthy or confusing checkout process
Checkout is supposed to feel like the final step in an exciting shopping experience, but when the process becomes long or confusing, shoppers lose patience. Every extra step you add risks losing the customer’s attention—and their sale.
3. Additional costs are added at checkout
When shoppers see the difference in the cart total amount and the checkout total amount, they feel cheated. Whether it’s extra taxes, shipping costs, or other charges, these last-minute surprises often result in checkout abandonment.
4. Lengthy forms with excessive personal information
Filling out long forms that request unnecessary personal details can be tedious for customers. Many will simply lose interest halfway through the process, especially if the requested information feels irrelevant to their purchase.
5. Requiring customers to create an account
Forcing shoppers to create an account before completing a purchase adds a barrier that many aren’t willing to cross. Not everyone considers signing up necessary, especially for one-time purchases.
6. Unexpectedly high shipping fees
Seeing high shipping costs right at the checkout usually becomes a red flag for many shoppers. They might have been willing to pay for the product, but sudden, excessive shipping fees cause them to reconsider, often resulting in cart abandonment.
7. Few choices for payment methods
With one-click digital payment options, no one likes to fill in the card details with accuracy and opt for the time-consuming payment gateway process. Shoppers prefer to pay in the way that’s most convenient for them. If they can’t use their preferred method, they may not like to shop with you the next time.
8. Delays in page loading
Checkout pages that take too long to load can push customers away. Yes, they can wait for a few seconds but not for minutes. The longer a page takes to load, the more customers might suspect technical issues or even question the reliability of the site—prompting them to abandon the process.
9. Unoptimized mobile interfaces
With more people shopping on their phones, a checkout that isn’t mobile-friendly can be a major turnoff. If customers struggle to navigate the checkout on smaller screens—pinching, zooming, or dealing with awkward layouts—they’d not prefer to come back again.
10. Bugs or glitches during checkout
Technical issues during checkout can quickly scare off potential buyers. Glitches, error messages, or sudden crashes make customers doubt the reliability of your store and often lead them to abandon their carts out of frustration or fear of losing their payment details.
11. Issues with payment processing
Payment processing issues can be a great hurdle for online shoppers. Sometimes the redirection between sites during the transaction results in payment failure. It not only disrupts the purchase but also creates doubt about the site’s reliability.
12. Account Verification emails take too long
If you require account verification, slow email confirmations can cause customers to lose interest. If the verification process takes too long, many shoppers may abandon their carts and never come back.
13. Difficulty in applying discount codes or coupons
Shoppers are always on the lookout for discounts, but if applying a code is overly complicated or if the system fails to accept it, they get discouraged. Some of them may not prefer to go ahead with the same cart value if they feel they’re not getting the expected deal.
14. Fear of data breaches or fraud
With the rise in cybercrimes and high-profile data breaches, many customers are concerned about security when shopping on a new or unfamiliar website. If shoppers don’t feel confident that their personal and financial information is safe, they will definitely not going to make purchases.
15. Doubtful about returns or exchanges
When customers aren’t clear on how returns or exchanges work, they may hesitate to make a purchase. Even if you have the policy pages attached, they will find it on the product page or checkout page to know whether the product is exchangeable if required, or what’s the return process.
So these were the common roadblocks that shoppers encounter during the checkout process. And, the reason why merchants are unable to resolve them is because they’re actually not aware of these pain points.
Well, there are other ways how you can identify whether your shoppers are facing any issues in their checkout process. Wondering which are they?
Let’s learn that in the next section.
How to Measure Your Checkout Performance?
Can you really optimize your checkout process without understanding how well it’s performing? Probably not.
Without the right data, you won’t know where customers are dropping off or what part of your checkout flow is causing friction. Identifying these problem areas is the first step toward building a seamless checkout experience.
To help you figure out where you stand, here’s a table with performance metrics and a range of values to measure your eCommerce checkout performance.
| Metric | Description | Ideal Range | Needs Improvement | Critical Action Required |
| Cart Abandonment Rate | % of shoppers who leave after adding items to the cart. | 20% – 30% | 30% – 50% | Above 50% |
| Checkout Conversion Rate | % of visitors who successfully complete the purchase. | 70% – 85% | 50% – 70% | Below 50% |
| Checkout Drop-off Rate | % of users exiting at any point during the checkout. | Below 20% | 20% – 40% | Above 40% |
| Average Order Value (AOV) | The average amount spent per completed order. | Above industry average | At industry average | Below industry average |
| Time to Complete Checkout | Average time users take to complete the checkout. | 1 – 2 minutes | 2 – 4 minutes | Above 4 minutes |
| Payment Failure Rate | % of transactions that fail due to payment issues. | Below 2% | 2% – 5% | Above 5% |
| Mobile vs. Desktop Conversion Rate | Difference in conversion between mobile and desktop. | Mobile within 10% of desktop | Mobile 10% – 20% lower than desktop | Mobile > 20% lower than desktop |
| Error Rate | % of users encountering errors during checkout. | Below 1% | 1% – 3% | Above 3% |
| Refund/Return Rates | % of orders that lead to returns or refunds. | Below 5% | 5% – 10% | Above 10% |
| Session Bounce Rate on Checkout Pages | % of users leaving without interacting on checkout pages. | Below 20% | 20% – 40% | Above 40% |
This table offers a snapshot of how well (or not) your checkout process is performing. If you find your metrics leaning toward the “Critical Action Required” column, it’s a clear signal that some part of your process is creating a roadblock for customers—and it’s time to dig deeper and find solutions.
Here are a few things you need to keep in mind when using the above table:
- Adjust as Needed: These ranges can be adjusted depending on your industry and business model. For example, High-end luxury products might have different abandonment rates than fast fashion.
- Follow the Data: It’s not just about the numbers. These metrics will guide you to the problem, but understanding the why is equally important. Analyzing your entire checkout funnel will help you pinpoint where the biggest drop-offs happen.
Once you’ve identified the problem areas using these metrics, it’s time to focus on solutions—we’ll learn more about this in the next section.
How to Design an Optimized Checkout Flow in eCommerce?
An optimized checkout flow is not just about eliminating pain points; it’s also about creating a seamless and enjoyable experience that encourages customers to complete their purchases.
Let’s explore how you can transform your checkout process with actionable strategies and best practices.
1. Ask Only for essential information
At this point, customers are typically asked to enter their shipping and billing information. If they’re confronted with too many fields to fill out, it can feel overwhelming. Long forms can frustrate shoppers and lead them to leave without completing their purchase.
Shoppers appreciate a quick and efficient checkout experience, which makes them feel more comfortable sharing their information.
So, by limiting the information you request to just the basics—like their name, address, and payment details—you make the process much smoother. For example, if you only ask for the shipping address and have an option to autofill the billing address, customers can enjoy this step (will discuss this later).
2. Offer a “Guest Checkout” option
When customers reach the checkout page, they typically encounter options for logging in or creating an account. However, many shoppers may not want to go through the hassle of signing up, especially if they’re just making a one-time purchase.
“Guest Checkout” is the best alternate option that can significantly enhance your customers’ checkout experience. This gives them the choice to skip the registration step and proceed directly to checkout.
Additionally, you can still capture essential customer information during the guest checkout process, like email addresses for order confirmations and shipping updates. After the purchase, you can even encourage them to create an account by highlighting the benefits, such as tracking orders or faster future checkouts.
3. Use address auto-completion features
Manually entering an address can be tedious, especially on mobile devices where typing may be slower and prone to errors. If the form takes too long to fill or if customers make mistakes, it can easily frustrate them.
Address auto-completion speeds up this process by reducing the number of keystrokes required and minimizing the risk of incorrect entries. When customers begin entering their shipping or billing address, an address auto-completion feature (often powered by Google or another third-party service) predicts the full address based on what they’ve typed so far as shown in the below example.
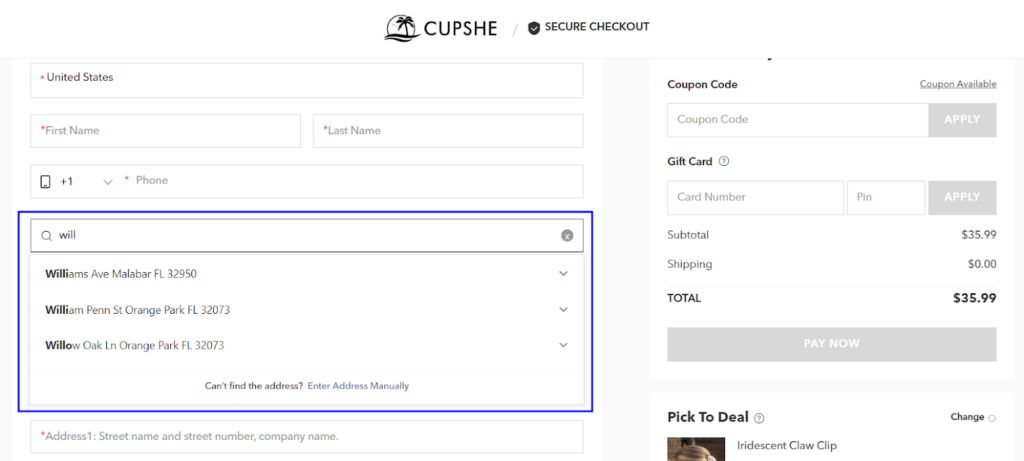
The user can then click on the correct suggestion, and the rest of the form fields are automatically filled in. Not only does this feature improve the user experience by making the checkout quicker and more accurate, but it also reduces the chances of shipping errors due to mistyped information.
4. Ask users to create an account after the purchase
Requiring account creation upfront can feel like a hassle, particularly for first-time buyers or those who are just looking to make a quick purchase. Instead of forcing customers to create an account before making a purchase, it’s better to ask them to do so after they’ve completed their order.
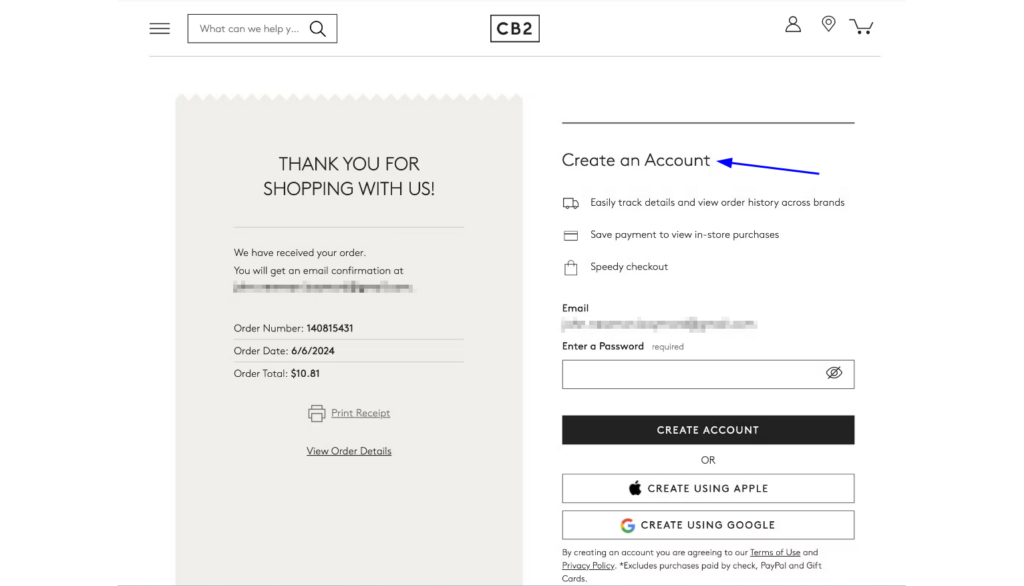
Post-purchase account creation feels more natural since the customer has already committed to the purchase, and they might be more willing to create an account for future convenience (like saving their shipping details, tracking orders, or accessing exclusive member perks).
5. Utilize Social Media Logins
This is one of the best ways to help your shoppers with account creation and speed up your checkout process.
During the checkout process, customers are typically prompted to log in or create an account. Instead of filling out lengthy forms, they can simply click on options like “Log in with Facebook” or “Log in with Google”. This method pulls their information directly from their social media profiles and minimizes the time and effort required in customer registration.
See how Zappos makes it easy for shoppers to continue their purchases with too many sign-in options.

Thus, this approach simplifies the account creation process, encourages more customers to complete their purchases, and enhances overall satisfaction.
6. Let them redeem their reward points
Giving customers the option to redeem their accumulated reward points during checkout is a powerful way to incentivize loyalty and encourage conversions.
If your store offers a loyalty or rewards program, this step enables customers to apply their accumulated points toward their purchases. So, during the checkout process, customers can be prompted with an option to apply any available reward points to their purchases. You can usually add it near the cost breakdown, where customers can see how their points reduce the total cost of the order.
Touchland, a brand known for its sleek and stylish hand sanitizers, has a seamless system for encouraging shoppers to sign up and earn or redeem reward points.
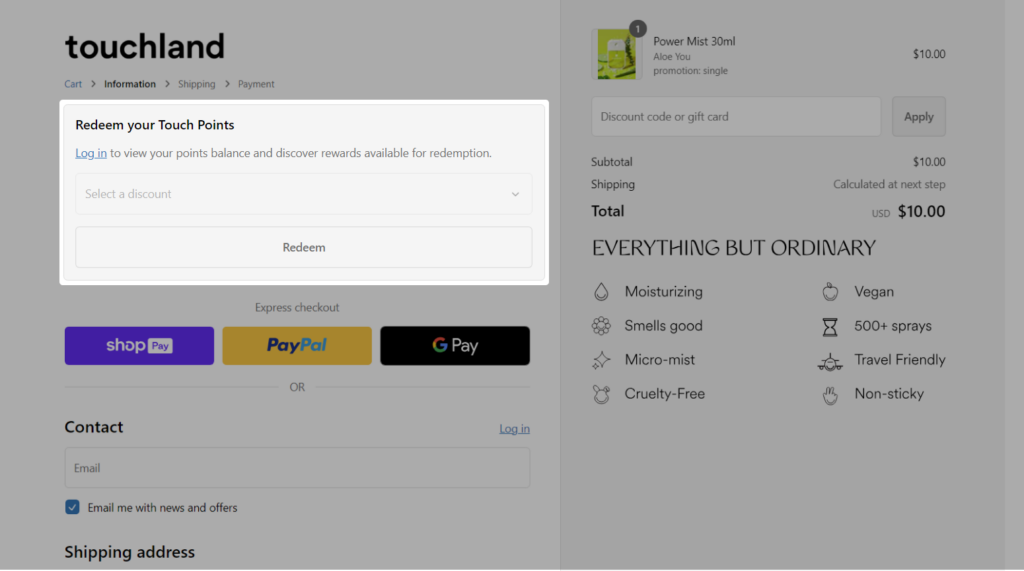
Many customers feel more engaged and valued when they can use their hard-earned reward points. It also offers them a sense of savings, which can push them to complete the purchase.
7. Provide upfront shipping estimates
Hidden or unexpectedly high shipping fees are a leading cause of cart abandonment.
When shoppers suddenly see an inflated total at checkout due to shipping costs, it can feel like an expensive deal. So, before customers reach the checkout, you display estimated shipping costs based on their location. This can be done as soon as they add an item to their cart or enter their ZIP code.
Some stores even offer a shipping calculator on product pages for full transparency. Providing upfront shipping costs creates transparency, reduces unpleasant surprises, and gives customers more confidence to complete their orders without hesitation.
8. Display the estimated delivery based on shipping method
One of the major uncertainties during online shopping is the delivery time.
Shoppers want to know exactly when they can expect their order—especially for time-sensitive purchases like gifts. If they don’t get this information upfront, they may hesitate to complete their purchase, fearing delays or slow delivery.
Once customers choose their preferred shipping method, you can show them a specific delivery date or range of dates—whether it’s “arrives by Friday” or “within 3-5 business days”. This can be based on their location and the chosen shipping speed.
Providing this detail upfront ensures there are no surprises later. You can display it on the shipping selection page or during the order review phase, depending on how your checkout is structured.
9. Offer multiple payment options
Not every customer prefers the same payment method. Some may feel more secure using a digital wallet, while others might prefer traditional credit or debit cards. If your online store only offers a few payment methods, you might lose customers who would have completed their purchase if their favorite payment option was available.
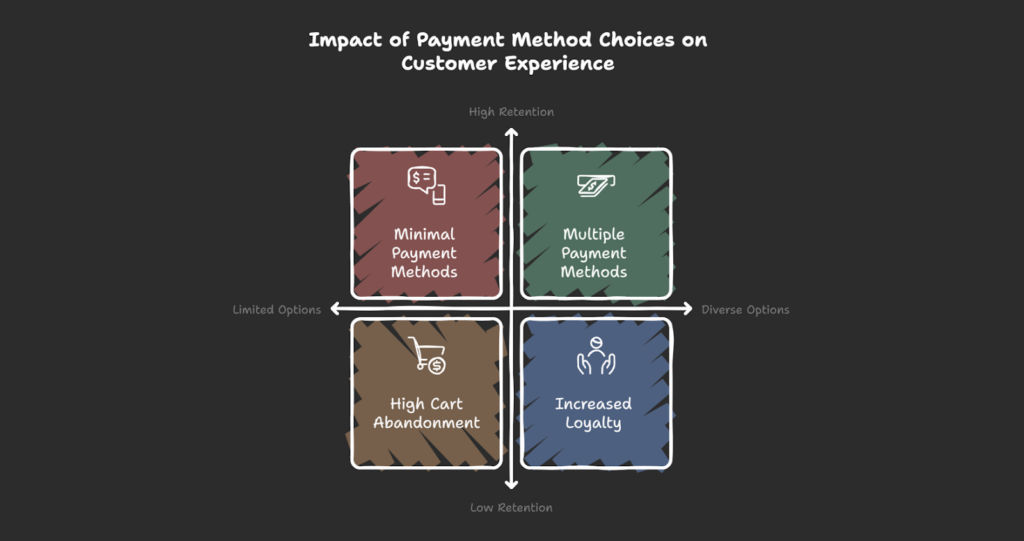
When customers reach the checkout stage, they should see several ways to pay for their purchases. This can include credit cards, debit cards, digital wallets like PayPal, Apple Pay, or Google Pay, and options like buy now, pay later services.
I’ve even come across an online mobile accessory store that offers a QR code for desktop shoppers to scan and pay using their UPI or digital wallets.
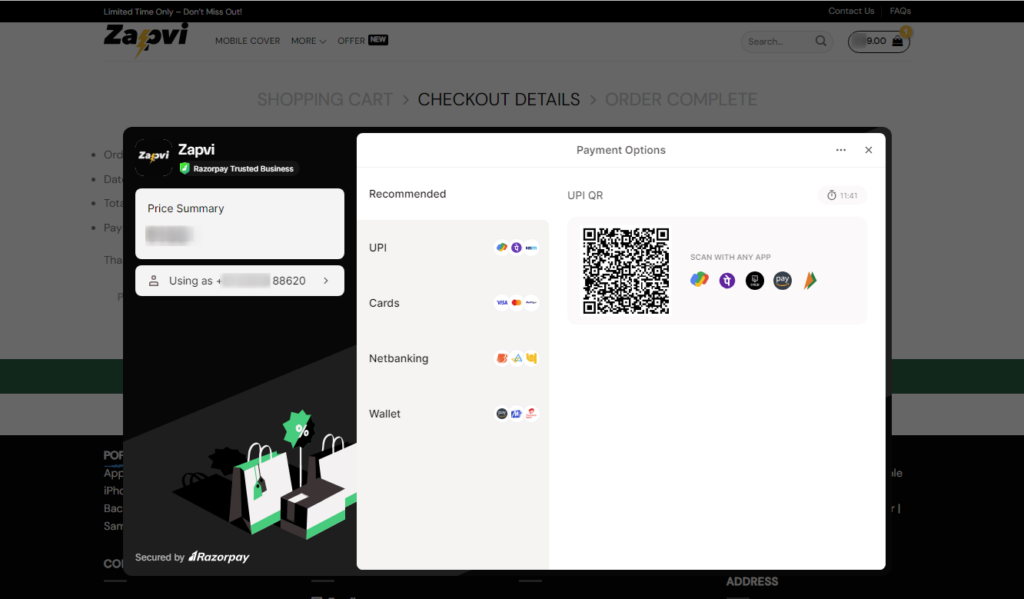
Customers can now choose the payment method that is most convenient for them. This flexibility not only meets varied customer preferences but also instills a sense of trust and convenience, ultimately boosting your conversion rates.
10. Show the available ‘Coupon codes’ with eligibility
The availability of discount box and unavailability of coupon codes can really disappoint your shoppers. Even worse, searching for a code online and finding one that doesn’t work can cause unnecessary disagreement. This often leads to abandoned carts.
Instead of making customers search for discount codes externally, you can provide a clear section during checkout listing any available coupon codes that they can apply to their orders. Along with each code, you can also display its eligibility criteria—such as minimum order value, applicable items, or expiration dates.
This creates a smoother and more transparent checkout experience, by reducing abandonment and improving overall customer satisfaction. It can also incentivize larger purchases if customers see that they’re close to qualifying for a discount.
11. Update totals dynamically
As customers adjust quantities, apply discount codes, select shipping methods, or modify any aspect of their order, the total cost is instantly recalculated and displayed on the screen. There’s no need for them to refresh the page or hit an “update” button to see the latest total.
This dynamic updating ensures that they can clearly see any adjustments to their final total, including taxes, shipping fees, and discounts. It keeps customers fully aware of what they’ll be paying and encourages them to complete their purchase.
When totals don’t update instantly, customers are left guessing what the final price will be until the last step of checkout. It can also create a negative experience if shoppers apply a discount or change a shipping option, only to find the expected price hasn’t been adjusted.
12. Show why to choose you
Many customers hesitate right before completing a purchase, second-guessing their decision. Sometimes, they wonder if they should search for a better deal or if they’ve chosen the right store. At checkout, when they are just a few clicks away from making a purchase, they might still need reassurance that they’re making the right choice.
So, you need to provide constant motivation by subtly reminding them of what sets your brand apart—whether it’s superior quality, exceptional customer support, or special perks—you help reaffirm their choice.
You can highlight your unique selling points (USPs) like free shipping, hassle-free returns, product guarantees, ethical sourcing, or customer satisfaction ratings. This could be through banners, badges, or small text next to the checkout button.
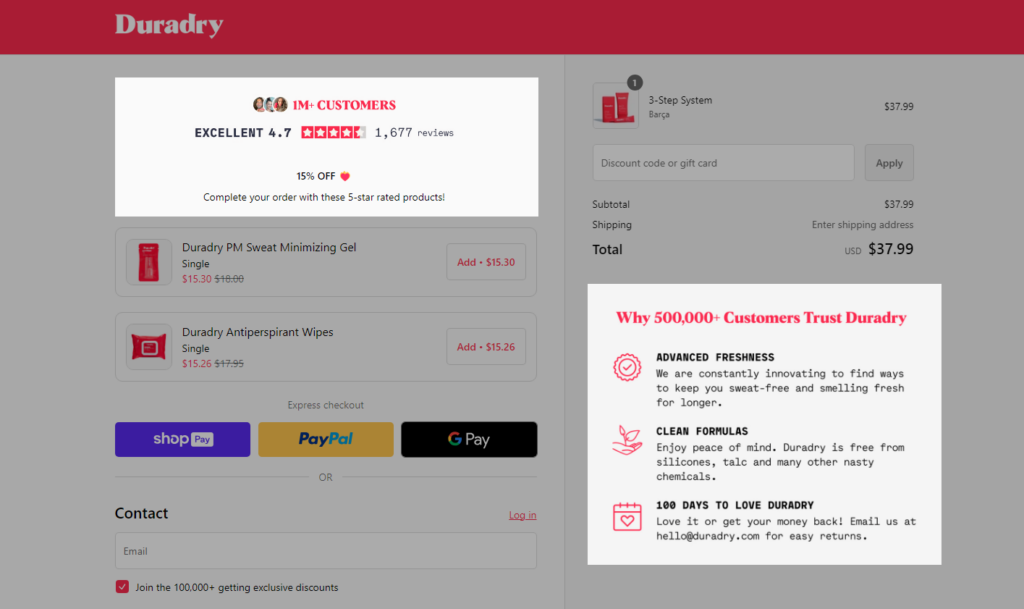
It’s about supporting their choice, making them feel they’re shopping with the best, and ensuring they don’t leave for another site.
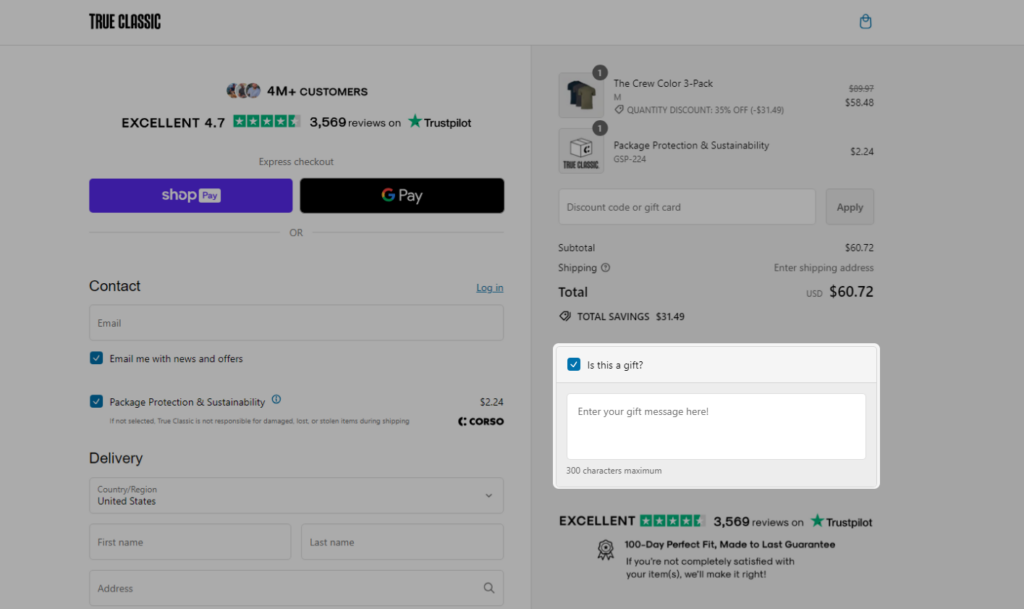
13. Allow users to mark orders as gifts
Many customers buy gifts online, and they appreciate stores that offer features like gift wrapping or personalized messages. Adding gift wrapping, personal messages, or special packaging you can cater to their needs and create a more enjoyable shopping experience.
Offering these choices can make the shopping experience feel more thoughtful and customized. Thus, making it easy for customers to indicate that their purchase is a gift can enhance their shopping experience and increase your sales.
For example, True Classic makes gifting effortless by adding a simple ‘Is this a gift?’ tickbox beneath the order summary at checkout. When customers select this option, a short text box appears, allowing them to add a personalized message.
14. Communicate the returns or exchange policy
One of the primary reasons customers abandon their carts is the fear of being stuck with a product they won’t be able to return or exchange. If you want your shoppers to complete the checkout process, you need to eliminate this concern.
At a strategic point during the checkout process—typically before finalizing the purchase—provide a summary of your returns or exchange policy. Make sure it’s easy to understand and highlights any key points, such as:
- How long customers have to return or exchange an item.
- Any conditions or requirements (e.g., the product must be in original condition, with tags).
- Instructions for initiating the return process (e.g., shipping labels, in-store returns).
- Clarify any costs associated with returns, such as restocking fees or shipping charges.
You can also provide a link to a detailed page for those who want to review the full policy.
15. Optimize checkout for small screens
Many website owners assume that using a responsive template or theme is enough to cater to mobile shoppers. However, while a responsive design ensures that your site adjusts to different screen sizes, it doesn’t automatically mean the checkout experience is optimized for mobile users.
A responsive template resizes content to fit smaller screens, but it doesn’t always account for usability challenges specific to mobile devices. Mobile users interact with websites differently—they rely on touch, need larger buttons, and often expect quicker load times. If your checkout flow is clunky or difficult to use on a mobile device, it will lead to abandoned carts, even if your site is technically “responsive”.
Optimizing your checkout for mobile means going beyond just resizing elements. It involves making sure the flow is intuitive for touch interaction, minimizing typing, offering one-click payment options like Apple Pay or Google Pay, and ensuring that pages load quickly even on slower mobile connections.
So, don’t just rely on a responsive theme—take time to truly optimize the mobile experience.
Final Thoughts!
As we discussed in the beginning, your eCommerce store can see a 35.26% increase in conversion rate simply by optimizing your checkout flow. The average 70% cart abandonment rate isn’t something to shrug off as normal—it’s a major opportunity for improvement.
Here, we’ve explored many actionable strategies that not only minimize friction but also enhance customer trust. Implementing the strategies discussed can drastically improve your checkout flow.
And, with the performance metrics table provided, you now have the tools to evaluate your success and identify areas for continuous improvement.
So, take these insights and put them into practice. If you’re looking for expert guidance to implement these changes, our eCommerce experts are here to help you optimize your checkout process. Book a Free Consultation Call Today!


Post a Comment
Got a question? Have a feedback? Please feel free to leave your ideas, opinions, and questions in the comments section of our post! ❤️