PrestaShop to Shopify Migration Checklist – A Complete Process

Migrating from PrestaShop to Shopify is surely a great decision.
But we know that migrating an eCommerce store from one platform to another is a big job.
I mean, there are so many steps to follow, areas to consider, and things not to miss (not by any chance), and the doubts and tension always stay high. After all, your business is at stake.
However, following the right process in the right way will make your Shopify migration journey easier.
To help you well, we’ve prepared a 29-step checklist that you can follow to transition from PrestaShop to Shopify smoothly.
From backing up your existing store and transferring product data to setting up your payment gateways and optimizing for SEO, we’ve broken down each stage of the process to ensure a hassle-free migration.
So, let’s get started with it!
PrestaShop to Shopify Migration Checklist
This migration from PrestaShop to Shopify is a massive step for your business as you work with an open-source platform and now you’re stepping in with Shopify, which is a hosted solution; an entirely new environment.
To help you avoid disruptions, here, we’ll break down the migration process into key phases and outline the steps involved for each phase to ensure you don’t miss out on any of them.
Let’s start.
Download the Migration Checklist
#Ideation Phase — PrestaShop to Shopify Migration
Okay, before we step into the migration process, you need to think about multiple areas, and those steps I’ve added in the ideation phase here. Let’s discuss the areas you need to work on at this stage.
1. Define Your Shopify Migration Goals
Before taking any steps, you must clear up doubts and have a clear vision of your goals.
Understanding what you want to achieve is necessary as it helps you find the most efficient path forward. You can start with:
- Identifying the reason for migrating to Shopify (Are you looking for better performance, scalability, or enhanced features?)
- Setting clear objectives (Do you aim to improve user experience, reduce maintenance efforts, or expand into new markets?)
Just keep your vision in mind—it will guide your decisions and keep you focused on your goals.
2. Analyze Current Store Performance
Before migrating, take note of your current store’s performance.
When you examine store performance before migration, you get to identify products that are driving the most amount of sales, pages that attract the most visitors, and what your customers are looking for.
This allows you to focus on things that are working fine already. So, when you start to work on your new Shopify store, you’ll know of weak areas to address while maintaining things that are already driving success to your business.
How Do You Analyze Store Performance?
To analyze store performance you can use tools like Google Analytics or PrestaShop Metrics to track key data points, including:
- Traffic sources – Where your visitors are coming from
- Conversion rates – How well your store turns visitors into buyers
- Bounce rates – Where customers are dropping off
- Customer behavior trends – Popular products, categories, and sales channels
Also, take note of underperforming products or pages so you can optimize them when you migrate to Shopify.
3. Competitor Research
Now, the next step is to see what your competitors are doing.
See, migrating to a new platform means starting something from scratch, not entirely but again. So, see migration as an opportunity to re-do, optimize, or remove a few strategies as you’re already on your way to improving your online presence.
For this, you need inspiration. And who inspires better than those who lead your industry?
So, take out your detective glasses and look up to your competitors.
- Analyze how your competitors operate, perform, and engage their audience.
- Observe what makes their strategies effective—everything from homepage layouts and product pages to navigation, customer reviews, live chat, and loyalty programs.
Understanding these elements will help you adjust your approach to achieve your goals with your new Shopify store.
4. Plan For New
Just as I said you adjust your approach to success after competitor research, it’s time you start planning on what you need in your new store. There are multiple areas you need to think about and structure better than before.
Here, I’ve listed key planning areas for your new Shopify store in a table.
✅ Store Structure & Navigation
- Define key categories, collections, and product navigation.
- Consider if any product or category restructuring is needed for a better shopping experience.
✅ Feature & Functionality List
- Write down all the necessary features, apps, and integrations (e.g., payment gateways, marketing tools).
- Determine custom functionalities to replicate or enhance on Shopify.
✅ Design & Branding Considerations
- Decide if a redesign or brand refresh is required.
- Gather all brand assets like logos, banners, and product images.
✅ Content Audit & SEO Optimization
- Review product descriptions, blogs, and metadata to determine updates.
- Plan new content with SEO and brand voice in mind.
Once these steps are covered, you’re ready to move forward with the next step of your migration process! 🚀
5. Budget & Resources Allocation
Migration is a long process and comes with multiple costs and expenses lingering with it.
And to manage your budget and resources, you need to plan on allocation right from the beginning. And it’s time you estimate costs and organize your team efforts to avoid unexpected expenses and delays during this transition.
Here’s an idea of how you manage your budget and resources.
- Calculate potential estimates for Shopify subscription plans, apps, custom development, and design.
- Check if your team can handle data migration, design, and testing.
(Consider hiring Shopify experts if needed.) - Assign tasks and assign roles within your team or to external partners.
6. Timeline Planning
Once you’ve decided on the budget and resources for migration, you start preparing a timeline estimation.
First of all, creating a timeline is creating a project brief and estimating the time it takes to complete. Here’s a look into the process.
- List your To-do
- Estimate how long each step may take
- Map out dependencies
- Discuss it with the team
- Manage and adapt as you start
This is an overview of the process. When you outline a clear schedule with defined milestones, you can keep better track of project and ensure each phase is managed and completed at its best.
Moreover, to set a precise timeline, you can first map out key stages like data backup, store setup, data import, design customization, and testing. Once you get them on paper, write estimated timeframes for each task based on your team’s capacity and the complexity of your PrestaShop store.
And yes, it’s necessary to set realistic deadlines to avoid overburdening tasks.
Tip: To keep things easy and smooth, include buffer time in your timeline to accommodate unexpected challenges, such as data inconsistencies or technical glitches. Having space-time will help you proceed easily as you don’t have to manage last-minute issues and compromise your launch date.
(Here’s your guide to understanding the cost & time for Shopify Migration.)
;
Now we step into another phase of migration.
Download the Migration Checklist
# Preparation Phase – PrestaShop to Shopify Migration
Once you follow each step in the ideation phase, you can start preparing further for your migration.
This stage of migration will require you to prepare multiple areas that need to be done right before migration. For a smooth transition, I’ve outlined them here, along with all the information you might need to work on them.
7. Backup Your PrestaShop Store
Before making any modifications to your current store, take a backup.
It’s necessary as systems are prone to errors and unexpected failures, and having a complete backup ensures you’re prepared for any setbacks. Your backup should include a copy of your product details, customer data, order history, and website content to keep you at peace throughout the migration process.
And if anything goes off the plan, you can easily restore your site to its previous state without losing any critical data.
How do you take backup for your PrestaShop website
To create a backup of your PrestaShop store, you can use plugins like:
- PrestaShop Backup Manager (built-in tool)
- phpMyAdmin (manual database export)
- Cloud Backup Services (Acronis, DropMySite)
Using these plugins allows you to back up your entire database, files, and themes effectively.
Also, double-check if the backup is taken successfully to ensure they’re complete and functional before moving forward with the migration process.
8. New Shopify Store Creation
After backing up your PrestaShop store, the next step is to create your Shopify store. This involves signing up for a Shopify account and configuring essential settings to get it ready for migration. Let’s get in a step by step process.
Step #1 — Sign Up for Shopify
To get started, visit Shopify’s website & sign up for a new account.
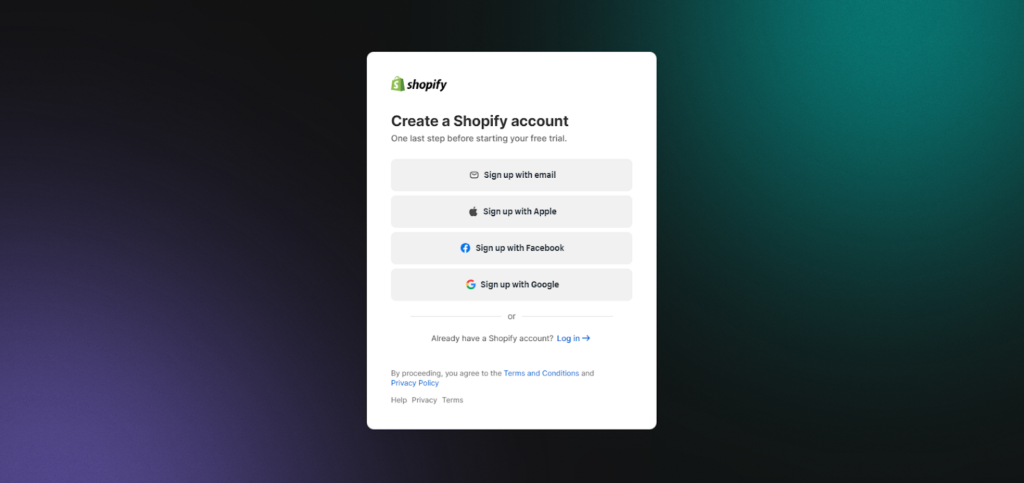
Shopify provides a 3-day free trial, giving you a chance to explore its features and navigate the platform before choosing a plan.
Here’s a preview of how your Shopify store will appear when newly set up.
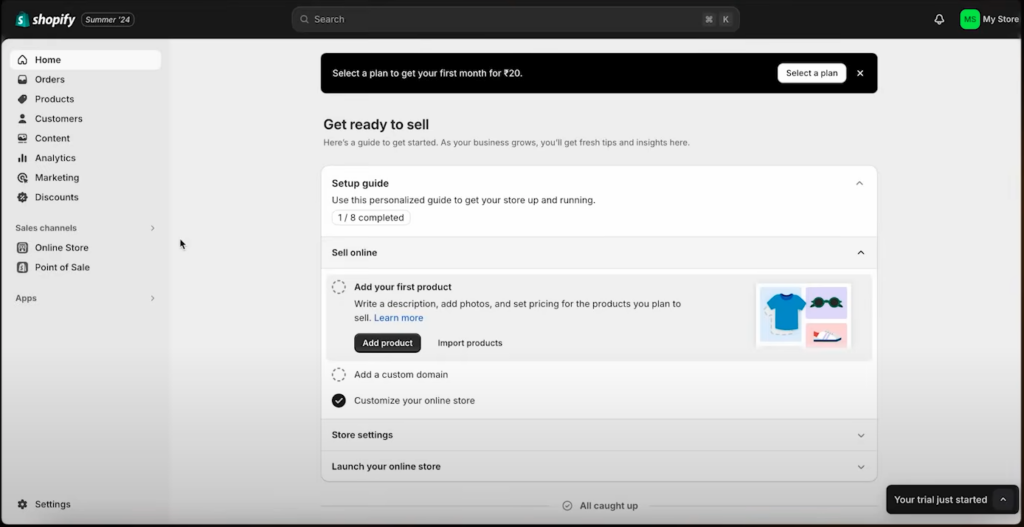
Step #2 — Enter Basic Store Details
Once your account is set up and you access the store dashboard, you’ll need to provide essential details like your store name, contact information, and business address.
To add these, navigate to Settings > General Information in your Shopify dashboard.
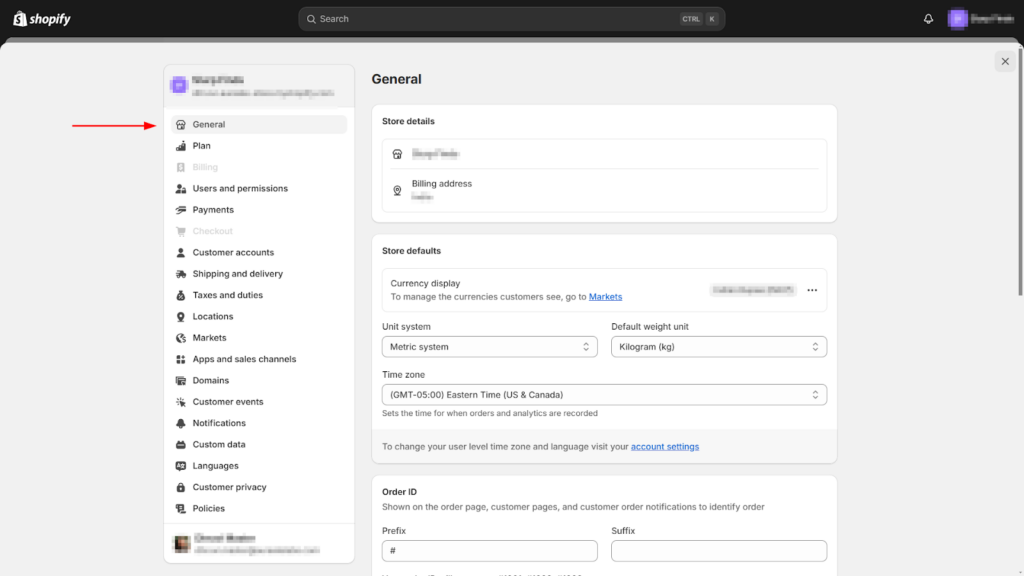
Step #3 — Configure Key Settings
In this section, you’ll need to set up key preferences such as currency, language, tax settings, and more. I’ve highlighted them here for your convenience.

These are crucial for ensuring that your store aligns with your business needs and target audience.
Step #4 — After that you need to work on your store theme. Shopify offers a wide range of free/paid themes to choose from, so take some time to select a theme that best represents your brand.
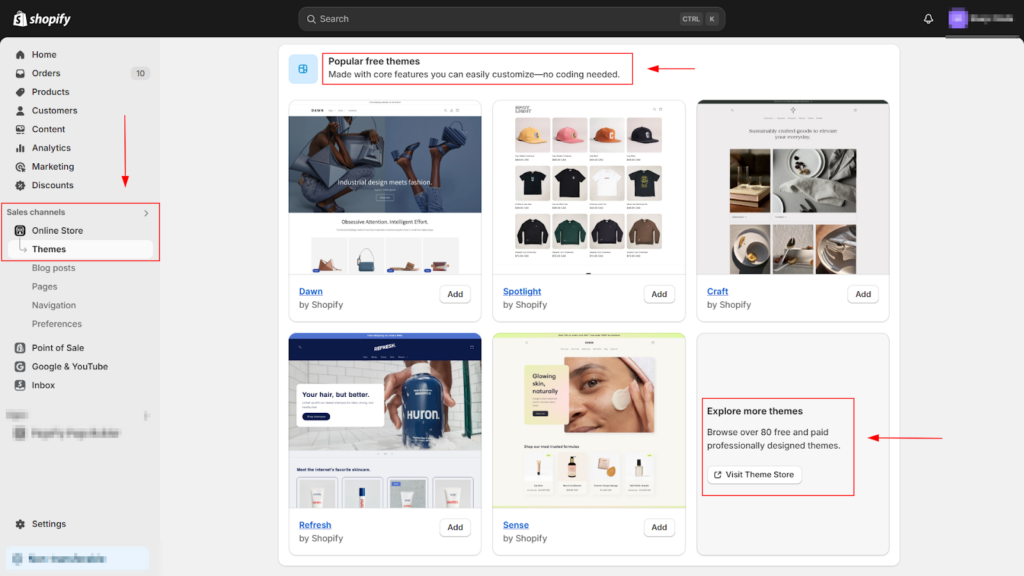
On that interface, you’ll find an option to visit their theme store and browse through their collection to make your selection.
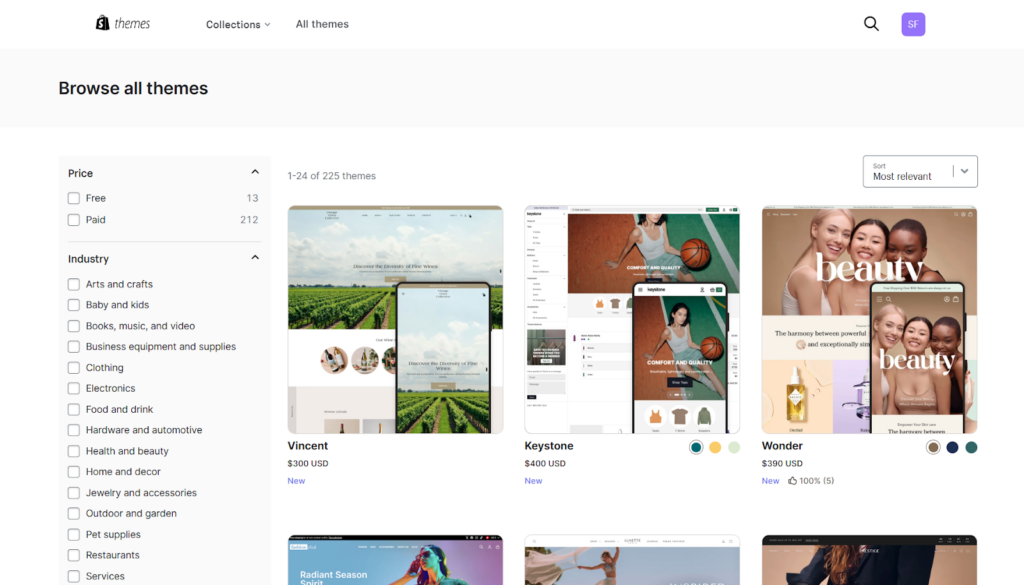
In the theme store, you can select a theme based on your budget (free or paid), industry, catalog size, and desired features. You can also preview and test themes to see which one aligns best with your niche and product line before making a final decision.
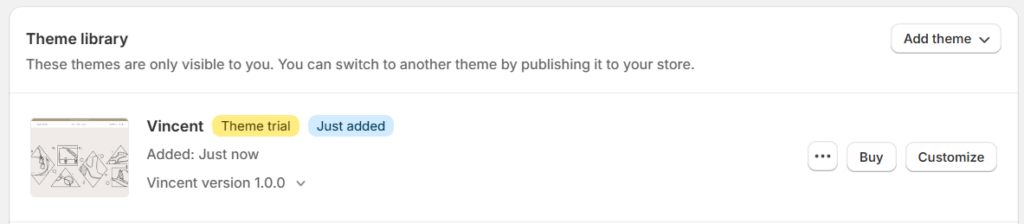
For now, decide whether you want to purchase a ready-made theme or opt for custom development for your new Shopify store. You can always purchase a theme later or invest in custom development down the road.
Additionally, you can further customize the theme once your products are migrated.
Step #5 — Explore Shopify’s Built-in Tools
Lastly, it’s a good idea to explore Shopify’s built-in tools and features. Setting up the basics in advance will streamline the process and ensure your store is fully functional and ready to receive data from your PrestaShop store.
Learn more: How to use Shopify – Tutorial for Beginners
9. Purchase a Shopify Subscription Plan
After exploring the dashboard, familiarizing yourself with the basics, and configuring key settings, you’ll be ready to choose a Shopify plan. Here’s an overview of the available Shopify plans:
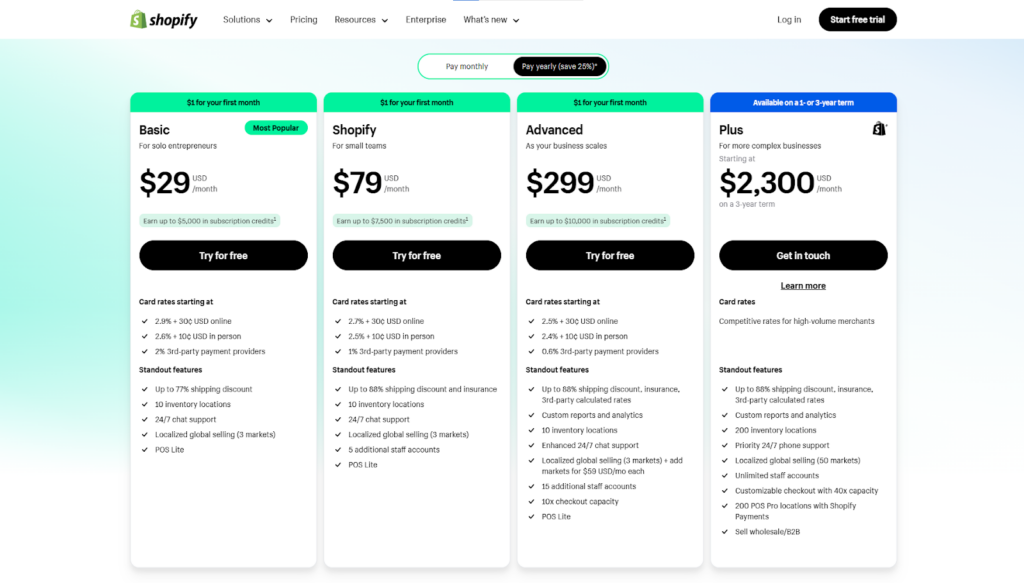
I’ve added a table to simplify the Shopify subscription plan cost.
| List of Plans Provided | Plan Pricing | Best for |
| Basic Shopify Plan | $39 per month (25% off on yearly payment) | Individuals and small businesses |
| Shopify Plan | $105 per month (25% off on yearly payment) | Small businesses |
| Advanced Shopify Plan | $399 per month (25% off on yearly payment) | Medium to large-sized businesses |
| Shopify Plus | Starting from $2000 per month | Enterprise sized businesses |
You may need some guidance in selecting the right Shopify plan. Here are key factors to consider:
- How many products do you plan to sell?
- What will be the size of your product catalog?
- How many team members need access to your store?
- Do you require advanced features like detailed reporting or custom coding?
- What is your budget for a monthly subscription?
Take your time and research thoroughly before making a decision.
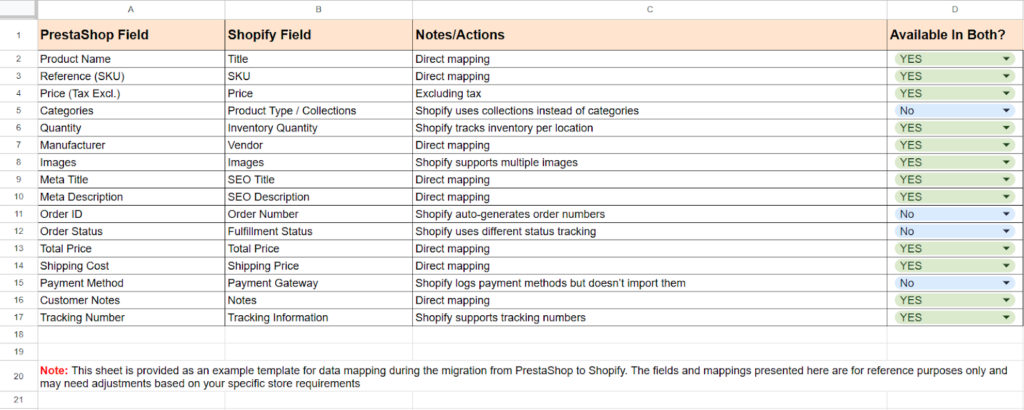
10. Perform Data Mapping
Once you’ve purchased your Shopify subscription, it’s time to perform data mapping.
In simple terms, data mapping is the process of matching information from one system to another, making sure it fits properly.
For example:
- In PrestaShop, you have product fields like Product Name, Price, and Categories.
- Shopify has similar fields: Title, Price, and Product Type, which can be mapped directly.
However, if PrestaShop has an extra field like Custom Product Code that Shopify doesn’t support directly, you’ll need to use Shopify Metafields to store that additional information.
It’s more like labeling boxes when moving to make sure everything go in right place of new home.
To simplify the data mapping process, you can create a spreadsheet listing all your existing PrestaShop data and find corresponding fields in Shopify. If a direct match isn’t available, consider using metafields to store that information.
I’ve prepared a PrestaShop to Shopify Data Mapping Template that might be of use to you.
11. Install Shopify Import Tool
Okay, at this point, you’ve your new Shopify store ready, and you also know on where you can paste all your previous data.
The next step is to install a Shopify import tool that helps you bring in all your products, customers, and order data from PrestaShop to Shopify. Taking the help of a tool will help you save time, reduce the chances of errors, and save from manual labor work, hence, a necessary consideration.
How do you install the Shopify Import tool?
- Log in to your Shopify admin panel.
- Go to the “Apps” section.
- Search for the “Store Importer” app, which offers some of the best tools for data importing.
- From the list of available tools, choose the one that best fits your needs and click “Add app” to install it on your store.
(These 3 apps top our suggestion list.)
Once you find the best one that fits your needs, click on the Add app to install it on your store. After installation, you’ll be ready to begin the data migration process.
;
Now this calls for a new (& most important) phase in your PrestaShop to Shopify migration process, which is data migration.
Download the Migration Checklist
# Data Migration Phase — PrestaShop to Shopify Migration
The easiest way to export data from your PrestaShop store is in a CSV file. So, once you have the CSV file ready, you can simply upload it to the Shopify Import Tool, and it will guide you through mapping your data fields to ensure everything is transferred accurately.
That’s a basic on what an export & import process will look like, let’s check on what you need to migrate.
12. Migration of Data
The first data you migrate is product data, followed by customer data, past order details, the remaining pages and content on your website, and finally, images and other media files.
Also, you’ll need idea on what to transfer, so, here I’ve outlined all the data you need to migrate.
| Product Data | Customer Data | Order Data | Pages & Blogs | Images & Media Files |
| Product titles, descriptions, and SKUs | Customer names, email addresses, and phone numbers | Order numbers, dates, and statuses | Page content (text, images, and formatting) | Product images |
| Product images and other media files | Shipping and billing addresses | Customer information (name, email, shipping address) | Page URLs and SEO metadata (titles, meta descriptions, keywords) | Logo and other brand assets |
| Product variants (e.g., size, color, material) | Order history and purchase behavior | Products purchased, quantities, and prices | Blog posts, including titles, content, images, and publish dates | Blog post images |
| Product pricing and inventory levels | Customer tags and notes | Shipping and billing information | Blog categories and tags | Other media files (e.g., PDFs, videos) |
| Product categories and tags | Payment information (if applicable) |
That’s all on data you need to migrate. Now, let’s check on multiple areas you need to keep in mind and follow.
Tips for Successful Data Migration:
- Map the fields correctly to ensure accurate data transfer.
- Ensure compliance with data privacy regulations when migrating customer information.
- Manually update order statuses and fulfillments in Shopify to match the original PrestaShop data.
- Update image links in product descriptions, blog posts, and pages to point to the new Shopify image URLs.
- For images and media file migration, you can manually upload them on Shopify, or use a third-party app to automate the process.
- Set up 301 redirects from old PrestaShop URLs to new Shopify URLs to avoid losing traffic and SEO benefits.
Moreover, I’ve attached a sample of the CSV format supported by Shopify for to import product data and customer data files for migration.
;
That’s all. By following these steps and carefully migrating your data, you can ensure a smooth transition from PrestaShop to Shopify and minimize disruptions to your online business.
Download the Migration Checklist
# Set Up Shopify Store — PrestaShop to Shopify Migration
By this time, your new Shopify store gathered a significant amount of data and is beginning to take shape. Hence, it calls for additional adjustments to ensure a seamless shopping experience.
Let’s check through the key adjustments you should make.
13. Theme Customization
Earlier, when creating your Shopify store, I mentioned the importance of deciding on your store’s design—be it a ready-made theme or custom development. Now is the time to decide and invest in the option that best fits your business needs.
If you choose to go with a ready-made theme, here are some ideas on how to customize it to align with your store’s aesthetics.
How to Customize Your Theme:
Once your theme is installed, go to your Shopify admin and navigate to Online Store > Themes > Customize.
Here, you’ll find a drag-and-drop editor to adjust your theme elements, such as fonts, colors, and layouts. You can also upload your logo, modify homepage sections, and customize the header & footer to let it align with your old PrestaShop store or new vision.
Moreover, if you need advanced features, unique design elements, or anything beyond the standard customization options available with Shopify, you will be required to rely on Shopify Apps or Hire a Shopify Expert for custom coding.
These advanced features and unique elements might include product sliders, custom banners, or interactive elements.
Tips for Theme Customization:
A few tips on how to do it better are always good. So, here I’ve added a few key best practices to keep in mind and create a seamless shopping experience.
- Test your theme on different devices using Shopify’s preview feature, and adjust fonts, buttons, and images for optimal mobile responsiveness.
- Product pages drive conversions, so make sure to optimize it at its best.
- Use drag-and-drop sections to feature bestsellers, new arrivals, and promotional banners across your site. A sticky menu can also improve accessibility and ease of navigation.
- Align your theme settings with your brand identity by using consistent colors, typography, and ensuring your logo is prominently displayed.
… And more!
For a deeper dive into Shopify UX best practices, I’ve attached a resource to help you refine your store for the best user experience. 🚀
For More: eCommerce UX Checklist
14. Product Setup
After customizing your theme, the next key step is adding and organizing your products to your Shopify store.
This set up will require you to add in product details, images, and well-structured categories that help customers easily find what they’re looking for. Here, I’ve added a step by step process on how you can set up products.
Step 1 – Go to Products > Add Product in your Shopify admin panel.
Step 2 – Fill in key details like the product name, description, price, SKU, and inventory levels. Write compelling descriptions that highlight product features, benefits, and unique selling points.
Step 3 – Use high-resolution images that showcase your products from multiple angles.
Step 4 – Optimize images for fast loading without compromising quality.
Step 5 – Create collections (categories) such as “New Arrivals” or “Best Sellers” to group similar products together.
Step 6 – Add tags to products to improve search functionality and help customers filter options.
Step 7 – Configure these options under the Variants section if your products come in multiple sizes, colors, or other variations.
Step 8 – Ensure accurate pricing and inventory tracking for each variant.
Step 9 – Optimize product pages by writing meta titles and descriptions with relevant keywords.
Step 10 – Use descriptive alt text for images to improve search engine visibility.
Step 11 – Add a review app to your store to allow customers to share feedback.
Step 12 – Following these steps will ensure your products are organized professionally, making them easier for customers to explore, choose, and buy. Moreover, make sure to set up inventory levels to track stock in case of overselling.
Following these steps will help keep your products organized and easily discoverable, ensuring a professional, user-friendly store setup.
Also, make sure to track inventory levels to avoid overselling.
15. Payment Gateways
Once you set up products and categories on your new Shopify store, the next step is about integrating payment gateways.
Here, you add trustworthy payment solutions to create a smooth and reliable checkout experience. The payment methods you choose can impact both your ability to receive payments and the customer’s trust in your store.
Below, I’ve added a process on how you set up payment gateways for your new Shopify store.
Step 1 – Go to Settings > Payments in your Shopify admin panel.
Step 2 – Choose from various payment gateways like Shopify Payments, PayPal, Stripe, and others based on your location and business needs.
Step 3 – Enable multiple payment methods, including credit/debit cards, digital wallets, and alternative options like UPI or Buy Now, Pay Later (BNPL) services to reach a wider audience.
In addition to selecting a trustworthy payment gateway, it’s important to secure your checkout process.
For that, you can use fraud prevention tools offered by Shopify Payments or third-party gateways to detect and block suspicious transactions.
16. Shipping Settings
After setting up the payment area, the next step is to configure your shipping settings.
To do this, go to Settings > Shipping and Delivery in your Shopify admin panel.
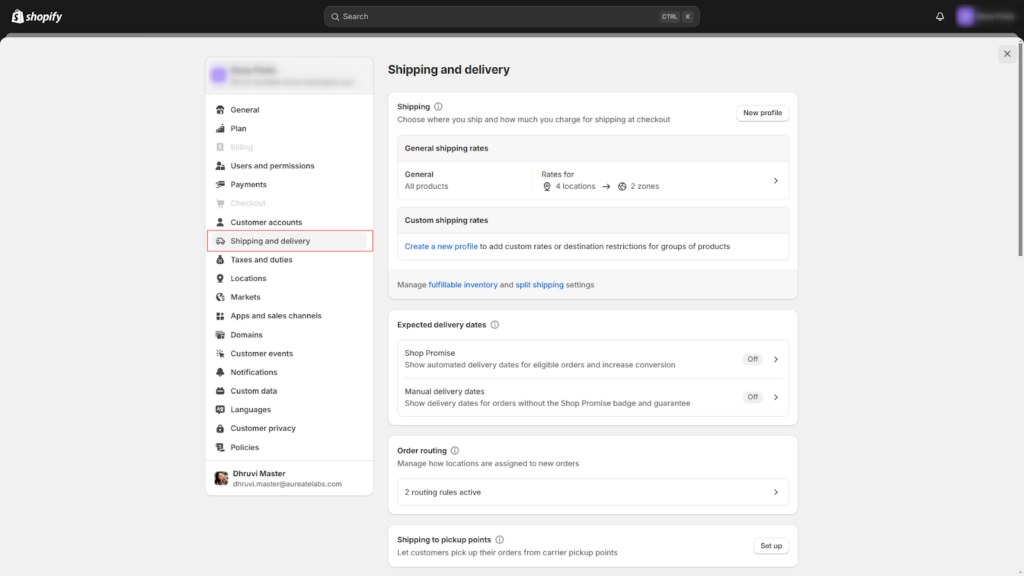
Let’s check into some details for key areas you need to define.
| No. | Tasks | What It Helps Set | Details to check through |
| 1. | Shipping Rates | Shipping charges for customers. | — Free Shipping— Flat Rates— Weight-based Rates— Destination-Based Rates |
| 2. | Shipping Zones | Regions where you ship. | — Define regions you deliver to (e.g., specific countries, states, or zip codes).— Customize shipping rates based on zones to accommodate regional costs. |
| 3. | Shipping Carriers | Delivery service providers. | — Select and integrate preferred carriers (e.g., FedEx, UPS, USPS, or local providers).— Set up real-time carrier-calculated rates. |
| 4. | Packaging Specifications | Packaging options & dimensions | — Select and integrate preferred carriers (e.g., FedEx, UPS, USPS, or local providers).— Set up real-time carrier-calculated rates. |
| 5 | Handling Fees | Additional charges for shipping | — Include fees for packaging materials, labor, or special handling services.— Ensure fees are reflected transparently in shipping costs. |
| 6. | Delivery Options | Delivery timelines & methods | — Standard Delivery (e.g., 5–7 business days).— Express Shipping (e.g., 1–3 business days).— Local Pickup or Delivery for nearby customers. |
| 7. | International Shipping | Shipping for international orders. | — Configure international zones and rates.— Account for customs duties and taxes using Shopify apps or carrier services. |
| 8. | Return Shipping Policies | Return & refund logistics | — Set up return labels or reverse logistics for easy customer returns. |
You can use all your previous shipping status here along with modifications of your preference.
17. Tax Settings
After setting up shipping part, tax and duty section will require your attention.
To configure tax settings, navigate to Settings > Taxes & Duties in your Shopify admin panel.

Here’s an idea on key areas you need to define here.
| No. | Tasks | What It Helps Set |
| 1. | Enable Tax Calculations | Ensures taxes are applied automatically. |
| 2. | Set Tax Rates By Regions | Helps apply region-specific taxes. |
| 3. | Include or Exclude Taxes | Adjusts pricing display. |
| 4. | VAT or GST Configuration | Complies with regional tax laws. |
| 5. | Collect tax on Shipping | Charges tax on shipping costs. |
| 6. | Add Tax Exemptions | Allows exemptions for specific cases. |
| 7. | Test Tax Calculations | Verifies accuracy of tax setups. |
I hope this structure offers a clear overview of the tax-related tasks, their objectives, and the steps to verify for proper configuration.
18. Domain Transfer & Setup
A very crucial step, the transfer of the domain to your Shopify store and set up settings for you to follow.
This step will ensure the continuity for your customers and preserve your online brand’s identity over internet. When you connect or transfer your current domain to Shopify, your store will remain accessible through the same trusted web address.
The only difference it makes is that now Shopify will be your hosting provider.
Getting in details, it’s necessary for you to know of domain management options provided by Shopify. Here we go.
Domain Management Options With Shopify:
- Connect Your Existing Domain — Keep your domain with the current registrar and link it to Shopify by updating DNS settings.
- Transfer Your Domain — Move your domain registration from your current registrar to Shopify for centralized management.
- Purchase a New Domain — Buy a brand-new domain directly from Shopify if you want to start fresh or rebrand.
Also, let’s look in to the domain transfer process from your current PrestaShop store to Shopify.
Transferring Domain from PrestaShop to Shopify:
Here’s a basic idea of how you transfer your domain:
Step 1: Log into your domain registrar and unlock it for transfer.
Step 2: Request the Obtain the Authorization Code (EPP Code) to verify ownership and start the transfer.
Step 3: Now, to transfer it in Shopify, go to Settings > Domains > Transfer Domain in your Shopify admin panel, enter your domain, and follow the instructions.
Step 4: If keeping your domain with the current registrar, update the A and CNAME records to point to Shopify.
Step 5: Follow Shopify’s verification steps. It may take up to 48 hours for changes to take effect.
Step 6: In Shopify, set your transferred or connected domain as the primary one under Settings > Domains.
& that’s all.
Information to consider: Transfer of domain to Shopify is optional. It’s not necessary to entirely move your domain to Shopify and instead you can connect your domain to the Shopify store by simply updating the A records.
Here’s your guide to do so — Connecting a third-party domain to Shopify
When you connect or transfer your domain to Shopify, the platform automatically activates SSL. However, it may take up to 48 hours for the SSL certificate to be fully issued and propagated across the web.
You can verify that SSL is enabled by checking the Domains section in your Shopify admin.
Once activated, your site URL will display as https://, ensuring a secure shopping experience for your customers.
Download the Migration Checklist
# Setting Up Marketing Channels & Analytics — PrestaShop to Shopify Migration
At this point, your new Shopify store is almost ready. This phase of migration process is to bring in your marketing efforts from the previous store. Let’s check on what needs to be done here.
19. Analytics Tools Integration
First thing you do is, reconnect or integrate your analytics tools to monitor your store’s performance.
Without proper analytics, understanding customer behavior, evaluating performance, and making data-driven decisions becomes challenging. So, let’s explore what needs to be integrated.
(1) Google Analytics:
Make sure your Google Analytics account is linkedin with your new Shopify store.
The integration will help you track website traffic, user behavior, and conversion rates, which provides insights into how visitors interact with your store, which pages perform best, and where improvements are needed.
For integration, in Shopify admin, go to Settings > Customer Events and connect Google Analytics 4 (GA4) using your measurement ID.
This will allow you access to its advanced tracking features, like event-based data collection, cross-platform tracking, sales funnels, and more that help optimize your marketing strategies.
Lastly, remember to enable Enhanced E-commerce in GA to gain deeper insights into product performance, user behavior, and conversion rates. Shopify natively supports this feature with GA4.
(2) Facebook Pixel:
Next in process, install a Facebook Pixel on your new Shopify store.
When you’ve installed Facebook pixel, which is a tracking pixel, it helps you run ads through Meta. Allowing you to track visitor interactions, optimize ad performance, and retarget potential customers.
A Quick Guide — Installing Facebook Pixel on Shopify
Here’s a glimpse into the installation process for Facebook Pixel:
Step 1: Create Facebook Pixel
- In Facebook Events Manager, go to Pixels > Create a Pixel and name it.
- Copy the Pixel ID.
Step 2: Add Pixel to Shopify
- In Shopify, navigate to Online Store > Preferences.
- Paste the Pixel ID in the Facebook Pixel field and Save.
Step 3: Verify Pixel
- Use the Facebook Pixel Helper Chrome extension to check if the Pixel is active.
- Confirm data tracking in Facebook Events Manager.
Step 4: Set Up Events (Optional)
- Enable Enhanced Ecommerce in Shopify under Preferences.
- Optionally, configure custom events (e.g., Add to Cart, Purchase) in Facebook Events Manager.
- Verify events with the Pixel Helper or in the Events Manager.
Following these steps will ensure your Facebook Pixel is properly set up to track user interactions and optimize your ad campaigns.
Additionally, make sure to reconfigure your Shopify feed URL in tools like Google Merchant Center, advertising platforms, and Google Search Console.
20. Connect Marketing Platforms & Apps
As you transition from PrestaShop to Shopify, it’s essential to reconnect your existing marketing platforms and explore new integrations to maintain seamless operations. These tools help automate campaigns, enhance customer engagement, and optimize ad performance.
Below is a breakdown of key areas that need your attention:
| Aspect | Details |
| Email Marketing Platforms | Integrate tools like Klaviyo, Mailchimp, or Shopify Email for abandoned cart recovery, newsletters, and customer retention. Sync your Shopify customer database for personalized campaigns. |
| SMS Marketing Tools | Connect SMS marketing apps to send alerts for abandoned carts, order confirmations, and promotions, ensuring real-time engagement. |
| Loyalty & Reward Programs | Install loyalty apps to reward customers with points, discounts, and exclusive perks, encouraging repeat purchases. |
| Ad Platforms Integration | — Google Ads: Link your account to track ad performance and run retargeting campaigns.— Facebook/Instagram Ads: Connect ad accounts and leverage Facebook Pixel data for targeted advertising. |
Ensure all integrations are set up correctly to maintain smooth marketing operations. If needed, consult a Shopify expert for assistance.
Download the Migration Checklist
# Preserving SEO — PrestaShop to Shopify Migration
Every store owner want to bring their hard earned search engine rankings to the new platform that move to. And you also want the same.
& in this stage, we’ll disucss on how you can bring all your well-worked SEO elements from your PrestaShop store to Shopify. Let’s discuss what you need to work on for it.
21. Set Up URL Redirects
When migrating from one platform to another there are chances for URL structures to change as most platforms use different structures.
This can result in broken links and lost traffic, AKA bad impression on Google for SEO.
- PrestaShop typically uses a structure like:
example.com/category-name (or example.com/category/category-id-category-name) - Shopify uses its own structure, such as:
example.com/collections/category-name.
This difference means that your old PrestaShop URLS may not align with the structure used by Shopify. Hence, you need to set up 301 URL redirects for every old URL corresponding new Shopify URL.
For this, you can either use Shopify’s built-in URL redirect manager or apps from the Shopify App Store which helps with bulk redirects.
If you choose to get ahead with using a third-party app, make sure to recheck all critical pages (home, product, category, blog), if they’re working through redirects.
22. Additional SEO Settings and Configurations
Okay, once you set up 301 redirects for most differing URLs, it’s time you review and perform additional settings to further preserve your SEO. Here are 10 things to keep in mind for that.
- Ensure every product, category, and page has unique meta titles and descriptions, incorporating relevant keywords.
- Review alt tags for all images to enhance accessibility and improve image search rankings.
- Double-check that titles, descriptions, prices, and stock information are accurate and consistent throughout your store.
- Verify that all internal links, including those in the navigation menu and footer, are functional.
- Identify and fix any broken links or incorrect redirects to ensure a seamless browsing experience.
- Confirm that the correct canonical tags are in place to avoid duplicate content issues.
- Ensure proper implementation and testing of all 301 redirects to prevent errors.
- Reconnect your store to Google Search Console to improve site indexing and performance monitoring.
- Submit your updated sitemap to Google Search Console to speed up the indexing process.
- Regularly check for crawl issues, missing pages, or duplicate content, and resolve them promptly.
By taking care of these SEO essentials, you can preserve your existing SEO efforts and even improve them to keep your new Shopify store highly visible on search engine results.
Download the Migration Checklist
# New Shopify Store Testing — PrestaShop to Shopify Migration
You’ve finally built and set up your new Shopify store. And now is the time to test if everything is in place and is working properly.
This stage of the migration process ensures that all the hard work you’ve performed, results in a fully functional, user-friendly, and optimized online store. Let’s check on the areas you work on.
23. Perform Quality Assurance (QA)
The quality assurance process involves a thorough review of your store to catch and fix any issues before you take it live.
There are multiple areas that you need to verify, which I’ve outlined here.
- Content Accuracy — Ensure that product details, descriptions, images, pricing, and inventory levels match the information from your original PrestaShop store.
- Functionality Testing — Verify that all features, including navigation menus, filters, search bars, and interactive elements like product carousels, are working correctly.
- Page Load Speed — Test your site’s loading times to provide a smooth experience. Slow load times can increase bounce rates.
- SEO Elements — Double-check meta tags, alt text for images, and ensure proper indexing for search engines.
- Link Validation — Test both internal and external links to ensure there are no broken or misdirected URLs.
24. Review Mobile Responsiveness
Next you need to prioritize its performance on mobile devices as large portion on online shopping belong there.
Make sure to check on following areas:
- Check how your store appears and functions on various devices, including smartphones and tablets with different screen sizes.
- Ensure touch elements like buttons, links, and sliders are user-friendly and easy to interact with on mobile devices.
- Verify that images, text, and layouts adjust seamlessly across all screen sizes.
- Test the entire checkout flow on mobile, ensuring it’s quick and hassle-free for users.
Thoroughly test your new Shopify store to ensure its quality and responsiveness. This will help guarantee an exceptional shopping experience for your customers on all devices and platforms.
Download the Migration Checklist
# Launch Preparations & Launch — PrestaShop to Shopify Migration
Your new store is almost ready and prepared for launch, yes. But…
Before we make it live for an audience, some launch preparations are necessary. Let’s get into your task list for this stage.
25. Enable Password Protection
For testing purposes if you want to make your store live but are still unsure to let the public access it, enable password protection.
Why Enable Password Protection?
- Keep the store hidden until all necessary tests are finished.
- Prevent customers from encountering an incomplete store.
- Allow team members or beta testers to access the store for feedback.
How to Enable Password Protection:
- Go to Online Store > Preferences in Shopify.
- Activate the Password Protection option and set a password for access.
- Share this password with key stakeholders for final reviews.
26. Push That Launch Button 🚀
After all the hard work of setting up and migrating to Shopify, it’s time to officially launch your new store. 😀
Next, you need to perform delta/partial migration for newly added records (e.g. customers, orders, etc.). Once that’s done, remove any password protection from your store and let your shoppers visit your newly created store.
Download the Migration Checklist
# Post-Migration Tasks — PrestaShop to Shopify Migration
Here are some key post-migration tasks to ensure everything runs smoothly. Let’s go through them.
27. Disable PrestaShop Store
It was fine to make your Shopify store live, but…
Before you pop the confetti in front of your audience, make sure to disable your old PrestaShop store.
When both of your stores are live, it can confuse the audience, leading to duplicate orders, inventory issues, and a perfect mess which makes it hard to explain audience and affected customers.
28. Announce Your New Store
Once your Shopify store is live and the PrestaShop store is disabled, it’s time to inform your audience about the transition.
This announcement will help generate excitement and guide customers to your new store, ensuring a seamless shift in traffic.
Announcement Tips:
- Build Anticipation: Share sneak peeks and countdowns on social media.
- Offer Incentives: Provide limited-time discounts or free shipping to encourage purchases.
- Customer-Centric Messaging: Highlight improvements in the shopping experience with the new store.
- Launch Announcements: Announce the launch via email and social media with engaging visuals.
- Reassure Customers: Let customers know their accounts and orders have been safely transferred.
- Follow-Up Email: Thank customers for their support and ask for feedback.
- Password Reset: Notify customers to reset their passwords and reactivate their accounts on the new platform.
29. Monitor Performance
Well, the work continues even after you launch your Shopify store successfully.
Once it’s live and customers start visiting, so, it’s necessary for you to monitor performance and address any issues that may arise. Make sure you track your store’s performance regularly and gather customer feedback to ensure a better shopping experience with new platform.
;
And here ends out PrestaShop to Shopify migration checklist.
Why Hire Experts for a Smooth Migration from PrestaShop to Shopify?
Just as you saw in process, migration is a lengthy and complex process.
It involves several technical aspects, such as data transfer, theme customization, app integration, SEO preservation, and more. Also, choosing to migrate to a new store is your significant step towards improving your online store’s performance and scalability.
& the last thing you need is the risk factor, right?
So, the only WISE SOLUTION here is to let experts do their job.
While you may have a great team to handle the migration tasks, a little lack in execution could put your online business and reputation at risk. That’s why it’s a good idea to hire experts who are experienced in migration and can effectively handle any unexpected challenges that arise.
Also, your next destination Shopify (your new destination) surely is an easy-to-use platform, however, there are multiple areas you might need an expert. Let me point out some for you.
- Shopify and PrestaShop have different structures and themes. You(a non-technical person) might not be able to customize the look and feel in a way that an expert can.
- While Shopify offers a variety of apps, not all of them are compatible or easy to integrate. Experts know how to choose and implement the right apps based on your specific needs.
- Maintaining SEO rankings during migration can be challenging, however, experts have the experience to ensure that your rankings stay intact.
- Migration often involves downtime, bugs, and errors—professionals know how to quickly resolve these issues.
- Lastly, the migration process can be time-consuming, so it’s essential to ensure it doesn’t disrupt your store and order management. Experts can handle the heavy lifting while you focus on running your business.
In short, hiring experts for your PrestaShop to Shopify migration will help ensure a smooth & efficient transition with minimal risks, allowing you to focus on what matters most—growing your business.
PS:
We’re Aureate Labs, and we’ve expertise in seamless PrestaShop to Shopify migrations.
Our team of experts can help you migrate to Shopify. From data transfer to SEO preservation, we can ensure your store transitions smoothly and efficiently. With our years of expertise, you can focus on growing your business while we manage the technical details.
Let us help you make the move to Shopify hassle-free. 😀

")


Post a Comment
Got a question? Have a feedback? Please feel free to leave your ideas, opinions, and questions in the comments section of our post! ❤️