Turn Your Shopify Store into a High-Performance Mobile App — No Coding Required
![How to Create a Mobile App from Shopify Store [No Coding] How to Create a Mobile App from Shopify Store [No Coding]](https://aureatelabs.com/wp-content/uploads/2024/11/How-to-Create-a-Mobile-App-from-Shopify-Store-No-Coding.jpg)
Now, why would you want to do this? Well, the answer is simple: brands with apps see much higher sales and revenue.
Apps dramatically boost customer engagement, foster loyalty, and drive repeat business. When customers download your app, they’re committing—they’re telling you they want more of your brand.
With an app, they’ll spend more time browsing, engaging, and ultimately, buying from you. Unlike a website, your app is right there on their phone, available 24/7.
A popular solution to make this happen is Appbrew. This tool allows you to create apps for both iOS and Android shoppers, without requiring any coding experience. In this blog, you’ll learn more about this app and how easy it is to set up.
So, let’s get started!
Why Appbrew?
Appbrew is a Shopify-approved app, that helps you to build a stunning and functional iOS & Android mobile app in clicks. It has an impressive 5-star rating which speaks about its effectiveness.
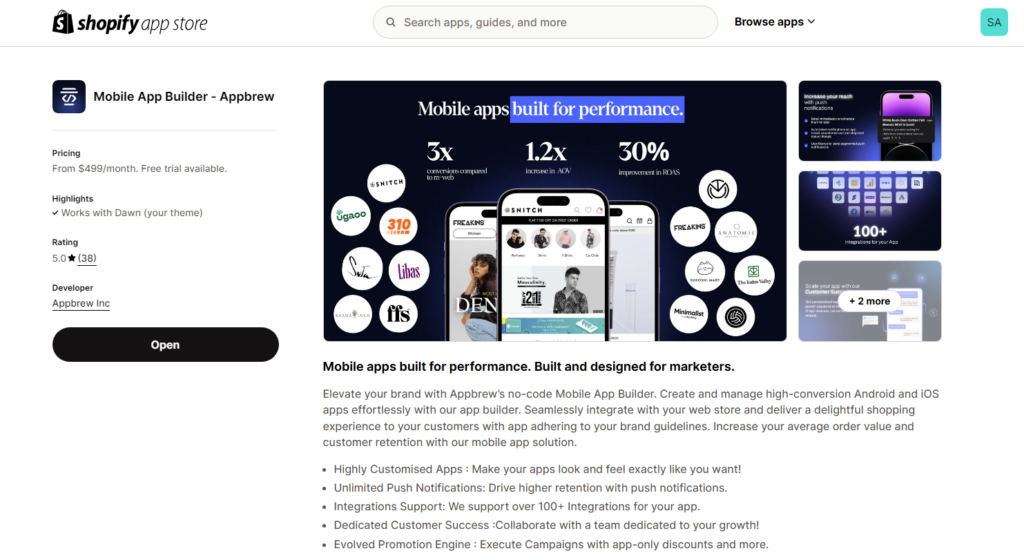
Appbrew offers a drag-and-drop interface to customize your app and submit it directly to the iOS App Store and Google Play Store.
Shopify doesn’t have a built-in method for turning your store into an app. So, unless you’re prepared to hire expensive developers, Appbrew is the solution we highly recommend. It’s easy to use and cost-effective, and it makes launching your app smooth and hassle-free.
By using Appbrew, you’ll be able to:
- Increase sales and retention
- Reduce ad spend
- Boost customer loyalty
- Keep customers engaged longer through their mobile devices
Creating an app with Appbrew is quick and straightforward. You can have your app ready in around a week. There’s no coding involved, and everything you need is at your fingertips. You can fully customize your app’s design, from color schemes to product layout, ensuring it matches your brand perfectly.
Key Features of Appbrew
- No coding required: Use their intuitive drag-and-drop editor to build your app.
- Developer account access: Appbrew handles the app submission process to the App Store and Google Play.
- High-converting themes: Choose from multiple templates created previously for different events that automatically sync with your Shopify store’s product data.
- Built-in checkout options: Offer multiple payment methods like Apple Pay, Google Pay, debit/credit cards, etc.
- Unlimited push notifications: Stay in touch with your customers through personalized notifications.
- QR code integration: Make it easy for customers to download your app and re-engage with your brand.
- Real-time analytics: Track sales, user engagement, and trends so you can make data-driven decisions to grow your business.
And, the best part—100+ integration options make Appbrew combine seamlessly not only with your existing Shopify store but also with any third-party apps you’re already using.
How to Convert your Shopify store to a Mobile app?
Ready to turn your online store into a mobile app?? Now we will see the complete process and as an Appbrew partner, we’re here to ensure this process is as smooth as possible.
Step 1: Pick the Right Mobile App Builder
First things first, you need a tool that simplifies the process. That’s where choosing the right Shopify mobile app builder comes in. The right app builder can save you a ton of time, money, and unnecessary hassles.
But how do you know if you’ve picked the right one? Look for these features:
- Choose a native app solution rather than a Web View app.
- The builder should offer a simple, drag-and-drop interface so you can focus on what matters—your brand.
- Your app should reflect your store’s personality. Look for options to match colors, fonts, and layouts to your brand.
- It’s a must that your app syncs seamlessly with your Shopify store—keeping products, inventory, and customer details always up-to-date.
- It should allow you to send a quick reminder of exclusive deals, reminders, or updates straight to your customers’ phones.
- Make sure your app builder supports both platforms—Android and iOS.
- Tools to track how your app performs and what your customers love.
This is exactly why Appbrew is perfect for building a professional-grade app. It ticks every box while keeping things simple and smooth.
Step 2: Add Appbrew to Your Shopify Store
Once you’ve decided on Appbrew (trust us, you’ll love it), it’s time to get started.
Simply visit the Appbrew app page and click the “Install” button. It will redirect you to your Shopify store, where you can authorize Appbrew to install and begin the setup process.
Once you’re inside the Appbrew app, you’ll be able to:
- Design your app with their drag-and-drop editor
- Track analytics to measure app performance
- Add App-specific discounts for your mobile shoppers
- Set up push notifications to keep customers engaged
- Integrate with third-party tools to expand your store’s functionality
And much more… It’s all easy to navigate, and here we’ll show you how it works.
Here’s what you can see once you enter the Appbrew app:
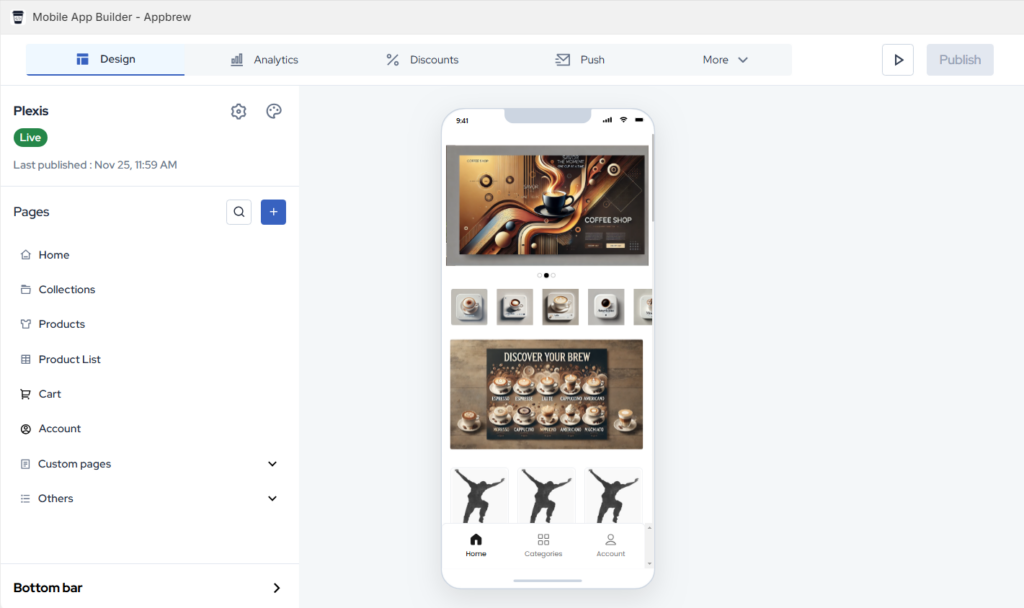
Appbrew’s dashboard is super user-friendly. Spend a few minutes exploring it, and you’ll feel right at home.
Step 3: Design an App That Feels Like You
Now comes the exciting part—designing your app! This is your chance to create something that feels like an extension of your Shopify store but optimized for a mobile experience.
One of the best features of Appbrew is the drag-and-drop editor, which allows you to build your app visually, just like the Shopify online store editor.
Make sure you’re in the Design tab—This is where you’ll customize the look and feel of your app.
This will be the default theme you’re working on; you also create additional themes and use them for different events like the Black Friday sale, Women’s Day sale, etc.
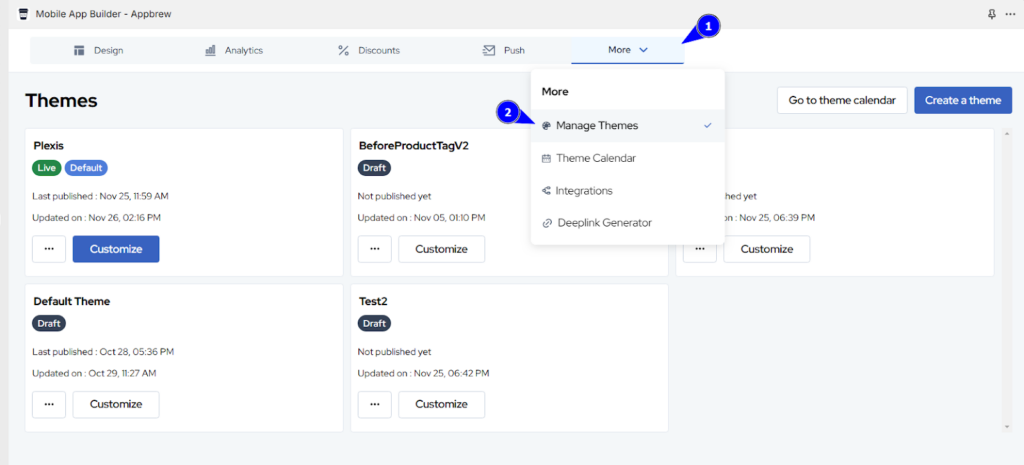
Now you can start with designing your Homepage, collection page, product page, cart page, and so on. Click on the page and you can find the option to add components (blocks) to the page layout, move them, or customize them to fit your style.
Whether it’s a search bar, a carousel, or a testimonial section, the editor lets you mix and match elements effortlessly. You can also add videos by simply copying and pasting a YouTube link and tweaking settings like background color and vertical padding control.
You can also add new custom pages if the layout is not already available in the editor like an “About Us” page or a “Contact Us” page.
Make sure to save the changes and publish the theme once the design part is done!
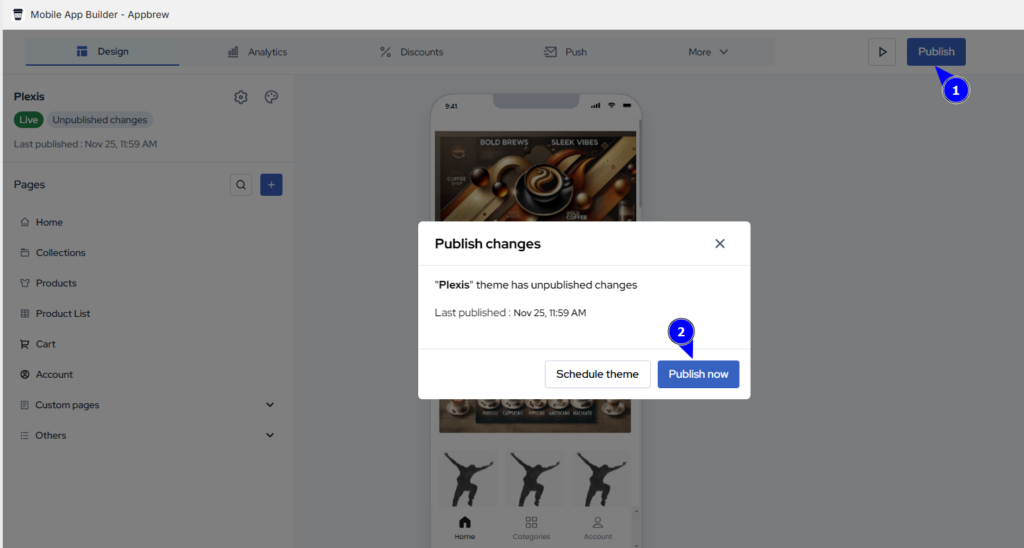
This way, you can simply design your mobile app and be ready to move to the next step.
Step 4: Create App-specific Discounts
Offering exclusive app-specific discounts is a fantastic way to drive traffic to your mobile app and reward loyal users. When customers know they can snag a special discount by shopping through your app, they’ll preferably make the switch.
Here’s how to create app-specific discounts in Appbrew:
- Head to the Discount section in Appbrew. This is where you’ll create and manage exclusive offers for your app users.
- Click on the “Create new discount” or just select the type of discount you wish to offer.
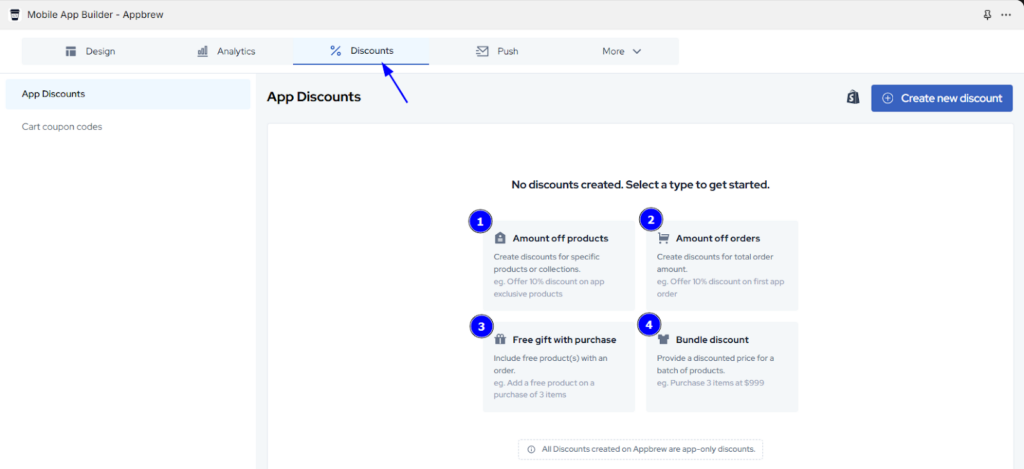
- Now, fill in the details that are required to create the discount like name, discount value, minimum order value, etc. based on the discount type you’ve selected.
- Finally, click on the “Create Discount” button.
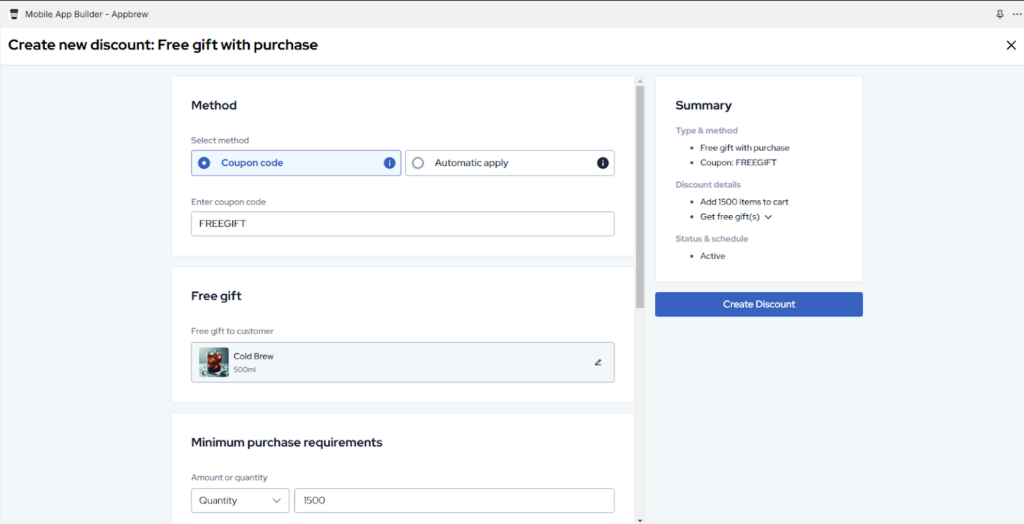
That’s it!
Appbrew allows you to set up automatic discounts, so users don’t need to enter a code. This way you can create as many discounts as you want and activate them at the right time.
Step 5: Add Push Notifications for App Users
Now that your app is designed and ready to impress, it’s time to take customer engagement to the next level. Push notifications are one of the most effective tools for keeping your app users informed, engaged, and excited about your store.
With Appbrew, setting up personalized push notifications is super easy. Open the Push section.
Here, you can create and send both manual and automated messages to keep customers coming back. For example, you can automatically push notifications to users who abandon their cart or haven’t interacted with your app in a while.
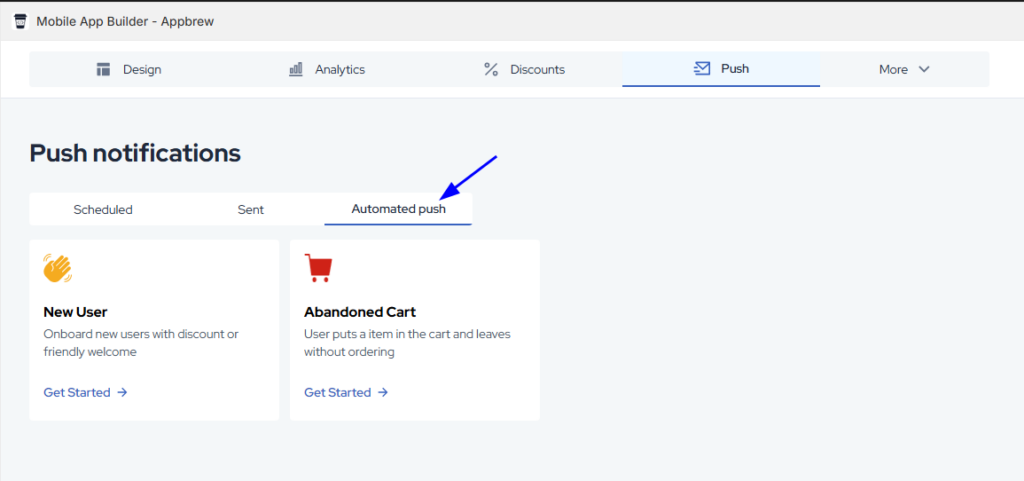
Simply click on the “Create push notification” button and add details related to your message and time. Yes, you can also see how will look as a notification in the live preview section (given below).
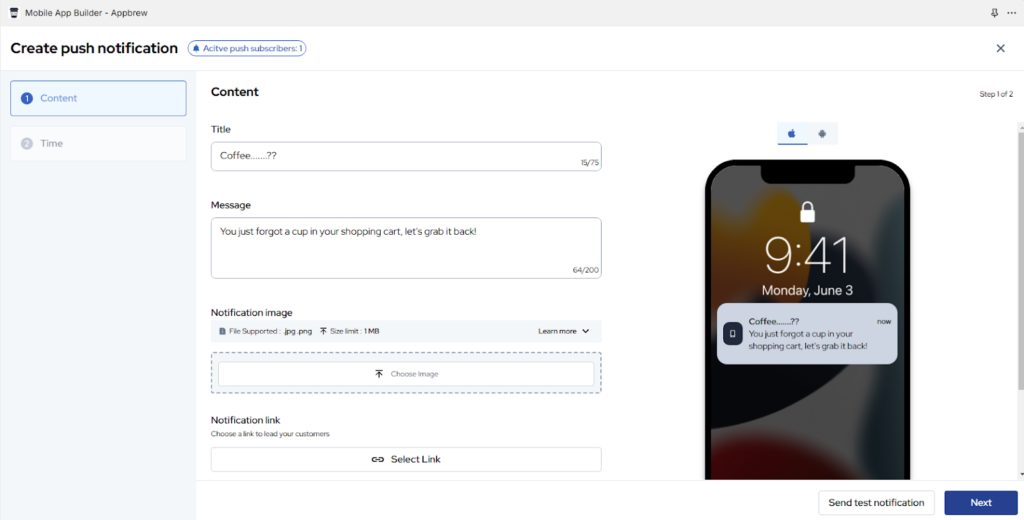
Once done with the details, you can also test the notification on your own device.
This way, you can create multiple notifications for different uses.
Step 6: Publish Your App on iOS and Android
Once your app looks and feels perfect, it’s time to make it live! Publishing your app might sound complicated, but Appbrew makes it surprisingly simple.
Here’s what you need to know:
1. Set Up Developer Accounts
First things first—you’ll need developer accounts to publish your app on iOS and Android platforms.
- Apple Developer Account: This is a yearly subscription that costs $99. It’s required to publish on the Apple App Store. You can set it up here.
- Google Play Console: For Android, the setup is simpler and more budget-friendly. It’s a one-time fee of $25 to register your account. Start the process here.
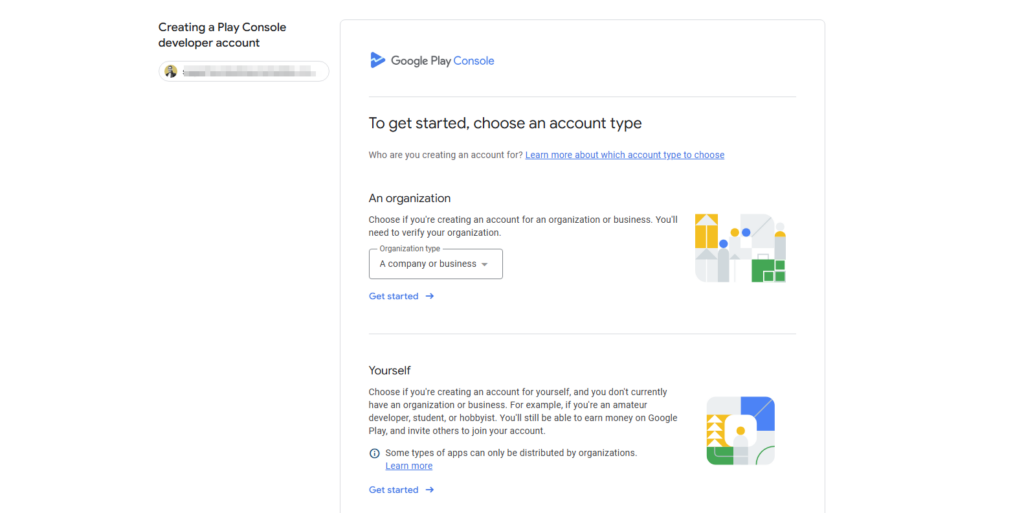
💡 Tip: Make sure the email address you use for these accounts is linked to your business to keep things professional and organized.
Each platform—Apple and Google, has its own rules, and while they can seem a bit strict, these guidelines ensure apps are high quality and secure for users.
Appbrew will walk you through everything you need, including:
- Optimizing your app’s design and functionality to meet platform standards.
- Preparing app assets, including the app icon, screenshots, and a compelling description for the store pages.
- Crafting a user-friendly privacy policy to stay compliant with Apple and Google policies.
So, you’re never left wondering “what’s next”—Appbrew provides all the guidance you need.
2. Share Access with Appbrew
To simplify the technical aspects, you might need to share developer account access with Appbrew.
For Google Play, grant Appbrew the necessary permissions in your Play Console.
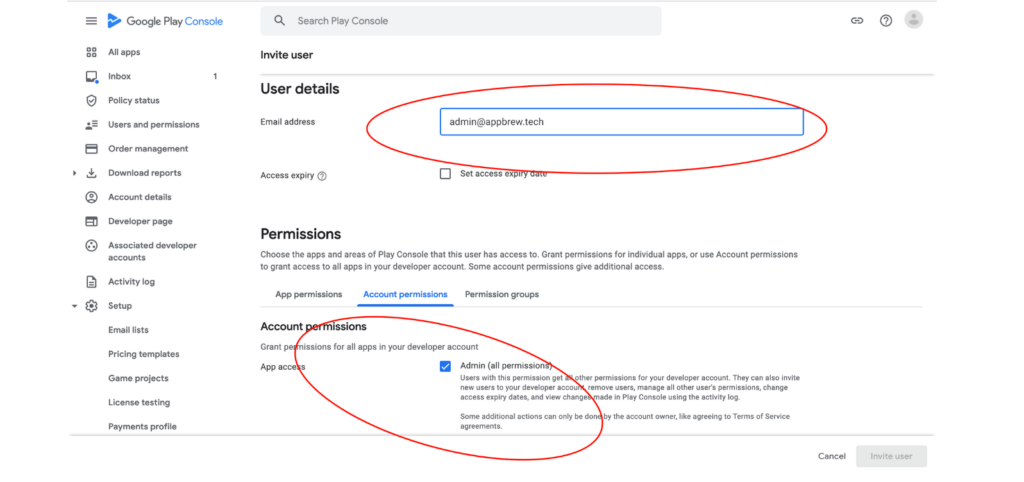
Now, for Apple Developer, provide Appbrew with access to help coordinate the submission process. This collaboration lets you focus on your business while Appbrew handles the technical details.
3. Submit Your App for Review
You’re almost there! Once your developer accounts are ready and your app checks all the boxes for platform guidelines, it’s time for the big moment—submitting your app for review.
Before submitting, make sure your app follows all the guidelines for both platforms. From content policies to design standards, both stores have specific requirements. (Don’t worry—Appbrew will guide you through this process to ensure your app is good to go!)
After submission, you’ll need a little patience. Reviewing the apps may take 3-5 days or longer.
Once your app passes the review stage, it will officially go live! Customers will be able to download it from the App Store and Google Play Store.
BONUS: How to Promote Your New Mobile App?
Building your app is just the first step—now it’s time to let your customers know it exists!
Here are a few tried-and-true strategies to promote your app:
1—Add Website Banners
Your website is the perfect place to announce your new mobile app, as it’s where most of your customers already interact with your brand.
You can add bright, attention-grabbing banners or pop-ups that highlight the app’s benefits. For example, a banner that says, “Exclusive Deals Only on Our App—Download now and Save more!” immediately lets customers know the benefits of the app and gives them a reason to download it.
To make it easy for visitors to take action, you can place the banner on key pages like your homepage, product pages, or checkout page. These are high-traffic areas where you have a good chance of converting website visitors into app users.
2—Email Your Customers
Your mailing list is one of your most valuable tools. These are people who already love your brand, so tell them about the perks of downloading your app.
You can send an email to your subscribers introducing your app and explaining why they’ll love it. Highlight special perks such as app-exclusive discounts, a faster checkout process, or early access to sales—things that make using the app a no-brainer. To make it as easy as possible for your customers, include direct download links for both iOS and Android.
This way, they can quickly install the app and start enjoying its benefits right away.
3—Get Social with It
Social media is a powerful tool for creating excitement about your app and getting the word out to a wider audience. Posting engaging content like short videos or stories can help dynamically showcase your app’s features.
You can highlight how easy it is to shop, show off exclusive offers only available through the app, or share sneak peeks of upcoming sales. To make it even more exciting, consider running a giveaway. Encourage users to download the app, tag friends, or share a post for a chance to win a gift card or an exclusive product.
4—Optimize Your App Store Listings
To make your app stand out and be easy to find, you should focus on optimizing its listings on the App Store and Google Play. For that, you need to add an engaging app description that includes relevant keywords your customers are likely to search for. This makes it easier for your app to show up in search results.
Visuals also play a big role here. Add high-quality screenshots that show off your app’s sleek design and user-friendly features, like browsing collections or quick payments. If possible, include a short video that gives a quick tour of your app.
Promoting your app may take a little time, but the results are worth it. As downloads grow and customers start using the app, you’ll see the difference it makes in engagement and sales.
Create your Mobile App Now!
Transforming your Shopify store into a mobile app with Appbrew is one of the smartest moves you can make to grow your business. It’s simple, cost-effective, and highly rewarding. You don’t need to be a tech expert or hire an expensive development team.
If you’re wondering how to start, think of your app as an extension of your e-commerce store. Focus on what makes your brand unique, and let the app reflect that. From customizable designs to seamless integrations, Appbrew offers everything you need to bring your app to life without the headaches of traditional app development.
If you’re wondering how to build your mobile app successfully, we’re here to take all the headaches. As an Appbrew partner, we help Shopify merchants like you seamlessly integrate Appbrew and add a sales channel to your business.


Post a Comment
Got a question? Have a feedback? Please feel free to leave your ideas, opinions, and questions in the comments section of our post! ❤️