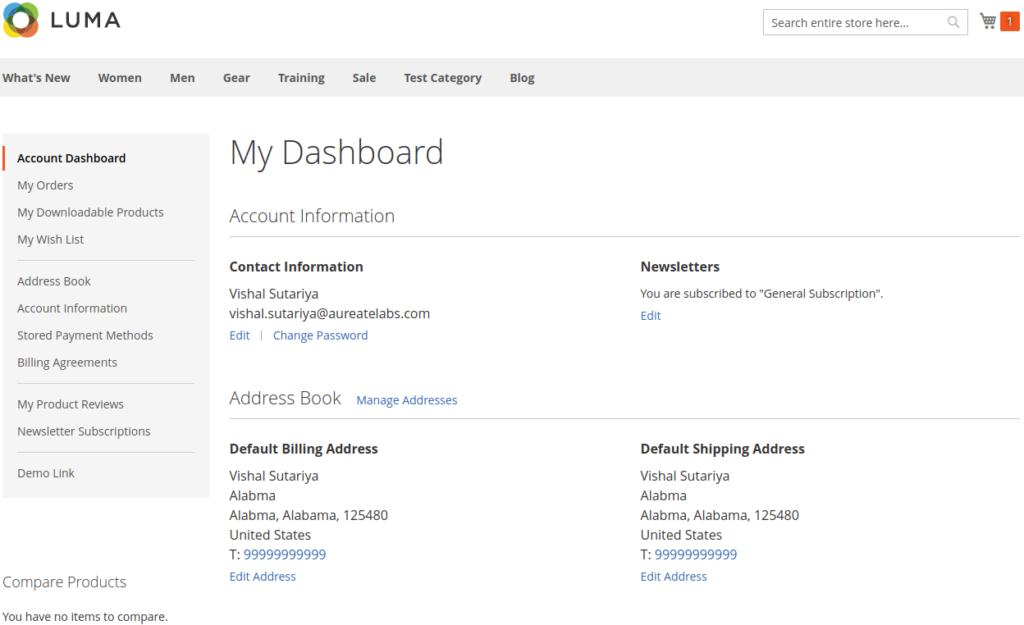
Today you will be learning about how to add a link in your account navigation.
First of all, you need to create customer_account.xml file in your theme or module. The path of this file is given below.
If you want to add a link in your module, then the path should be app/code/<VendorName>/<ModuleName>/view/frontend/layout/customer_account.xml
If you want to add a link in your theme, then the path should be app/design/<VendorName>/<ThemeName>/Magento_Customer/layout/customer_account.xml
Now, we need to create customer_account.xml at the respective paths given above. Add the following code in the file just created.
<?xml version="1.0"?>
<page xmlns:xsi="http://www.w3.org/2001/XMLSchema-instance" xsi:noNamespaceSchemaLocation="urn:magento:framework:View/Layout/etc/page_configuration.xsd">
  <body>
      <referenceBlock name="customer_account_navigation">
          <block class="Magento\Customer\Block\Account\Delimiter" name="customer-account-navigation-delimiter-demo" template="Magento_Customer::account/navigation-delimiter.phtml" before="customer-account-navigation-demo-link" />
          <block class="Magento\Framework\View\Element\Html\Link\Current" name="customer-account-navigation-demo-link">
              <arguments>
                  <argument name="label" xsi:type="string">Demo Link</argument>
                  <argument name="path" xsi:type="string">module/controller/action</argument>
              </arguments>
          </block>
      </referenceBlock>
  </body>
</page>
In the above example we have used delimiter block (name with “customer-account-navigation-delimiter-demo”) to add a separator. In case you don’t want the separator, remove that block.
The result will same as the below image.

I hope you found this article valuable. Please leave any comments below and contact us for support in customizing or developing your Magento store.
Helpful resources:


Post a Comment
Got a question? Have a feedback? Please feel free to leave your ideas, opinions, and questions in the comments section of our post! ❤️