ClickFunnels and Shopify: Comparison and 3-Steps Integration

When it’s about building an eCommerce website, you won’t find a better platform than Shopify. However, you may often struggle to convert visitors into sales if you are not using any sales or marketing tools in your Shopify store. Therefore you need a magic tool that takes care of your eCommerce sales funnel. ClickFunnels and Shopify – can be the right combination for your online business.
If you’re a Shopify store owner and want more sales, then connecting ClickFunnels could be the first step in making those dreams come true.
In this article, you will walk through the detailed ClickFunnels Shopify integration process. To make the process easier, we’ve put together helpful screenshots that show exactly how you can do this in just a few steps.
Let’s begin the read…
What is ClickFunnels?
ClickFunnels is a funnel automation tool that helps you turn your brilliant ideas into actionable sales funnels. It includes a number of marketing tools and features to help you build your own funnels and email marketing campaigns to grow your online business.
ClickFunnels is a tool that marketers and online store owners can use to turn one-time visitors into customers by replacing the basic web page of your existing website with a high-converting sales page.
From creating sales pages to automating marketing funnel, emails, and more, ClickFunnels can be used to help you generate more leads and boost your sales.
ClickFunnels Vs Shopify
ClickFunnels and Shopify come with the same motive but the ways are different.
ClickFunnels > Sales funnel
ClickFunnels focuses on creating custom landing pages with exclusive offers and marketing funnels for your business which then leads to your website or blog.
This allows you to sell anything from digital products like ebooks, membership sites, and coaching programs to physical products like books, clothing, or even services like web design services or consulting services, etc.
Shopify store > Sales Page
Shopify is a platform that helps you build an online store or an eCommerce website for selling products online. Here, the individual product page works as a Shopify sales page that helps store owners sell all types of products and services.
Difference between ClickFunnels and Shopify
- Platform: Shopify lets you create an entire eCommerce website whereas ClickFunnels helps you build sales landing pages.
- Products: Shopify lets you sell multiple products including services. Whereas ClickFunnels is best for selling single products.
- Inventory Management: You can manage your product inventory with your Shopify store but ClickFunnels doesn’t support inventory management.
- Product line: Shopify is best for selling physical products whereas ClickFunnels is best for selling digital products like eBooks, membership, etc.
While both the platforms ClickFunnels and Shopify help you fulfill the same goal, i.e. selling products or services, it doesn’t mean that you can’t use them both together.
Yes, you heard that right. Shopify store owners can connect ClickFunnels with Shopify and boost their conversion rate and Shopify sales.
Let’s see how to integrate ClickFunnels with Shopify within less than 5 minutes.
ClickFunnels and Shopify Integration Process
Here are the step-by-step instructions to help Shopify store owners integrate ClickFunnels with Shopify.
Step 1: Connecting Shopify Account to ClickFunnels
Log in to your ClickFunnels and Shopify accounts and keep them open in different tabs of your browser.
In the ClickFunnels account, go to the Account menu and open Account settings > Integration.
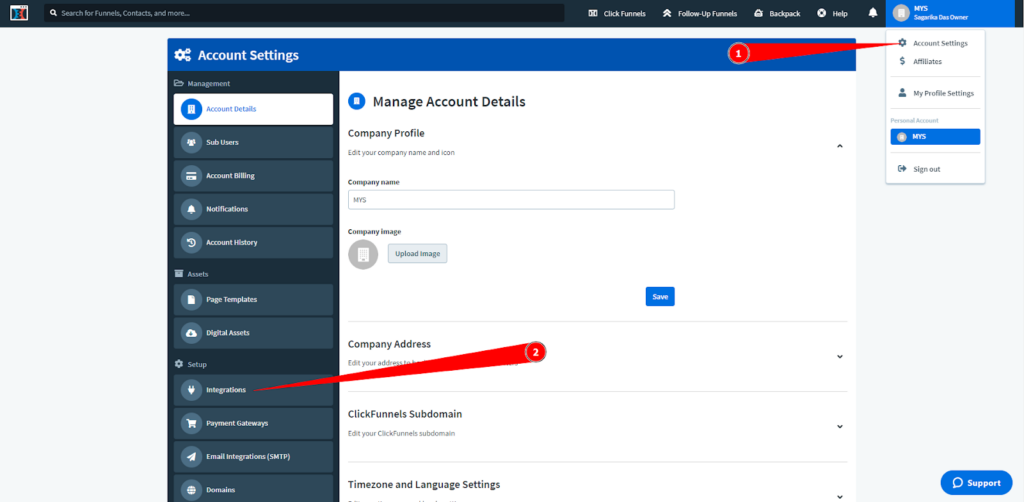
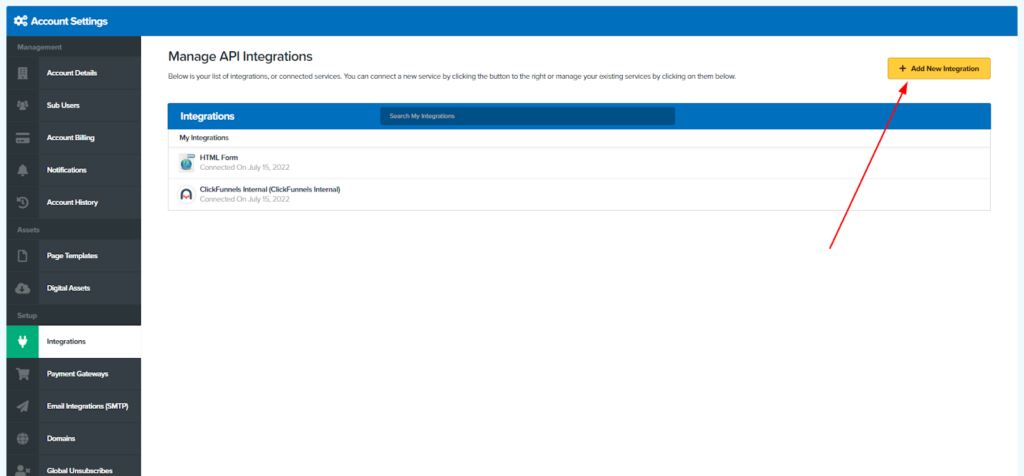
Now click on the Add New Integration button. This will show all the third-party tools that you can integrate with your ClickFunnels account.
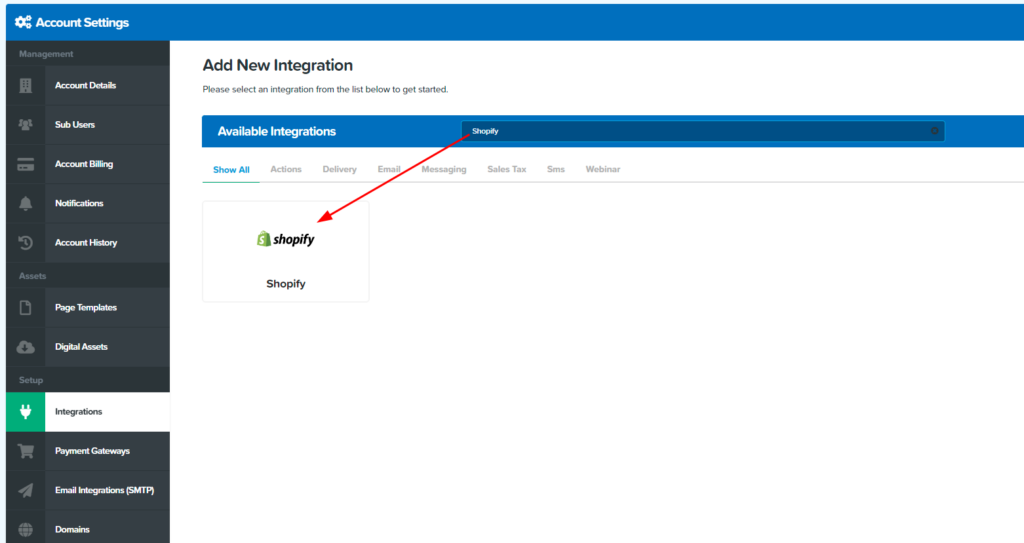
Use the Search box to find Shopify from the list and click on it.
Now, add your business name and Shopify store URL in the format “shop.myshopify.com” and click on Connect integration.
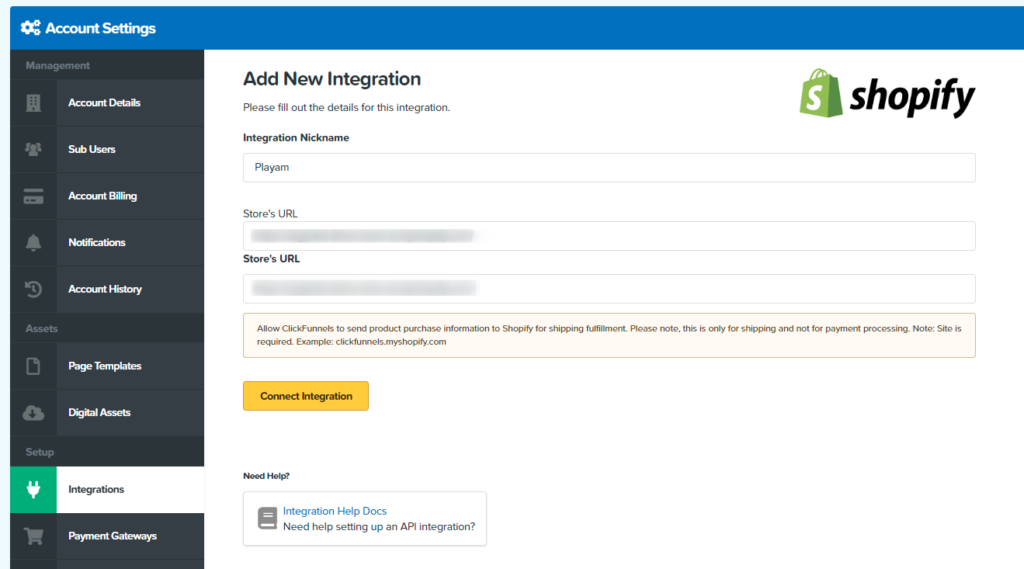
Clicking on the Connect integration button will open a new window that will help you complete the ClickFunnels Shopify integration. Click on Install unlisted app and give required permission to ClickFunnels.

After clicking on the Install unlisted app, you may see your Shopify store is added to the integration list of your ClickFunnels account.
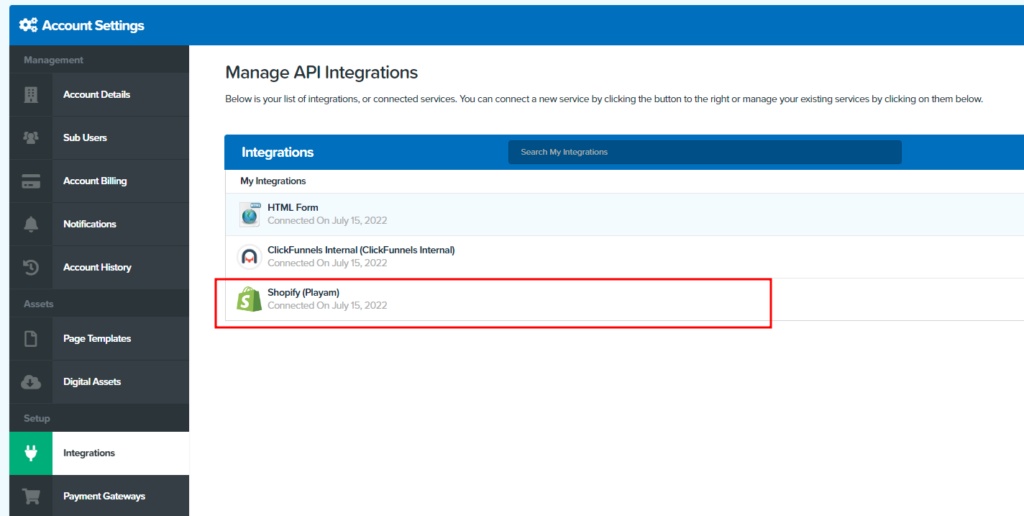
And by this, you have successfully completed the ClickFunnels Shopify integration.
So next what you need to do is “Build a new funnel”.
It’s not too hard but if you feel you need help, we are there. Our Shopify Development Service offers complete Shopify store setup and integration services to make your online store ready to rock!
Step 2: Build a New Sales funnel
Let’s start creating your first page with ClickFunnels!
For that, you can click on Build funnel from the dashboard or click on the Build a new funnel on the Funnel page.
You can close the popup and there, then you will see the cookbook where you can decide what kind of industry you are in and what kind of funnel you need.

And, here you can see the different types of sales funnels. And when you click on the sales funnels, you can read more about it.
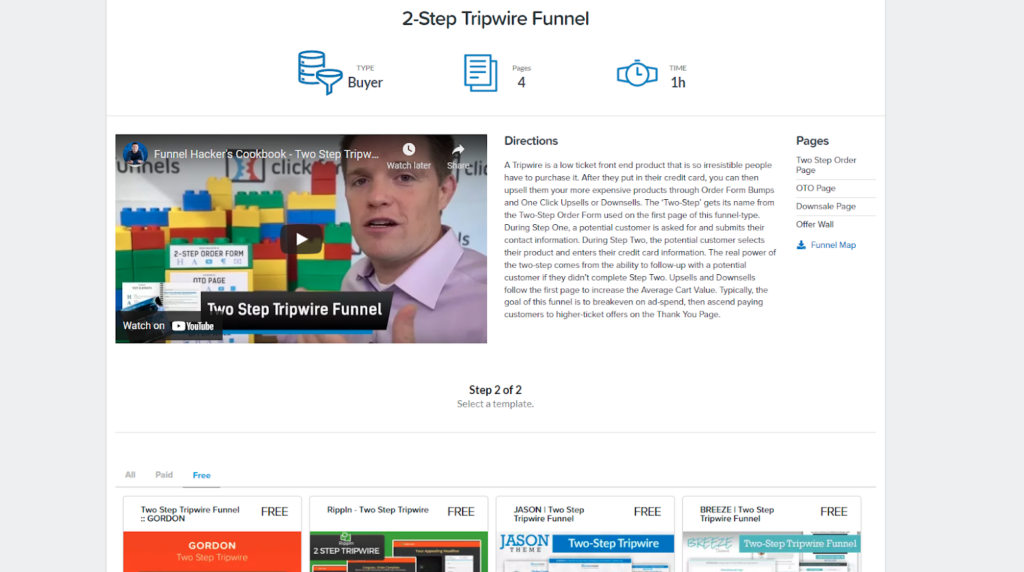
And there, you will see the different templates that you can choose for that particular type of funnel. And, you will be free as well as the paid ones, so you can choose whichever you need.
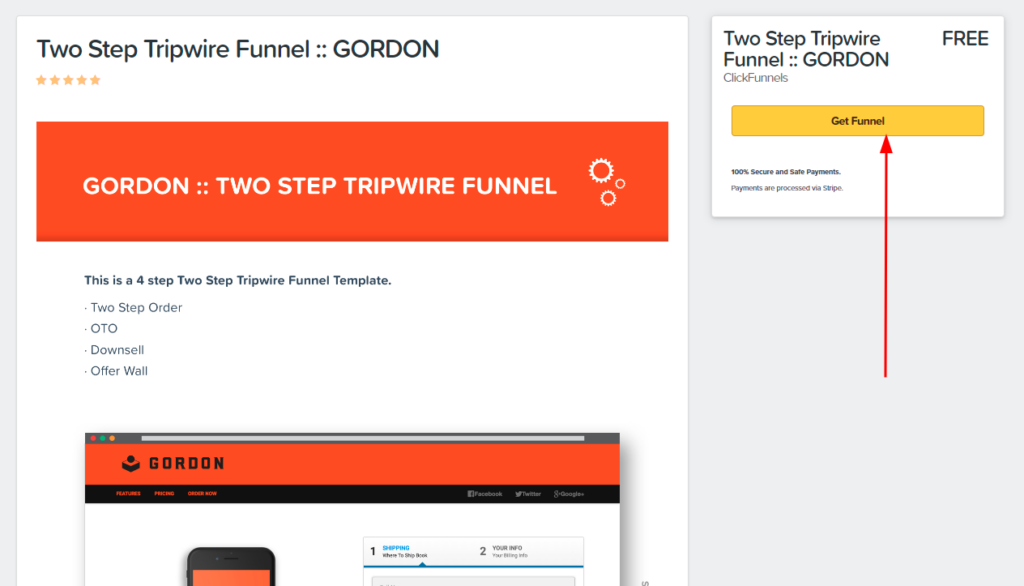
Click on the Get Funnel button to add the funnel template.
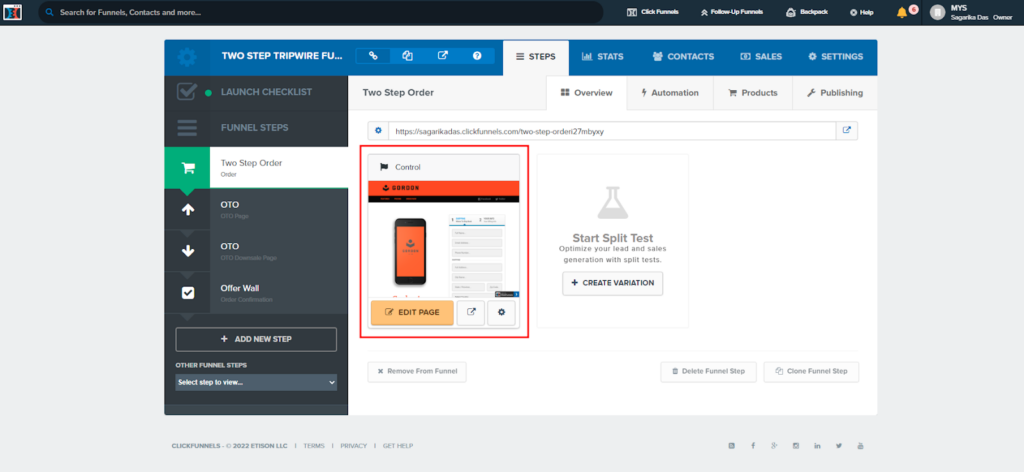
Now you can modify it using the funnel builder and create landing pages for your sales funnel.
In the editor, you would have all of the options and menus to customize the elements of the funnel landing page. You can also check the preview and test the funnel based on your sales strategy before publishing it for your shoppers.
This is how you can create funnels for your sales pages.
Once you’re done with the funnel, you can now add your Shopify product to the funnel for selling products online.
Here are the steps below!
Step 3: Add Shopify Products to ClickFunnels
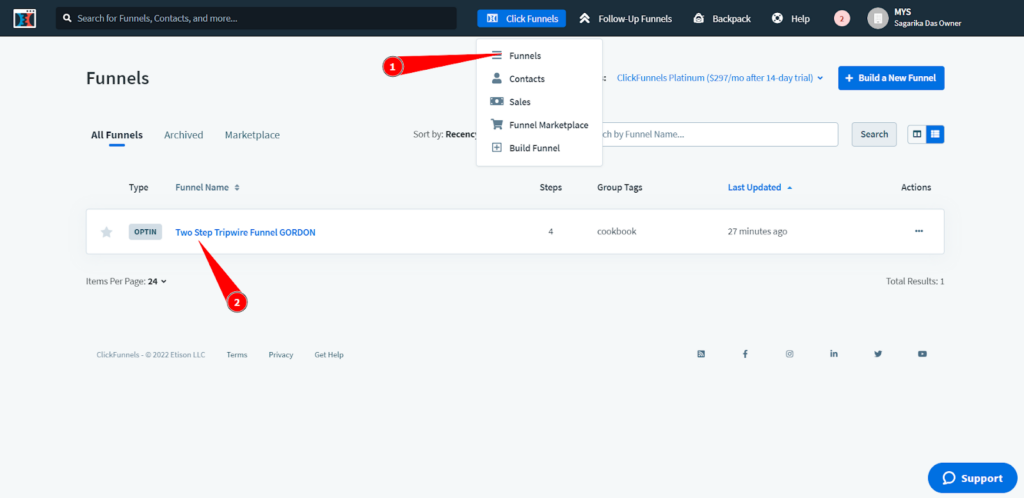
From the ClickFunnels account menu bar, go to Click Funnels > Funnels. Click on the funnel you added earlier.
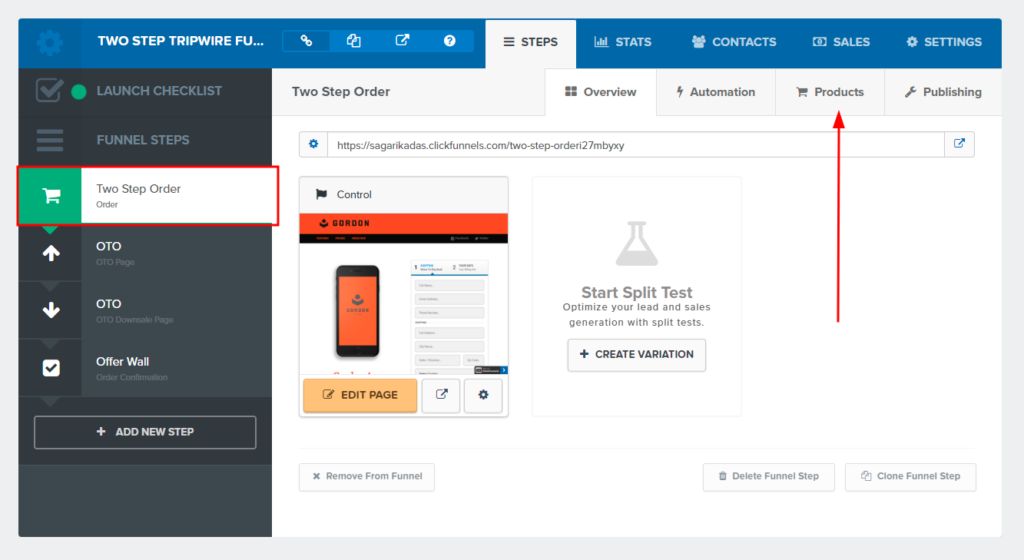
Now click on the Products to set up the product based on what funnel template you used.
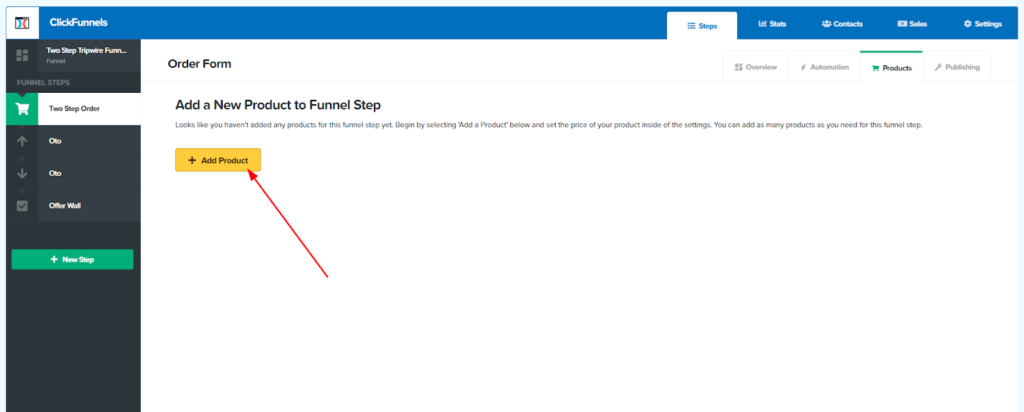
Here you can see the Order Form where you would be able to set up the product. Click on Add Product.
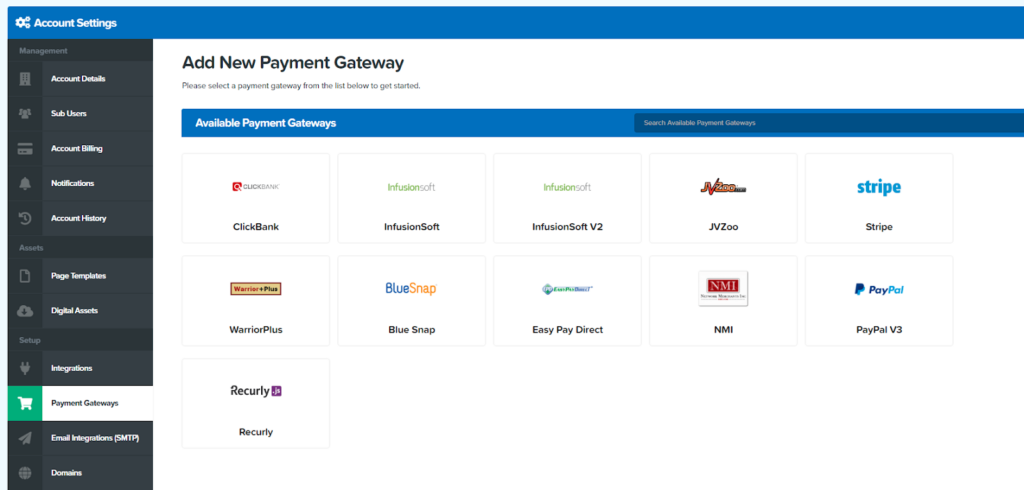
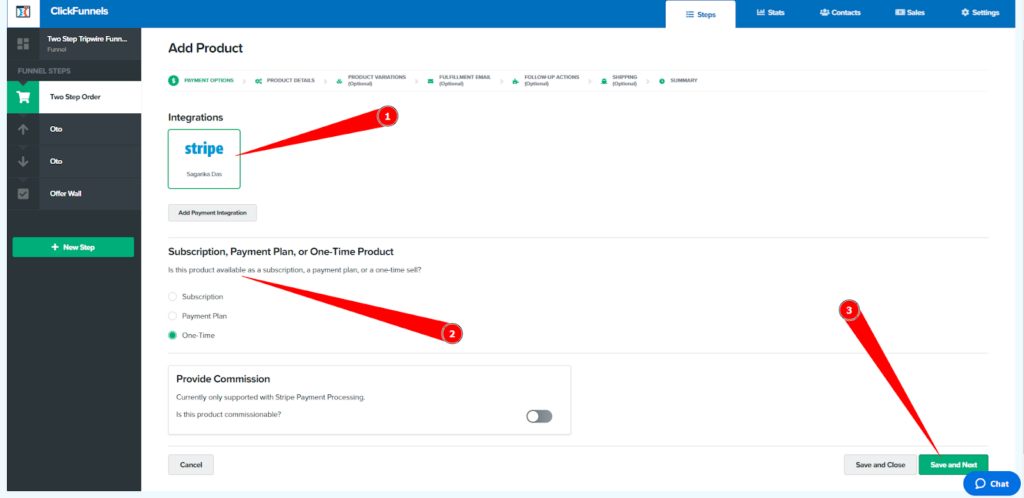
If you haven’t set up the Payment Gateway integration, you will see the below screen. So, first of all, you have to set it up before adding a Shopify product to the sales funnel.
Click on Add Payment Integration.

So these all are the different payment integration options that ClickFunnels integrates with. Now complete the payment integration process and come back to the product settings.
After setting up the payment integration, you can now set up the product using your payment gateway which has to be one of the supported payment integrations.
Click Save and Next.
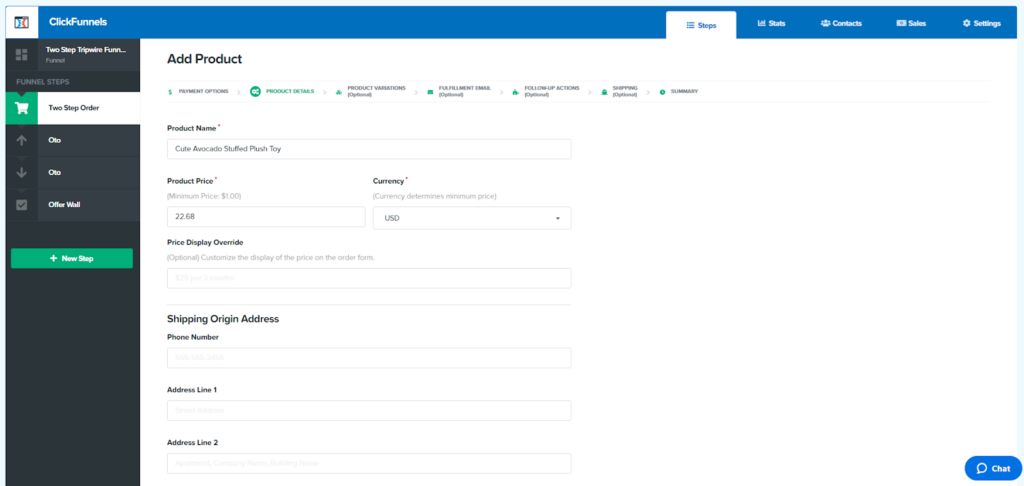
Next comes the product details! Fill in the information about your products like name, price, currency, origin shipping address, etc., and go to the next step.
If your product has variants, you can add them by enabling the Create Product Variations option and creating attributes one by one.
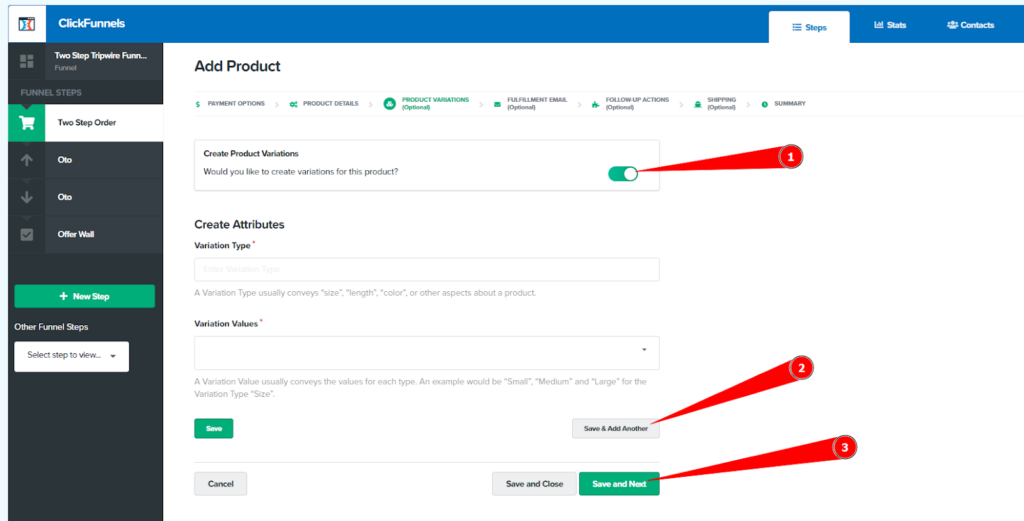
If you don’t want to add the product variants, then just leave it disabled and move to the next step.
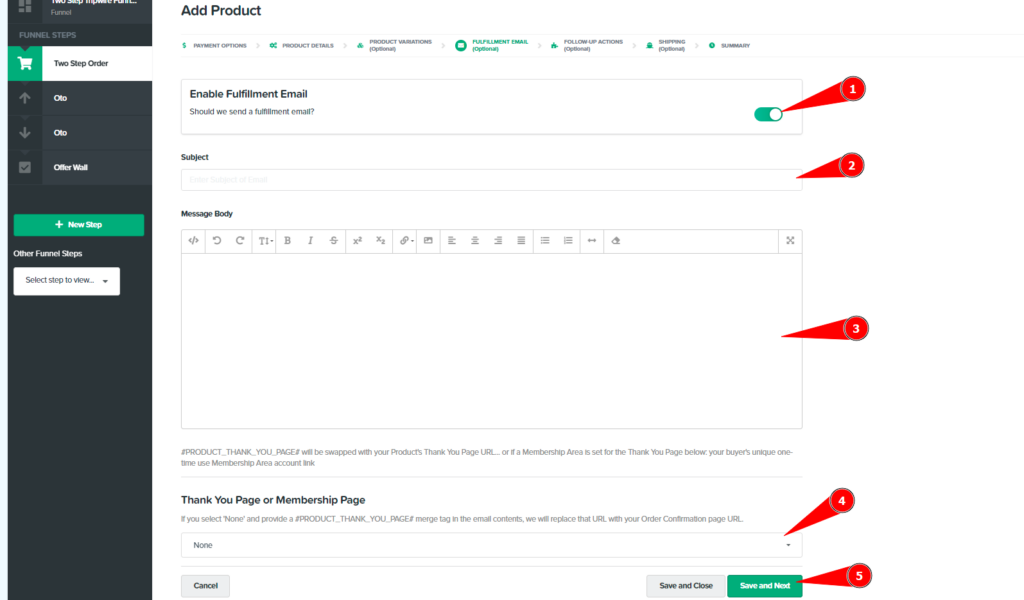
Next comes the Fulfillment Email option for sending automated emails to your customers! Here you can enable order fulfillment email by ClickFunnels and also add your personalized email message for your customers.
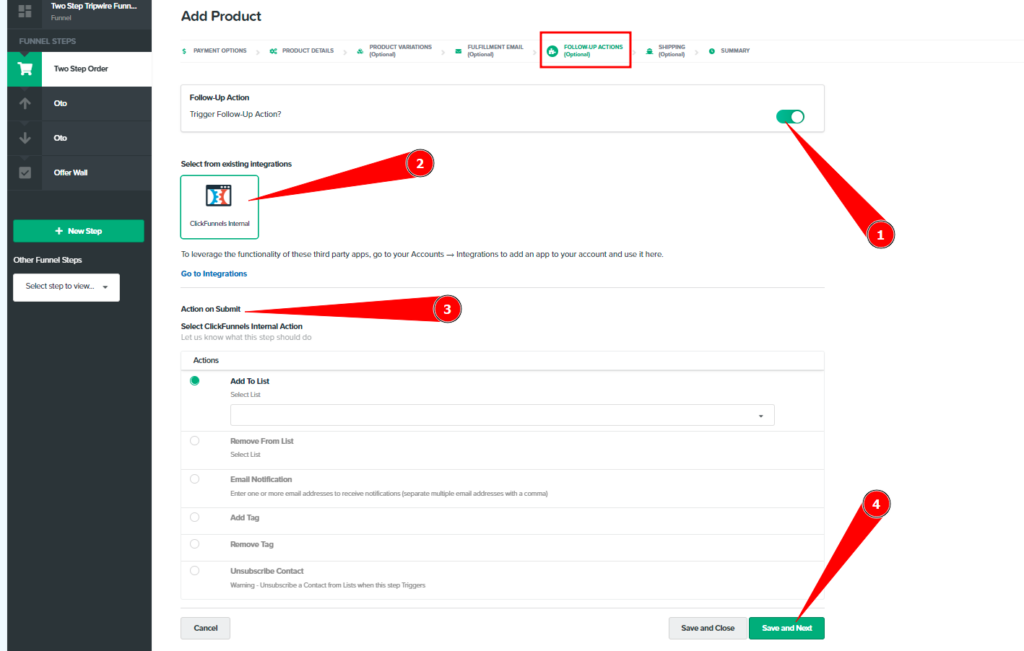
Next, you can use the ClickFunnels internal actions or also add other third-party tools to add follow-up actions for your sales page.
Once done with the configuration, hit Save and Next!
In the shipping tab, you can enable the shipping for your physical product and there you will see Shopify or all the other supported shipping integrations. You can click on Shopify and then you can connect the corresponding SKU and then save the product.
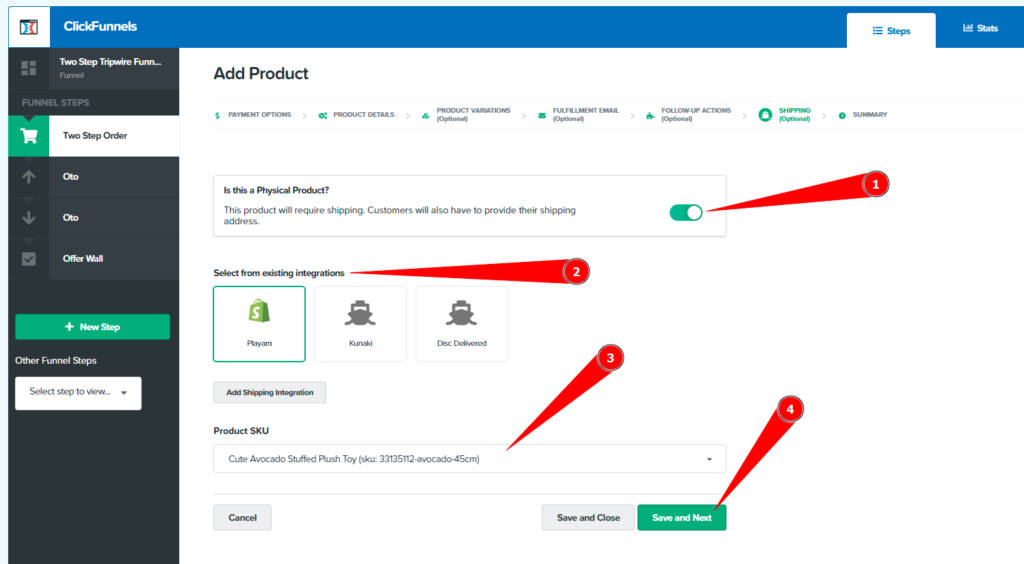
The Shopify integration is used to make sure that you take care of the shipping process. So whenever a purchase would take place inside the ClickFunnels order form, this shipping integration would create a new order into your Shopify store so that you can take care of the shipping aspect of it.
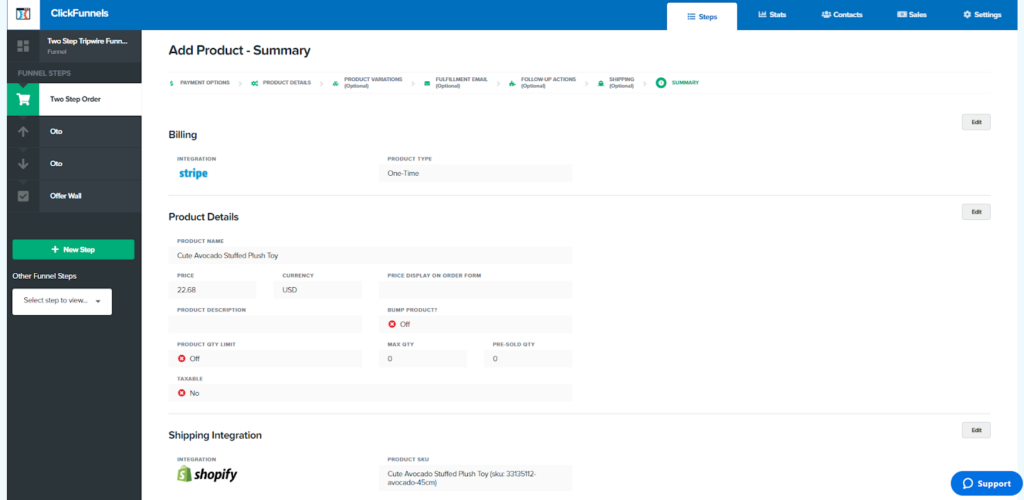
If you are selling digital products, you can keep this option disabled and move to the product summary. Here you can validate the product details and check if the product is configured properly or not.
You can also edit each section using the Edit button. Once you are confident with the product setup, you can click on Return to Product list.
You will see a success message for each step you complete.
In Order forms > Products, you can find the list of your products added to the funnel.
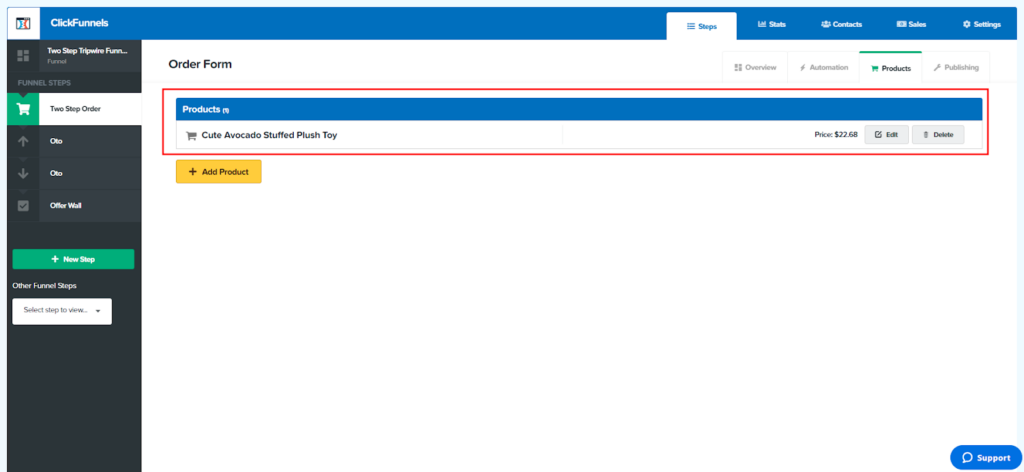
This is how you can add more products (with or without variants) to your funnels after the ClickFunnels Shopify integration.
What’s next??? Now you can test out your order form and see that your checkout page is working properly. After that, if everything is fine you’re now all set to promote your ClickFunnels page to target potential customers.
Final Thoughts
If you’re looking to take your conversion rates and sales up a notch or two, connecting your Shopify account with ClickFunnels can help improve your Shopify sales even more.
In this article, you’ve learned:
- How to Use ClickFunnels with Shopify?
- How does ClickFunnels integrate with the Shopify store?
- How to build a sales funnel for Shopify?
- How to use ClickFunnels to sell products online?
This is how to sell products using the ClickFunnels Shopify integration. Hope it was helpful to you and your online store.
Need help?? Our Shopify experts can help you in adding sales channels to your online store.

")


Post a Comment
Got a question? Have a feedback? Please feel free to leave your ideas, opinions, and questions in the comments section of our post! ❤️