
Magento theme structure
Storefront custom themes are located at the app/design/frontend/<Vendor>/ directory.
Magento built-in themes are located at the vendor/magento/theme-frontend-<theme_code> directory when Magento is installed using composer.
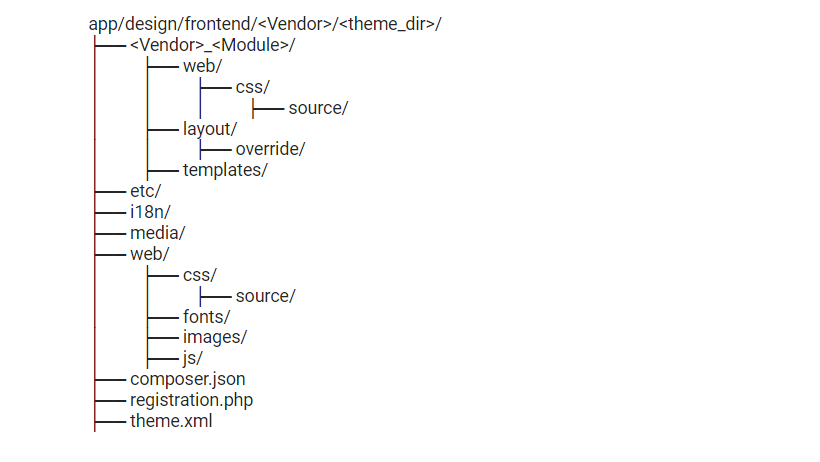
The structure of a Magento theme directory
theme.xml file
Create theme.xml file to initialize the theme. It contains theme title, the preview image of theme, parent theme from which all layouts, CSS can be inherited by default.
To set parent theme is one of the best practices if you want to inherit default Magento theme and customize it.
There are unlimited levels of parent theme that you can inherit, and they will fall back sequentially until there are no more parents defined.
<theme xmlns:xsi="http://www.w3.org/2001/XMLSchema-instance" xsi:noNamespaceSchemaLocation="urn:magento:framework:Config/etc/theme.xsd">
     <title>New Theme</title>
     <parent>Magento/luma</parent>
     <media>
         <preview_image>media/preview.jpg</preview_image>
     </media>
</theme>
view.xml file
Create view.xml file to change the type and size of the image or create your own type in the app/design/frontend/<VendorName>/<ThemeName>/etc directory.
<view xmlns:xsi="http://www.w3.org/2001/XMLSchema-instance" xsi:noNamespaceSchemaLocation="urn:magento:framework:Config/etc/view.xsd">
<media>
<images module="Magento_Catalog">
…
     <image id="category_page_grid" type="small_image">
        <width>250</width>
        <height>250</height>
      </image>
...
    </images>
</media>
</view>
Module and theme layout files
Base layouts:
Layout files provided by modules. Location :
– Page configuration and generic layout files: <module_dir>/view/frontend/layout
– Page layout files: <module_dir>/view/frontend/page_layout
Theme layouts:
Layout files provided by themes. Location :
– Page configuration and generic layout files: <theme_dir>/<Namespace>_<Module>/layout
– Page layout files: <theme_dir>/<Namespace>_<Module>/page_layout
Best practice: Do not modify base design files instead of follow coding standards and extend or override a layout for any modification.
Extend Layout
You can create extending layout files, and modify your code as per your needs. To extend the layout, add layout file at the following location:
<theme_dir>/<Namespace_Module>/layout/layout.xmlFor example,
To customize the layout defined in /view/frontend/layout/catalog_product_view.xml, you need to add a layout file with the same name in your custom theme, like the following: /Magento_Catalog/layout/catalog_product_view.xml
Override Layout
If you want to change a large amount of customization, you have to override layout file, This means that the new file that you place in the theme will be used instead of the parent theme layout file of the base layout file.
Override base layouts
To override base layout file, put a layout file with same name at the following location:
<theme_dir>/<Namespace_Module>/layout/override/base/layout.xmlFor example,
/Magento_Checkout/layout/override/base/checkout_cart_index.xml
Override theme layouts
To override theme layout file, put a layout file with same name at the following location:
<theme_dir>/<Namespace_Module>/layout/override/theme/<Parent_Vendor>/<Parent_Theme>/layout.xmlFor example,
/Magento_Checkout/layout/override/theme/Magento/luma/checkout_cart_index.xml
Do not remove generic blocks from *.phtml files or xml layouts.
If you may have deleted generic blocks from XML layouts, some extensions won’t work. Magento third party extension makes use of the generic block to insert its own new block, if you remove a generic block, there’s a possibility that the third party extension won’t work properly.
Containers and blocks
A container is a structure without content which holds other blocks and containers.
<move> element is used to change the position of block or container, to move an element, you have to refer it with its name and then set destination attribute which can either be a container or a block.
Example:
<move element="name.of.an.element" destination="name.of.destination.element" as="new_alias" before="-"/>Remove block and container using remove and display attribute of <referenceBlock> / <referenceContainer> element.
- You can remove block or container from layout by setting value of remove attribute to true, default value of remove attribute is false.
Example:
<referenceBlock name="block.name" remove="true" />- <remove> is used to remove static resources linked in a page from the <head> section.
Example:
<page xmlns:xsi="http://www.w3.org/2001/XMLSchema-instance" xsi:noNamespaceSchemaLocation="urn:magento:framework:View/Layout/etc/page_configuration.xsd">
   <head>
        <!-- Remove local resources -->
        <remove src="css/styles-m.css" />
        <!-- Remove external resources -->
        <remove src="https://maxcdn.bootstrapcdn.com/bootstrap/3.3.4/js/bootstrap.min.js"/>
        <remove src="http://fonts.googleapis.com/css?family=Montserrat" />
   </head>
</page>- You can disable a block or a container with its child element from the layout by setting the value of display attribute to a true, default value of display attribute is false. You can always overwrite the display attribute, but in case if the remove attribute is set to true, the value of the display attribute is ignored.
Example:
<referenceContainer name="container.name" display="false" />You can reorder block and container using after and before attributes of the <referenceBlock> / <referenceContainer> element.
- both after and before attributes are present, after attribute takes precedence.
- both after and before attributes are absent or empty, all elements are considered as non-positioned. All other elements are positioned at their specified locations.
- multiple elements have before or after set to dash (-), all elements are displayed at the top (or bottom in case of after attribute).but the ordering of these elements is undefined.
CSS
When the theme is inherited from the parent theme, make changes in _extend.less or _theme.less file instead of overriding the .less files.
Your theme’s _theme.less file overrides your parent’s theme. So, if you have assign parent theme to your theme, copy the entire content from the parent theme’s _theme.less file.
Use Magento generic CSS classes wherever possible.
There are many CSS classes, that are defined in Magento default installation, whenever you are going to create new store template, it is a good practice to use generic CSS classes because there are many third-party extensions that uses Magento generic CSS classes.
Override or extend Magento Ui library component
To customize UI component, you can override or extend the Magento library components.
For Example, if you want to change the style of a button, you can extend or override _button.less file.
Extend component’s styles
Add _buttons_extend.less and _extend.less files in <theme_dir>/web/css/source directory. Then add your custom style of button in _buttons_extend.less file, and register it in the _extend.less file by adding the following code:
@import '_buttons_extend.less';Override component’s styles
Create _button.less file in <theme_dir>/web/css/source directory. And add your custom style of button in it.
Magento Ui Component Files are located at lib/web/css directory:

You can also include your own custom CSS by adding it in default_head_blocks.xml file which is located in the Magento_Theme module.
Example
<page xmlns:xsi="http://www.w3.org/2001/XMLSchema-instance" xsi:noNamespaceSchemaLocation="urn:magento:framework:View/Layout/etc/page_configuration.xsd">
    <head>
        <css src="css/styles-m.css" />
        <css src="css/styles-l.css" media="screen and (min-width: 768px)"/>
        <css src="css/print.css" media="print" />
    </head>
</page>
If you want to make major customization in the existing style of a particular module, copy _module.less file from Magento core module to your own theme in the same path, and add your customization to it.
Translation
If you need to change the phrases in the user interface, add custom CSV dictionary files instead of overriding .phtml templates.
In case if the location is changed for a store, Magento searches for translations in the related dictionaries at the following location:
- Module translations: <module_dir>/i18n/
- Theme translations:
- <parent_theme_dir>/i18n/ (iterated through all ancestor themes)
- <current_theme_dir>/i18n/
- Translation package: app/i18n/
- Magento database


Post a Comment
Got a question? Have a feedback? Please feel free to leave your ideas, opinions, and questions in the comments section of our post! ❤️