OpenCart to Shopify Migration Checklist – A Complete Process

Shifting from Opencart to Shopify is a smart move, and there is no doubt about it.
But here’s the thing, migrating your online store to a new platform isn’t a walk in the park. There are plenty of steps to take, decisions to make, and risks you absolutely cannot afford to overlook.
Naturally, the OpenCart to Shopify migration process comes with a fair share of stress and second thoughts. After all, your business is at stake.
That said, when you follow a clear roadmap, the entire Shopify migration can feel way relieving.
So, to guide you right, we’ve built a thorough 29-point OpenCart to Shopify migration checklist that walks you through the entire process of moving your eCommerce platform.
Whether it’s backing up your store, migrating essential data, tweaking the design, or aligning your SEO, everything is structured in phases for a smooth transition.
Let’s get in your task list on how to migrate to Shopify..!!!
OpenCart to Shopify Migration Checklist
Migrating from an open-source solution (Opencart) to a hosted platform (Shopify) changes how your store operates from the ground up.
The systems are different, and the approach to migration & management needs an update. To minimize hiccups, we’ve broken the migration process into detailed stages.
Each stage includes essential tasks that are too important to skip
Here, we start with our discussion on the OpenCart to Shopify migration checklist.
Download the Migration Checklist
# Ideation Phase — OpenCart to Shopify Migration Checklist
1. Clarify Why You’re Migrating
Before jumping in to making any step from OpenCart to Shopify migration checklist, make sure you know why you want to migrate to Shopify.
- Are you aiming for better usability, quicker performance, or fewer technical roadblocks?
- Want to reduce the maintenance workload or offer a better shopping experience?
When your goals are crystal clear, your decisions throughout the process will be easier and smarter.
2. Analyze Current Store’s Performance
It’s smart to analyze how your existing Opencart store is performing before you make any changes. This helps you pinpoint what’s working and what’s not.
How Do You Analyze Store Performance?
You can consider using tools like Google Analytics, Opencart Advanced Reports, or third-party extensions to gather:
- Traffic sources – Where your visitors are coming from?
- Conversion rates – How well your store turns visitors into buyers?
- Bounce rates – Where customers are dropping off?
- Customer behavior trends – Popular products, categories, and sales channels
Knowing what areas are working well will give you a better base for your new Shopify setup.
Also, take note of underperforming products or pages so you can optimize them when you migrate from Shopify.
3. Competitor Research
You’re moving to Shopify. That’s a great chance to refresh things and maybe even rebrand & redesign a little. Take time to look into competitors’ stores, especially those already on Shopify:
- Check their product page designs, menu layouts, and homepage structure.
- See what features they’re using (live chat, reviews, loyalty programs).
- Get inspired by their UX and marketing tactics.
This helps shape your own Shopify store plan in a way that matches market expectations.
4. Plan For New Shopify Store
Now that you’ve got ideas and insights, it’s time to draft a better structure for your Shopify store.
Here, I’ve listed key planning areas for your new Shopify store in a table.
| Key Areas | What You Need To Do |
| Store Structure & Navigation | → Define key categories, collections, and product navigation.→ Consider if any product or category restructuring is needed for a better shopping experience. |
| Feature & Functionality List | → Write down all the necessary features, apps, and integrations (e.g., payment gateways, marketing tools).→ Determine custom functionalities to replicate or enhance on Shopify. |
| Design & Branding Considerations | → Decide if a redesign or brand refresh is required.→ Gather all brand assets like logos, banners, and product images. |
| Content Audit & SEO Optimization | → Review product descriptions, blogs, and metadata to determine updates.→ Plan new content with SEO and brand voice in mind. |
Once these steps are covered, you’re ready to move forward with the next step of your migration process!
5. Budget & Resources Allocation
Migrating your OpenCart store to Shopify will come with a long process and multiple costs and expenses associated with it.
For managing your budget and team resources, you’ll need a plan on allocation right from the beginning. And at this stage, you need to work on cost estimations and organize team efforts to avoid unexpected expenses and delays during migration.
Here’s how you can effectively manage your budget and resources:
- Calculate potential expenses for Shopify subscription plans, necessary apps, custom development, and design work.
- Check whether your team can handle data migration, theme design, and thorough testing.
- If needed, consider hiring Shopify experts to fill any skill or resource gaps.
- Clearly assign tasks and roles, either within your team or to trusted external partners, to ensure a smooth execution.
6. Timeline Planning
Once you’ve finalized the budget and resources for your migration, the next step is to prepare a timeline estimation.
Creating a timeline essentially means building a project brief and estimating how long each step of migration will take. Here’s how the process looks:
- List out all your to-dos
- Estimate the time required for each task
- Identify task dependencies
- Discuss the timeline with your team
- Manage and adapt the schedule as the project progresses
This gives you a overview of the planning process. When you outline a clear schedule with well-defined milestones, you’re better equipped to track progress and ensure each phase of the migration is completed effectively and on time.
To set a precise timeline, start by mapping out key stages such as data backup, Shopify store setup, data import, theme customization, and testing. Once you’ve outlined these stages, assign estimated timeframes to each based on your team’s bandwidth and the complexity of your current OpenCart store.
It’s important to set realistic deadlines to avoid overwhelming your team or rushing through critical steps.
Pro Tip: Always include buffer time in your timeline. This cushion allows you to handle unexpected setbacks, like data inconsistencies or technical issues, without disrupting your entire launch plan. Having that extra space gives you the flexibility to stay on track and avoid last-minute compromises.
(Here’s your guide to understanding the cost & time for Shopify Migration.)
Now we step into another phase of the OpenCart to Shopify migration checklist.
Download the Migration Checklist
# Preparation Phase – OpenCart to Shopify Migration Checklist
After completing the ideation phase of OpenCart to Shopify migration checklist, you’re ready to move into the preparation phase of your migration to Shopify. This stage involves getting several critical elements in place to ensure the process runs smoothly.
Below is one of the most important tasks to tackle before beginning the actual migration:
7. Backup Your OpenCart Store
Before making any changes to your current OpenCart store, it’s essential to create a full backup.
Systems can encounter unexpected errors, crashes, or data loss, and having a comprehensive backup in place ensures you’re protected. Your backup should include your product catalog, customer information, order history, extensions, and theme files, basically everything your store relies on.
A backup is necessary as it allows you to easily revert back to your previous setup without risking essential business data, giving you peace of mind when migration is in-progress.
How to Back Up Your OpenCart Store?
You can back up your OpenCart website using the following methods:
- Built-in OpenCart Backup Tool: Found in the admin panel under System > Maintenance > Backup/Restore, this lets you export your database.
- phpMyAdmin: Use this to manually export your database directly from your hosting control panel.
- File Manager or FTP: Download your entire OpenCart directory, including files and theme assets, via cPanel or an FTP client.
- Cloud Backup Services: Platforms like Acronis or DropMySite can help you schedule automatic cloud backups for both files and databases.
Once you’ve created your backup, verify its integrity and make sure all essential files and data have been saved correctly and are recoverable. This step adds an extra layer of confidence before you begin the migration process.
8. New Shopify Store Creation
After backing up your OpenCart store, the next step in OpenCart to Shopify migration checklist is to set up your new Shopify store.
This involves signing up for a Shopify account and configuring some essential settings to get everything ready for the migration. Let’s walk through it step by step.
Step #1 — Sign Up for Shopify
To begin, head over to Shopify’s website and sign up for a new account.
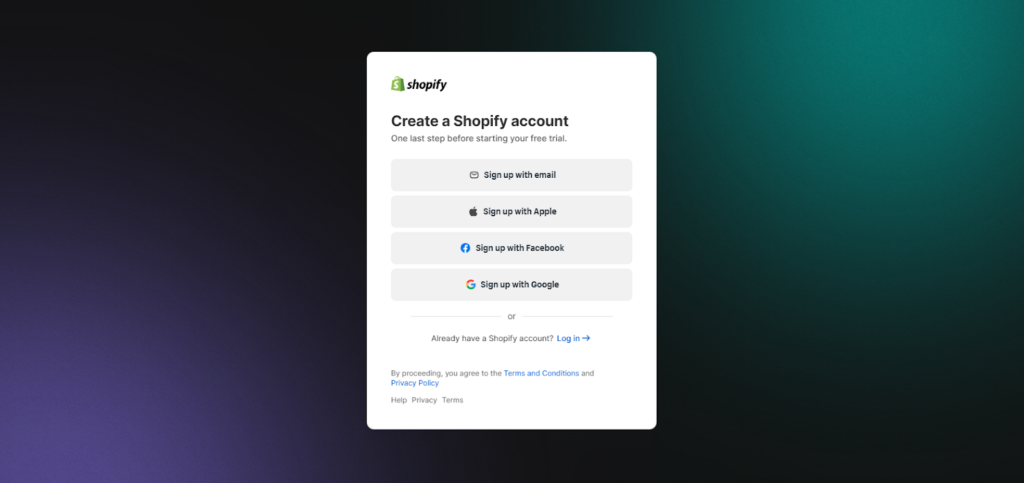
Shopify offers a 3-day free trial, which allows you to explore the platform and get familiar with its features before committing to a paid plan. Here’s a glimpse of what your Shopify admin dashboard will look like once the store is freshly created.
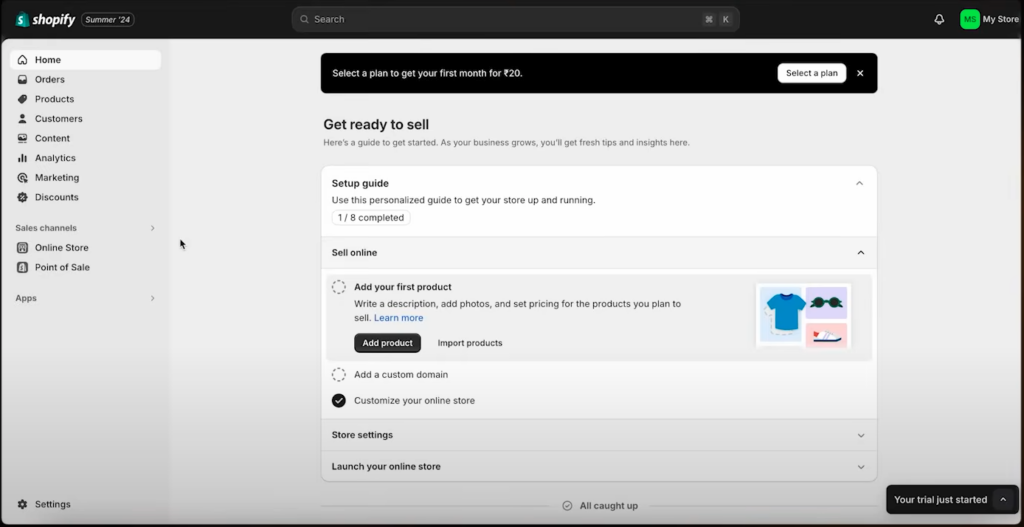
Step #2 — Enter Basic Store Details
Once your account is created and you’re inside the Shopify dashboard, you’ll be prompted to enter important store details such as your store name, business address, and contact information.
To input these, go to Settings > Store Details in your Shopify admin panel.
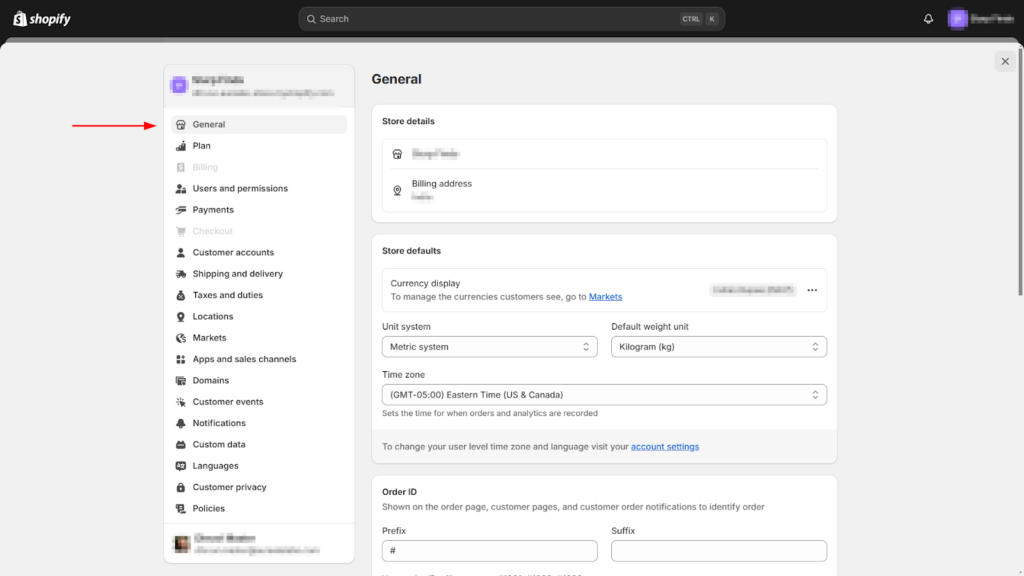
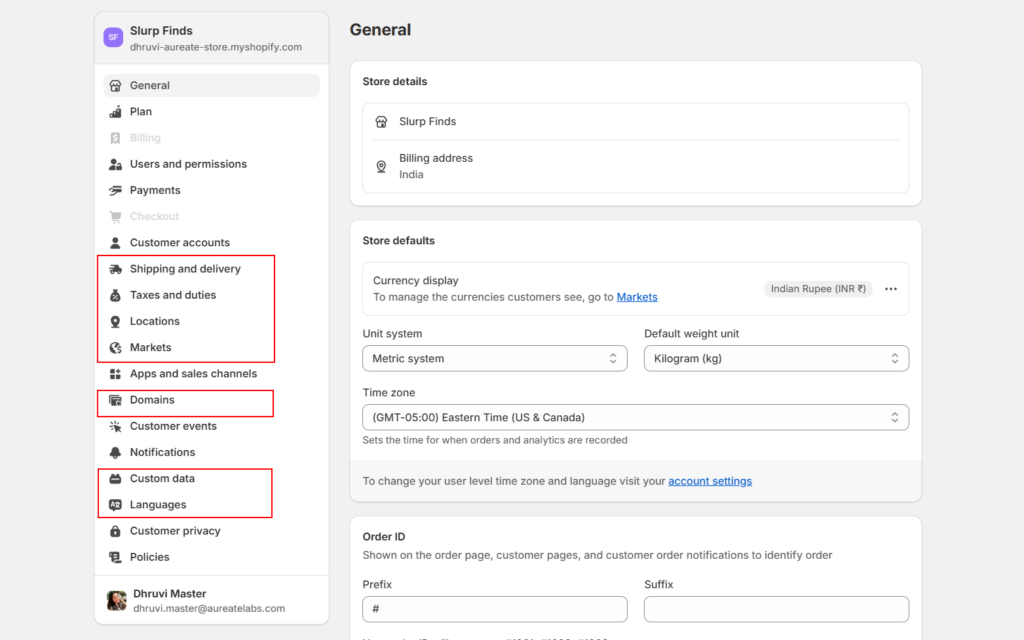
Step #3 — Configure Key Settings
In this step, you’ll want to set up essential store preferences such as your store’s currency, language, timezone, and tax rules. These foundational settings ensure your store is tailored to your business needs and target audience.
Step #4 — Choose and Set Up a Theme
Next, you’ll want to work on your store’s design. Shopify offers a wide variety of both free and premium themes, so you can choose one that reflects your brand and product offering.
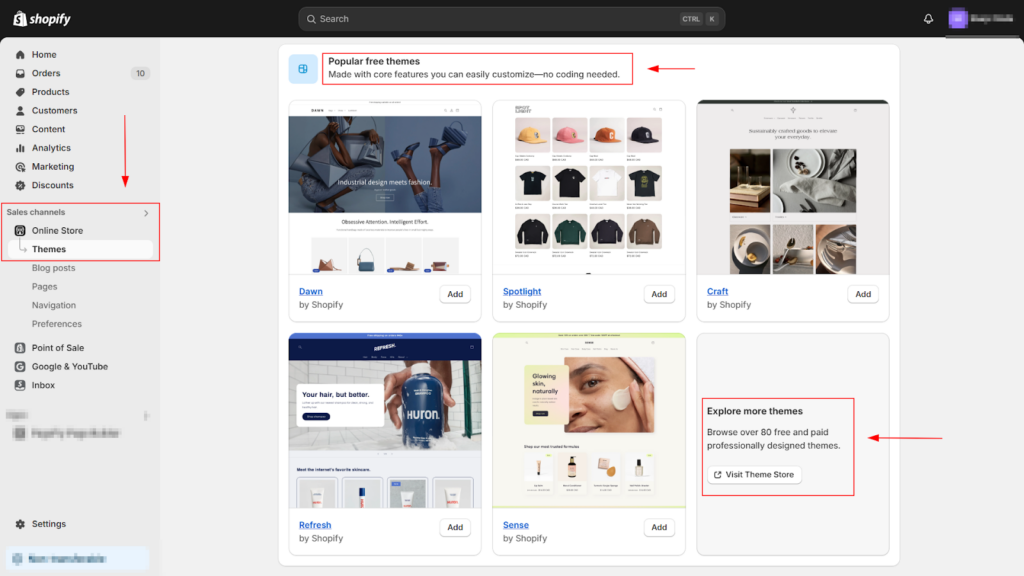
You’ll find an option within the admin to explore the Shopify Theme Store, where you can browse themes based on industry, features, layout styles, and budget.
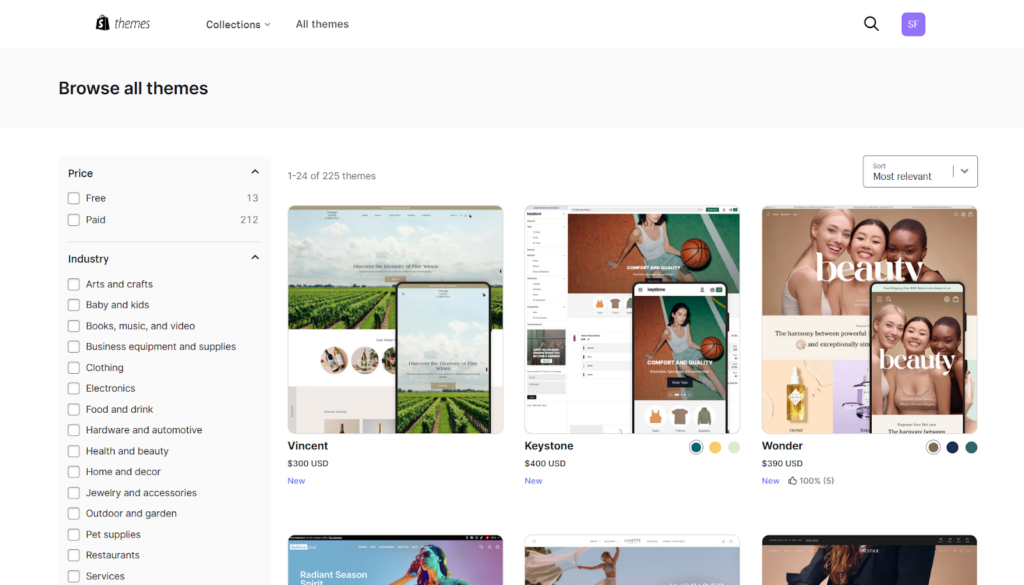
You can preview and test different themes to find the one that fits your niche and catalog size. Whether you go for a ready-made theme or invest in a custom design, you can always make changes later as your store evolves.
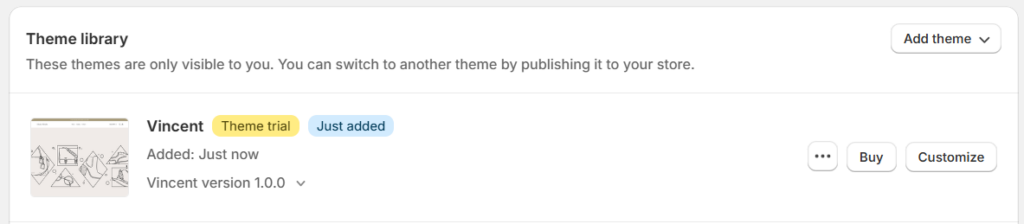
For now, decide whether you want to install a theme right away or want to get custom Shopify development services for your new store from experts.
You can always return to theme customization after completing the Shopify data migration.
Step #5 — Explore Shopify’s Built-in Tools
Finally, take a moment to explore the tools and features built into Shopify.
These include marketing, analytics, payment integrations, and more. Getting familiar with them early will make the setup process much smoother and help prepare your store to receive data from your OpenCart site.
Learn more: How to use Shopify – Tutorial for Beginners
With that, move to the next step of the OpenCart to Shopify migration checklist.
9. Purchase a Shopify Subscription Plan
After exploring the dashboard, familiarizing yourself with the basics, and configuring key settings, your next step is to choose a Shopify subscription plan. Below is an overview of the available Shopify plans to help you get started:
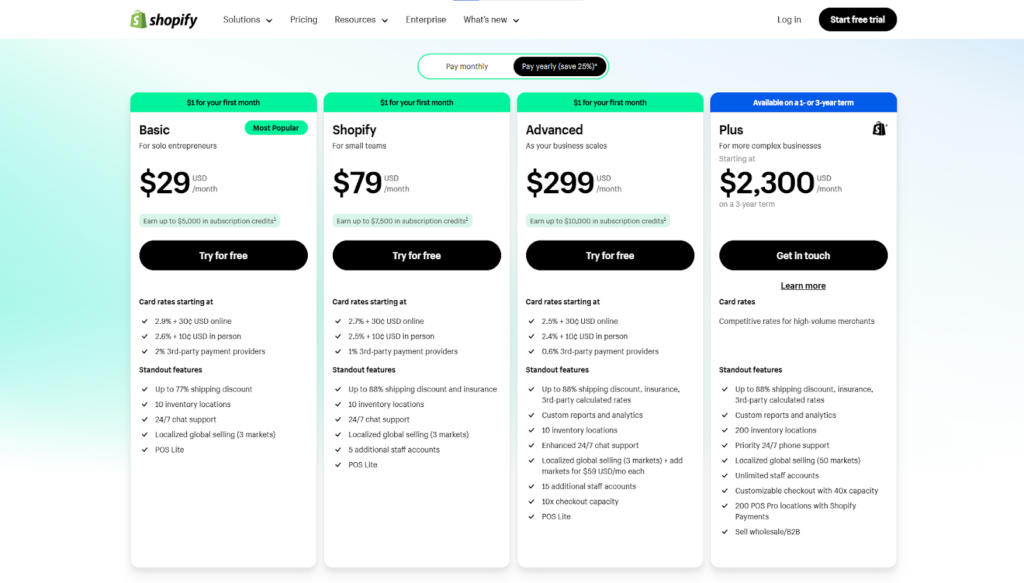
I’ve created a simplified table to help you understand the cost and purpose of each plan:
| List of Plans Provided | Plan Pricing | Best for |
| Basic Shopify Plan | $39 per month (25% off on yearly payment) | Individuals and small businesses |
| Shopify Plan | $105 per month (25% off on yearly payment) | Small businesses |
| Advanced Shopify Plan | $399 per month (25% off on yearly payment) | Medium to large-sized businesses |
| Shopify Plus | Starting from $2000 per month | Enterprise-sized businesses |
If you’re unsure which plan suits your business, consider the following questions:
- How many products will you be selling?
- What’s the size and complexity of your product catalog?
- How many team members will manage the store?
- Do you need features like advanced reports or custom development?
- What is your monthly subscription budget?
Take your time to review each plan and choose the one that best aligns with your store’s current needs and future goals.
After that, it’s time to switch to next step of OpenCart to Shopify migration checklist.
10. Perform Data Mapping
Mapping must be complete before product import to prevent errors.
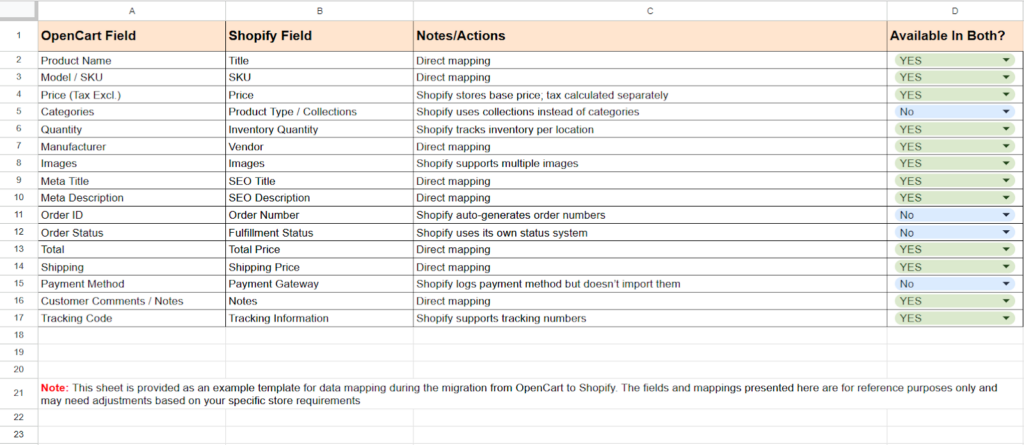
If I put it simply, data mapping is the process of aligning your existing OpenCart data fields with Shopify’s data structure, ensuring everything transfers to the right place.
For example:
- In OpenCart, you may have fields like Product Name, Price, and Manufacturer.
- In Shopify, these correspond to Title, Price, and Vendor, and can be mapped accordingly.
However, if OpenCart has additional fields, such as a custom SKU format or specific shipping label that Shopify doesn’t support natively, you’ll need to store that data using Shopify Metafields.
It’s more like labeling boxes when moving to make sure everything goes in the right place in the new home.
To make data mapping easier, you can create a spreadsheet that lists your OpenCart fields alongside corresponding Shopify fields. Where there’s no direct match, you can note whether to use metafields or other Shopify customization options.
I’ve also prepared an OpenCart to Shopify Data Mapping Template that you might find helpful.
Once you’re done with the data mapping process, make sure to conduct the app mapping process for the extensions and modules that you’re using with your online store on OpenCart.
This will help you figure out how you manage functionality after you migrate to Shopify.
11. Install Shopify Import Tool
Okay, at this point of following OpenCart to Shopify migration checklist, you’ve got your new Shopify store ready, and you also know where to paste all your previous data.
The next step is to install a Shopify import tool that helps you bring in all your products, customers, and order data from OpenCart to Shopify. Using a tool for this step saves time for product import, reduces the chances of errors, and eliminates the need for manual labor, making it an essential part of the process.
How do you install the Shopify Import tool?
- Log in to your Shopify admin panel.
- Go to the “Apps” section.
- Search for the “Store Importer” app, which includes some of the best tools for data importing.
- From the list of available tools, choose the one that best fits your needs and click “Add app” to install it on your store.
(These 3 apps top our suggestion list.)
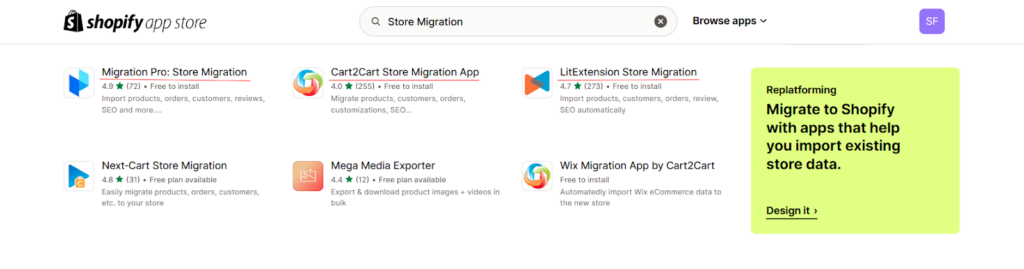
Once you find the best one that fits your needs, click “Add app” to install it on your store. After installation, you’ll be ready to begin the data migration process.
Now, moving further in OpenCart to Shopify Migration Checklist, this calls for a new (and most important) phase in your migration process, Migration of data.
Download the Migration Checklist
# Data Migration Phase — OpenCart to Shopify Migration Checklist
The easiest way to export data from your OpenCart store is in a CSV file. So, once you have the CSV file ready, you can simply upload it to the Shopify Import Tool, and it will guide you through mapping your data fields to ensure everything is transferred accurately.
That’s a basic look at what an export & import process will look like, now, let’s check what you need to migrate.
12. Migration of Data
The first data you migrate is product data, followed by customer data, past order details, the remaining pages and content on your store, and finally, images and other media files.
Also, you’ll need clarity on what to transfer, so here I’ve outlined all the data you need to migrate:
| Product Import | Customer Data Import | Order Data Import | Pages & Blogs Import | Images & Media Files Import |
| Product titles, descriptions, and SKUs | Customer names, email addresses, and phone numbers | Order numbers, dates, and statuses | Page content (text, images, and formatting) | Product images |
| Product images and other media files | Shipping and billing addresses | Customer information (name, email, shipping address) | Page URLs and SEO metadata (titles, meta descriptions, keywords) | Logo and other brand assets |
| Product variants (e.g., size, color, material) | Order history and purchase behavior | Products purchased, quantities, and prices | Blog posts, including titles, content, images, and publish dates | Blog post images |
| Product pricing and inventory levels | Customer tags and notes | Shipping and billing information | Blog categories and tags | Other media files (e.g., PDFs, videos) |
| Product categories and tags | Payment information (if applicable) |
That’s all the data you need to migrate. Now, let’s move on to the areas you need to keep in mind throughout the process.
💡 Tips for Successful Data Migration
- Map the fields correctly to ensure accurate data transfer.
- Ensure compliance with data privacy regulations when migrating customer information.
- Manually update order statuses and fulfillments in Shopify to match the original OpenCart data.
- Update image links in product descriptions, blog posts, and pages to point to the new Shopify image URLs.
- For images and media, either manually upload them to Shopify or use a third-party app to streamline the process.
- Set up 301 redirects from old OpenCart URLs to new Shopify URLs to preserve your SEO and avoid traffic drops.
Moreover, I’ve attached sample CSV templates supported by Shopify for importing product and customer data:
By following these steps and carefully migrating your data, you’ll ensure a smooth transition from OpenCart to Shopify and minimize disruptions to your online business.
Download the Migration Checklist
# Set Up Shopify Store — OpenCart to Shopify Migration Checklist
By this time of following OpenCart to Shopify migration checklist, your new Shopify store has gathered a significant amount of data and is beginning to take shape. Hence, it calls for additional adjustments to ensure a seamless shopping experience.
Let’s check through the key adjustments you should make.
13. Theme Customization
Now that your Shopify store is populated with essential data, it’s time to focus on visual customization to deliver a seamless and brand-aligned shopping experience.
Earlier in the process, you may have chosen between a ready-made Shopify theme or a custom design. This is the stage where that decision comes into play.
Whichever route you’ve taken, it’s time to fine-tune your store’s look and feel to reflect your brand identity.
How to Customize Your Theme:
Once you’ve installed your theme, follow these steps:
- Navigate to Online Store > Themes > Customize in your Shopify admin.
- Use Shopify’s intuitive drag-and-drop builder to modify theme elements like fonts, colors, layout sections, and more.
- Upload your logo, update homepage sections, and tweak your header and footer to mirror either your previous OpenCart store or your new brand vision.
If you require additional design flexibility or want to incorporate advanced features, like interactive product carousels, announcement banners, or custom landing pages, you can either use Shopify Apps or Hire a Shopify Expert to implement custom code. – Notes Below
- Need to break this statement into 2 lines instead of 1.
- Add this link – You might be hire Shopify expert who is providing support and maintenance services.
Tips for Theme Customization:
A few tips on how to do it better are always good. So, here I’ve added a few key best practices to keep in mind and create a seamless shopping experience:
- Test responsiveness across devices using Shopify’s preview tool. Make sure text sizes, image placements, and button clicks feel intuitive on mobile and desktop.
- Prioritize product pages, as they directly impact conversions. Use quality visuals and clear call-to-actions.
- Use visual sections to highlight trending products, discounts, and categories like “Best Sellers” or “New Arrivals.”
- Maintain brand consistency by sticking to a coherent color palette, font set, and placing your logo prominently.
… And more!
For more insights on optimizing your store design, check out the eCommerce UX Checklist I’ve attached.
14. Product Setup
Once your theme is tailored to your brand, the next step is organizing and uploading your products to your Shopify store. This is where you structure the backbone of your store, product listings, categories, and inventory.
Here’s a clear step-by-step process to help you do it effectively:
Step-by-Step Guide to Product Management
- Go to Products > Add Product in your Shopify admin.
- Enter key product details: name, description, pricing, SKU, and stock quantity.
- Write engaging product descriptions that communicate features, benefits, and reasons to buy.
- Upload high-quality images that showcase your product from multiple angles.
- Optimize those images for fast loading to keep site performance smooth.
- Create collections like “Best Sellers” or “Sale Items” to organize products into easy-to-browse groups.
- Add tags to improve search functionality and filtering options.
- Use the Variants section to add size, color, material, or other variations.
- Double-check pricing and inventory levels for each variant to prevent overselling.
- Fill in SEO-friendly meta titles and descriptions for each product page.
- Add alt text for all images to boost search engine visibility.
- Integrate a product review app to let customers leave feedback and build trust.
These steps ensure your products are well-organized, easy to find, and compelling to purchase. Additionally, make sure inventory tracking is enabled so you’re always aware of stock levels.
With that, we can move to the next step of the OpenCart to Shopify migration checklist.
15. Payment Gateways
After your product catalog is live, the next major task is enabling payments so customers can complete their purchases smoothly and securely. This step involves choosing and configuring payment gateways that are reliable, fast, and aligned with your target audience’s preferences.
How to Set Up Payment Gateways in Shopify?
- In your Shopify admin, go to Settings > Payments.
- Choose from various providers like Shopify Payments, Stripe, PayPal, or other region-specific options.
- Enable multiple methods such as credit/debit cards, digital wallets, UPI, or Buy Now, Pay Later (BNPL) services to accommodate a wide range of customer preferences.
Additional Tips for Payment Integration:
- Implement fraud detection tools available within Shopify Payments or through your chosen payment provider. These help flag and block suspicious transactions.
- Make sure your checkout experience is clean and clutter-free. Clear CTAs, minimal distractions, and trust badges can go a long way in reducing cart abandonment.
- Ensure your store supports secure payment processing (SSL) and displays relevant trust signals to boost buyer confidence.
16. Shipping Settings
With payment methods in place, the next crucial step is setting up your shipping settings to ensure smooth order fulfillment and clear cost expectations for your customers.
To configure shipping on Shopify: Go to Settings > Shipping and Delivery in your Shopify admin panel.
This area allows you to define how, where, and at what cost you ship products. Whether you’re handling local deliveries, international orders, or offering express options, it’s important to align these settings with your business operations and customer expectations.
Here’s a breakdown of the key shipping components you need to configure:
| No. | Task | What It Sets | Details to Review |
| 1. | Shipping Rates | Charges customers pay for shipping | Set up:– Free Shipping– Flat Rates– Weight-Based Rates– Destination-Based Rates |
| 2. | Shipping Zones | Regions where your store ships | Define specific zones (countries, regions, postal codes) and assign custom rates per zone to reflect local delivery costs. |
| 3. | Shipping Carriers | Delivery service providers | Choose carriers like FedEx, UPS, USPS, or local services. Enable real-time carrier-calculated rates to offer accurate shipping costs. |
| 4. | Packaging Specifications | Package types and dimensions | Specify box sizes and packaging types used for shipments. This helps in calculating accurate rates, especially when using real-time carrier pricing. |
| 5. | Handling Fees | Extra charges added to shipping | Add fees for materials, special handling, or labor. Ensure transparency so customers understand the breakdown of costs. |
| 6. | Delivery Options | Delivery speed and availability | Offer methods like:– Standard Delivery (e.g., 5–7 business days)– Express Shipping (1–3 days)– Local Pickup or Delivery options |
| 7. | International Shipping | Cross-border shipping setup | Define international zones and pricing. Use Shopify apps or carrier tools to include customs duties and taxes if applicable. |
| 8. | Return Shipping Policies | Process for product returns | Set up return labels and policies to enable smooth reverse logistics. This improves customer satisfaction and trust. |
You can build on your previous OpenCart shipping setup by replicating similar zones and rates, then tweaking them as needed for your new Shopify workflows. A well-configured shipping system not only keeps operations efficient but also boosts customer confidence by offering clarity and choice at checkout.
With that, we can move to next step of OpenCart to Shopify migration checklist, where we set up a few tax details.
17. Tax Settings
Once your shipping setup is complete, the next essential task is configuring your tax and duties settings to ensure compliance and accurate pricing across regions.
To access tax settings: Go to Settings > Taxes and Duties in your Shopify admin panel.
This section helps you manage how taxes are applied to products, shipping, and checkout processes based on your customers’ locations and applicable tax regulations.
Here’s a structured breakdown of key tax configuration tasks:
| No. | Task | What It Helps Set |
| 1. | Enable Tax Calculations | Automatically applies relevant taxes during checkout. |
| 2. | Set Tax Rates by Regions | Applies appropriate rates based on country, state, or zone. |
| 3. | Include or Exclude Taxes | Determines whether product prices show with or without tax. |
| 4. | VAT or GST Configuration | Ensures compliance with region-specific tax laws. |
| 5. | Collect Tax on Shipping | Adds tax to shipping charges when applicable. |
| 6. | Add Tax Exemptions | Allows exemptions for qualified customers or products. |
| 7. | Test Tax Calculations | Verifies that taxes are calculated and displayed correctly. |
Shopify automates much of the tax calculation based on customer location and product details.
However, it’s essential to double-check regional requirements, especially if you’re selling internationally or handling VAT/GST.
This structured approach should give you a clear overview of what needs to be done and why each step matters for a compliant and seamless checkout process.
18. Domain Transfer & Setup
One of the most crucial steps in the platform migration process is transferring or connecting your domain to Shopify. This ensures a seamless transition for your customers and helps maintain your brand’s online identity.
By connecting or transferring your domain to Shopify, your store remains accessible through the same familiar web address, only now, Shopify becomes your hosting provider.
Let’s explore your domain management options first.
Domain Management Options With Shopify:
Shopify offers three ways to manage your domain:
- Connect Your Existing Domain → Keep your domain registered with your current provider and simply point it to Shopify by updating the DNS settings (A and CNAME records).
- Transfer Your Domain to Shopify → Move the domain registration to Shopify for centralized control and easier management.
- Purchase a New Domain from Shopify → If you’re rebranding or starting fresh, you can buy a new domain directly within the Shopify platform.
How to Transfer a Domain from OpenCart to Shopify?
If your domain was previously used with your OpenCart store, follow these steps to transfer or connect it to Shopify:
# To Transfer Your Domain to Shopify:
- Log in to your domain registrar and unlock your domain to make it transferable.
- Request the Authorization Code (EPP Code) to verify ownership.
- In Shopify, go to Settings > Domains > Transfer Domain, enter your domain name, and follow the transfer prompts.
- Wait for DNS propagation, which may take up to 48 hours to complete.
# To Connect Your Existing Domain Without Transfer:
- Log into your domain registrar and update your DNS settings:
- Set the A Record to Shopify’s IP address: 23.227.38.65
- Set the CNAME Record for www to: shops.myshopify.com
- In Shopify, navigate to Settings > Domains > Connect Existing Domain and follow the verification steps.
- Once verified, set your connected domain as the primary domain to ensure consistent branding.
It’s important to note that transferring your domain to Shopify is completely optional.
You don’t need to move your domain registration to Shopify, instead, you can simply connect your existing domain to your Shopify store by updating the A records through your current domain registrar.
Shopify provides a detailed guide on how to connect a third-party domain, making this process straightforward.
Once your domain is either connected or transferred, Shopify will automatically activate an SSL certificate for your store.
This process can take up to 48 hours for the SSL to be fully issued and propagated across the web. You can confirm whether SSL is enabled by checking the Domains section in your Shopify admin.
Once activated, your store’s URL will display as https://, ensuring a secure and trustworthy shopping experience for your customers.
With that, we can move to phase of our OpenCart to Shopify migration checklist.
Download the Migration Checklist
# Setting Up Marketing Channels & Analytics — OpenCart to Shopify Migration Checklist
At this stage of following OpenCart to Shopify migration checklist, your new Shopify store is nearly ready to launch. Now it’s time to migrate your marketing setup, bringing over the tools and tracking systems that powered your previous store.
This step ensures you don’t lose momentum and have full visibility into your store’s performance right from the start.
19. Analytics Tools Integration
The first priority is to reconnect or integrate your analytics tools so you can accurately monitor how your store performs post-migration. Without analytics, it’s difficult to track user behavior, evaluate marketing effectiveness, or make informed decisions.
Let’s break down what to set up.
(1) Google Analytics
Start by integrating your key analytics platforms to monitor your store’s performance from day one.
- Google Analytics: Link your GA4 account to Shopify via Settings > Customer Events using your measurement ID.
- Facebook Pixel: Add your Pixel ID under Online Store > Preferences in Shopify to track customer behavior and optimize your Meta ads.
Use tools like Facebook Pixel Helper to confirm proper setup and tracking.
Also, don’t forget to update your product feed URLs in:
- Google Merchant Center
- Google Search Console
- Any advertising platforms you’re using
This ensures continuity in tracking, ad performance, and visibility across channels after the platform migration.
20. Connect Marketing Platforms & Apps
As you migrate from OpenCart to Shopify, it’s important to reconnect your existing marketing tools and explore new integrations to keep your campaigns running smoothly. These platforms help boost engagement, automate outreach, and drive conversions.
| Aspect | Details |
| Email Marketing | Connect tools like Klaviyo, Mailchimp, or Shopify Email for newsletters, abandoned cart recovery, and retention campaigns. Sync customer data for personalization. |
| SMS Marketing | Integrate SMS apps to send real-time updates like order confirmations, promo alerts, and cart reminders. |
| Loyalty Programs | Add loyalty apps to offer points, discounts, or perks, motivating customers to return and shop more. |
| Ad Platforms | – Google Ads: Link your account to track and optimize campaign performance.- Meta Ads: Connect Facebook/Instagram for retargeting and performance tracking using Pixel data. |
Make sure all integrations are correctly configured. If you’re unsure, consider getting help from a certified Shopify expert to avoid any data loss or tracking issues.
Download the Migration Checklist
# Preserving SEO — OpenCart to Shopify Migration Checklist
Every store owner wants to preserve the valuable search engine rankings they’ve worked hard to achieve, and you’re no different. At this stage of following OpenCart to Shopify migration checklist, it’s time to focus on carrying over the SEO foundation from your OpenCart store to new Shopify store.
Let’s go over the key SEO elements you need to migrate and optimize for continued visibility and performance.
21. Set Up URL Redirects
During platform migration, URL structures often change, leading to broken links, lost traffic, and negative SEO impact if not managed properly.
- OpenCart typically uses a URL structure like:
example.com/category-name - Shopify uses its own URL structure, such as:
example.com/collections/category-name
This structural difference means that your old OpenCart URLs won’t automatically align with Shopify’s format.
To avoid broken links and loss of organic traffic, you’ll need to implement 301 redirects, pointing each old URL to its new Shopify equivalent.
You can do this using Shopify’s built-in URL Redirects tool, or by installing a third-party redirect app for bulk actions.
Regardless of the method, make sure to test all key pages (like homepage, product, category, and blog pages) to confirm they’re redirecting properly. This step helps retain your SEO equity and ensures a seamless transition for both users and search engines.
22. Additional SEO Settings and Configurations
Once you’ve set up 301 redirects for all key URLs, the next step is to redirect SEO from your previous store to Shopify to ensure long-term visibility and traffic retention
Here are 10 crucial actions to take:
- Make sure every product, category, and page has a unique meta title and description with relevant keywords to boost search engine relevance.
- Add descriptive alt tags to all images to support accessibility and improve performance in image search results.
- Ensure Data Consistency
Review and confirm that all titles, descriptions, prices, and stock statuses are consistent and accurate across your store. - Check all internal links, especially in your navigation menus, product grids, and footer, to ensure they lead to the correct destinations.
- Identify and resolve any broken links or incorrectly configured redirects to protect user experience and search rankings.
- Ensure canonical tags are correctly implemented to prevent duplicate content issues and consolidate page authority.
- Recheck that every 301 redirect is working properly, especially for high-traffic and indexed pages.
- Link your new Shopify store to Google Search Console for enhanced visibility, performance insights, and index tracking.
- Upload your new sitemap.xml in Search Console to help Google quickly crawl and index your updated content structure.
- Continually check for crawl errors, missing pages, duplicate content, and other SEO issues; and address them proactively.
By following these steps, you not only safeguard your existing SEO equity during the platform migration but also lay a solid foundation for improved visibility in Shopify.
Download the Migration Checklist
# New Shopify Store Testing — OpenCart to Shopify Migration Checklist
Now that your Shopify store is fully built and configured, it’s time for a critical step: testing everything.
This final phase of OpenCart to Shopify migration checklist ensures that all your hard work translates into a fully functional, user-friendly, and conversion-ready storefront.
23. Perform Quality Assurance (QA)
Before going live, it’s essential to perform a comprehensive QA check to ensure your Shopify store functions flawlessly.
This step helps identify and resolve any issues that could disrupt the customer experience.
1. Content Accuracy
Cross-check all product details, descriptions, images, prices, and stock levels with your original OpenCart store to ensure everything is accurate and up to date.
2. Functionality Testing
Test every interactive element, including navigation menus, filters, search bars, product sliders, and variant selectors, to ensure a smooth and intuitive experience.
3. Page Load Speed
Evaluate your store’s loading speed. A fast site not only improves user experience but also contributes positively to SEO and conversion rates.
4. SEO Validation
Confirm that meta titles, descriptions, image alt tags, and canonical tags are properly configured. Make sure all pages are crawlable and indexable by search engines.
5. Link Check
Review all internal and external links to ensure they work correctly, especially in menus, CTAs, product pages, and blog posts, to avoid broken links or misdirected URLs.
24. Review Mobile Responsiveness
With the majority of online shoppers browsing from mobile devices, ensuring mobile compatibility is non-negotiable.
1. Cross-Device Testing → Preview your store on various screen sizes, smartphones, tablets, and different operating systems, to ensure consistent design and usability.
2. Touch-Friendly Interface → Make sure buttons, links, dropdowns, and sliders are easy to tap and navigate on smaller screens.
3. Responsive Layouts → Confirm that all content, including images, text, and product grids, adjusts cleanly to different screen widths without visual distortion.
4. Mobile Checkout Flow → Test the full checkout process on mobile, from adding a product to completing payment. It should be quick, intuitive, and friction-free.
Thorough QA and mobile optimization are the final steps to delivering a seamless, professional shopping experience, ensuring that your Shopify store is truly ready for launch.
Download the Migration Checklist
# Launch Preparations & Launch — OpenCart to Shopify Migration Checklist
Your new store is almost ready and prepared for launch, yes. But…
Before we make it live for an audience, some launch preparations are necessary. Let’s get into your task list for this stage of OpenCart to Shopify migration checklist.
25. Enable Password Protection
As you approach launch, it’s a good idea to keep your Shopify store private while final reviews and testing are completed.
Why Enable Password Protection?
- Prevent public access while the store is still under review
- Avoid customers seeing incomplete pages or features
- Allow team members or select testers to explore the store and provide feedback
How to Enable Password Protection?
- Go to Online Store > Preferences.
- Scroll to the Password Protection section.
- Enable it and set a secure password.
- Share the password with stakeholders who need access.
This helps you maintain control over your store’s visibility until it’s fully ready to go live.
26. Push That Launch Button 🚀
After all the hard work, it’s finally time to make your new Shopify store live.
Before removing password protection, complete a delta (or partial) migration to transfer any new data, such as recent orders, customers, or products, that was added to your OpenCart store after your initial platform migration.
Once everything is in place, disable password protection and welcome your customers to your brand-new store.
# Post-Migration Tasks — OpenCart to Shopify Migration Checklist
Launching is just the beginning. To ensure smooth operations and a great customer experience, tackle these final steps of OpenCart to Shopify migration checklist:
27. Disable OpenCart Store
Even though your Shopify store is now live, make sure to shut down your old OpenCart store to avoid confusion.
Running both stores simultaneously can cause:
- Duplicate orders
- Inventory mismatched
- Confusion for returning customers
Disabling your old store ensures a clean transition with no conflicting data or customer experience issues.
28. Announce Your New Store
Let your audience know about the upgrade and direct them to your new Shopify store.
Tips for an Effective Announcement:
- Create Buzz: Use teasers, sneak peeks, or countdowns on social media.
- Drive Engagement: Offer launch incentives like discounts or free shipping.
- Highlight Benefits: Emphasize improved speed, mobile experience, or new features.
- Notify Through Multiple Channels: Send out launch emails, post on socials, and add a site-wide banner.
- Reassure Customers: Let them know their data has been safely migrated.
- Prompt Action: Ask customers to reset their passwords and log into their new accounts.
- Follow Up: Thank your customers for their support and ask for feedback post-launch.
29. Monitor Performance
Now that you’re live, keep a close eye on your store’s performance. Check:
- Site speed and load times
- Checkout and cart functionality
- Customer behavior and feedback
- Error reports or broken pages
Use tools like Shopify Analytics and Google Search Console to monitor traffic, SEO health, and conversion metrics. Address any issues early to ensure your customers have a smooth experience.
And here ends our OpenCart to Shopify migration checklist.
Download the Migration Checklist
Why Hire Experts for a Smooth Migration from OpenCart to Shopify?
As you’ve followed along with OpenCart to Shopify Migration Checklist, it’s clear that migrating to Shopify isn’t just a platform migration.
It’s a technical, strategic, and detailed process that involves much more than simply copying over data.
From data transfer and theme rebuilding to app integrations and SEO preservation, every phase carries risks that can impact your store’s performance and reputation. And let’s face it, the last thing you want during this transition is unexpected downtime, broken URLs, or a hit to your search rankings.
That’s why the safest and most efficient route is to bring in platform migration experts.
Structural Differences Matter:
OpenCart and Shopify operate on entirely different frameworks. Your OpenCart store may rely on custom modules or themes that don’t translate well. Experts know how to rebuild your store’s design and features natively in Shopify while retaining your brand identity.
Accurate Data Migration:
Migrating customer details, order history, product information, and meta fields can be tricky. Experts ensure better product import and import of other critical data, without loss or corruption.
SEO Preservation Is Complex:
OpenCart URLs and SEO structures differ from Shopify’s. Without proper handling (like 301 redirects, metadata transfer, canonical tagging, etc.), your hard-earned search rankings could take a hit. Professionals know exactly how to manage these elements to preserve and even improve your SEO post-migration.
Theme & UI Adjustments:
Shopify’s theme system is unique, and recreating your store’s design from OpenCart can be challenging without development knowledge. Experts can design your store to match or even enhance your previous look and feel.
App Recommendations & Setup:
Shopify’s app ecosystem is robust, but it’s not plug-and-play. Experts help you select the right apps, configure them to match your workflow, and avoid unnecessary tools that slow down your store.
Avoid Downtime or Order Errors:
When not done right, platform migrations can lead to inventory mismatches, duplicate orders, or broken checkout flows. Professional migration teams test everything thoroughly to avoid post-launch chaos.
Time Is Money:
As a business owner, your time is best spent on strategy and growth. Delegating the heavy lifting to professionals saves you time and ensures a smoother experience overall.
In short, even when following an OpenCart to Shopify Migration Checklist seems viable, hiring experts for your OpenCart to Shopify migration will help ensure a smooth & efficient transition with minimal risks.
Relying on Shopify migration experts will allow you to focus on what matters most, growing your business.
PS – Shopify Migration Service
We’re Aureate Labs, and we’ve expertise in seamless OpenCart to Shopify migrations.
Our team of experts can help you migrate to Shopify. From data transfer to SEO preservation, we can ensure your store transitions smoothly and efficiently. With our years of expertise, you can focus on growing your business while we manage the technical details.
Let us help you make the move to Shopify hassle-free. 😀

")


Post a Comment
Got a question? Have a feedback? Please feel free to leave your ideas, opinions, and questions in the comments section of our post! ❤️