Chapters Close

Free Shipping is one of the programs you can set up on Magento 2 when customers don’t need to pay any fee for the delivery. Free shipping makes them feel more comfortable and this is one marketing strategy that can encourage them to purchase more.

From Magento 2 Shopping Cart Rule settings, depending on the conditions you set, the Free Shipping can be applied for any order when all conditions are met.

Step 1: Activate Free Shipping

  • On the Admin Panel go to Stores > Settings > Configuration > Sales > Shipping Methods.
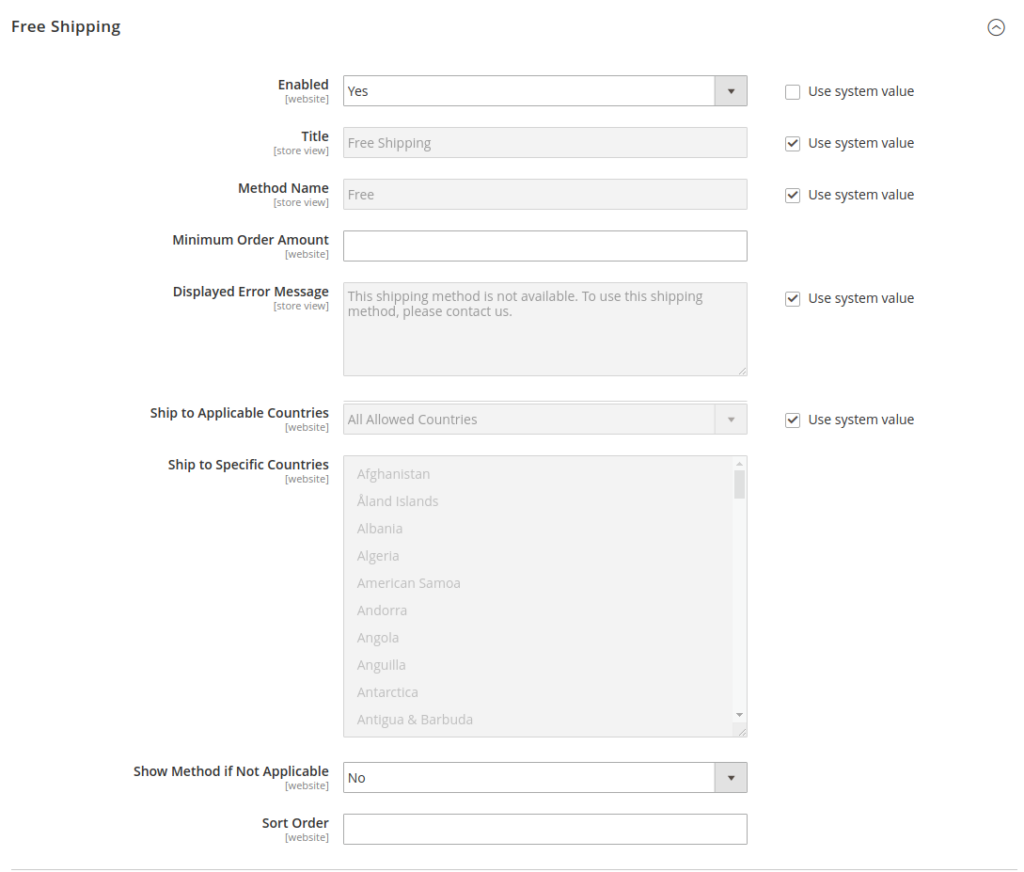
  • Open the Free Shipping section and follow the steps given below:
    • Enable the Free Shipping by choosing Yes.
    • Add the Title.
    • Enter the Method Name to make clear about the shipping method. For free shipping, type Free in the box.
    • Offer the Minimum Order Amount for the shipping.
    • Enter an error message in the Displayed Error Message box that will appear if Free Shipping is not available.
    • The Ship to Applicable Countries can be set to either of the two options:
      • All Allowed Countries: Free Shipping is supported for all the countries.
      • Specific Countries: Free Shipping is only supported for selected countries.
    • Set Show Method if Not Applicable to Yes if you want to show Free Shipping all the time.
    • Set the Sort Order on the Shipping Method on the checkout page.

Step 2: Activate Free Shipping in the Carrier Configuration

  • On the Admin Panel go to Stores > Settings > Configuration > Sales > Shipping Methods > UPS.
  • Set Free Method to “Ground.”
  • Enable the Free Shipping with Minimum Order Amount to the minimum amount of purchase for which free shipping is applicable in the Minimum Order Amount for Free Shipping field.

Step 3: Set a Shopping Cart Price Rule

On the Admin Panel Go to Marketing > Promotions > Cart Price Rules.

Apply Free Shipping for Any Order

  • In the Rule Information tab:
    • Set Name for the new rule and leave some descriptions of that.
    • Assign to the Website and Customer Group
    • Set Status to Active for which the rule is applied.
    • Set Coupon to No Coupon if shipping promotion is offered without any coupons.
  • In the Actions tab, open Pricing Structure Rules section:
    • Set Apply to Percent of product price discount
    • Set Apply to Shipping Amount to Yes
    • Set Free Shipping to For shipment with matching items.
  • In the Labels tab.
    • Under the Default Label section, insert the text in the Default Rule Label for All Store Views.
    • Under the Store View Specific Labels set the label for each store view.

Step 4: Check the Rule

After creating the rule you can test the rule right way to ensure that it is perfect.

Thank you for reading this blog. Please share your thoughts below, and if you require assistance with your Magento store development, our team is here to help

In this article, you will learn one more part of Magento store development: how to generate a translation dictionary for a module in Magento 2

You can generate a translation dictionary to use by itself (for example, to translate words and phrases in a custom module) or for use by a language package.

Work with translation dictionaries

To translate words and phrases, you must:

  • Run the translation collection command to extract translatable words and phrases from enabled components.
  • Translate the words and phrases.

After that:

  • You can package the translation dictionaries into a language package and provide the package to the Magento store administrator.
  • In the Magento Admin, the store administrator configures the translations.

Command options:

php bin/magento i18n:collect-phrases [-o|--output="<csv file path and name>"] [-m|--magento] <path to directory to translate>

The following table explains the parameters and values of the above command:

ParameterValue Required?
<path to directory to translate>Path to a directory that has translatable code; in other words, PHP, PHTML, or XML files that have phrases to translate.
The tool starts searching in the path you entered and searches all the files and subdirectories it contains.
Do not use this parameter if you use -m|–magento.

Yes (dictionaries), no (packages).
-m|–magento Required to create a language package from this translation dictionary.
If used, searches the directories that contain bin/magento. This option adds themes or modules to each line in the dictionary.
An example follows:
“No Items Found”,”No Items Found”,module,Magento_Wishlist
No
-o|–output=”<path>” Specifies the absolute file system path and file name of the translation dictionary .csv file to create. The value you enter is case-sensitive. The name of the .csv file must exactly match the locale name, including the characters’ case.
If you omit this parameter, the output is directed to stdout.
No

To create a language pack from a translation dictionary, you must use the -m|–magento option.

Example: Create a translation dictionary for a module or theme

Collect phrases from your module:

Run below command from Magento root directory to generate translation directory for a module.

php bin/magento i18n:collect-phrases -o 	app/code/ExampleCorp/SampleModule/i18n/en_US.csv app/code/ExampleCorp/SampleModule

FAQs

How to translate in Magento 2?


To translate in Magento 2, you need to use the Inline tool. You can enable it through the admin dashboard. First, switch to developer mode and go to Stores > Settings > Configuration > Advanced > Developer > Translate Inline and enable it for storefront or admin panel. You can then translate by clicking on the book icon.

How to install language pack in Magento 2?


To install language pack in Magento 2, follow the below steps:
1. Choose a language pack from the component manager and install it. 
2. Create its store view by going to Stores>Settings>All Stores in the admin panel.
3. Go to Locale Options and select the Locale for the translated page.
4. Use the command line to add the language pack.

How to add language switcher in Magento 2?


To add language switcher in Magento 2, follow these steps:
1. Visit the configuration option in Stores and go to Magefan Extensions > Auto Language Switcher.
2. Enable the Auto Language Switcher extension and select Switcher mode.
3. Configure the restrictions to add allowed pages to the language switcher.
4. Set the default store view for different countries.

What is i18n in Magento 2?


i18n in Magento 2 refers to the internalization feature. It is used to localize Magento stores based on location and language. It uses language packs to configure the stores based on strings for a particular market by translating product names, titles, prices, and other attributes.

This article will help you to understand how one can add multiple websites in Magento 2.

Magento allows you to setup multi-websites on just single installation of Magento. Its configuration is really simple. It will allow you to create a separate website so you can handle the products, customers, product price and many more things on websites bases. 

After installing Magento you need to login into the store and follow the steps given below.

How to create multiple new websites in Magento?

You can create multiple new websites in Magento in 5 steps.

Step 1: Navigate to all store settings and click on create a new website

Navigate to Stores>Settings>All Stores and create a new Magento website, a new store and a new store view. 

This is just the sample data. For instance, we have named our website a German website. After saving this information you will find it in the list as shown below.

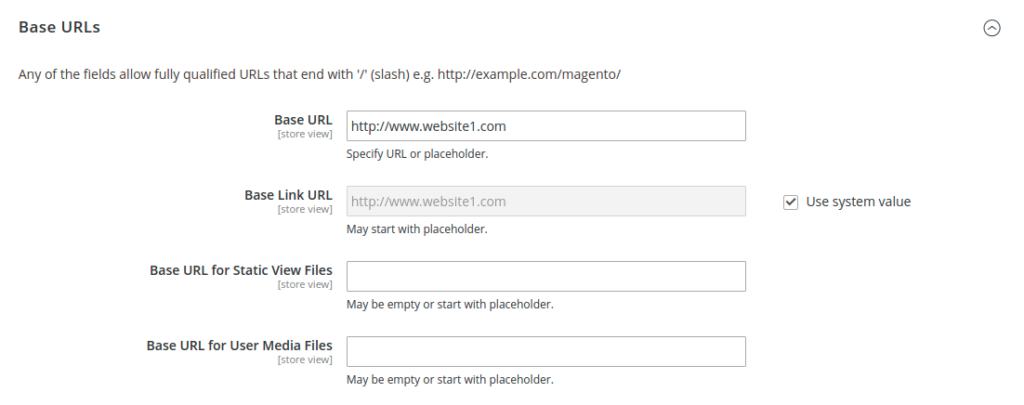
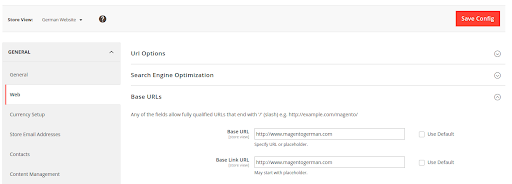
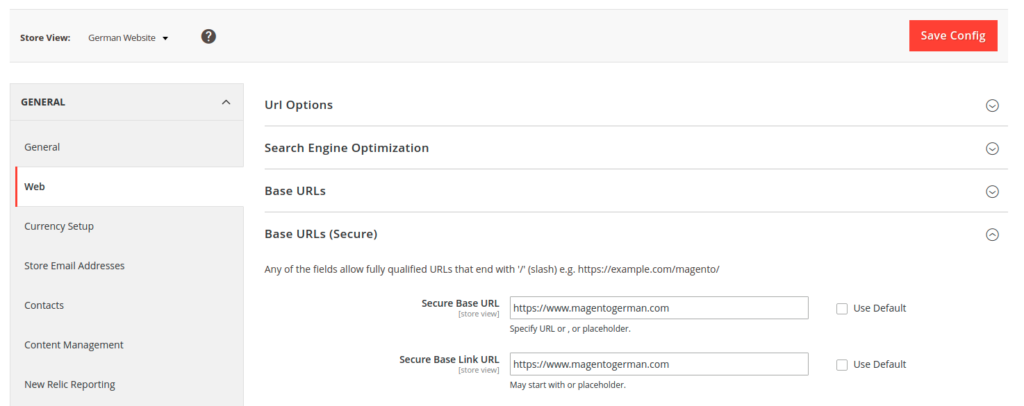
Navigate to Stores>Configuration>General>Web>Base Urls, here you need to update the Base Url and Base link URL fields.

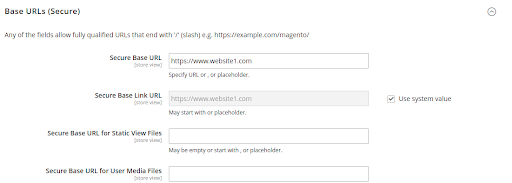
Navigate to Stores>Configuration>General>Web>Base Urls (Secure), here you will see that the Base Url and Base link URL fields will be automatically filled.

This image shows the base url section with the required domain name.

Step 3: Configure the store view and select the preferred store view

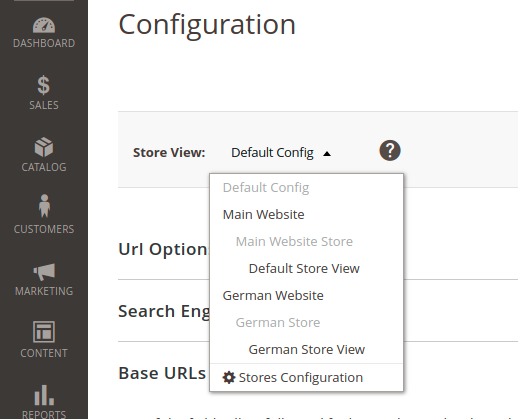
We need to update these URLs for the German website. You will see a store view option at the top of the page on the left side. Open this drop-down menu and select the German website.

Step 4: Save the configuration

Save this configuration.

Step 5: Open the .htaccess file and add the code

Now we need to open the .htaccess file from our Magento root directory. And find IfModule mod_rewrite.c section. Add below lines of code in this section.

SetEnvIf Host magentogerman.com* MAGE_RUN_CODE=german_website
SetEnvIf Host magentogerman.com* MAGE_RUN_TYPE=website

Now we will be able to access both our websites.

FAQs

Is multiple store creation possible in Magento 2?


Yes, multiple store creation is possible in Magento 2. You can have multiple websites, multiple stores under a single domain, or even multiple domains with a single Magento installation. You can label these additional stores as subdomains and manage them through the admin panel.

What is the difference between a store and a website in Magento 2?


The difference between a store and a website in Magento 2 is that a website is like a parent to the stores. A single Magento website can hold multiple stores, each with their own products and designs but have the same settings and configurations as the parent website. For example, a website can have a default currency and payment method. For every store in the website, the same currency and payment method is applicable, even if the products sold are different.

How do I switch to another website in Magento 2?


To switch to another website in Magento 2, you need to use the admin panel. In the panel, navigate to Stores>Settings>Configuration. In the Store View section, you can see a list of all your websites. Choose the required website from the drop-down menu. Select the “Web” option under the General tab to configure the settings for the selected website.

What is multistore in Magento 2?


Multi store in Magento 2 allows you to create multiple stores with a single Magento installation. Though these stores have different customers, designs, or products, they can be managed by the same admin panel. Multi store is useful in creating different versions of the same store by changing the currency and language.

To expand the awareness of your brand, Magento 2 allows inviting friends to use your products via email by setting up the Refer Email to a Friend in the configuration.

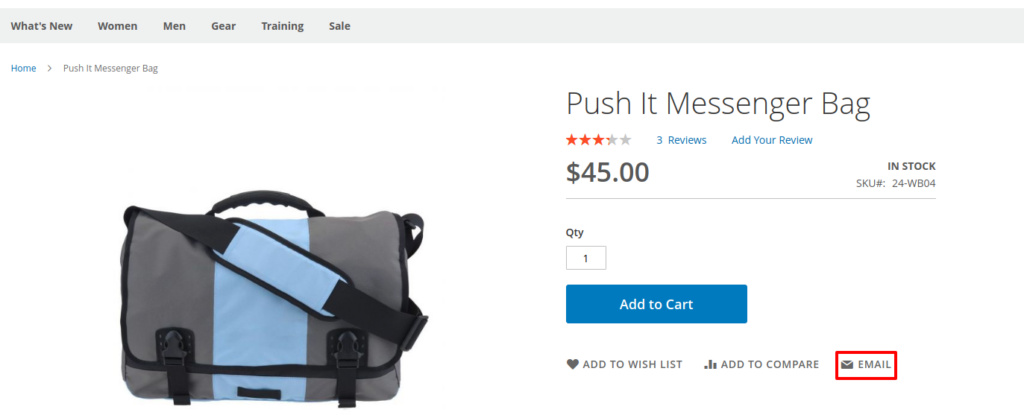
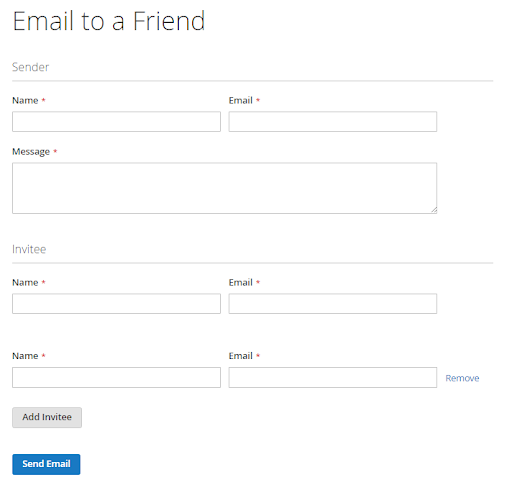
For a more straightforward approach, Email a Friend link appears along with an envelope icon instantly on the products page. By clicking on the link, customers are redirected to the Email to a Friend page, then fill in all the required information for the email.

It is possible to send mail to multiple recipients; however, to avoid spam, you should limit the number of sharing products per hour and the number of recipients per email. There is a complete Affiliate solution for Magento 2.

The Refer Email is a great way to help you drive traffic to your store while saving much more money on other modes of promotions.

Besides, sharing of your products by the customers will make your brand trustworthy in the marketplace. To ensure the delivery of your mail you should enable SMTP.

Setup Refer Email a Friend

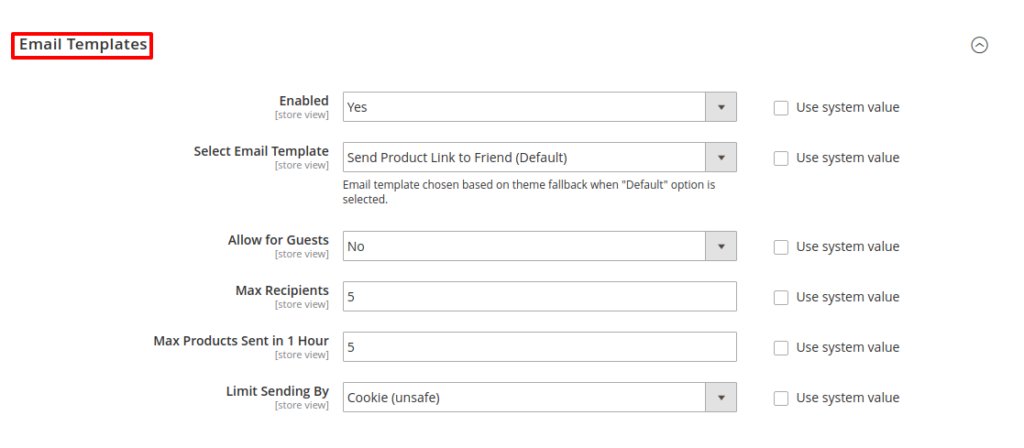
  • On the Admin Panel Go to Stores > Settings > Configuration > Catalog > Email to a Friend.
  • Open the Email Templates section,
  • In the Enable field, choose Yes to apply email template.
  • Select the Email Template that you need from the drop-down menu. This email template is enabled as default now. 
  • Set the Max Recipient to the maximum number of friends who are on the delivery list of an email.
  • Set the Max Products Sent in 1 Hour to the maximum number of products that can be sent by the sender to friends per hour.
  • The Limit Sending By allows you to detect the sender of a mail in two ways:
    • IP Address: the number address of the computer.
    • Cookies: Counting the number of times the mail is sent through browser cookies. This approach is not safe because the sender can erase the cookie before sending.

Send an email to a friend

  • Email a Friend link is now available to tap on the products page.
    • The login information is required if not logged in.
    • Create a new account if a user does not have an account on your store.
  • Enter Name and Email of the sender.
  • Enter Name and Email of the invitee. If sending to multiple friends at the same time, click the Add Invitee button.
  • Send the Email once it is ready.

This article will help you to understand how to set up RSS feed in Magento 2.

RSS (Rich Site Summary) summarises the latest information published on a website through the list of headlines, update notices, helps to distribute content to a wide number of people at the same time. 

It is one of the most important factors of Magento 2 SEO. To build and run a successful Magento store, it is essential to make your Magento website easily accessible. RSS feeds are very useful for this to happen.

Step 1: Open Configuration from Magneto 2 Admin.

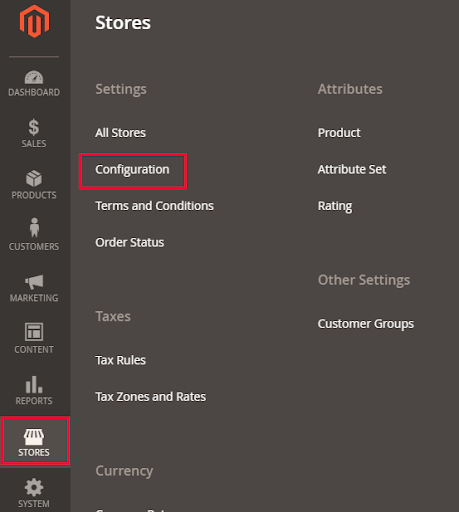
Open admin panel of Magento 2 and then go to Stores -> Configuration.

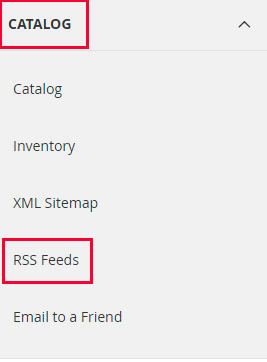
Scroll down and go to the CATALOG tab, and navigate to the RSS Feeds.

Step 2: Enable RSS Configuration.

Go to the RSS config section and select Enable from the drop-down menu.

Now go to Wish List. By enabling it, RSS feed link will appear at the top of your customer’s wishlist pages. To enable this setting, select Enable from the drop-down menu.

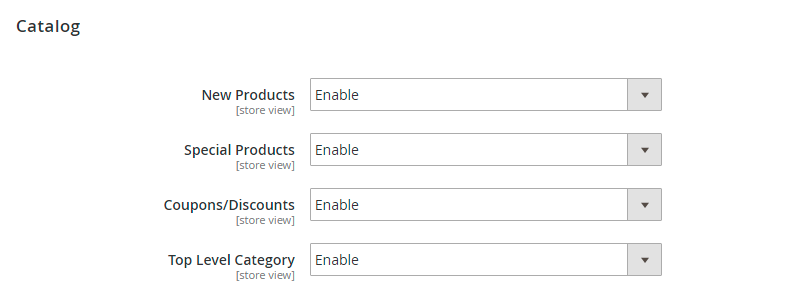
Now go to the Catalog section where you can enable the Catalog feeds. These Catalog feeds are:

  • New Products: Recently added products
  • Special Products: Products that have special prices.
  • Coupons/Discounts: Special coupons or discounts available in the store.

Top Level Category: Any new or changed top-level category of the catalog.

Now go to the last section – Order. By enabling this, customers can track their order status through the feed. If you want to do that, then select Enable from the drop-down menu.

Now save the configuration using the Save Config button from the top of this configuration page. 

Helpful resources:

Let’s learn about how to add a link in the top menu with the help of this article. In this example we will add “Order History” link in the top menu. 

First thing you need to do is to create a default.xml file in your theme or module.

If you want to add a link in your theme, then the path should be:

app/design/<VendorName>/<ThemeName>/Magento_Customer/layout/default.xml

In case if you want to add a link in your module, then the path should be: app/code/<VendorName>/<ModuleName>/view/frontend/layout/default.xml

Now, for creating the default.xml file at above given path we need to add the following code in it:

<?xml version="1.0"?>
<page xmlns:xsi="http://www.w3.org/2001/XMLSchema-instance" xsi:noNamespaceSchemaLocation="urn:magento:framework:View/Layout/etc/page_configuration.xsd">
  <body>
      <referenceBlock name="top.links">
          <block class="Magento\Customer\Block\Account\SortLink" name="order-history-top-link" after="wish-list-link">
              <arguments>
                  <argument name="path" xsi:type="string">sales/order/history</argument>
                  <argument name="label" xsi:type="string" translate="true">Order History</argument>
              </arguments>
          </block>
      </referenceBlock>
  </body>
</page>

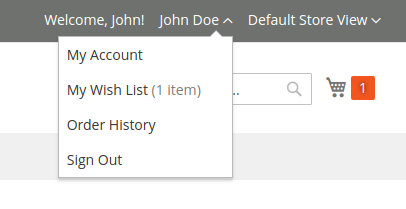
After following the example given above you will see that the link must have been added in the top menu and will appear as given below:

image

Now, Let’s learn to add link into top header section instead of top link dropdown. In this example, we will add “Contact Us” link in header. For that you need to add the following code in default.xml file.

<?xml version="1.0"?>
<page xmlns:xsi="http://www.w3.org/2001/XMLSchema-instance"
    xsi:noNamespaceSchemaLocation="urn:magento:framework:View/Layout/etc/page_configuration.xsd">
  <body>
      <referenceBlock name="header.links">
          <block class="Magento\Framework\View\Element\Html\Link" name="contact-top-header-link">
              <arguments>
                  <argument name="path" xsi:type="string">contact</argument>
                  <argument name="label" xsi:type="string" translate="true">Contact Us</argument>
              </arguments>
          </block>
      </referenceBlock>
  </body>
</page>

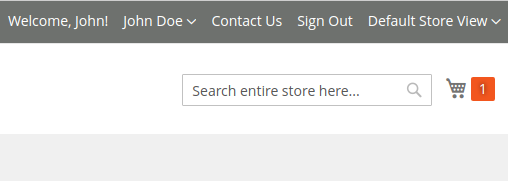
For the example given above the link will be added in the top header section and will look like this:

Feel free to leave the comments below and contact us if you need any help to customize your Magento store.

Happy coding!

This article will help you to understand how to create or remove your Magento Crontab.

Create Cron using CLI

Starting with version 2.2, Magento creates a crontab for us. Run cron as the Magento file system owner.

  1. Log in as, or switch to, the Magento file system owner in the terminal.
  2. Change to your Magento installation directory: cd <your Magento install dir>/
  3. Enter the following command: php bin/magento cron:install [--force] Here, use –force to rewrite and Magento crontab.

The Magento crontab is inside #~ MAGENTO START and #~ MAGENTO END comments in your crontab.

  • magento cron:install does not rewrite an existing crontab inside #~ MAGENTO START and #~ MAGENTO END comments in your crontab.
  • magento cron:install --force has no effect on any cron jobs outside the Magento comments.

To view the crontab, enter the following command as the Magento file system owner in terminal:

Example:

#~ MAGENTO START
* * * * * /usr/bin/php /var/www/html/magento2/bin/magento cron:run 2>&1 | grep -v Ran jobs by schedule >> /var/www/html/magento2/var/log/magento.cron.log
* * * * * /usr/bin/php /var/www/html/magento2/update/cron.php >> /var/www/html/magento2/var/log/update.cron.log
* * * * * /usr/bin/php /var/www/html/magento2/bin/magento setup:cron:run >> /var/www/html/magento2/var/log/setup.cron.log
#~ MAGENTO END

Remove Cron using CLI

To clear cron schedule in Magento 2:

  1. Log in as, or switch to, the Magento file system owner in the terminal.
  2. Change to your Magento installation directory: cd <your Magento install dir>/
  3. Enter the following command: php bin/magento cron:remove

This command has no effect on cron jobs outside the #~ MAGENTO START and #~ MAGENTO END comments in your crontab.

Run Cron from CLI

Command options:

php bin/magento cron:run --group index
php bin/magento cron:run --group default

php bin/magento cron:run [–group=""] where --group specifies the cron group to run.
Example :

Hope it helps you! 🙂 Enjoy your magento development activities.

FAQs

What is * * * * * In cron job?


The * * * * * in cron job indicates the run schedule of the job. Each asterisk corresponds to the minute, the hour, the day, the month, and the year at which the job should repeat. You can replace each of the * with a number (0-59 for minutes, 0-12 for hours, and so on) to create a schedule for the job. If you use the expression “* * * * *” the job will run every single minute of every hour.

How do I disable cron job in Magento?


To disable the cron job in Magento 2, use the command line – php bin/magento cron:disable. It will update the cron_schedule table and set the status field to error for all scheduled cron jobs. Alternatively, you can run the command crontab -e and comment out the line that starts with * * * * * and ends with php.

How to create custom cron in Magento 2?


To create a custom cron in Magento 2, follow the below-mentioned steps –

1. Create a new module in the app/code directory of your Magento installation.
2. Next, create a new crontab.xml file in the module’s etc directory.
3. In the above file, use the following code to define your custom cron job:
<?xml version="1.0"?>
<config xmlns:xsi="http://www.w3.org/2001/XMLSchema-instance" xsi:noNamespaceSchemaLocation="urn:magento:module:Magento_Cron:etc/crontab.xsd">
<group id="default">
<job name="vendor_module_custom_cron" instance="Vendor\Module\Cron\CustomCron" method="execute">
<schedule>*/5 * * * *</schedule>
</job>
</group>
</config>

4. Further, create a new class in the Cron directory of your module as CustomCron.php.
5. Now, in the above file, define the execute method by adding the below code –
<?php
namespace Vendor\Module\Cron;
class CustomCron
{
public function execute()
{
//Add your cron job logic here
}
}

6. Thereafter, run the command php bin/magento setup:upgrade in your Magento root directory to enable the module.

How to check cron is enabled in Magento 2?


To check cron is enabled in Magento 2, use the command line – php bin/magento cron:status in CLI. Make sure to run it in your Magento root directory! This command will return the status of the cron jobs and will only indicate whether or not cron is enabled.

In this blog post, I will guide you on how to change the Magento 2 configuration from the CLI command. So without wasting much time, let’s dive into the post.

We can set any configuration options from the command line.

  • Before installing Magento, one can set the configuration values for the default scope only, which is the only valid scope.
  • After installing  Magento, You can set the configuration values for any website or store view scope which is quite beneficial.

We use the commands given below to set the Magento 2 configuration:

  • bin/magento config:set sets any non-sensitive configuration value by its configuration path.
  • bin/magento config:sensitive:set sets any sensitive configuration value by its configuration path.
  • bin/magento config:show shows saved configuration values; values of encrypted settings that are displayed as asterisks.

To set a configuration value, you must know at least one of the following:

  • The configuration path
  • The scope code, to set a configuration value for a particular scope

Set configuration values

  • To set system-specific configuration values on Magento 2.2.0 – 2.2.3, use: $ bin/magento config:set [--scope="..."] [--scope-code="..."] [-l | --lock] path value
  • To set system-specific configuration values on Magento 2.2.4 and higher, use: $ bin/magento config:set [--scope="..."] [--scope-code="..."] [-le | --lock-env] [-lc | --lock-config] path value
  • To set sensitive configuration values, use: $ bin/magento config:sensitive:set [--scope="..."] [--scope-code="..."] path value
    • The config:sensitive:set command writes sensitive settings to <Magento base directory>/app/etc/env.php.

–scope : Defines scope of the configuration. Valid values are default, website, or store. The default value is set as default.

–scope-code: Defines scope code of configuration (website code or store view code).

-l or –lock (Version: 2.2.0 – 2.2.3) : Either locks the value so it cannot be edited in the Magento Admin or changes a setting that is already locked in the Magento Admin. The command writes the value to the <Magento base dir>/app/etc/env.php file.

-le or –lock-eav (Version 2.2.4 and higher) :  Either locks the value so it cannot be edited in the Magento Admin or changes a setting that is already locked in the Magento Admin. The command writes the value to the <Magento base dir>/app/etc/env.php file.

-lc or –lock-config(Version 2.2.4 and higher) : Either locks the value so it cannot be edited in the Magento Admin or changes a setting that is already locked in the Magento Admin. The command writes the value to the <Magento base dir>/app/etc/config.php file. The –lock-config option overwrites –lock-env if you specify both the options.

Path : Required. The configuration path.
Value : Required. The value of the configuration.

Example:

  1. Set Sender Email for Sales Representative with default scope:
    • $ bin/magento config:set trans_email/ident_sales/email sales@aureatelabs.com
  2. Set the Sender Email for Sales Representative for the base website:
    • $ bin/magento config:set --scope="website" --scope-code="base" trans_email/ident_sales/email aureate_sales@aureatelabs.com
  3. Set the Sender Email for Sales Representative for the test store view:
    • $ bin/magento config:set --scope="stores" --scope-code="default" trans_email/ident_sales/email aureate_sales@aureatelabs.com

Set configuration values that cannot be edited in the Magento Admin

If you have used –lock-eav (version 2.2.4 or higher) or –lock (version 2.2.0-2.2.3) option to set Magento configuration, this command will save the configuration value in <Magento base dir>/app/etc/eav.php file and will disable the config field for further editing the value in the admin.

$ bin/magento config:set --lock-env --scope=stores --scope-code=default trans_email/ident_sales/email sales@aureatelabs.com

If you have used –lock-config (version 2.2.4 or higher) option to set Magento configuration, this command saves configuration value in <Magento base dir>/app/etc/config.php file and disables the config field for edit value in the admin.

$ bin/magento config:set --lock-config --scope=stores --scope-code=default web/url/use_store 1

Display the value of configuration settings

$ bin/magento config:show [--scope[="..."]] [--scope-code[="..."]] path

Example:
$ bin/magento config:show --scope="stores" --scope-code="default" web/url/use_store

Result :
1

Show all saved configuration

$ bin/magento config:show

Result :
web/seo/use_rewrites - 1
web/unsecure/base_url - http://127.0.0.1/magento/
web/unsecure/base_static_url -
web/unsecure/base_media_url -
web/secure/base_url - https://127.0.0.1/magento/
web/secure/use_in_frontend - 0
web/secure/use_in_adminhtml - 0
web/secure/base_static_url -
web/secure/base_media_url -
.
.
.

Show all saved configuration for the base website

$ bin/magento config:show --scope="website" --scope-code="base"

Result :
web/unsecure/base_url - http://127.0.0.1/magento/
trans_email/ident_sales/email - aureate_sales@aureatelabs.com
.
.

Show Sender Email of Sales Representative configuration for default scope

$ bin/magento config:show trans_email/ident_sales/email

Result :
sales@aureatelabs.com

Show Sender Email for Sales Representative configuration for the base website

$ bin/magento config:show --scope="website" --scope-code="base" trans_email/ident_sales/email

If the configuration value is not set for the website, then it will give an error as shown below:
Configuration for path: "trans_email/ident_sales/email" doesn't exist

Hope this detailed article served your purpose. Feel free to leave the comments below and contact us if you need any help to customize your Magento store.

Thanks for your interest.

FAQs

What is CLI command in magento 2?


The CLI command in Magento 2 stands for Command Line Interface. The interface allows you to perform a variety of tasks including commerce installation, updates, clearing cache memory, and other such configuration tasks utilizing commands. You can also add, modify, or list all available commands through the command line interface.

How do I access magento from command line?


To access Magento from command line, follow the below steps:
1. Open the command prompt on the Magento server.
2. Redirect the directory to the folder where Magento is installed. 
3. Run the command “chmod 744 bin/magento” to execute the CLI.
4. Once the CLI is executable, utilize bin/magento to use the CLI and also list all the commands.

How to make a cli command in magento 2?


To make a CLI command in Magento 2, follow these steps –

1. Create a new module in the app/code directory of your Magento installation.
2. In the module’s etc directory, create a new module.xml file.
3. Add the following code to register the module with Magento:
<?xml version="1.0"?>
<config xmlns:xsi="http://www.w3.org/2001/XMLSchema-instance" xsi:noNamespaceSchemaLocation="urn:magento:framework:Module/etc/module.xsd">
<module name="Vendor_Module" setup_version="1.0.0"/>
</config>

4. Now, in the module’s Console directory, create a new Command class, and it must implement the configure() & execute() methods. 
<?php
namespace Vendor\Module\Console;
use Symfony\Component\Console\Command\Command;
use Symfony\Component\Console\Input\InputInterface;
use Symfony\Component\Console\Output\OutputInterface;
class CommandName extends Command
{
protected function configure()
{
$this->setName('vendor:commandname')
->setDescription('Command Description');
}
protected function execute(InputInterface $input, OutputInterface $output)
{
//Add your command logic here
$output->writeln('Command executed successfully.');
}
}

5. Further, create a new di.xml file in the module’s etc directory by adding the code –
?xml version="1.0"?>
<config xmlns:xsi="http://www.w3.org/2001/XMLSchema-instance" xsi:noNamespaceSchemaLocation="urn:magento:framework:ObjectManager/etc/config.xsd">
<type name="Magento\Framework\Console\CommandList">
<arguments>
            <argument name="commands" xsi:type="array">
            <item name="vendor_module_commandname"
             xsi:type="object">Vendor\Module\Console\CommandName</item>
</argument>
</arguments>
</type>
</config>

6. Run the command php bin/magento setup:upgrade in your Magento root directory to enable the module.
7. Thereafter, run the command php bin/magento vendor:commandname to execute the command.

What is the correct way to execute magento CLI commands?


The correct way to execute the Magento CLI command is by using php bin/magento <command> in the root directory. For example, to run the command cache:clean, use php bin/magento cache:clean. You can also use the list command php bin/magento list to retrieve all the available other commands.
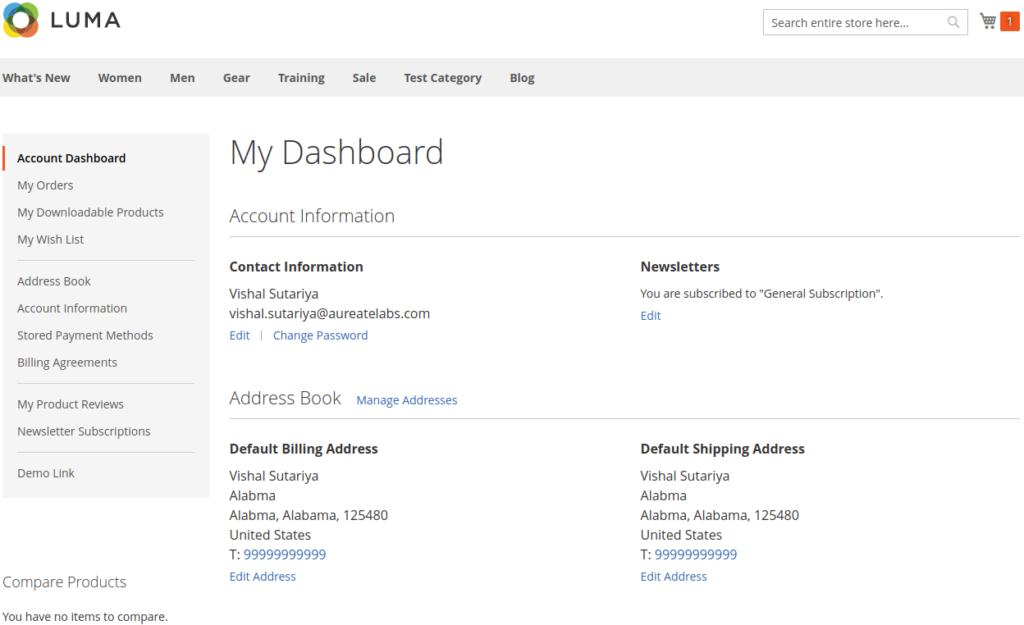
Today you will be learning about how to add a link in your account navigation.

First of all, you need to create customer_account.xml file in your theme or module. The path of this file is given below.

If you want to add a link in your module, then the path should be app/code/<VendorName>/<ModuleName>/view/frontend/layout/customer_account.xml

If you want to add a link in your theme, then the path should be app/design/<VendorName>/<ThemeName>/Magento_Customer/layout/customer_account.xml

Now, we need to create customer_account.xml at the respective paths given above. Add the following code in the file just created.

<?xml version="1.0"?>
<page xmlns:xsi="http://www.w3.org/2001/XMLSchema-instance" xsi:noNamespaceSchemaLocation="urn:magento:framework:View/Layout/etc/page_configuration.xsd">
  <body>
      <referenceBlock name="customer_account_navigation">
          <block class="Magento\Customer\Block\Account\Delimiter" name="customer-account-navigation-delimiter-demo" template="Magento_Customer::account/navigation-delimiter.phtml" before="customer-account-navigation-demo-link" />
          <block class="Magento\Framework\View\Element\Html\Link\Current" name="customer-account-navigation-demo-link">
              <arguments>
                  <argument name="label" xsi:type="string">Demo Link</argument>
                  <argument name="path" xsi:type="string">module/controller/action</argument>
              </arguments>
          </block>
      </referenceBlock>
  </body>
</page>

In the above example we have used delimiter block (name with “customer-account-navigation-delimiter-demo”) to add a separator. In case you don’t want the separator, remove that block.

The result will same as the below image.

I hope you found this article valuable. Please leave any comments below and contact us for support in customizing or developing your Magento store.

Helpful resources:

This piece of information will throw some light on to how to send an order email to a custom email address in Magento 2.

To achieve this, you just have to follow a couple of steps mentioned below:

  • Step 1: Set an email form
  • Step 2: Create a Controller file


Step 1: Set an email form

Set the email form with the input field line as given below:

<form id="send-order-email" action="<?php $block->getUrl('demomodule/order/sendemail'); ?>">
   <label>Email Address</label>
   <input type="text" class="input-text" id="email">
</form>

Step 2: Create a Controller file

Create a controller file at the path given below and add the following code: app\code\Aureatelabs\DemoModule\Controller\Order\Email
This file is based on the class \Magento\Framework\App\Action\Action and it will take the submit action from the form created in the first step.

public function execute()
{
   $email = $this->getRequest()->getParam('email');
   $order = $this->_objectManager->create('Magento\Sales\Model\Order')->load(1); // this is entity id
   $order->setCustomerEmail($email);
   if ($order) {
       try {
           $this->_objectManager->create('\Magento\Sales\Model\OrderNotifier')
               ->notify($order);
           $this->messageManager->addSuccess(__('You sent the order email.'));
       } catch (\Magento\Framework\Exception\LocalizedException $e) {
           $this->messageManager->addError($e->getMessage());
       } catch (\Exception $e) {
           $this->messageManager->addError(__('We can\'t send the email order right now.'));
           $this->_objectManager->create('Magento\Sales\Model\OrderNotifier')->critical($e);
       }
   }
}

Feel free to leave the comments below and contact us if you need any help to customize your Magento store.

Happy coding!

Grow your online business like 3,321 subscribers

    * This site is protected by reCAPTCHA and the Google Privacy Policy and Terms of Service apply.
    envelope

    Thank You!

    We are reviewing your submission, and will be in touch shortly.