
Widgets are elements for adding static or dynamic content in any cms block and cms page in magento 2. Widgets have configurable parameters that can be set when you are adding the widget in the admin panel. Widgets are reusable component and with configurable parameter you can use the same widget in different number of pages with different parameter value.
Some of the custom widget implementation is as follows:
- Dynamic listing of recently viewed products
- Dynamic product listing
- Dynamic flash elements that are inserted in content pages
- Interactive navigation elements and action blocks
- Promotional banners
For creating custom widget you have to create one module. Here I will be using the Aureatelabs_CustomWidget as my module.
Create the registration.php file in the app/code/Aureatelabs/CustomWidget folder.
<?php

\Magento\Framework\Component\ComponentRegistrar::register(
   \Magento\Framework\Component\ComponentRegistrar::MODULE,
   'Aureatelabs_CustomWidget',
   __DIR__
);
Create the module.xml file in the app/code/Aureatelabs/CustomWidget/etc folder.
<?xml version="1.0"?>
<config xmlns:xsi="http://www.w3.org/2001/XMLSchema-instance" xsi:noNamespaceSchemaLocation="urn:magento:framework:Module/etc/module.xsd">
   <module name="Aureatelabs_CustomWidget" setup_version="1.0.0" />
</config>
Now for initialisation of the widget we need a widget.xml file. So next you need to do is create the widget.xml file in the app/code/Aureatelabs/CustomWidget/etc folder.
<?xml version="1.0" encoding="UTF-8"?>
<widgets xmlns:xsi="http://www.w3.org/2001/XMLSchema-instance" xsi:noNamespaceSchemaLocation="urn:magento:module:Magento_Widget:etc/widget.xsd">
<widget class="Aureatelabs\CustomWidget\Block\Widget\CustomWidget" id="aureatelabs_customwidget">
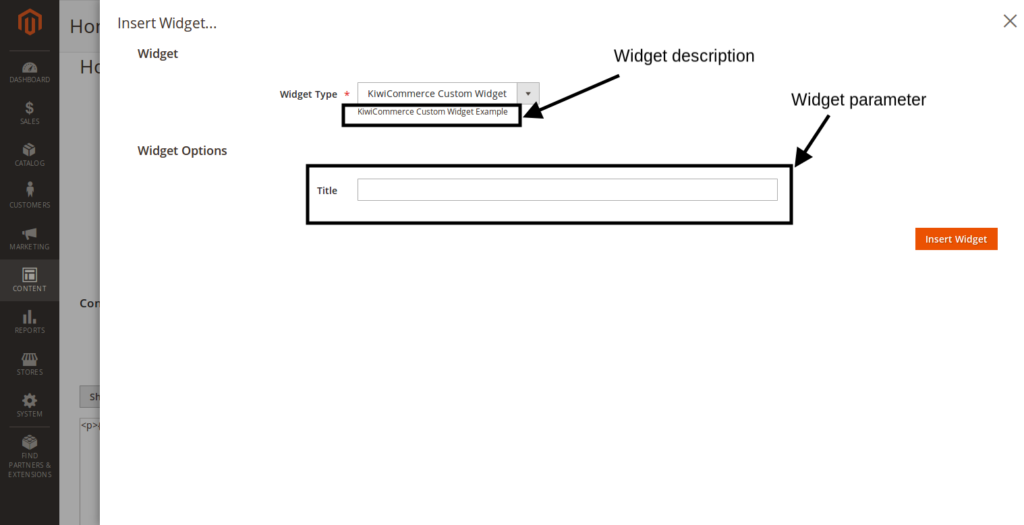
<label>Aureatelabs Custom Widget</label>
<description>Aureatelabs Custom Widget Example</description>
<parameters>
<parameter name="title" sort_order="10" visible="true" xsi:type="text">
<label>Title</label>
</parameter>
</parameters>
</widget>
</widgets>Here in the widget node there are two attributes
- class : Defines the widget class
- id : Gives custom widget an unique id
In widget node there are child nodes such as:
- label : Sets the widget label that will appear in the widget list
- description : Sets widget description
- parameters : The parameters node allows you to add different parameters like the text, select, multiselect, block and templates. We will discuss further about this later in this tutorial.
Now we have to create a block file for the widget as defined in widget.xml. So create the CustomWidget.php file in the app/code/Aureatelabs/CustomWidget/Block/Widget folder.
<?php
namespace Aureatelabs\CustomWidget\Block\Widget;

use Magento\Framework\View\Element\Template;
use Magento\Widget\Block\BlockInterface;

class CustomWidget extends Template implements BlockInterface
{
   protected $_template = "widget/custom_widget.phtml";

}
In the above snippet, $_template is used to set the template for the widget.
We have set the $_template value to “widget/custom_widget.phtml”. So it will search for the custom_widget.phtml file in the app/code/Aureatelabs/CustomWidget/view/frontend/templates/widget folder.
Thus create the custom_widget.phtml file in the app/code/Aureatelabs/CustomWidget/view/frontend/templates/widget folder.
<h1><?php echo $this->getData('title'); ?></h1>In order to get the parameter value from the phtml file we have to use $this->getData(‘parameter_name’)
It is important to note that we can also use this in block file for getting the parameter value.
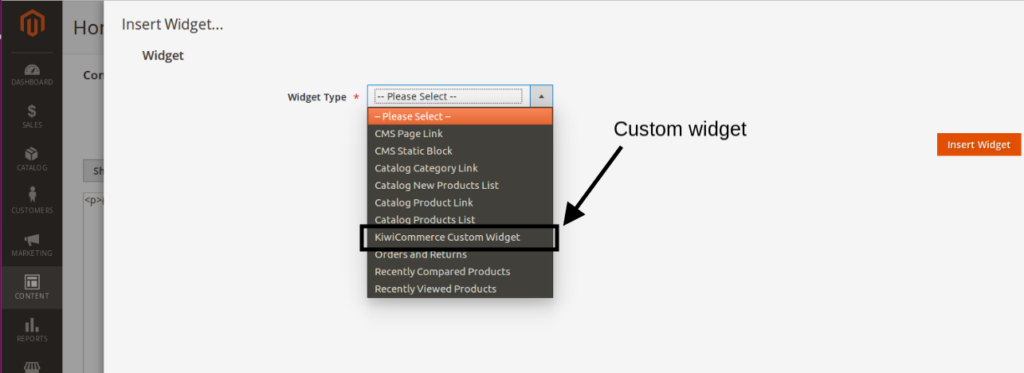
We have performed all the steps that are needed to create a custom widget in magento 2 . Now we have to just Flush the cache and add our custom widget in any cms page or any cms block.
You will see the “Aureatelabs Custom Widget” in the widget list.
We have created a simple custom widget in magento 2. For advanced information about custom widgets refer the section given below.
How to add the select and multiselect parameters in the custom widget
In order to add the select and multiselect options in the widget, you have to add the parameters given below in the widget.xml file.
<?xml version="1.0" encoding="UTF-8"?>
<widgets xmlns:xsi="http://www.w3.org/2001/XMLSchema-instance" xsi:noNamespaceSchemaLocation="urn:magento:module:Magento_Widget:etc/widget.xsd">
   <widget class="Aureatelabs\CustomWidget\Block\Widget\CustomWidget" id="aureatelabs_customwidget">
       <label>Aureatelabs Custom Widget</label>
       <description>Aureatelabs Custom Widget Example</description>
       <parameters>
           <parameter name="options" xsi:type="select" visible="true" source_model="Aureatelabs\CustomWidget\Model\Config\Source\DataOptions" sort_order="20" >
               <label>Select options</label>
               <description>Select options</description>
           </parameter>
           <parameter name="data_options" xsi:type="multiselect" visible="true" source_model="Aureatelabs\CustomWidget\Model\Config\Source\DataOptions" sort_order="40" >
               <label>Data Options</label>
               <description>Select data options </description>
           </parameter>
       </parameters>
   </widget>
</widgets>
Here, in parameter node in xsi:type attribute, set the value to select or multiselect.
There is one more attribute named the source_model. It is used in the select and multiselect widget parameter.
Now you have to create a source file for the select and multiselect parameter.So create a DataOptions.php file in the app/code/Aureatelabs/CustomWidget/Model/Config/Source folder
<?php
namespace Aureatelabs\CustomWidget\Model\Config\Source;

use Magento\Framework\Option\ArrayInterface;

class DataOptions implements ArrayInterface
{
   public function toOptionArray()
   {
       $options = [
           [
               'value' => 'option1',
               'label' => __('Option-1')
           ],
           [
               'value' => 'option2',
               'label' => __('Option-2')
           ],
           [
               'value' => 'option3',
               'label' => __('Option-3')
           ],
       ];

       return $options;
   }
}
Dependency in Widget Parameter
Depends attribute is used when one parameter is dependent on the other parameter.
<?xml version="1.0" encoding="UTF-8"?>
<widgets xmlns:xsi="http://www.w3.org/2001/XMLSchema-instance" xsi:noNamespaceSchemaLocation="urn:magento:module:Magento_Widget:etc/widget.xsd">
   <widget class="Aureatelabs\CustomWidget\Block\Widget\CustomWidget" id="aureatelabs_customwidget">
       <label>Aureatelabs Custom Widget</label>
       <description>Aureatelabs Custom Widget Example</description>
       <parameters>
           <parameter name="enable_url" xsi:type="select" visible="true" source_model="Magento\Config\Model\Config\Source\Yesno" sort_order="20" >
               <label>Add URL</label>
               <description>Enable or disable URL link </description>
           </parameter>
           <parameter name="url" xsi:type="text" visible="true" sort_order="30" >
               <label>URL</label>
               <depends>
                   <parameter name="enable_url" value="1" />
               </depends>
           </parameter>
       </parameters>
   </widget>
</widgets>
In above example url parameter is dependent on the enable_url parameter. When enable_url value is set to 1, then the url parameter will be displayed or else the url parameter will not be shown.


Post a Comment
Got a question? Have a feedback? Please feel free to leave your ideas, opinions, and questions in the comments section of our post! ❤️