How to Customize Shopify Thank You Page With Thankify?

There are hundreds of options available when it comes to customizing your online store, starting from the Homepage to the cart page, even the checkout page (in some cases). But when it comes to customizing your thank you page, the options are very limited.
That’s really unfair!! 🙁
For Shopify merchants, the Thank You page is a place where you can make your customers feel special or even bury seeds for your future sales. However, the existing limitations of Shopify can make the thank you page customization challenging for you.
But what if there was a simple way to make your Thank You page as unique as your eCommerce brand? We’ve got good news for you!
In this blog, we’ll reveal how Thankify can help you cut these limitations, let you customize the Shopify thank you page, and create a better user experience for your customers.
Let’s get started!
Get Thank You Page Design Guide
Why Shopify’s Default Thank You Page Falls Short?
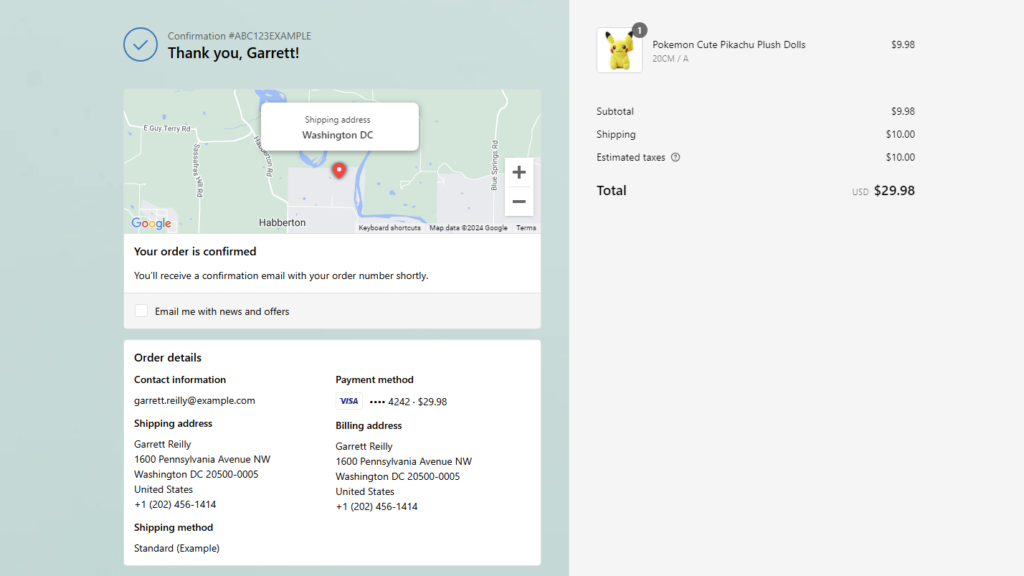
With Shopify’s default Thank You page, you’re basically limited to a static page that doesn’t allow customization or any way to boost customer engagement.
Here we’ll learn more about these limitations and then find a perfect solution for you.
1. Minimal Design Flexibility
Shopify’s default Thank You page follows a common layout across all stores, which typically includes an order confirmation, payment summary, and shipping details.
Yes, you’ve got the option to customize the color, font, and logo placements. However, there is no control over the page layout or no space to add personalized messages, promote additional products, or gather valuable customer feedback.
This not only affects the user experience but also limits the possibility of boosting retention or driving future sales.
2. No Post-Purchase Engagement
Thanking your customers and engaging them with post-purchase offers, such as future discounts or loyalty offers, is an effective way to retain them. Shopify’s Thank You page doesn’t easily support these types of touches, which can make customers feel disconnected.
3. No Upselling Opportunities
The default Shopify Thank You page doesn’t support easy upselling or product recommendations. It limits your ability to engage customers after they make a purchase, which means you miss the chance to suggest additional products or offers, as well as a good opportunity to increase your average order value.
4. No Direct Customer Feedback Mechanisms
Customer feedback is valuable for any business. But Shopify’s default Thank You page lacks a way to collect customer feedback, such as reviews or ratings on the Thank You page. Adding this feature often requires coding, which can feel like a lot of effort for something so simple yet valuable.
5. Technical Knowledge Requirement
While Shopify allows basic tweaks for the thank you page, like adding tracking pixels or scripts, the customization process can be time-consuming. Merchants must manually recreate previous customizations if they were made using apps or additional scripts that require technical knowledge.
Plus, many apps need updates to work with Shopify’s latest checkout features; otherwise, the customizations may break. Again, hiring a Shopify developer is an option but adds cost to the project.
Despite the default Thank You page limitations, there’s good news for Shopify merchants. There’s a Shopify app that can be the solution for all your challenges with Thank you page customizations.
Solution: Thankify—Smart Thank You Page For Shopify
Yes, it’s Thankify, the all-in-one solution for customizing your Shopify thank you page!
If the default Shopify Thank You page has been a barrier for you to creating a fully branded, engaging post-purchase experience, Thankify is here to change that.
Get Thank You Page Design Guide
So, what exactly is Thankify and why should you, as a Shopify merchant, care?
Let’s learn more about this app and its functionality.
What is Thankify?
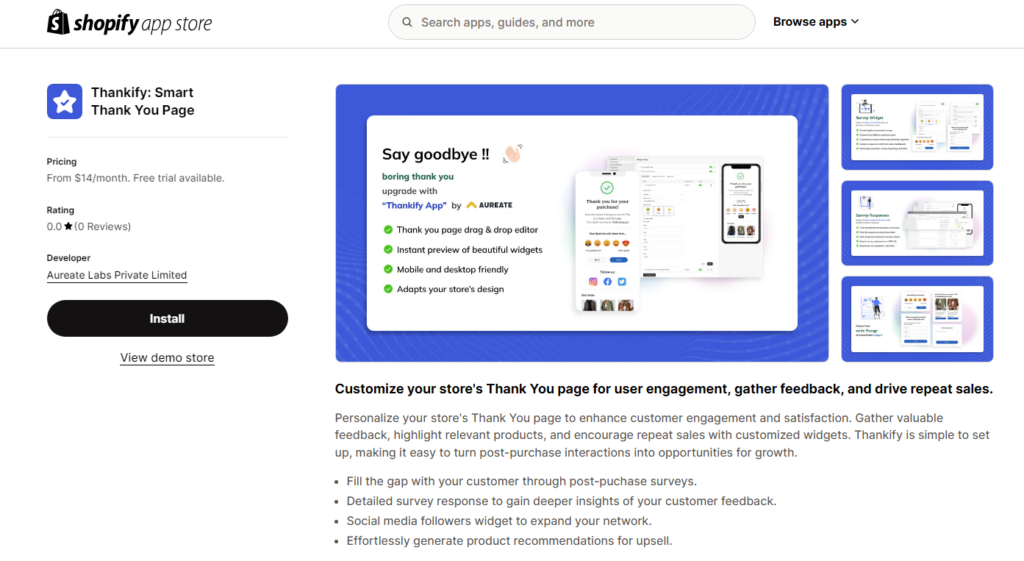
Thankify is a Shopify app designed to help merchants customize their Thank You page and transform it into an engaging, branded experience. If you’re tired of the default, static Shopify Thank You page that offers little room for customization, Thankify is the answer.
It allows you to personalize the page with messages, images, and interactive elements that create a lasting impression. You can easily collect customer feedback, showcase upsells or related products, and even manage these features in real-time, all without writing a single line of code.
Thankify offers several key features to enhance your Shopify store’s Thank You page (we’ll explore this in detail):
- Social media follow widget: Add social media buttons to encourage customers to stay connected with your brand after they complete a purchase.
- Post-purchase surveys: Collect valuable customer feedback through customized surveys right on the Thank You page.
- Product recommendations: Showcase related products to increase cross-selling opportunities with a product carousel.
- Rich content editor: Personalize your page with images, custom messages, discounts, and links—without any coding.
The best part is—Thankify offers a simple, intuitive interface with real-time previews, so you can see your changes before they go live. Plus, there’s a flexible pricing plan that grows with your store’s needs. Whether you’re a small business or a larger enterprise, Thankify adapts to fit your budget and goals.
In short, Thankify empowers you to offer a professional, branded post-purchase experience—without the stress or the steep learning curve!
Excited to know how Thankify enhances your thank you page and user experience??
For that, we need to explore the next section… Let’s go!
Get Thank You Page Design Guide
How to Customize Shopify Thank You Page with Thankify?
So, you’re ready to level up your post-purchase experience and make your Shopify Thank You page as engaging as your store’s homepage. In our previous guide on Shopify Thank you page customizations, we have shared some must-have customization ideas for your thank you page.
Now we will learn how you can execute those ideas with the Thankify Shopify app.
Make sure you have installed Thankify: Smart Thank You Page in your Shopify store.
1# Add a personalized message
Yes, saying “thank you” is important, but why not do it in a way that makes your customers feel special? With Thankify, you can add custom Thank you messages to your page.
Here are the steps to follow:
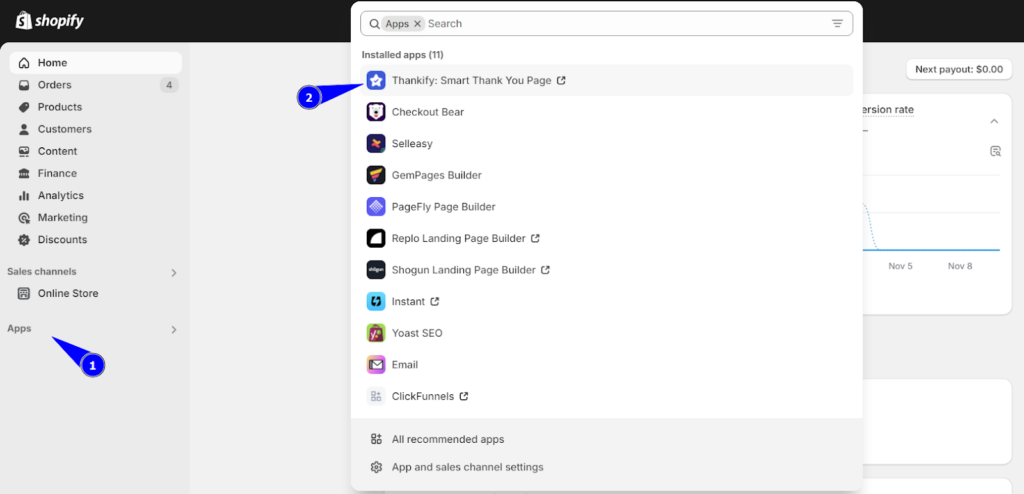
Step 1: In the Shopify admin, go to the Apps and click on the Thankify app.
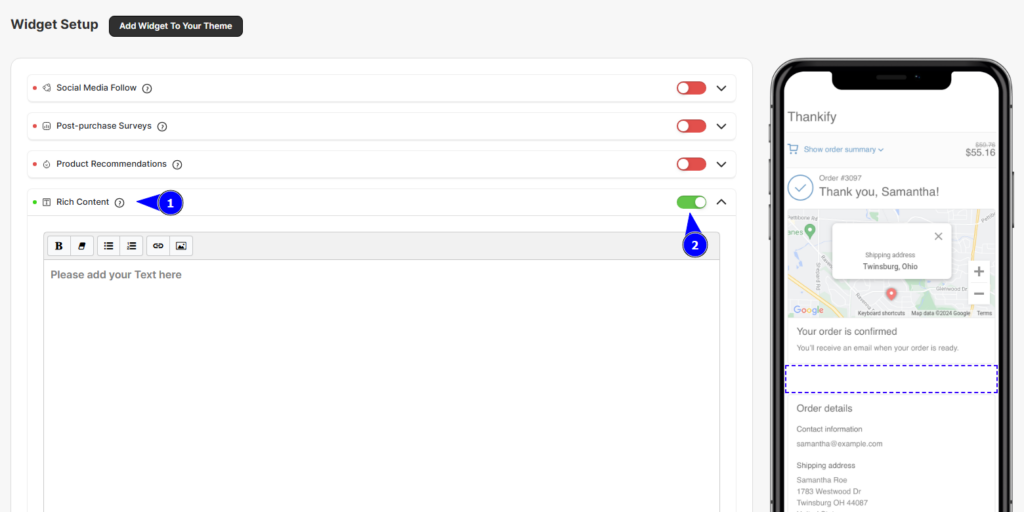
Step 2: Go to the Widget Setup section and select the “Rich Content” widget.
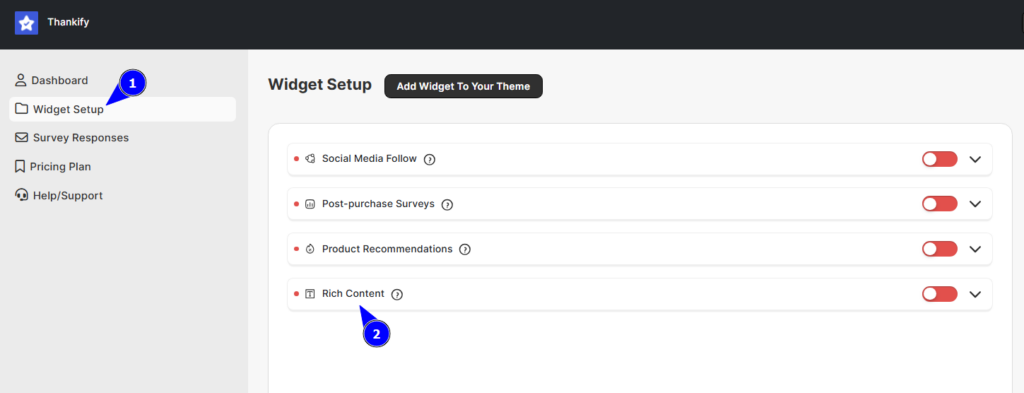
Make sure to switch ON (green) the toggle button to activate the widget as shown below:
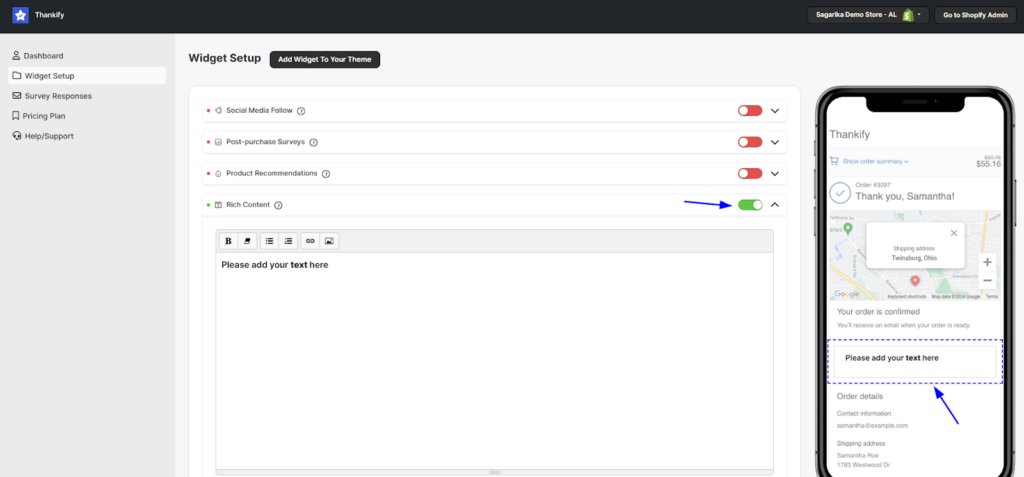
Once you’ve activated the widget, you’ll notice a highlighted space in the live preview screen. This indicates that your custom added content will appear there in the highlighted section.
Step 3: Now add your custom message in the Rich Content input box. Remove the placeholder text and add your custom content. You can also use the formatting tools to customize its appearance.
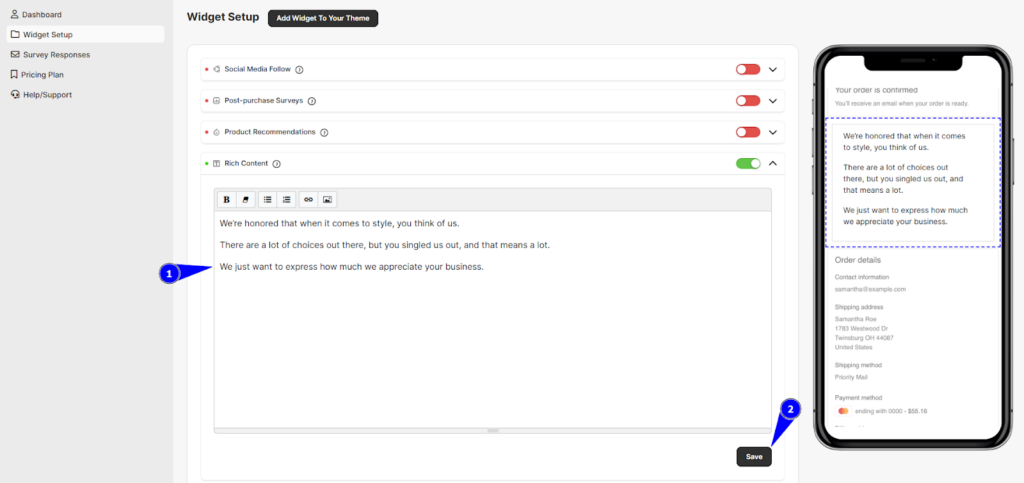
Step 4: Hit the save button.
Now, if you want to see how it actually looks on your thank you page, you can simply click the “Add Widget To Your Theme” button at the top.
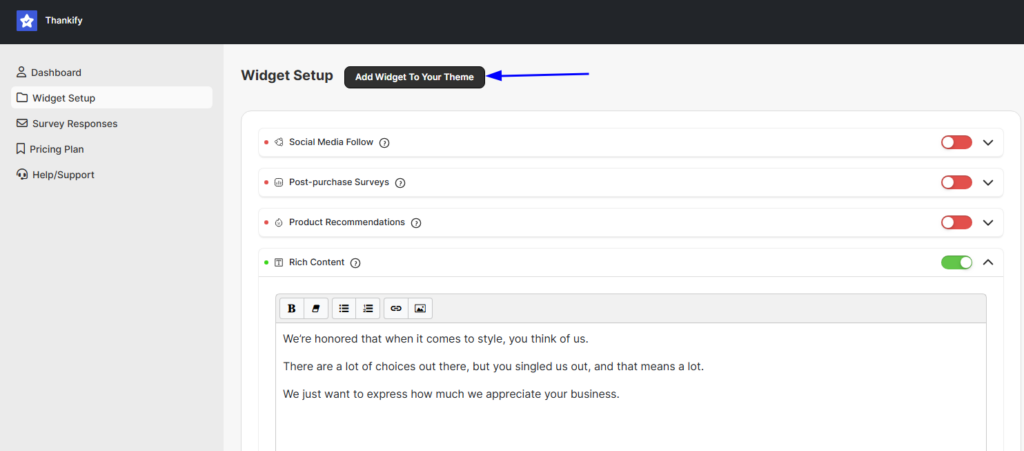
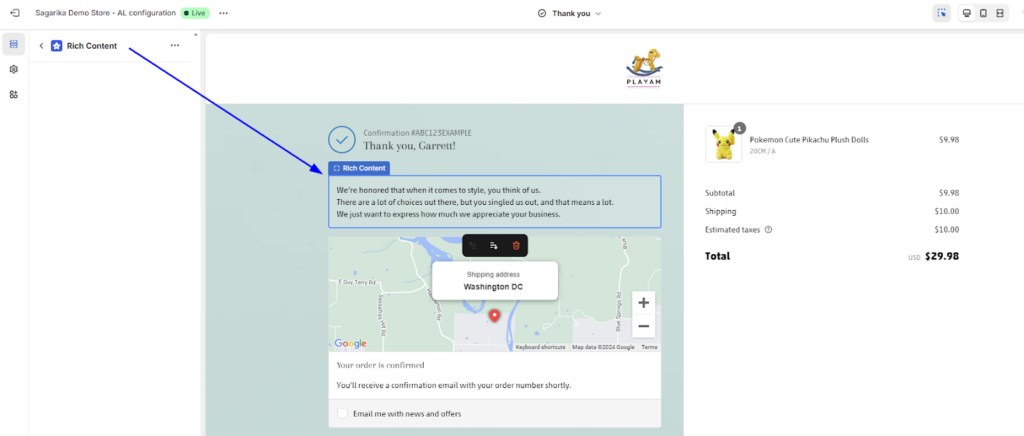
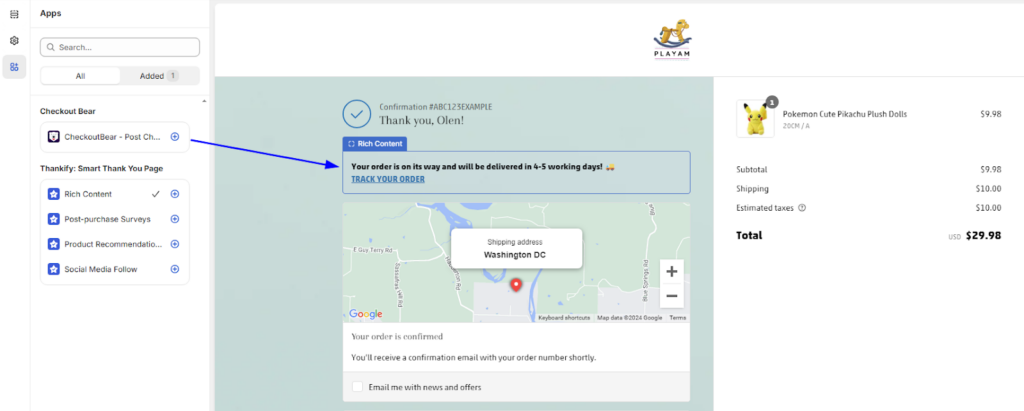
This will redirect you to the theme editor where you can see the widget of the Thankify app.
Here is the output:
2# Offer Order tracking details
After the purchase, the first thing they will be concerned about is their order delivery. And, Thankify makes it super easy to add order tracking details to your Thank You page.
Here’s how to set it up:
Step 1: In the Thankify app, go to the Widget Setup section.
Step 2: Select the “Rich Content” widget (as in the personalized message setup), and make sure it’s enabled.
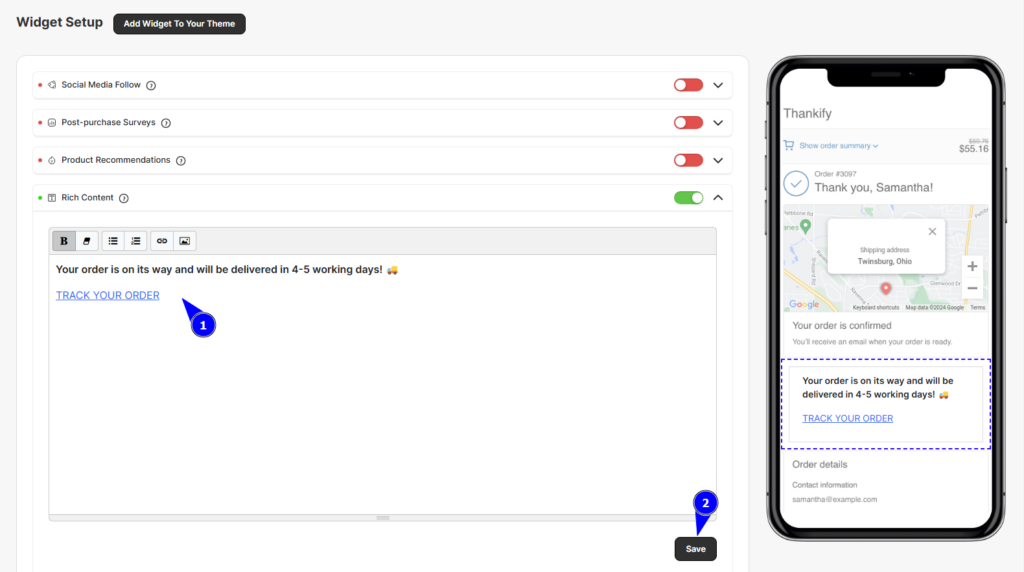
Step 3: In the input box, add custom text like, “Track your order here” and hyperlink it to Shopify’s order status page so customers can track their order directly from your Thank You page.
Step 4: Save your changes.
Now, you can use the “Add Widget to Your Theme” button to preview how it looks.
3# Add social sharing buttons
Of course, they may like to follow your brand on Social Media.
Social sharing buttons on your Thank You page offer an easy way to stay connected with your customers long after the purchase. With Thankify’s Social Media Follow widget, you can encourage shoppers to follow your brand on Facebook, Twitter, Instagram, and more.
Here’s how to set it up:
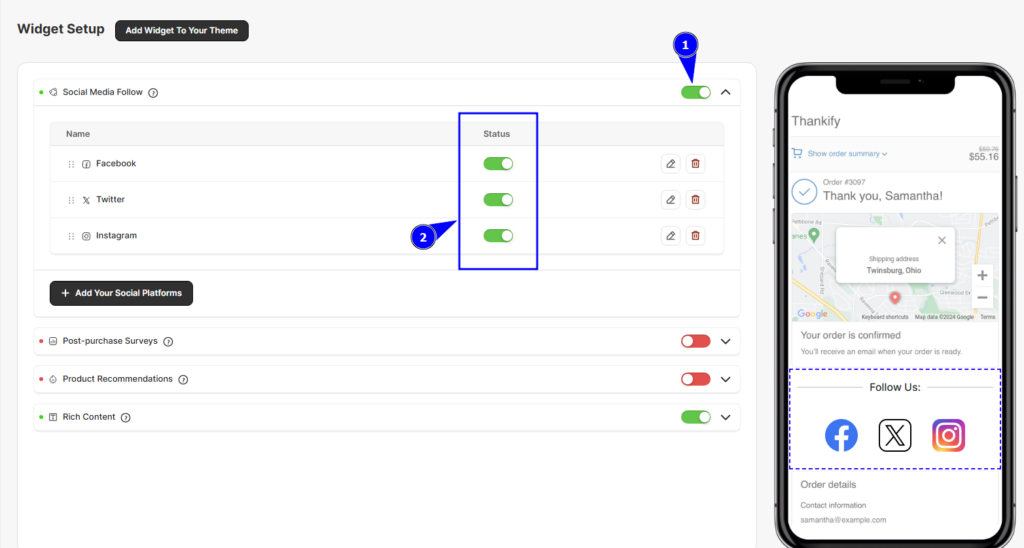
Step 1: In the Thankify dashboard, head to the Widget Setup section and choose the Social Media Follow widget—it’s the one that allows you to add those tiny social media icons.
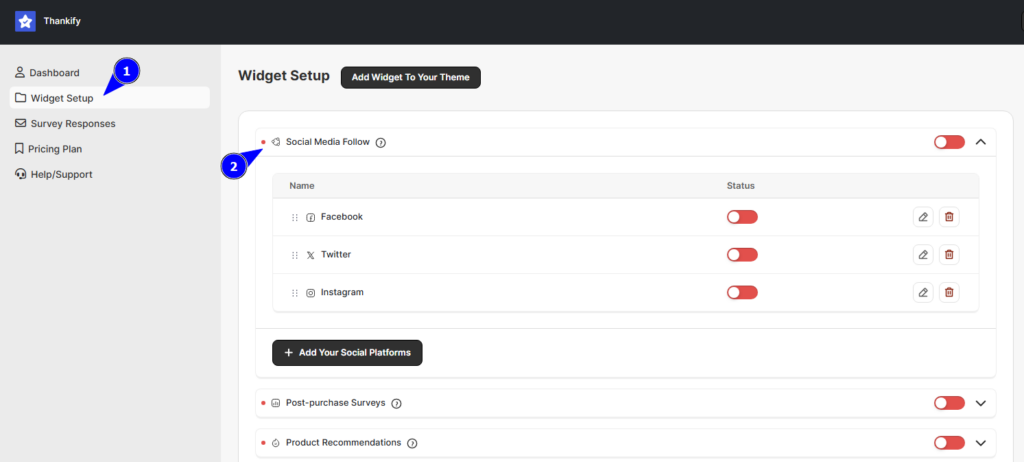
Step 2: Flip the toggle to “ON” for the widget. Also, do the same for the social media buttons (under the widget) you want to enable. This little switch lights up your social buttons.
In the live preview, you’ll see a highlighted spot where these icons will pop up.
Step 3: You can now add these social media links by clicking on the edit (✏️) icon next to any platform and updating the link.
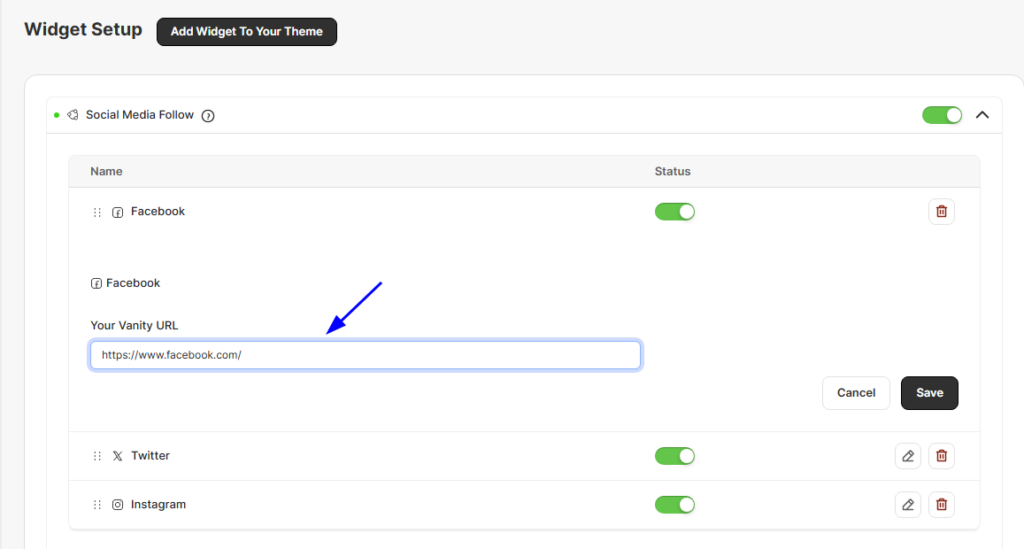
Repeat for Instagram, Twitter, or whichever platforms you’re on.
Step 4: Click on “+ Add Your Social Platforms” to add a new social media button to the list and enter the URLs for your brand’s social profiles. For example, if you’re adding Facebook, drop in your page’s URL like this: https://www.facebook.com/YourBrand.
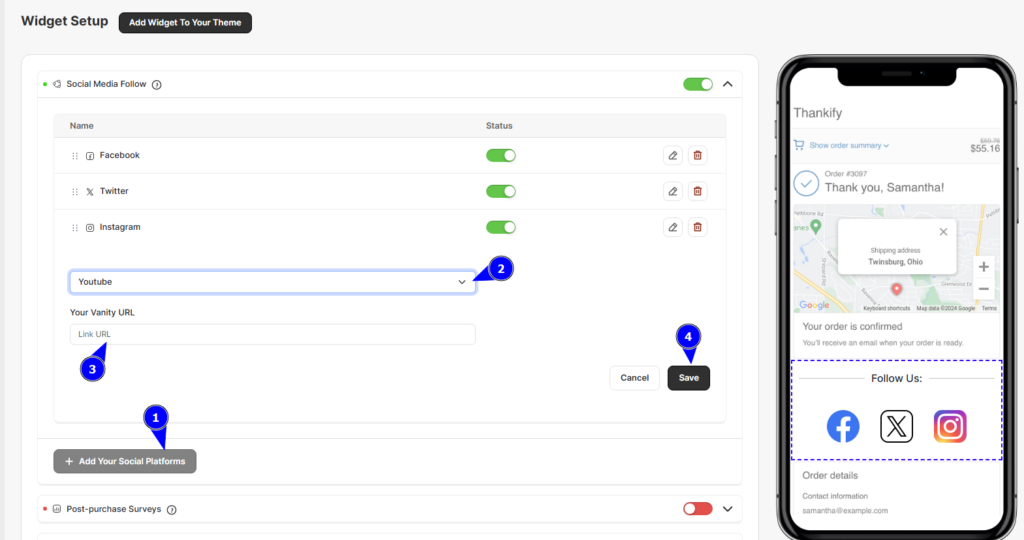
Step 5: Save your changes.
Step 6: Arrange the buttons by dragging them into your preferred order.
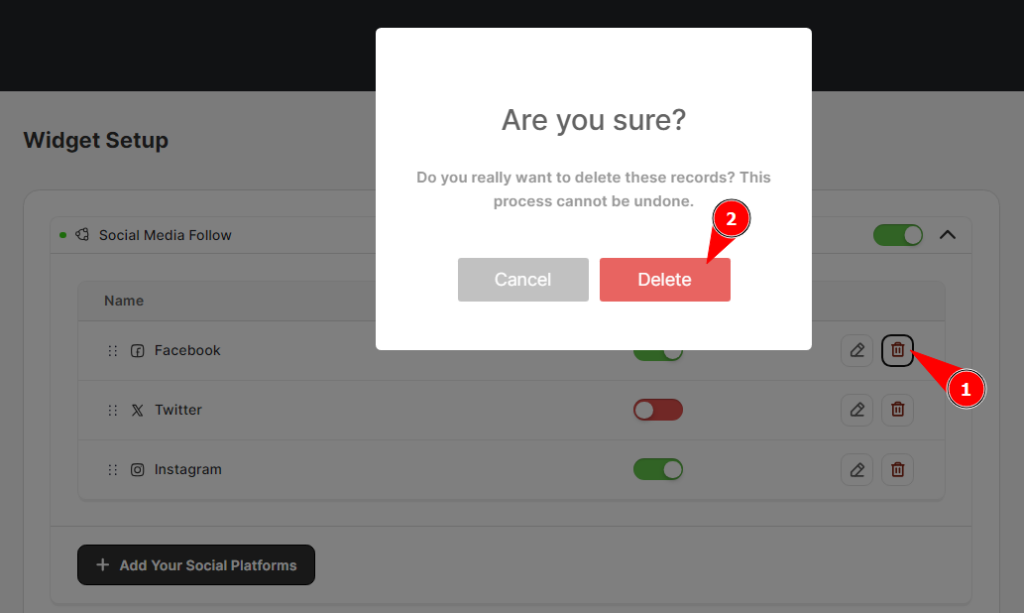
If you ever want to remove any social media link, just deactivate the platform by toggling it off.
Now, let’s check out how the actual output will look like by clicking on the “Add Widget To Your Theme” button.
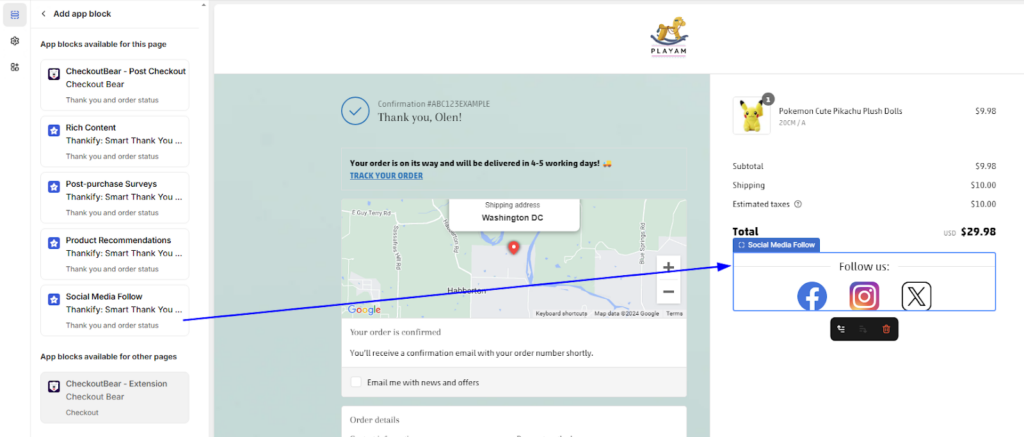
4# Make sure your customers are leaving reviews
Customer insights are very important if you want to improve the user experience. And thank you page brings you that opportunity where you can actually ask your shoppers for their feedback.
The Thankify app’s Post-Purchase Surveys widget makes it easy for customers to leave reviews right on the Thank You page and gives you instant insights.
Here are the steps to follow:
Step 1: In the Thankify app, go to the Widget Setup section, and select Post-Purchase Surveys. Toggle it on.
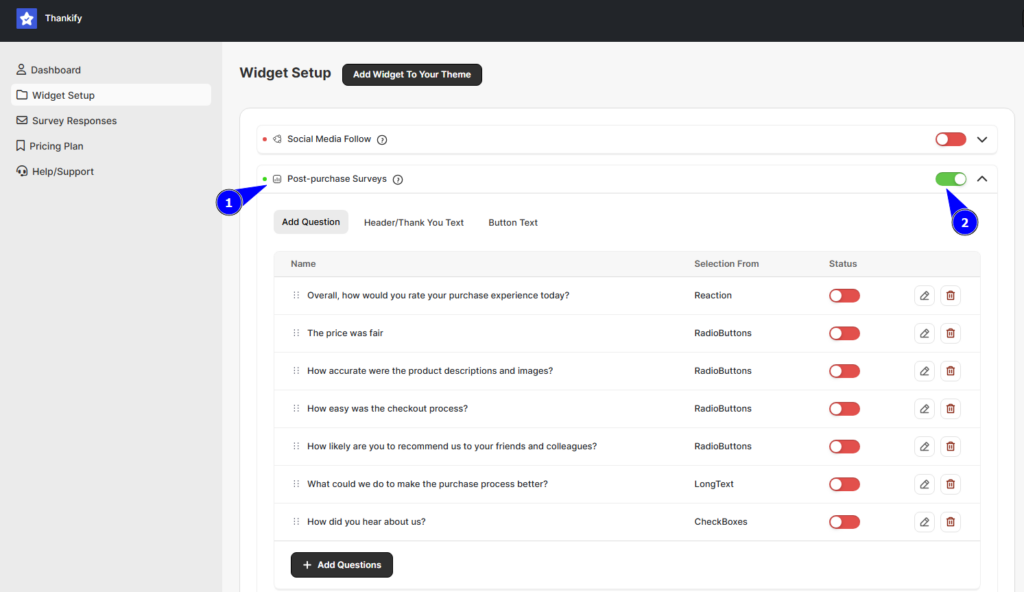
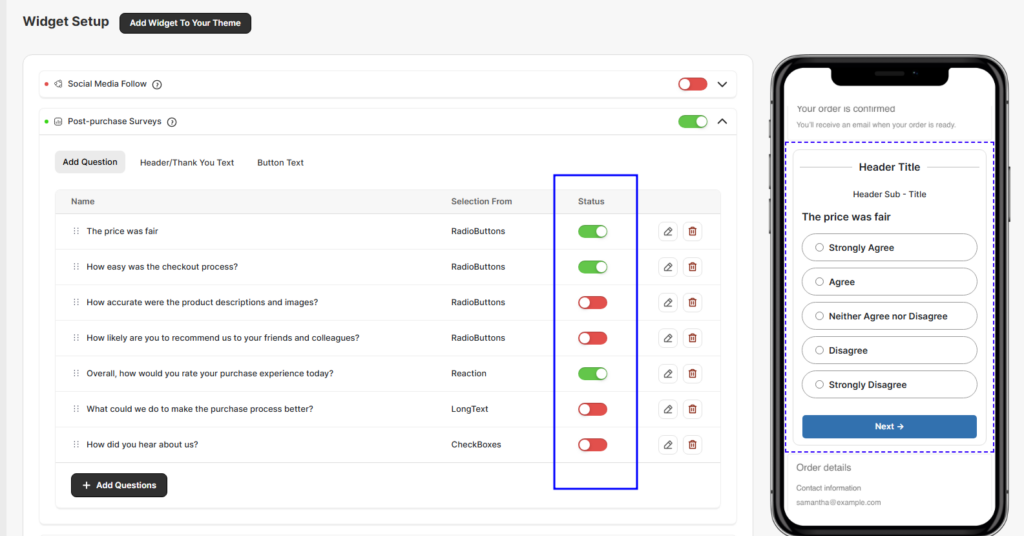
Step 2: You can find a list of questions already available for you to use. Just enable the questions by toggling it on. It will be added to your survey.
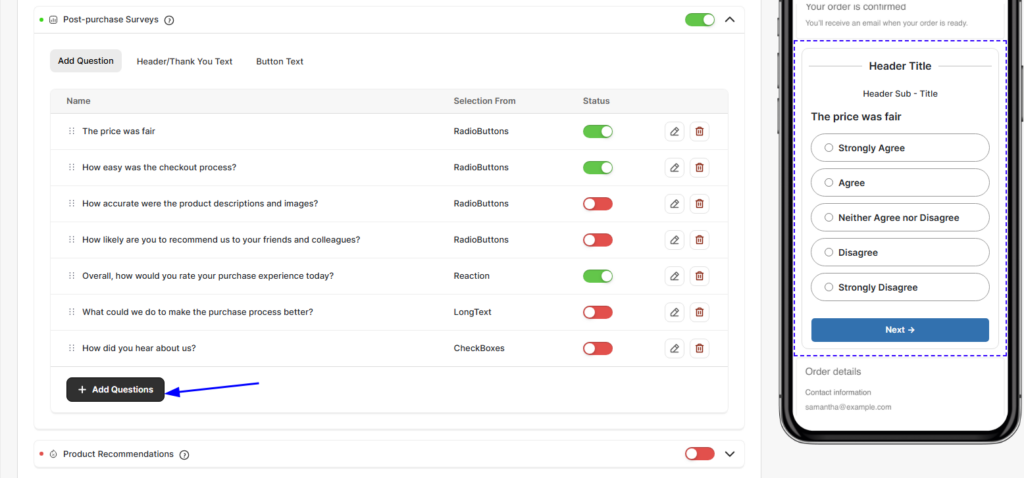
Step 3: Now, click “+ Add Questions” to add a new question.
Step 4: Select the type of question you want to create from the options available.
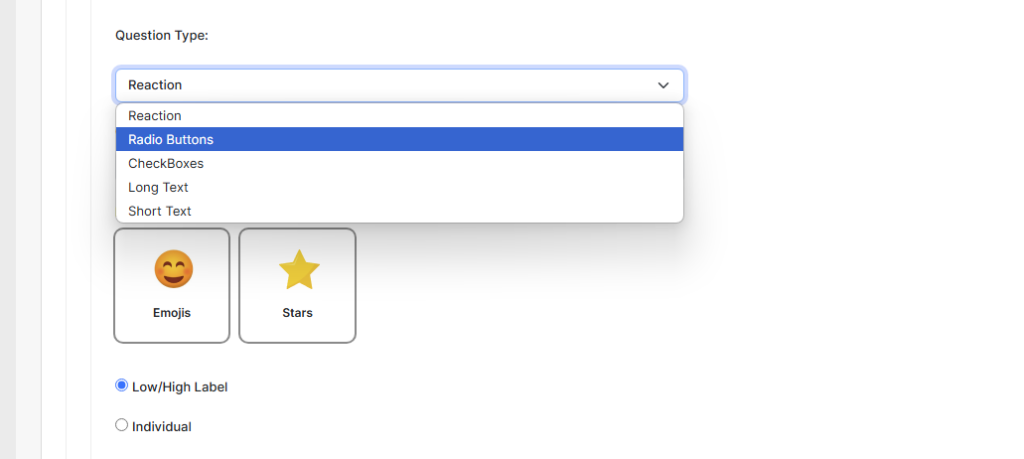
Step 5: Add a title for the question.
Step 6: When you choose a Reaction, Checkbox, or Radio button question type, you need to specify the answer fields too—like stars, checkboxes, or reactions—for responses.
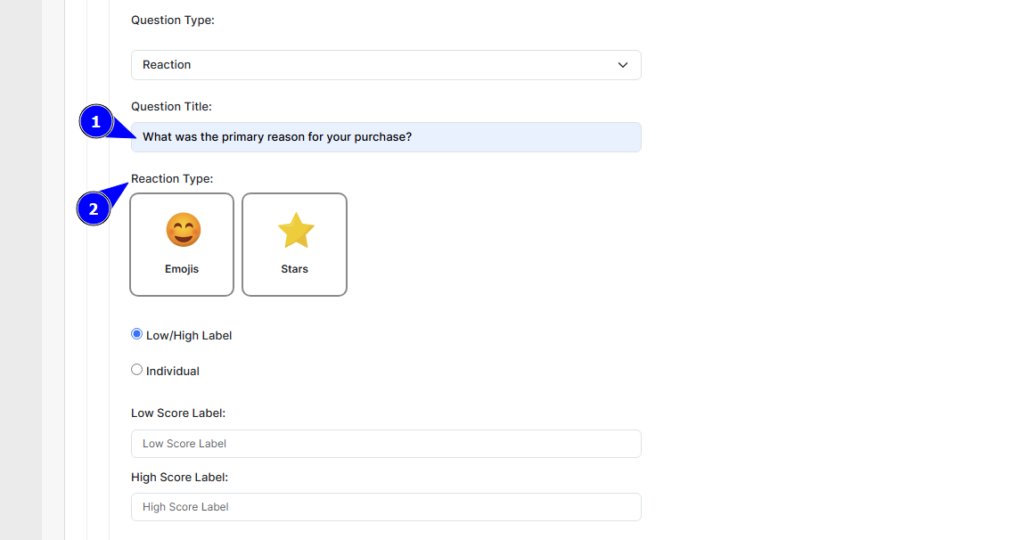
Step 7: Once done with the changes, hit the Save button.
Step 8: Now, switch to the next tab, i.e. Header/Thank You Text. Add a welcoming header title or message like “We’d Love Your Feedback!”.
Step 9: Next, add a thank you title or message they see after submitting their review, like “Thanks for sharing! Your feedback helps us improve”.
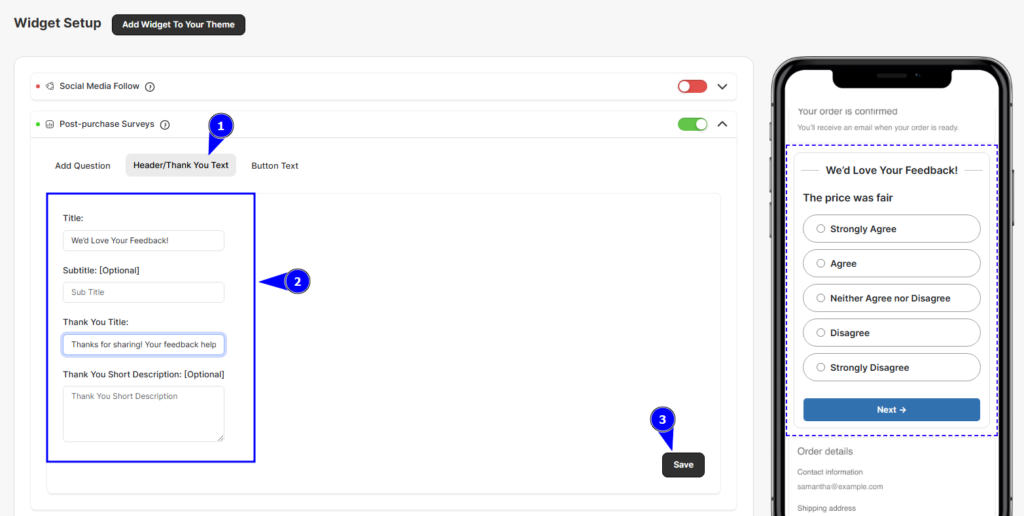
Step 10: Again, move to the next tab, “Button Text” and customize the labels of the Next, Previous, or Submit buttons if you want. Otherwise, you can keep it as it is.
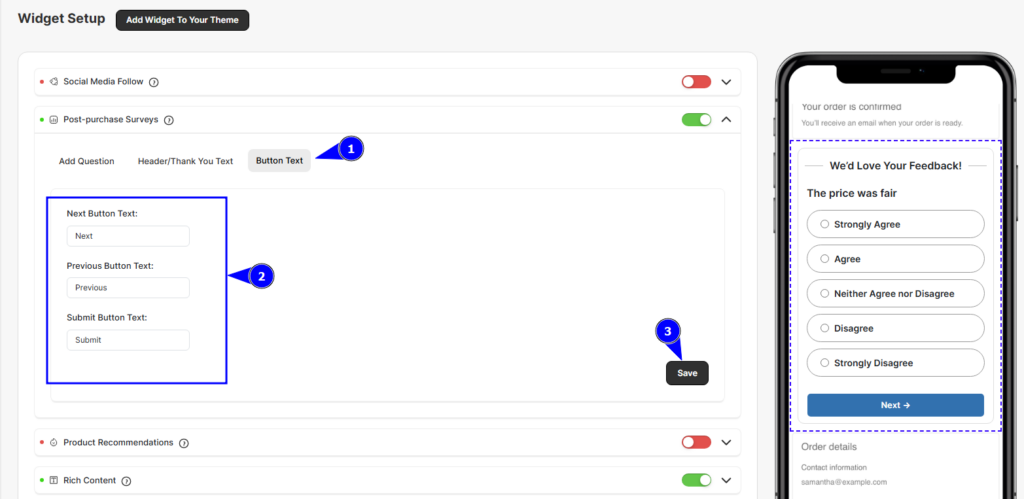
Step 11: Lastly, save the changes.
Now, you can use the “Add Widget to Your Theme” button to preview how it looks.
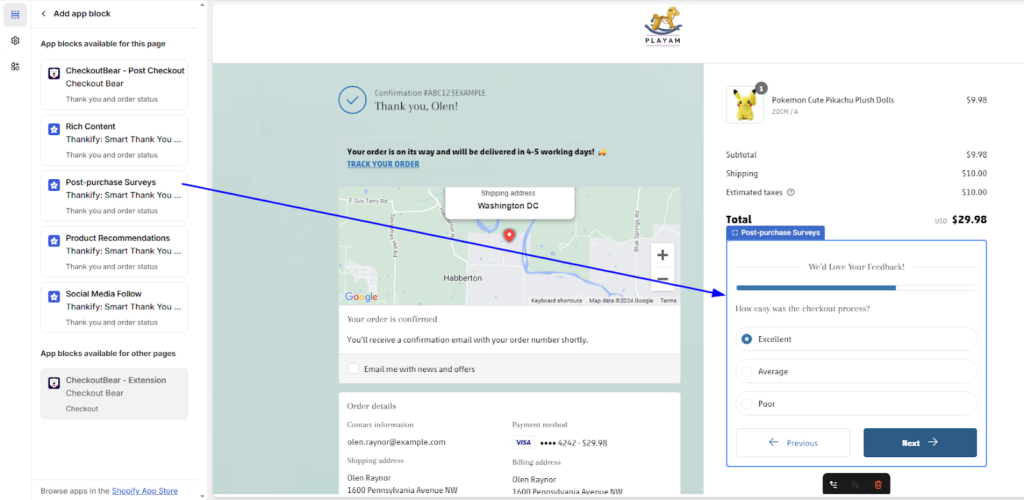
5# Show off your best products
It’s not necessary that the shoppers have purchased the best-selling products in your store. So, you can showcase your best-selling products and encourage them to give it a try.
Here you can show them off using the Thankify app.
Let’s see how we can do that.
Step 1: Go to the Widget Setup section, choose the Product Recommendation widget, and switch the toggle to “ON”.
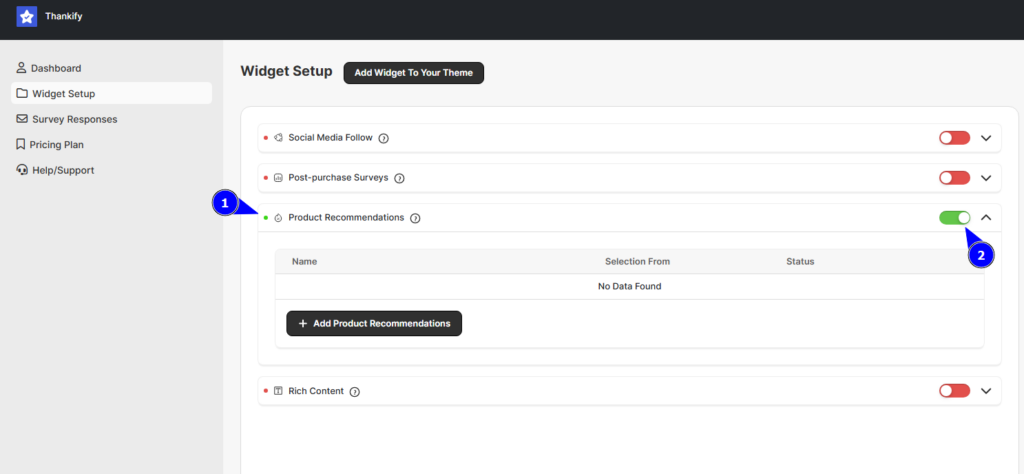
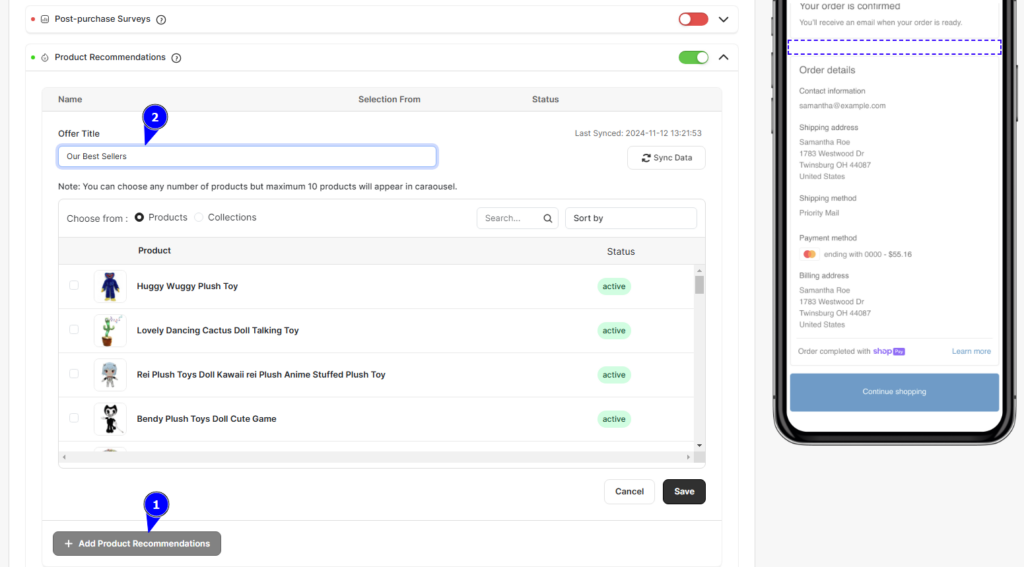
Step 2: Click on “+ Product Recommendations” and give it a title.
Step 3: Next, decide if you want to recommend specific products or entire collections. You can easily browse and select products directly from your catalog.
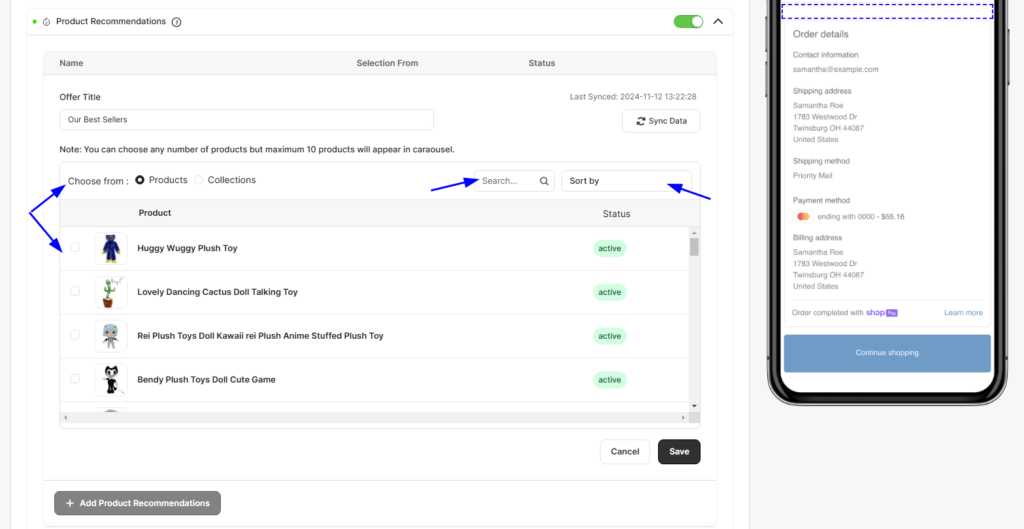
Step 4: Add up to 10 products in a carousel format.
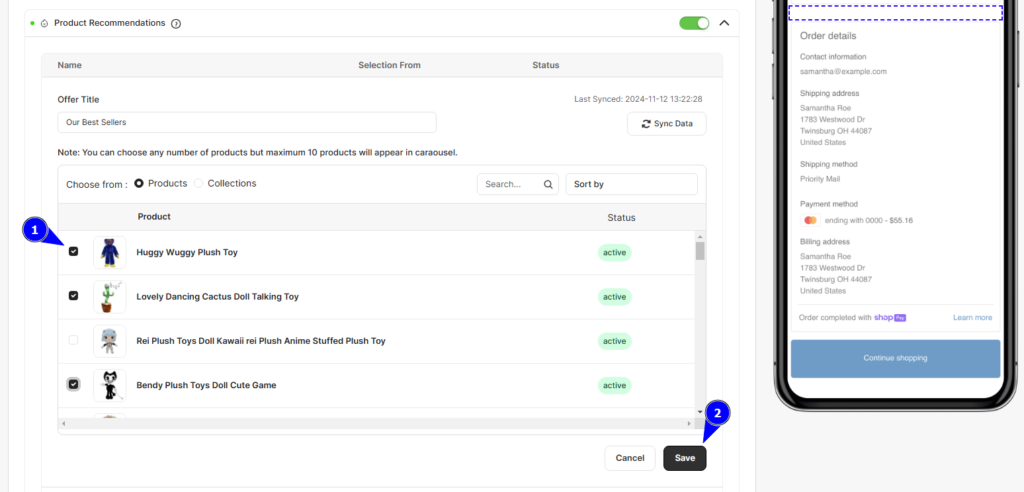
You can also rearrange recommendations with a simple drag and drop to make the most relevant items pop up first!
Step 5: Hit save, and check how the carousel looks on your Thank You page.
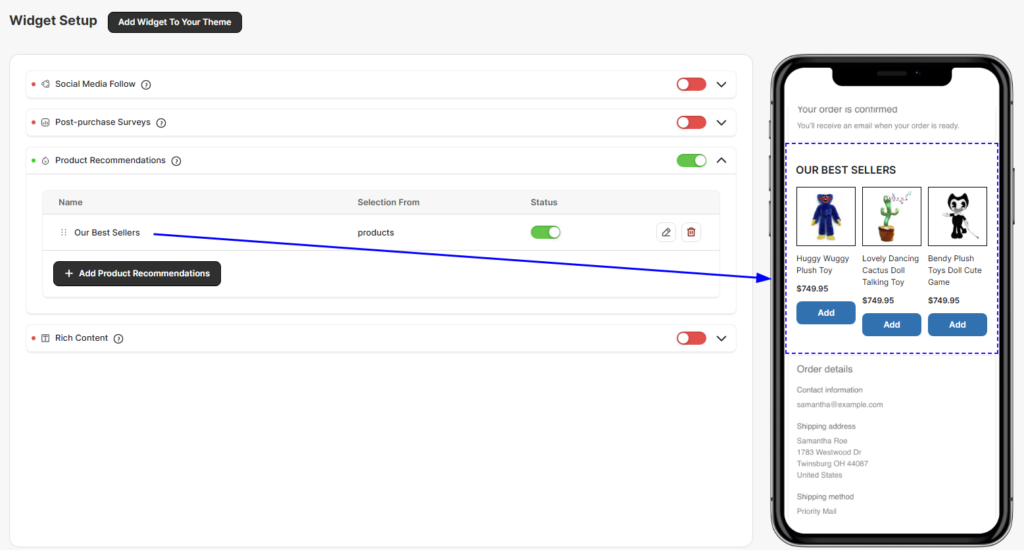
Now, your customers will see recommended products that might interest them right after their purchase, giving you the opportunity to boost your sales!
Get Thank You Page Design Guide
6# Include a Discount code for future purchases
Who doesn’t love a good discount?
Offering your customers a special offer or coupon code right after they complete their purchase is a great way to keep them coming back. With Thankify, it’s super easy to add this to your Thank You page.
Here’s how to do that:
Step 1: In the Thankify app, go to the Widget Setup section, select the “Rich Content” widget, and toggle it ON (green).
Step 2: Add your discount code details in the Rich Content input box. You can make it pop with some creative text like, “Here’s 15% off your next purchase—use code THANKYOU15!”
Step 3: Save your changes.
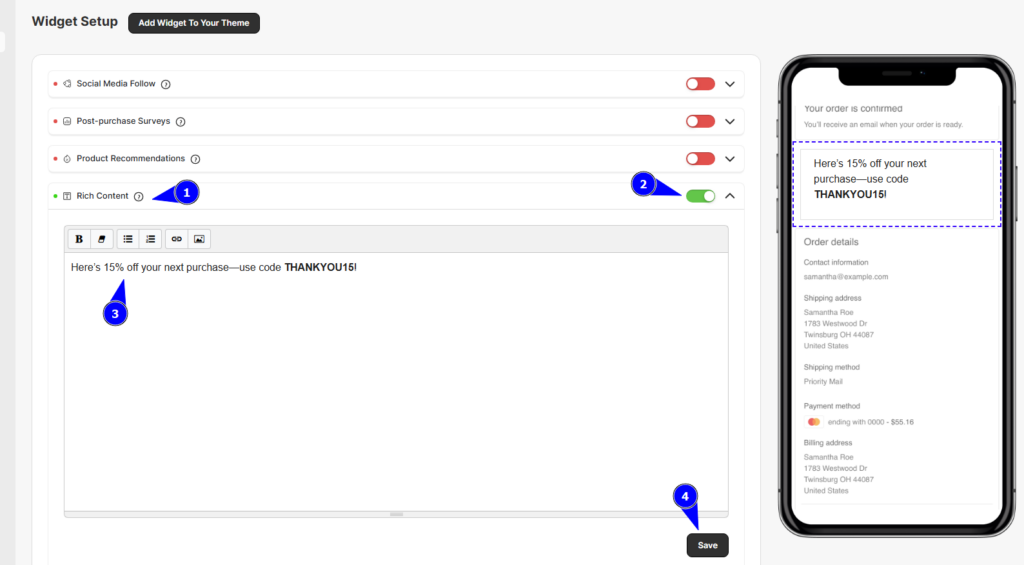
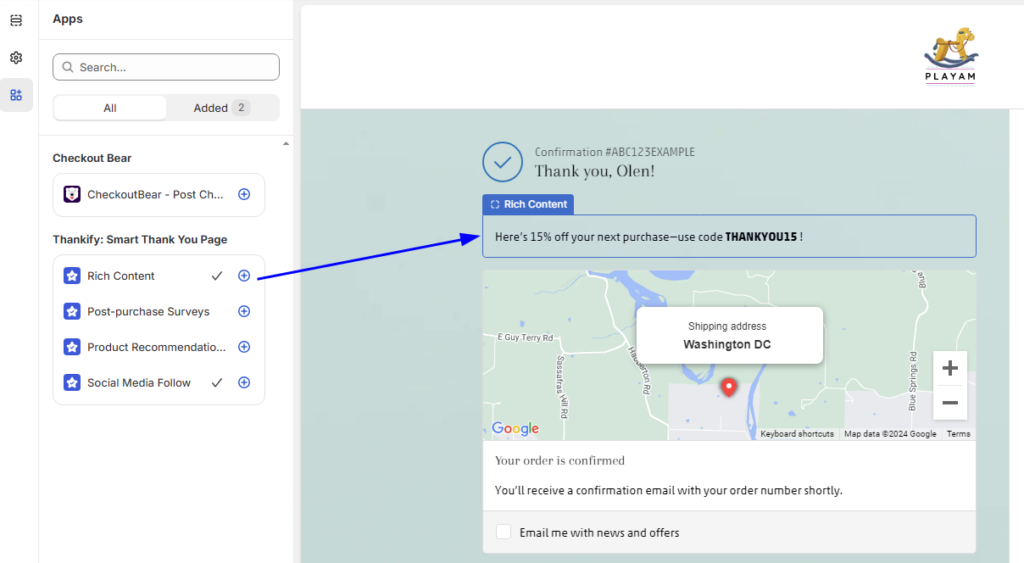
Want to see how it looks? Click on “Add Widget To Your Theme” to preview your changes in the theme editor. Now, you’ve just given your customers a reason to return!
7# Promote sales events using Image Banners
Do you have any upcoming events or have something to promote?
You can add an attractive event banner to your thank you page and invite customers to come back. But why the Thank you page???
As the Thank you page has more than 100% open rate, it’s the ideal place to grab your customers’ attention. Thanks to Thankify, you can easily showcase sales, limited-time offers, or seasonal promotions right on your Shopify Thank You page.
Here’s how you can make it happen:
Step 1: In the Thankify app, go to the Widget Setup section and select the Rich Content widget.
Step 2: Activate the widget by toggling it ON (green).
Step 3: Now, instead of typing text in the input box, use the “Image Upload” feature to add your banner. Simply select the banner image that showcases your sale, event, or promotion.
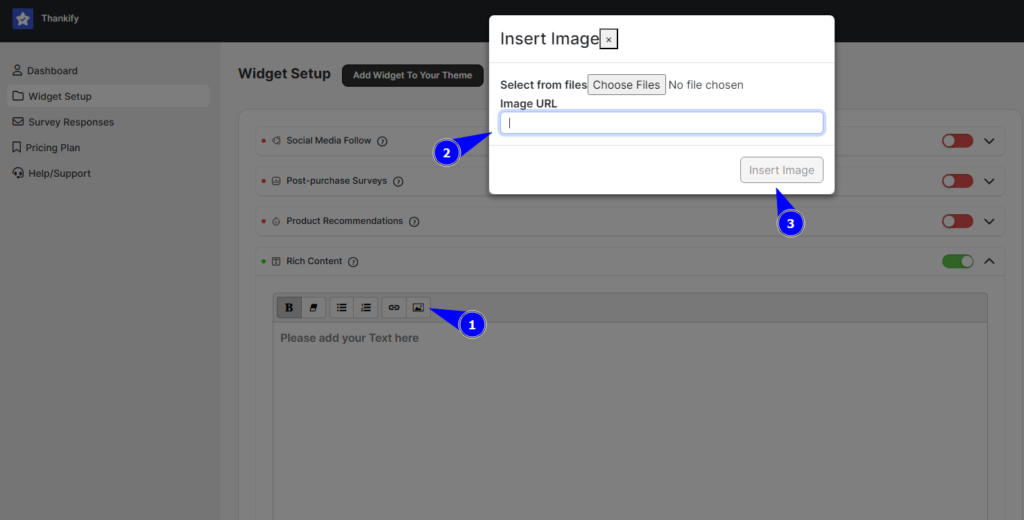
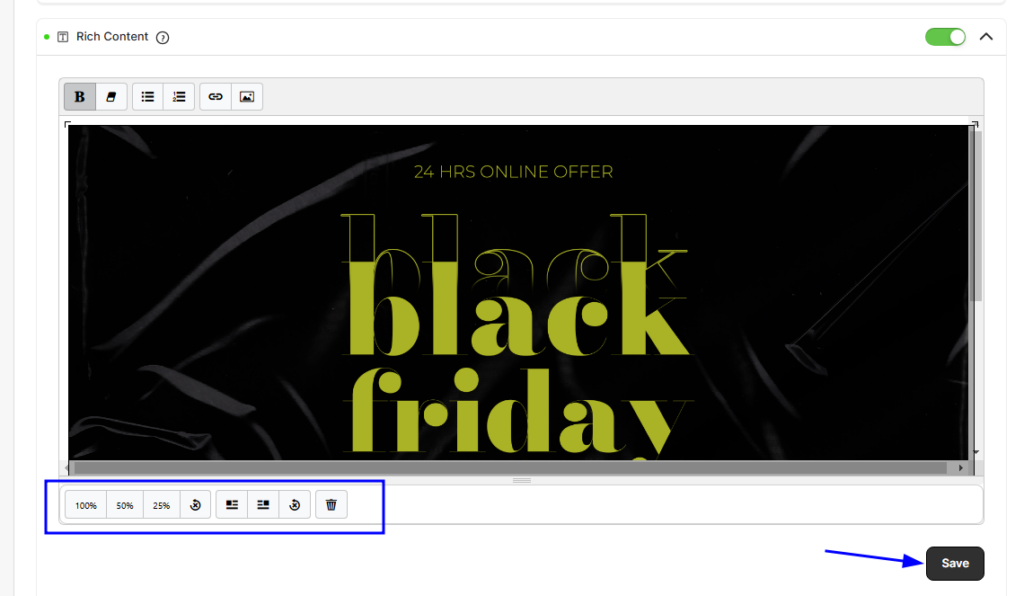
Step 5: Adjust the size and positioning as needed using the widget’s tools, and click Save.
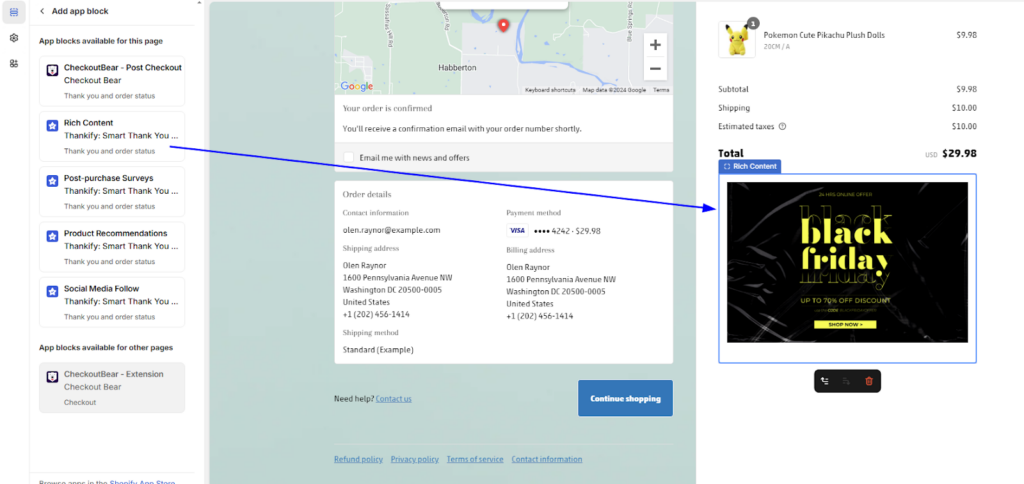
Want to preview it? Just click Add Widget To Your Theme, and you’ll be redirected to the theme editor where you can see how the banner will appear on your Thank You page.
8# Provide Customer Support information
Suppose your customer has just completed a purchase, and they’re excited—but what if they have questions?
Make sure they know help is right there if they need it! With Thankify, adding customer support details—like an email, phone number, or link to your Help Center—is simple.
Here are the steps to follow:
Step 1: In the Thankify app, go to the Widget Setup section and activate the Rich Content widget by toggling it on.
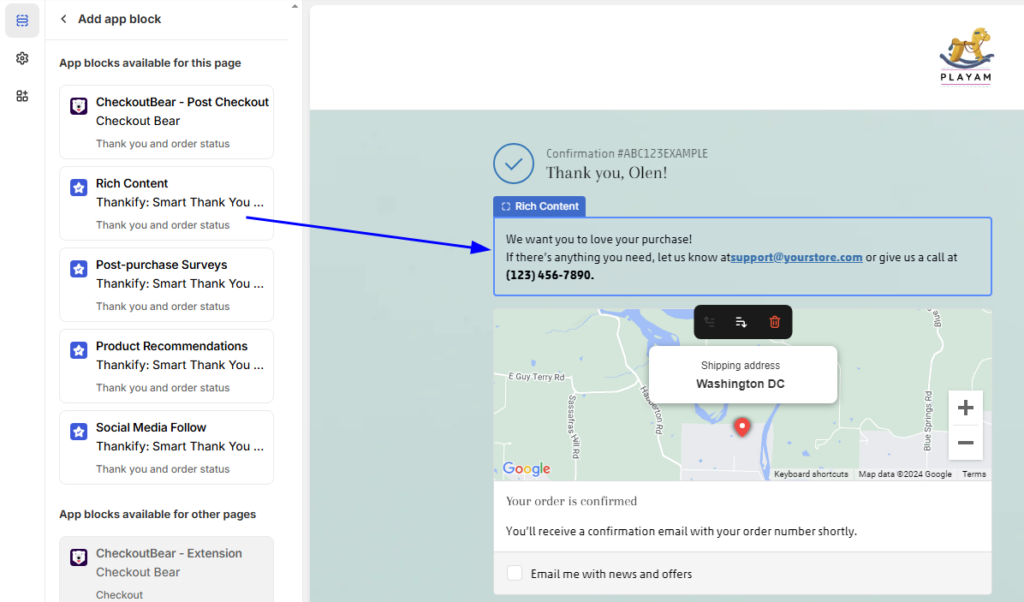
Step 2: In the Rich Content input box, replace the placeholder text with your customer support details.
For example, you can include text like, “We want you to love your purchase! If there’s anything you need, let us know at support@yourstore.com or give us a call at (123) 456-7890.”
Use formatting options to highlight the information.
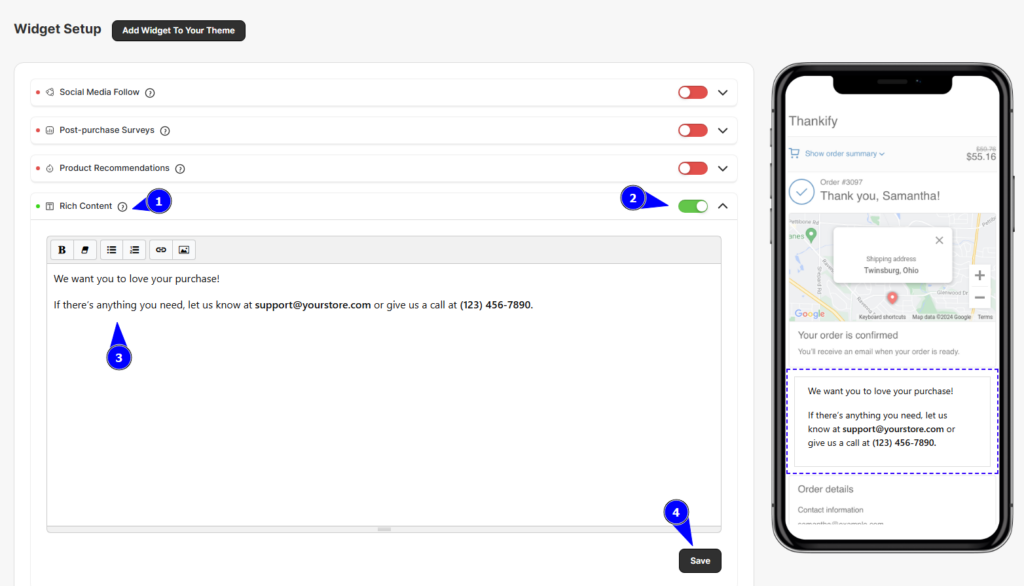
Step 3: Hit Save, then click Add Widget To Your Theme to see it in action on your Thank You page.
Here’s the final output:
So, this was the execution part. In case you have more doubts about this Shopify thank you page customization app, you can resolve them in the next section.
Let’s go!
Get Thank You Page Design Guide
Common Questions about the Thankify App
I know you’re now familiar with Thankify. However, for those who still have some questions, this FAQ section will help you. Or if you’re looking for a detailed installation guide, you can jump directly to the Thankify tutorial.
How does Thankify enhance the default Thank You page on Shopify?
Thankify allows for a customizable Thank You page with personalized messages, order tracking, social sharing, and more to improve the post-purchase experience.
How can I collect customer feedback using Thankify?
Thankify includes a survey feature that lets you ask for feedback on the Thank You page. You can select from multiple question types such as Radio Buttons, Checkboxes, Short or Long Text, and even Reaction-based questions. This helps you gather valuable feedback right after the purchase. The survey responses can be easily exported for analysis.
Does Thankify work well on mobile devices?
Yes, Thankify’s Thank You pages are fully responsive, so they look and function great on all devices, including mobile phones, tablets, and desktops, ensuring a consistent post-purchase experience.
Is coding knowledge required to use Thankify?
No, Thankify is designed to be user-friendly, and no coding skills are necessary. Each widget comes with a straightforward interface for configuration, so you can customize the Thank You page without needing to adjust HTML or CSS.
How do I monitor the responses to my post-purchase surveys?
You can easily view and monitor survey responses within the Thankify app. You also get an export option which allows you to download the data for further analysis or follow-up.
Can I export my survey responses or ratings?
Yes! Thankify makes it easy to export your customer feedback. You can click on the “Export” button located at the top right corner of the survey responses table, and download the data in a convenient format.
Can I deactivate Thankify without uninstalling it?
Yes, you can deactivate Thankify’s widgets without uninstalling the app. Simply toggle off the widgets you no longer wish to use. This allows you to temporarily disable them while still keeping the app installed for future use.
Summing Up!
So, the thank you page is never the end of your sales funnel. In fact, it’s the beginning of a whole new chapter—one we like to call “Customer Retention”!
That’s why it’s important to maintain the same excitement and positive experience your customers had when they first discovered your store. And, a small change in how you approach the Thank You page can make a big difference in customer retention.
Rather than just a simple order confirmation, you can create a perfect Thank you page that boosts customer loyalty and even boosts future sales. With Thankify, you can easily break free from Shopify’s limitations and have a Thank You page that feels as unique and personal as your brand.
And, after learning so many ways to customize your Shopify thank you page, wouldn’t you like to implement it for your store?
So, install the Thankify: Smart Thank You Page app now and design beautiful thank you pages by yourselves!


Post a Comment
Got a question? Have a feedback? Please feel free to leave your ideas, opinions, and questions in the comments section of our post! ❤️