
Time for another Magento web development hack. I will be guiding you on how to attach a file in the product admin form and display the attachment on the product detail page.
Here we will be using Aureatelabs as the Vendor name and ProductAttachment as the module’s name. You can change this according to your Vendor and Module name.
Step 1: Create module registration file
First, create a registration.php file in app/code/Aureatelabs/ProductAttachment directory
<?php

\Magento\Framework\Component\ComponentRegistrar::register(
   \Magento\Framework\Component\ComponentRegistrar::MODULE,
   'Aureatelabs_ProductAttachment',
   __DIR__
);
Next create a module.xml file in app/code/Aureatelabs/ProductAttachment/etc directory.
<?xml version="1.0"?>
<config xmlns:xsi="http://www.w3.org/2001/XMLSchema-instance"
       xsi:noNamespaceSchemaLocation="urn:magento:framework:Module/etc/module.xsd">
   <module name="Aureatelabs_ProductAttachment" setup_version="1.0.0" />
</config>
Step 2: Create InstallData script to add product attachment attribute
Next, we will create a script to add product attribute. So create an InstallData.php in app/code/Aureatelabs/ProductAttachment/Setup directory.
<?php
namespace Aureatelabs\ProductAttachment\Setup;

use Magento\Framework\Setup\ModuleContextInterface;
use Magento\Framework\Setup\ModuleDataSetupInterface;
use Magento\Framework\Setup\InstallDataInterface;
use Magento\Eav\Setup\EavSetupFactory;

/**
 * Class InstallData
 * @package Aureatelabs\ProductAttachment\Setup
 *
 * @codeCoverageIgnore
 */
class InstallData implements InstallDataInterface
{
    /**
     * @var EavSetupFactory
     */
    protected $_eavSetupFactory;

    public function __construct(
        EavSetupFactory $eavSetupFactory
    ) {
        $this->_eavSetupFactory = $eavSetupFactory;
    }

    /**
     * {@inheritdoc}
     * @SuppressWarnings(PHPMD.CyclomaticComplexity)
     * @SuppressWarnings(PHPMD.ExcessiveMethodLength)
     * @SuppressWarnings(PHPMD.NPathComplexity)
     */
    public function install(ModuleDataSetupInterface $setup, ModuleContextInterface $context)
    {
        $eavSetup = $this->_eavSetupFactory->create(["setup"=>$setup]);
        $eavSetup->addAttribute(
            \Magento\Catalog\Model\Product::ENTITY,
            'attachment',
            [
                'group' => 'Product Attachment',
                'type' => 'varchar',
                'label' => 'Attachment',
                'input' => 'file',
                'backend' => 'Aureatelabs\ProductAttachment\Model\Product\Attribute\Backend\File',
                'frontend' => '',
                'class' => '',
                'source' => '',
                'global' => \Magento\Eav\Model\Entity\Attribute\ScopedAttributeInterface::SCOPE_GLOBAL,
                'visible' => true,
                'required' => false,
                'user_defined' => true,
                'default' => '',
                'searchable' => false,
                'filterable' => false,
                'comparable' => false,
                'visible_on_front' => false,
                'unique' => false,
                'apply_to' => 'simple,configurable', // applicable for simple and configurable product
                'used_in_product_listing' => true
            ]
        );
    }
}
Here attachment is product attribute code.
- group: Here we have used Product Attachment in the group. So new attribute created in product admin form will be added in a new tab named Product Attachment.
- type: Here we will define varchar in type. We will save file name in attribute so we need varchar in type.
- label: Define the product attribute label, this label will be shown in product admin form.
- input: Define file to display file type input in product admin form.
- backend: In this define the backend model path. This backend model will handle the file upload and will save the value of the attribute when saving the product.
- user_defined: It is custom attribute so will use true in this column.
- apply_to: In this column define different product type so this attribute will work with only these product types.
- used_in_product_listing: To use this attribute value in the frontend in product listing set this to true.
Next, we will create a backend model file to save uploaded file in the media folder and save the file name to this attribute value.
Step 3: Create backend model file to upload product attachment file and save value in attachment attribute
So create File.php in app/code/Aureatelabs/ProductAttachment/Model/Product/Attribute/Backend directory
<?php
namespace Aureatelabs\ProductAttachment\Model\Product\Attribute\Backend;

use Magento\Framework\App\Filesystem\DirectoryList;
use Magento\Eav\Model\Entity\Attribute\Backend\AbstractBackend;

class File extends AbstractBackend
{
    /**
     * @var \Magento\Framework\Filesystem\Driver\File
     */
    protected $_file;

    /**
     * @var \Psr\Log\LoggerInterface
     */
    protected $_logger;

    /**
     * @var \Magento\Framework\Filesystem
     */
    protected $_filesystem;

    /**
     * @var \Magento\MediaStorage\Model\File\UploaderFactory
     */
    protected $_fileUploaderFactory;


    /**
     * Construct
     *
     * @param \Psr\Log\LoggerInterface $logger
     * @param \Magento\Framework\Filesystem $filesystem
     * @param \Magento\MediaStorage\Model\File\UploaderFactory $fileUploaderFactory
     */
    public function __construct(
        \Psr\Log\LoggerInterface $logger,
        \Magento\Framework\Filesystem $filesystem,
        \Magento\Framework\Filesystem\Driver\File $file,
        \Magento\MediaStorage\Model\File\UploaderFactory $fileUploaderFactory
    ) {
        $this->_file = $file;
        $this->_filesystem = $filesystem;
        $this->_fileUploaderFactory = $fileUploaderFactory;
        $this->_logger = $logger;
    }

    public function afterSave($object)
    {

        $path = $this->_filesystem->getDirectoryRead(
            DirectoryList::MEDIA
        )->getAbsolutePath(
            'catalog/product/attachment/'
        );
        $delete = $object->getData($this->getAttribute()->getName() . '_delete');

        if ($delete) {
            $fileName = $object->getData($this->getAttribute()->getName());
            $object->setData($this->getAttribute()->getName(), '');
            $this->getAttribute()->getEntity()->saveAttribute($object, $this->getAttribute()->getName());
            if ($this->_file->isExists($path.$fileName))  {
                $this->_file->deleteFile($path.$fileName);
            }

        }

        if (empty($_FILES['product']['tmp_name'][$this->getAttribute()->getName()])) {
            return $this;
        }

        try {
            /** @var $uploader \Magento\MediaStorage\Model\File\Uploader */
            $uploader = $this->_fileUpzloaderFactory->create(['fileId' => 'product['.$this->getAttribute()->getName().']']);
            $uploader->setAllowRenameFiles(true);
            $result = $uploader->save($path);
            $object->setData($this->getAttribute()->getName(), $result['file']);
            $this->getAttribute()->getEntity()->saveAttribute($object, $this->getAttribute()->getName());
        } catch (\Exception $e) {
            if ($e->getCode() != \Magento\MediaStorage\Model\File\Uploader::TMP_NAME_EMPTY) {
                $this->_logger->critical($e);
            }
        }

        return $this;
    }

}
Now you can see the product attachment tab and input type file attribute in a new tab in product admin form.
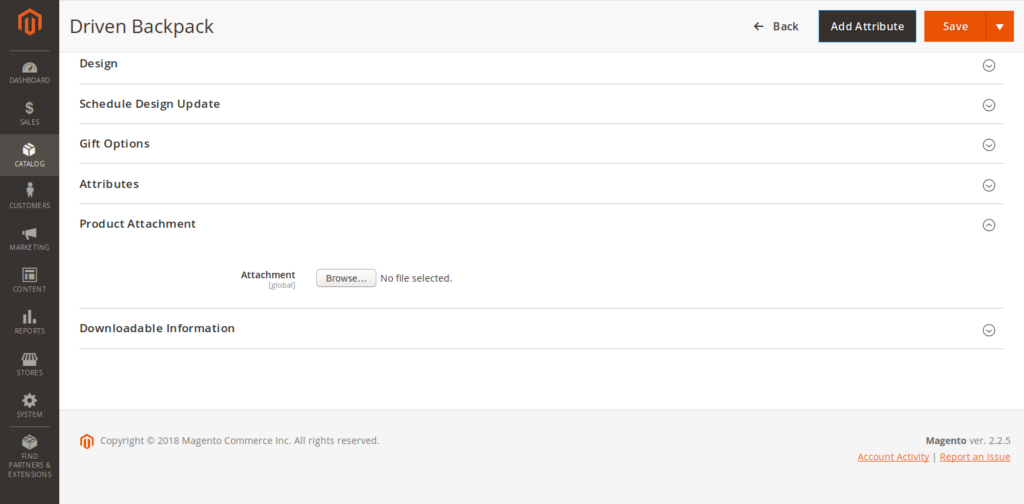
Now after attaching file and save the product, the file is uploaded in pub/media/catalog/product/attachment directory and file name stored in attachment attribute value.
Step 4: Display product attachment link and delete checkbox after saving product in admin form
But after saving the product in product attachment tab file name is not showing up or how to remove file checkbox is not showing up.
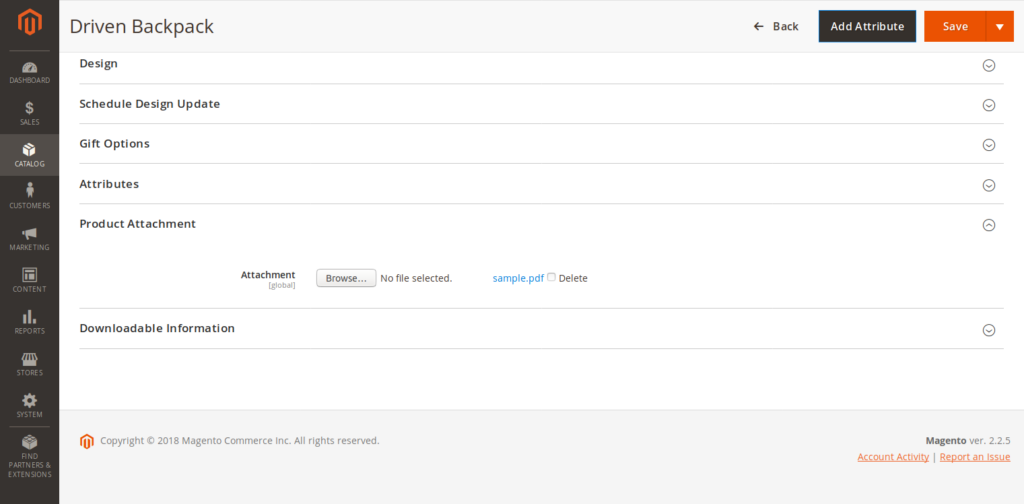
So we will display an anchor tag that contains the file path and we will also add delete checkbox to remove the file in the product attachment tab.
We will use a modifier to add these changes in product attachment tab.
So we will create a di.xml in app/code/Aureatelabs/ProductAttachment/etc/adminhtml directory.
<?xml version="1.0"?>
<config xmlns:xsi="http://www.w3.org/2001/XMLSchema-instance" xsi:noNamespaceSchemaLocation="urn:magento:framework:ObjectManager/etc/config.xsd">
   <virtualType name="Magento\Catalog\Ui\DataProvider\Product\Form\Modifier\Pool" type="Magento\Ui\DataProvider\Modifier\Pool">
       <arguments>
           <argument name="modifiers" xsi:type="array">
               <item name="attachment" xsi:type="array">
                   <item name="class" xsi:type="string">Aureatelabs\ProductAttachment\Ui\DataProvider\Product\Form\Modifier\File</item>
                   <item name="sortOrder" xsi:type="number">1000</item>
               </item>
           </argument>
       </arguments>
   </virtualType>
</config>
Next, we will create File.php in app/code/Aureatelabs/ProductAttachment/Ui/DataProvider/Product/Form/Modifier directory.
<?php
namespace Aureatelabs\ProductAttachment\Ui\DataProvider\Product\Form\Modifier;

use Magento\Framework\Stdlib\ArrayManager;
use Magento\Store\Model\StoreManagerInterface;
use Magento\Catalog\Ui\DataProvider\Product\Form\Modifier\AbstractModifier;

class File extends AbstractModifier
{
    /**
     * @var ArrayManager
     */
    protected $arrayManager;

    /**
     * @var StoreManagerInterface
     */
    protected $storeManager;

    /**
     * @param ArrayManager $arrayManager
     * @param StoreManagerInterface $storeManager
     */
    public function __construct(
        ArrayManager $arrayManager,
        StoreManagerInterface $storeManager
    ) {
        $this->arrayManager = $arrayManager;
        $this->storeManager = $storeManager;
    }

    public function modifyMeta(array $meta)
    {
        $fieldCode = 'attachment';
        $elementPath = $this->arrayManager->findPath($fieldCode, $meta, null, 'children');
        $containerPath = $this->arrayManager->findPath(static::CONTAINER_PREFIX . $fieldCode, $meta, null, 'children');

        if (!$elementPath) {
            return $meta;
        }

        $mediaUrl =  $this->storeManager->getStore()
            ->getBaseUrl(\Magento\Framework\UrlInterface::URL_TYPE_MEDIA);

        $meta = $this->arrayManager->merge(
            $containerPath,
            $meta,
            [
                'children'  => [
                    $fieldCode => [
                        'arguments' => [
                            'data' => [
                                'config' => [
                                    'elementTmpl'   => 'Aureatelabs_ProductAttachment/elements/file',
                                    'media_url' => $mediaUrl
                                ],
                            ],
                        ],
                    ]
                ]
            ]
        );
        return $meta;
    }

    public function modifyData(array $data)
    {
        return $data;
    }
}
We have defined an HTML template file in the modifier.
So next we will create file.html in app/code/Aureatelabs/ProductAttachment/view/adminhtml/web/template/elements diectory.
<input class="admin__control-file" type="file" data-bind="
    hasFocus: focused,
    attr: {
        name: inputName,
        placeholder: placeholder,
        'aria-describedby': noticeId,
        id: uid,
        disabled: disabled,
        form: formId
    }"
/>
<!-- ko if: $parent.source.data.product[code] -->
<span>
    <a attr="href: media_url+'catalog/product/attachment/'+$parent.source.data.product[code]" text="$parent.source.data.product[code]" target="_blank"></a>
    <label attr="for: uid+'_delete'">
        <input type="checkbox" attr="name: 'product['+code + '_delete]', id: uid+'_delete', form: formId">
        <span data-bind="i18n:'Delete'"></span>
    </label>
</span>
<!-- /ko -->
Now after saving the product, it will display anchor tag with attachment file path and delete checkbox.
We have already added define delete file code in backend model app/code/Aureatelabs/ProductAttachment/Model/Product/Attribute/Backend/File.php.
Step 5: Display product attachment in product detail page in frontend
Next, we will create a new product attachment tab in the product detail page and will show product attachment for that product.
So next we will create a catalog_product_view.xml in app/code/Aureatelabs/ProductAttachment/view/frontend/layout directory.
<?xml version="1.0"?>
<page xmlns:xsi="http://www.w3.org/2001/XMLSchema-instance" xsi:noNamespaceSchemaLocation="urn:magento:framework:View/Layout/etc/page_configuration.xsd">
	<body>
    	<referenceBlock name="product.info.details">
        	<block class="Aureatelabs\ProductAttachment\Block\Attachment" name="product.attachment.tab" template="Aureatelabs_ProductAttachment::product_attachment.phtml" group="detailed_info">
            	<arguments>
                	<argument translate="true" name="title" xsi:type="string">Product Attachment</argument>
            	</arguments>
        	</block>
    	</referenceBlock>
	</body>
</page>
As we have defined in layout file we will create block and phtml file.
So next we will create an Attachment.php in app/code/Aureatelabs/ProductAttachment/Block directory.
<?php
namespace Aureatelabs\ProductAttachment\Block;

class Attachment extends \Magento\Catalog\Block\Product\View {

	public function getMediaUrl() {
    	return $this->_storeManager->getStore()
        	->getBaseUrl(\Magento\Framework\UrlInterface::URL_TYPE_MEDIA);
	}

	public function getProductAttachmentUrl($attachment) {

    	return $this->getMediaUrl()."catalog/product/attachment/".$attachment;

	}
}
Next we will create a product_attachment.phtml in app/code/Aureatelabs/ProductAttachment/view/frontend/templates directory.
<?php
// get current product data
$product = $block->getProduct();


if (!empty($product->getAttachment())) {

	$attachmentUrl = $block->getProductAttachmentUrl($product->getAttachment());
	?>
	<a href="<?php echo $attachmentUrl ?>" target="_blank"><?php echo $product->getAttachment() ?></a>
<?php
}
Now flush cache and open the product detail page. Now you can see the product attachment tab.

Also read:
FAQs
To upload image in admin form Magento 2, open the admin panel. Navigate to Products>Catalog tab and click on the product to which you add an image. Then, navigate to the Images and Videos tab and click on the camera icon. Here, you can select the required image from your local storage. Click on the orange save button to save all the images.
To display data in frontend in Magento 2, follow the below steps:
1. Create a Resource Model for the data in the required table.
2. Create a collection model to fetch data from the table.
3. Extend the model by creating a data interface.
4. Implement the model and locate a block file.
5. Input data in the phtml file and utilize commands to manage the data.
To save admin form data in Magento 2, check the following steps:
1. Create a submit.php file to save form input data.
2. Locate the file in app\code\Extension\Controller\Index\Submit.php
3. Enter data saved message in the code to display when necessary.
4. Implement the code and test it to save data in the database.
To upload an image in Magento 2, follow the below-mentioned steps –
1. Inject the Magento\Framework\File\UploaderFactory class in your constructor –protected $_uploaderFactory;
public function __construct(
// …
\Magento\Framework\File\UploaderFactory $uploaderFactory,
// …
) {
// …
$this->_uploaderFactory = $uploaderFactory;
// …
}
2. Now, use the create() function of the $_uploaderFactory object to create an instance of the \Magento\Framework\File\Uploader class -
$uploader = $this->_uploaderFactory->create(['fileId' => 'image']);
3. Next, set the path to the media folder where you want to upload the image –$path = 'path/to/media/folder';
$uploader->setAllowCreateFolders(true);
$uploader->setAllowedExtensions(['jpg', 'jpeg', 'gif', 'png']);
$uploader->save($path);
4. Once the image is uploaded, you can use it in your products or pages.


this code is not working in magento 2.3.2 version . can you please suggest any other model?
How to upload multiple attachment for the same product? can you please update the code for it?
Thanks!
Please, _fileUpzloaderFactory replace by _fileUploaderFactory
Thank you!
Great tutorial, it works for me.
I found a little bug in the end of app/code/Aureatelabs/ProductAttachment/Model/Product/Attribute/Backend/File.php – in try function there is “_fileUpzloaderFactory” instead of “_fileUploaderFactory”.
Regards,
Beren
Thank you!
Thanks for your sharing. This topic is very useful for me.
Beside that, i found out a issue, it’s maybe a bug:
Steps to reproduce:
– change scope of attachment to Website (not global or storeview)
– on top-left, select view scope “All Stores View”, then select new file and save product
– on top-left, select a storeview of any website, then select new file and save product. After saving complete, i check on delete to remove file.
result actually: file removed and checkbox Use Default Value automactically selected. The current value of attachment is Default Value ( <= It's bug)
result expect: file removed, checkbox Use Default Value is not checked.
—
If you have some suggestions to resolve it, please let's me know. Thanks so much.
Best Regards.
Tuan.
Thanks for sharing.
I have an issue want to raise.
When the attribute’s scope is Website, the function delete will not work normally.
How to add multiple pdf files upload here?
Worked perfectly for me!
I added 2 attributes so I had to make a for each over the fieldCodes in the modifier but it also worked like a charme.