Chapters Close

In this post, I will be guiding you to excluding JavaScript files from minifying. Sometimes it is required to load third-party JavaScript files in our custom module/theme & .min file is not available.

Use Case

  • You are implementing a custom payment method module for the current project:
    • Here you found the payment gateway is providing minified javascript file(s) but file(s) name doesn’t have .min suffix like payment-abc.min.js
  • At this point, you have a tight budget and ETA. You can’t just tell the client or payment gateway refused your request.

How minify js files work in  Magento 2?

At first, you have to enable minify JavaScript JS from Admin or using the command line in production mode.

\> php bin/magento config:set dev/js/minify_files 1

Disable JS merge if enable:
\> php bin/magento config:set dev/js/merge_files 0
\> php bin/magento cache:flush

Then run deploy command:

\> php bin/magento setup:static-content:deploy

Now open the Magento 2 website on the browser and open DevTools, in Network panel it will show the minify js loader file: requirejs-min-resolver.min.js. This file is responsible to open all js files in .min and contains RegEx rules to exclude js files from adding .min suffix. Magento creates this file when JS minify & production mode is enabled.

Let’s do it

Using the above test case:

  • You are implementing a custom payment method module for the current project but JavaScript files of the payment gateway do not have .min suffix and you will  tell Magento 2 to add file path in the requirejs-min-resolver.min.js file.
  • We will add an after plugin on the getExcludes method of Magento\Framework\View\Asset\Minification class. So you got an idea this class is responsible for minifying files in Magento 2.

In your di.xml file at app/code/Vendor/Payment/etc directory:

<type name="Magento\Framework\View\Asset\Minification">
    <plugin name="vendor_prevent_minification" type="Vendor\PaymentModule\Plugin\View\MinificationPlugin" />
</type>

Then create a plugin file: MinificationPlugin.php at app/code/Vendor/Payment/Plugin/View directory:

<?php

namespace Vendor\PaymentModule\Plugin\View;

use \Magento\Framework\View\Asset\Minification;

class MinificationPlugin
{
    /**
     * Exclude static componentry files from being minified.
     *
     * Using the config node `minify_exclude` is not an option because it does
     * not get merged but overridden by subsequent modules.
     *
     * @see \Magento\Framework\View\Asset\Minification::XML_PATH_MINIFICATION_EXCLUDES
     *
     * @param Minification $subject
     * @param string[] $excludes
     * @param string $contentType
     * @return string[]
     */
    public function afterGetExcludes(Minification $subject, array $excludes, $contentType)
    {
         // Here we are checking if not “js” then skip it
         if ($contentType !== 'js') {
            return $excludes; // Skip if contentType is not “js”
         }


         // Array variable adds path to exclude minify
         $excludes[]= 'https://webservices.paymentgateway.net/';
         return $excludes;
     }
}

Now change the Vendor/PaymentModule name as per your module and then run below commands:

\> php bin/magento cache:flush
\> php bin/magento setup:di:compile
\> php bin/magento setup:static-content:deploy

In browser, now check the payment js will open properly because file path is added in requirejs-min-resolver.min.js file.

Conclusion

Excluding JS files from minifying is an out-of-box feature of Magento 2 and it is very helpful when working with third-party services like Google ReCaptcha, Payment methods, shipping methods, email marketing, etc.

Let me know if you found the article helpful so that it will encourage me to write new blogs.

Thank you.

Here, In this blog, I’ll guide you to add columns in the tier price grid of the product. Sometimes it’s essential to understand client’s Magento web development requirements by overriding the core modules. Here, I am sharing a use case in which we’ve to override the tier price functionality.

Use Case: Our client has a few products which can be sold separately or in a bulk. Let’s take the example of soap. Users can purchase the soap single or in a pack of 8 to which they called family package and also there is one more option, Users can also purchase a pack of 24 to which they called Box.

To fulfill the client requirement we’ve decided to override the tier price functionality and divided the solution into the two parts. 

  • Add a secondary unit column in tier price
  • Display units on the frontend by using the dropdown.

This blog consists of a first solution which is, to add a column in the tier price grid. To do so, you have to do the below things in your extension.

  1. Add a required field in the tier price table
  2. Add a field in the grid
  3. Override save & update handlers

Let’s follow the above steps and customize the tier price.

1. Add a required field in the tier price table:

Here, we’ll add the field in the tier price table using the database schema. To do so, create the db_schema.xml in the etc folder and add a below code in it.


Copy Code

<schema xmlns:xsi="http://www.w3.org/2001/XMLSchema-instance"   
xsi:noNamespaceSchemaLocation="urn:magento:framework:Setup/Declaration/Schema/etc/schema.xsd">
   <table name="catalog_product_entity_tier_price" resource="default" engine="innodb" comment="Tier Pricing Table">
       <column xsi:type="varchar" name="{KEY}" nullable="true" length="255" comment="comment" />
   </table>
</schema>

2. Add a field in the grid:

We’ll add a field in a tier price grid using the modifiers by the following way.  First we’ll create a di.xml in the etc/adminhtml and add a modifier pool in it.


Copy Code
<config xmlns:xsi="http://www.w3.org/2001/XMLSchema-instance"  xsi:noNamespaceSchemaLocation="urn:magento:framework:ObjectManager/etc/config.xsd">
   <virtualType name="Magento\Catalog\Ui\DataProvider\Product\Form\Modifier\Pool" type="Magento\Ui\DataProvider\Modifier\Pool">
       <arguments>
           <argument name="modifiers" xsi:type="array">
               <item name="{identifier}" xsi:type="array">
                   <item name="class" xsi:type="string">{vendor}\{module}\Ui\DataProvider\Product\Form\Modifier\UpdateTierPricing</item>
                   <item name="sortOrder" xsi:type="number">200</item>
               </item>
           </argument>
       </arguments>
   </virtualType>
   <type name="{vendor}\{module}\Ui\DataProvider\Product\Form\Modifier\UpdateTierPricing">
       <arguments>
           <argument name="scopeName" xsi:type="string">product_form.product_form</argument>
       </arguments>
   </type>
</config>

Now, create a UpdateTierPricing.php at the Ui\DataProvider\Product\Form\Modifier and add the below code.


Copy Code
class UpdateTierPricing extends AbstractModifier
{
   /**
    * @var ArrayManager
    * @since 101.0.0
    */
   protected $arrayManager;

   /**
    * @var string
    * @since 101.0.0
    */
   protected $scopeName;

   /**
    * @var array
    * @since 101.0.0
    */
   protected $meta = [];

   /**
    * UpdateTierPricing constructor.
    * @param ArrayManager $arrayManager
    */
   public function __construct(
       ArrayManager $arrayManager
   ) {
       $this->arrayManager = $arrayManager;
   }

   /**
    * @param array $data
    * @return array
    * @since 100.1.0
    */
   public function modifyData(array $data)
   {
       // TODO: Implement modifyData() method.
       return $data;
   }

   /**
    * @param array $meta
    * @return array
    * @since 100.1.0
    */
   public function modifyMeta(array $meta)
   {
       // TODO: Implement modifyMeta() method.
       $this->meta = $meta;

       $this->customizeTierPrice();

       return $this->meta;
   }

   /**
    * @return $this
    */
   private function customizeTierPrice()
   {
       $tierPricePath = $this->arrayManager->findPath(
           ProductAttributeInterface::CODE_TIER_PRICE,
           $this->meta,
           null,
           'children'
       );

       if ($tierPricePath) {
           $this->meta = $this->arrayManager->merge(
               $tierPricePath,
               $this->meta,
               $this->getTierPriceStructure()
           );
       }

       return $this;
   }

   /**
    * @return array
    */
   private function getTierPriceStructure()
   {
       return [
           'children' => [
               'record' => [
                   'children' => [
                       {KEY} => [
                           'arguments' => [
                               'data' => [
                                   'config' => [
                                       'formElement' => Input::NAME,
                                       'componentType' => Field::NAME,
                                       'dataType' => Number::NAME,
                                       'label' => __('Label'),
                                       'dataScope' => '{KEY},
                                       'sortOrder' => 25,
                                   ],
                               ],
                           ],
                       ],
                   ],
               ],
           ],
       ];
   }
}

3. Override save & update handlers:

After performing the above steps we’ve added the field in the grid and the database. Now, we have to override the handlers using the preference.

To do so, we’ve to first create the SaveHandler.php in the Model directory. This file overrides the save functionality of tier price which will execute during the save the new product.


Copy Code
use Magento\Catalog\Model\Product\Attribute\Backend\TierPrice\SaveHandler;

class SavePriceHandler extends SaveHandler
{

   /**
    * Get additional tier price fields.
    *
    * @param array $objectArray
    * @return array
    */
   public function getAdditionalFields(array $objectArray): array
   {
       $percentageValue = $this->getPercentage($objectArray);

       return [
           'value' => $percentageValue ? null : $objectArray['price'],
           'percentage_value' => $percentageValue ?: null,
           {KEY} => $this->getSecondaryUnit($objectArray),
       ];
   }

   /**
    * @param array $priceRow
    * @return mixed|null
    */
   public function getSecondaryUnit(array  $priceRow)
   {
       return isset($priceRow[{KEY}]) && !empty($priceRow[{KEY}])
           ? $priceRow[{KEY}]
           : null;
   }
}

To update the tier price data while update the product need to create the UpdateHandler.php in the Model directory and copy the code from vendor/magento/module-catalog/Model/Product/Attribute/Backend/TierPrice/UpdateHandler.php and remove the updateValues function from the code and add below code in the file.

Note: Here, don’t forget to extend the UpdateHandler.


Copy Code
/**
* Update existing tier prices for processed product
*
* @param array $valuesToUpdate
* @param array $oldValues
* @return bool
*/
public function updateValues(array $valuesToUpdate, array $oldValues): bool
{

   $isChanged = false;
   foreach ($valuesToUpdate as $key => $value) {
       if ((!empty($value['value']) && (float)$oldValues[$key]['price'] !== (float)$value['value'])
           || $this->getPercentage($oldValues[$key]) !== $this->getPercentage($value)
           || $this->getSecondaryUnit($oldValues[$key]) !== $this->getSecondaryUnit($value)
       ) {
           $price = new \Magento\Framework\DataObject(
               [
                   'value_id' => $oldValues[$key]['price_id'],
                   'value' => $value['value'],
                   'percentage_value' => $this->getPercentage($value),
                   {KEY} => $this->getSecondaryUnit($value),
               ]
           );
           $this->tierPriceResource->savePriceData($price);
           $isChanged = true;
       }
   }

   return $isChanged;
}

/**
* Get additional tier price fields.
*
* @param array $objectArray
* @return array
*/
public function getAdditionalFields(array $objectArray): array
{
   $percentageValue = $this->getPercentage($objectArray);

   return [
       'value' => $percentageValue ? null : $objectArray['price'],
       'percentage_value' => $percentageValue ?: null,
       {KEY} => $this->getSecondaryUnit($objectArray),
   ];
}

/**
* @param array $priceRow
* @return mixed|null
*/
public function getSecondaryUnit(array  $priceRow)
{
   return isset($priceRow[{KEY}]) && !empty($priceRow[{KEY}])
       ? $priceRow[{KEY}]
       : null;
}

Create DataColumnUpdate.php in the Model directory. This file will load the saved data in the database.


Copy Code
class DataColumnUpdate extends Tierprice
{
   /**
    * @param array $columns
    * @return array
    */
   protected function _loadPriceDataColumns($columns)
   {
       $columns = parent::_loadPriceDataColumns($columns);
       $columns[{KEY}] = {KEY};
       return $columns;
   }
}

Now, you have to add the di.xml in the etc directory and add below code.


Copy Code
<config xmlns:xsi="http://www.w3.org/2001/XMLSchema-instance"  xsi:noNamespaceSchemaLocation="urn:magento:framework:ObjectManager/etc/config.xsd">
   <preference for="Magento\Catalog\Model\Product\Attribute\Backend\TierPrice\UpdateHandler"
               type="{vendor}\{module}\Model\UpdatePriceHandler" />
   <preference for="Magento\Catalog\Model\Product\Attribute\Backend\TierPrice\SaveHandler"
               type="{vendor}\{module}\Model\Product\Attribute\Backend\TierPrice\SavePriceHandler" />
   <preference for="Magento\Catalog\Model\ResourceModel\Product\Attribute\Backend\Tierprice"
               type="{vendor}\{module}\Model\ResourceModel\Product\Attribute\Backend\DataColumnUpdate" />
</config>

Here, we’ve added the all necessary code to override the tier pricing functionality. Now, just execute the below command from the Magento root directory and verify your implementation.


Copy Code
php bin/magento setup:upgrade
php bin/magento setup:di:compile

I hope this solution will resolve your problem. Let me know your thoughts in the comment section. And if you have any queries with this blog, I will be happy to solve that. Thanks and cheers … 🙂

Also read: Convert the price from one current to another in Magento 2


Hello readers welcome to my new post on Magento 2. I have written this post while working on one of my recent projects. Considering the issue I faced and solution I got after doing some research and development, I thought of sharing it with my virtual colleagues like you.

I this post, I will be guiding you through what is LiveReload, what is Grunt, how to install Grunt, how to install LiveReload, and finally how to work with LiveReload. So without further a do, lets dive into the post.

But before starting, there are following prerequisites which must be met.

Prerequisites

  • Set your Magento 2 to the developer mode.
  • Before installed Grunt please verify that Node.js already exists on a system.

What is LiveReload?

  • LiveReload is a browser extension for web developers to easily develop web design.
  • To utilize LiveReload, you would like a client (this script) in your browser and a server should be run on your development machine.
  • LiveReload tracks filesystem changes. When you save a file, it will be pre-processed as required, and the browser will be refreshed.
  • It’s a better way to develop a Magento website using this kind tool because for a Magento developer it’s to much time-consuming process to change CSS files, clean the cache and refresh the page manually to see the result, then he again goes back and does some other changes on CSS then repeat the same process and so on, while with the Liverelaod you to just save and check on the browser and all the changes has applied on the browser web page.
  • This reduced the time to clean the cache, either deploying the static-content, but you do need Grunt installed on the server.

What is Grunt?

  • Grunt (Grunt JavaScript Task Runner) is a tool that lets you build automated tasks in JavaScript.
  • This method was used to perform regular tasks like minification, compiling, unit testing and linting automatically. It uses a command-line interface to run custom tasks specified in a file (known as a Gruntfile).
  • Magento 2 contains manual tasks that you only need to configure.

Now, first of all, We are starting to install the grunt on your local or development server.

Installation of Grunt

  • Install the Grunt CLI globally on your server. To do this, run the following command in a command prompt


Copy Code
$ npm install -g grunt-cli
  • Go to your project root() directory to copy and paste the contents of the following sample files:
    • package.json.sample into package.json
    • Gruntfile.js.sample into Gruntfile.js
    • grunt-config.json.sample into grunt-config.jso
  • To Install the node.js project dependencies, including Grunt, for your Magento instance. To do this, run the following commands in the command prompt:
    • cd <your_Magento_instance_directory>
    • npm install
    • npm update
  • Add your theme to Grunt configuration. To do this, in the dev/tools/grunt/configs/themes.js file, add your theme in module.exports as shown below:


Copy Code
module.exports = {
       ...
   <theme>: {
   area: 'frontend',
       name: '<Vendor>/<theme>',
       locale: '<language>',
       files: [
       '<path_to_file1>', //path to root source file
       '<path_to_file2>'
   ],
       dsl: 'less'
       ...
},
  • Now you can use the grunt clean to delete static files in pub/static and var directories that are connected to the theme.
  • The grunt watch command can be used to detect modifications in source code, recompile.css code, and refresh pages in a browser.

Installation of Livereload

  • Install and configure the Livereload extension on your development browser. Refer the link for download the browser extension.
  • Installed the Livereload globally on your server. To do this, run the following command in a command prompt:


Copy Code
$ npm install -g livereload 
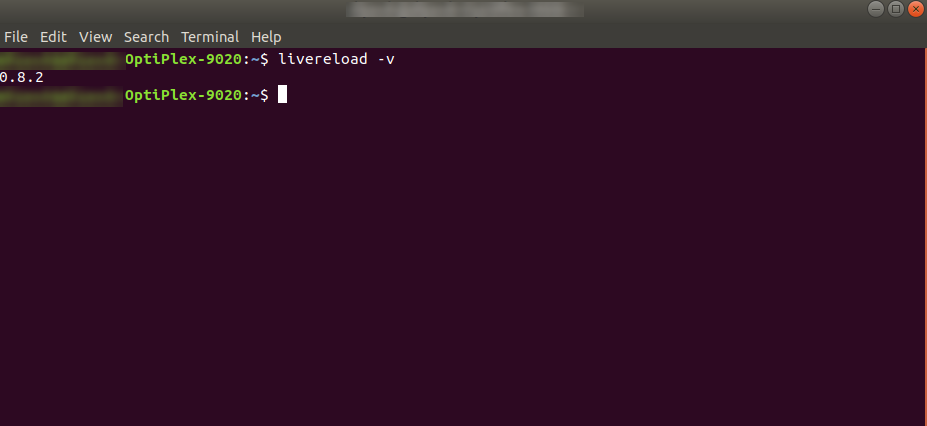
  • To confirm the Livereload installed successfully on your server, run the below command in the command line.


Copy Code
livereload -v 
  • Then implement the script code below inside <head> tag in default.xml or default_head_blocks.xml of your current theme.

For example


Copy Code
app/design/frontend/<Vendor>/<theme>/Magento_Theme/layout/default_head_blocks.xml


Copy Code
<page xmlns:xsi="http://www.w3.org/2001/XMLSchema-instance" xsi:noNamespaceSchemaLocation="urn:magento:framework:View/Layout/etc/page_configuration.xsd">
    <head>
        <script src="http://mage233:35729/livereload.js" src_type="url" />
    </head>
</page>

On the above code, you can see the src URL add the JS file. Please check the details below.

  • Your store URL: http://mage233
  • Your Port Number(Mostly, It remains the same): 35729
  • Add this JS File on the root of your project: livereload.js

You can download the livereload.js from here.

How to work with Livereload?

  • LiveReload toolbar button is located in the main toolbar in Chrome, Safari and in the Add-on Toolbar of Firefox (at the bottom).
  • Click on the LiveReload toolbar button to enable or disable LiveReload.This icon indicates LiveReload status of the current tab (unavailable / disabled / enabled, connecting / enabled, connected).
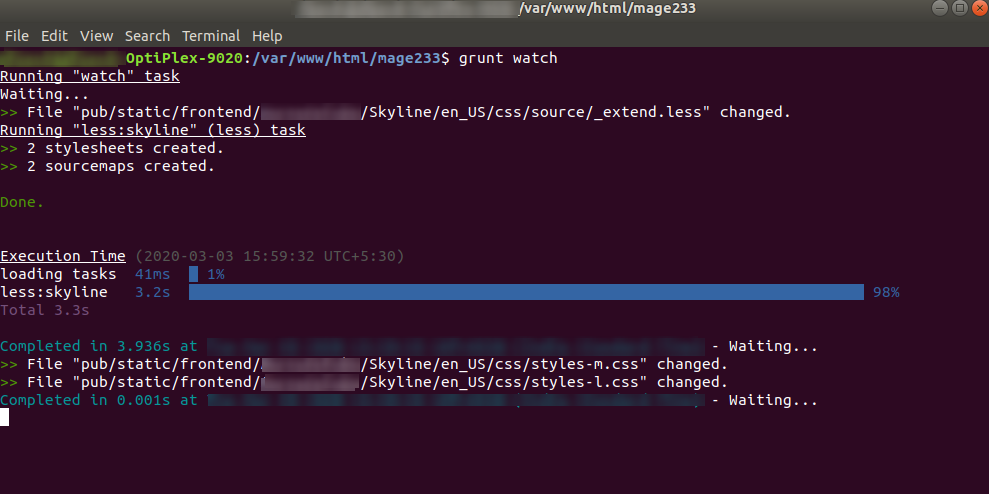
  • First of all, You have to run the grunt watch command in the command line to monitor the file CSS changes.
  • You have to enable the LiveReload extension from your browser toolbar. You can see the inner dot darken after enabling the extension.
  • To check that everything goes right. Please enter http://mage233:35729 URL on the browser. It will show the  {“tinylr”:”Welcome”,”version”:”1.1.1″}
  • Now open your _extend.less file and add/edit the CSS changes and save it. You will see in grunt watch command toolbar pub static file updates and show the updated file.

Finally, the changes appear quicky on the browser web page without the page reload.

I hope this will help to integrate theme easily. This is the most suitable way to integrate a theme.

Thanks for reading this post and feel free to drop your comments, will be happy to read them. See you on my next post, till then take care.

Helpful resources:

For better user experience, every business requires a search engine for an e-commerce site. The quick and relevant search result is the most important part of every search engine. Nowadays, every user searches for their required product on the website and expects a relevant result. What happens if your search engine is unable to provide the relevant results? Will it abandon the site or will it try with different synonyms? To resolve this issue, there are various open-source search engines available in the market but we’re picking the best search engines among them. First of all, each search engine has its own benefits and can be utilized according to the requirements. To choose a search engine, we must think about the following three things.
  1. Catalog size: Size of catalog in your store.
  2. Indexing: Search engine capacity to handle a real time search.
  3. Memory: Server also matters for search engines. Because it requires memory to perform the operation.
Let’s overview some search engines.
  • Elasticsearch is currently at the top position among all the search engines. Elasticsearch has changed the performance limitations. It’s performance and relevance is much higher than all other search engines.
  • Elasticsearch also quickly updates the data and it’s very important with real-time indexing.
  • When the size of the database increases, it’s difficult to work with it but elastic search also scales up accordingly and it doesn’t impact the search result.
  • When you have a large catalog of approximately 60k+ then only you can feel the actual performance impact of elastic search more than the other search engines.
  • Elasticsearch also consumes more memory so, your server should be with high configuration.

Solr:

  • Solr stands at the second rank on the trending chart of search engines. It has its separate benefits from other search engines. If you want the functionality that your search engine can read the rich content like text, pdf documents then you must prefer the Solr search engine.
  • Solr stands at different positions because of its performance and features.
  • Solr has very great capabilities for faceted search.
  • This search engine works best for the static data which are not frequently updating.

Sphinx:

  • The next search engine on my list is Sphinx. Sphinx is a very popular and experienced search engine. This search engine has powerful capabilities for the layered navigations due to its expertise and experiences.
  • Sphinx search supports the high scalability but not as compared to the elastic search.
  • Sphinx search consumes very less memory than other search engines. When your server is not with the high configuration then you must prefer this search engine.
Here, we can’t compare the above search engines because each has its individual feature which leads them in the market. Basically, When you have a very large catalog and high configured server then you must prefer the elastic search to see it’s extraordinary capabilities. But if your catalog size is small then you can choose the Sphinx/Solr.

Sphinx Search vs Elasticsearch

The main difference between Spinx search vs elasticsearch is— Sphinx Search needs managed schema files for defining data types, fields, and index structure whereas Elasticsearch doesn’t need index schema to index data and assign fields types. Sphinx is considered an open-source full-text search engine, whereas Elasticsearch is a tool in the “Search as a Service” category. I hope you got a good understanding of the different kinds of Search Engines. Let me know your thoughts in the comment section. And if you have any queries with this blog I will be happy to solve that. Thanks and cheers … 🙂

FAQs

Which is better Elasticsearch or Solr?

You can choose Elasticsearch or Solr as both are leading search engines. Elasticsearch is faster and easier to use. Though it is heavier than Solr, the performance difference is worth it. On the other hand, Solr has more features and is better suited for complex queries.

Is Elasticsearch based on Solr?

No, Elasticsearch is not based on Solr. Both Elasticsearch and Solr are based on the same Java library Lucene and have several similar core features. But Solr is more focused on text-based queries and Elasticsearch works towards analytical queries. Their architecture and community support also vastly differ.

Does Amazon use Solr?

Yes, Amazon uses Solr. Amazon’s CloudSearch service is based on Solr to support full-text searches. It forms the search engine’s functionality by indexing and ranking search results. Though Amazon also uses other search engines, CloudSearch and in turn Solr forms an integral part of all Amazon apps.

Is Elasticsearch the best search engine?

Yes, Elasticsearch is the best search engine. Though other search engines are widely used, Elasticsearch’s speed, community support, flexibility, and scalability makes it popular. The search engine can index data within a second, and scale to multiple searches to accommodate petabytes of data. Elasticsearch is best suited for use cases where data updates continually.

Hello readers, how’s your Magento development going, I hope it’s going fine.

You must have landed this post, because you are looking for solutions on how you can override reorder functionality in Magento 2 by disabling core plugin. No worries I will be guiding you through this solution.

So first of all, I will show you from the last two days the things that I have done to override the reorder functionality in Magento 2, then I will give you the final solutions.

Steps I took to override the reorder functionality in Magento 2

1. To override the functionality, I created around plugin which didn’t work because one of core magento extensions was already used around plugin for that and they are not using callable($proceed) function in around plugin so that the function process terminated there.

2. Tried to override core magento extension plugin files through preference which didn’t work because we can’t override the core plugins through preference.

3. Tried to change the sequence of core magento extension through custom extension and tried to load custom extension first but didn’t work because we can’t load core extension after custom extension. We can add dependency in our custom extension but that dependency calls core extension first.

4. Finally I disabled core magento extension plugin through custom extension and then call my custom plugin after it. This trick works like a charm.
(Please find the code below)

Please create a custom extension and write the below code in etc/di.xml.

<config xmlns:xsi="http://www.w3.org/2001/XMLSchema-instance" xsi:noNamespaceSchemaLocation="urn:magento:framework:ObjectManager/etc/config.xsd">
    <type name="Magento\Sales\Controller\Order\Reorder">
        <plugin name="replaceQuoteItems" type="Magento\NegotiableQuote\Plugin\Sales\Controller\Order\ReorderPlugin" disabled="true" />
        <plugin name="replaceOrderItem" type="VendorName\ModuleName\Plugin\Sales\Controller\Order\ReorderPlugin" />
    </type>
</config>

Now, Please run the DI compile process: php bin/magento setup:di:compile

I hope this post can save someone’s valuable time and help him/her to understand the basic concepts of the Magento 2 framework.

Thanks for reading and comment down if you have any query, will be more than happy to help you. You can also follow us on twitter and share your queries there as well.

In this magento web development tip, we will be guiding you on how to display a custom admin system message in the backend.

One of the most useful default functionality is the admin notification. Magento uses this functionality to notify admin user of various errors, warning, upgrade and patch information. Whenever you log in to the admin panel, such notifications may appear giving you some vital information. These notifications can vary from messages about invalidated indexes to vulnerability issues. Adding custom system messages can be helpful and we are going to show you how to do it in a few simple steps.

There are four types of system admin notification that Magento uses which are listed below.

Notice: updates, releases, and other Magento news
Minor: minor updates and other messages
Major: important notifications, which you should check shortly
Critical: vulnerability issues and other most important notifications

Here we are using Aureatelabs as the Vendor name and CustomNotification as the name of the module.  You can change this according to your Vendor and Module name.

First you have to create a di.xml file in app/code/Aureatelabs/CustomNotification/etc/adminhtml/ directory

<?xml version="1.0"?>
<config xmlns:xsi="http://www.w3.org/2001/XMLSchema-instance" xsi:noNamespaceSchemaLocation="urn:magento:framework:ObjectManager/etc/config.xsd">
   <type name="Magento\Framework\Notification\MessageList">
       <arguments>
           <argument name="messages" xsi:type="array">
               <item name="customMessageNotification" xsi:type="string">Aureatelabs\CustomNotification\Model\System\Message\CustomMessageNotification</item>
           </argument>
       </arguments>
   </type>
</config>

Next we will be creating CustomMessageNotification.php in  app/code/Aureatelabs/CustomNotification/Model/System/Message directory.

This class must implement the “\Magento\Framework\Notification\MessageInterface” interface.

<?php
namespace Aureatelabs\CustomNotification\Model\System\Message;

use Magento\Framework\Notification\MessageInterface;

class CustomMessageNotification implements MessageInterface {

   /**
    * Message identity
    */
   const MESSAGE_IDENTITY = 'custom_system_notification';

   /**
    * Retrieve unique system message identity
    *
    * @return string
    */
   public function getIdentity()
   {
       return self::MESSAGE_IDENTITY;
   }

   /**
    * Check whether the system message should be shown
    *
    * @return bool
    */
   public function isDisplayed()
   {
       // return true will show the system notification, here you have to check your condition to display notification and base on that return true or false
       return true;
   }

   /**
    * Retrieve system message text
    *
    * @return \Magento\Framework\Phrase
    */
   public function getText()
   {
       return __('Custom System Message Notification Text.');
   }

   /**
    * Retrieve system message severity
    * Possible default system message types:
    * - MessageInterface::SEVERITY_CRITICAL
    * - MessageInterface::SEVERITY_MAJOR
    * - MessageInterface::SEVERITY_MINOR
    * - MessageInterface::SEVERITY_NOTICE
    *
    * @return int
    */
   public function getSeverity()
   {
       return self::SEVERITY_MAJOR;
   }

}

Possible default system message types are

SEVERITY_CRITICAL – to add a critical message
SEVERITY_MAJOR – to add a major message
SEVERITY_MINOR – to add a minor message
SEVERITY_NOTICE – to add a notice

 Now, execute the two commands given below:

php bin/magento setup:di:compile
php bin/magento cache:flush

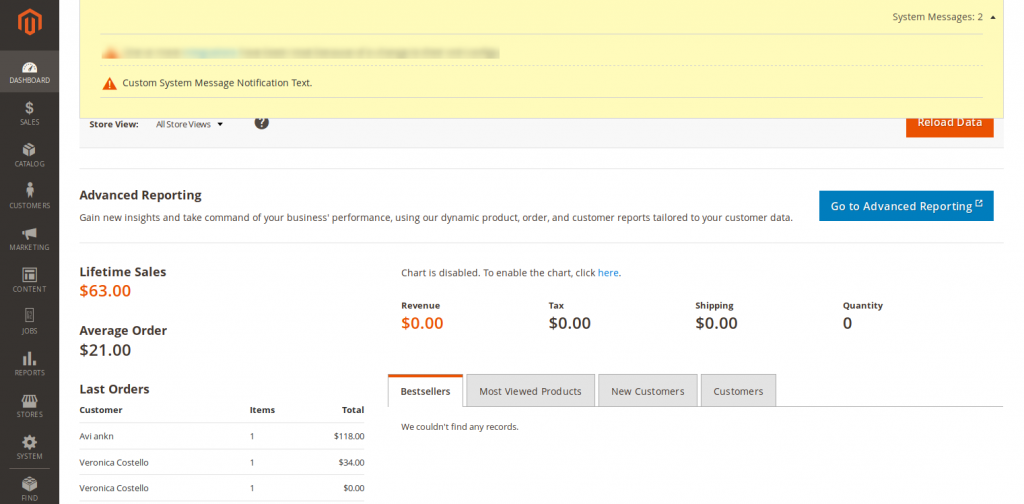
And that’s it. Log in into the admin panel and you will see a custom system admin message notification.

Custom system admin message notification screenshot

Related Sources

  1. How to Call Custom phtml in UI-Component Form in Magento 2?
  2. How to create a custom tab and call custom phtml in the admin category

As developer we know, how extra 15 mins could help us in cross-checking the work and improve if something is lacking. Not every developers has those extra 15 mins, but you can produce it by increasing your work speed and using tools already provided in the system.

The blog is important for all the Magento developers who want to speed up Magento 2 frontend development using chrome extensions. .

Why we should use Chrome extensions for Magento 2 Frontend Development?

  • Do you have an issue with the finding template/block without enabling a template hint?
  • Taking time while theme development/customization for finding a correct block/layout/phtml?
  • Having difficulties to identify which queries are executed on a particular page?
  • Do you want to increase the theme development speed?

Available Chrome extensions

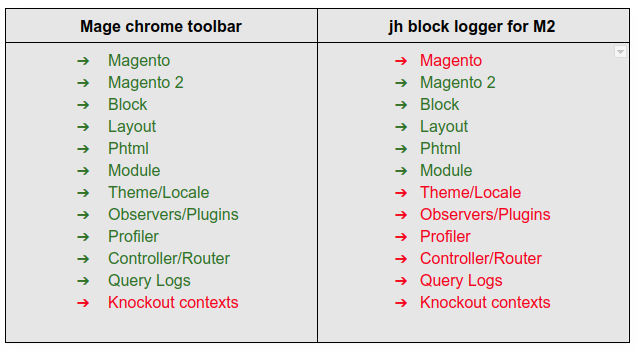
I have checked the various available extensions to speed up Magento 2 frontend development. I have found the best 2 extensions which I have mentioned below. You can use any of them. Mage chrome toolbar by Magespecialist

Mage chrome toolbar by Magespecialist

JH Block Logger

Above both extensions have their own benefits but it depends on your requirement. Both tools are very easy to install & use.

Benefits

  • It allows you to quickly access the information you need to debug your Magento performances, to build your new theme or to modify an existing one.
  • Easily and fast access to observers, profilers and theme information.
  • Help to identifies phtml/layout/block for an element.
  • Help to identifies locale, theme & stack.
  • Get information about which queries are executed on the page and how much time taken by each query.
  • All this information are available with one click after one-time setup & configuration.

Comparison

Features of Mage chrome toolbar

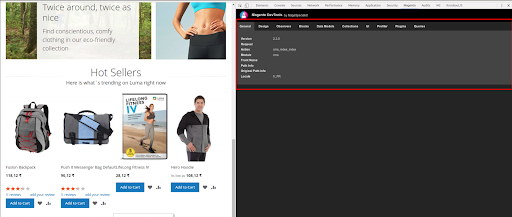
Global Page Information

From the main panel you can see information from:

  • Theme
  • Controller / Router
  • Request parameters
  • Layout and Layout updates
  • Observers
  • Data Models inspector
  • Collections inspector
  • Blocks, Containers, uiComponents
  • Profiler

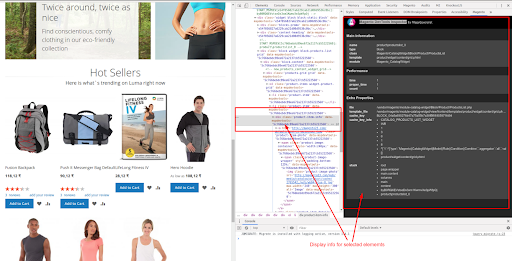
Item Information

By selecting an item in you page you can see:

  • Block information
  • Used template
  • Server elapsed time
  • Block nesting
  • Template file
  • Cache information
  • uiComponent information
  • Container information

Mage chrome toolbar’s installation & configuration

  • Go to the project root directory in CLI and run following command
    • composer require msp/devtools
  • Now execute below command to Update database
    • php bin/magento setup:upgrade
  • Turnoff Full page caching while using this tool.
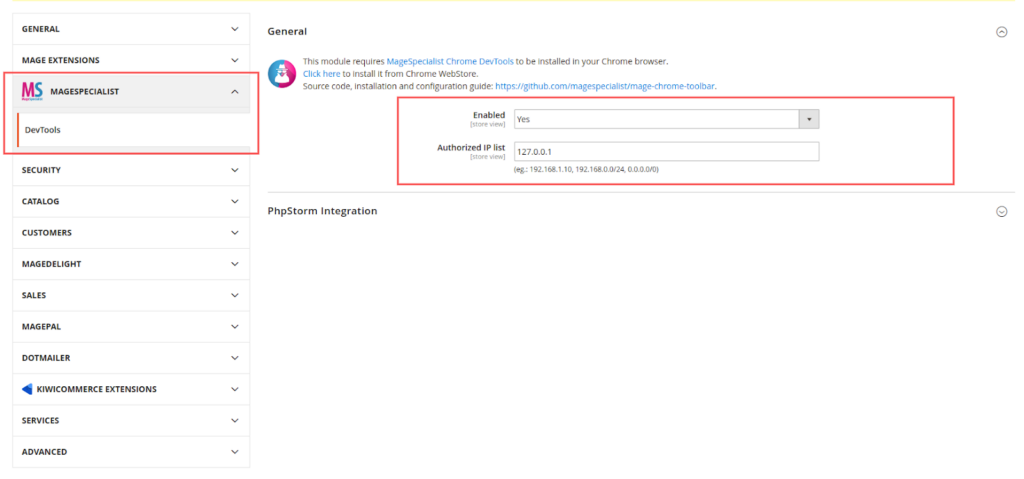
  • Open Magento backend and go to Stores > Settings > Configuration > MageSpecialist > DevTools
  • Enable the devtools and set IP restrictions (This extension working on restricted ip’s only)
  • To enable Profiler to do the following.
    • Add below line to  pub/index.php
$_SERVER['MAGE_PROFILER'] = [
     'drivers' => [
          [
      'output'=>'MSP\DevTools\Profiler\Driver\Standard\Output\DevTools'
      ]
   ]
];
  • Or you can add below line to .htaccess
SetEnv MAGE_PROFILER MSP\DevTools\Profiler\Driver\Standard\Output\DevTools
  • Now, Install chrome extension from below link

https://chrome.google.com/webstore/detail/magespecialist-devtools-f/odbnbnenehdodpnebgldhhmicbnlmapj

That’s it installation & configuration is done. I had followed some basic and simple steps to use tools. Now, let’s check some screens of this tool which I had taken it from my instance.

Special thanks to @wearejh & @magespecialist for providing such nice tools to Magento Developers.

I hope this blog will help you with frontend development. Let me know your thoughts in the comment section. And if you have any query with this blog I will be happy to solve that. Thanks and cheers … 🙂

A Helper is a class that provides functionalities for various features throughout the Magento website. Available for use anywhere on the website, Magento 2 Helper can be called in controllers, views, models and even in other helpers too!

Here, I will show you how to call a helper class methods in the template files. There’s a small tip for you, we suggest you use the second method.

Method 1: Using $this->helper directly in the template files

In Magento 2 templates there is an object: $this. It is an object of the class. Check below how to call the helper method using $this.

$this->helper('[Vendor]\[Module]\Helper\[Helper Name]')

Use this method as a last resort because as far as we know, calling a helper in your template is equal to using the object manager directly. Thus, we should inject the helper in the constructor of the block. See method 2 given below.

Method 2: By injecting helper in the  constructor of the block class

This is the best practice for using helper in Magento 2. Helper method can be called anywhere in Magento 2 using Dependency Injection. You should not call the helper directly in the template.

To use this helper method, check the below code snippet where you can see the helper instance is dependent on the block,  that renders the template and creates a method in your block, which then calls the helper and calls that method in the template.

Define your block as shown below:

protected $helper;
public function __construct(
    ....
    \{Vendor}\{Module}\Helper\Data $helper,
    ....
) {
    ....
    $this->helper = $helper;
    ....
}

public function callHelperMethod()
{
    return $this->helper->getDataFromHelper();
}

Then you can call the helper in your template with : $block->callHelperMethod()

Conclusion

In this article, I’ve shown you how to call the helper method in .phtml template files. If you still need any help regarding the helper class or anything related to Magento development, we are happy to help you. Feel free to get in touch!

FAQs

What is template helper code?


Template helper code is the code used to build dynamic templates which are used to simplify HTML tasks. They are included as part of another template code to improve the functionality of the template. There are various helper codes depending on the function such as tag helpers, link helpers, etc.

What is built in helpers?


Built in helpers are helpers already included in the template engine. They are universally available to any developers using the template and usually simplify commonly used functions such as looping or formatting. Some of the commonly used built-in helpers include #if, #unless, #each, #with, and others.

How to use helper in magento2?


To use helper in Magento 2, add the newly created module in a Helper folder. Update the module directory to include the folder. Then, create a data.php file in the Helper folder and update the file with the required code. Edit the index.php file and clear cache to check the helper.

How to call Phtml in Magento 2?


To call phtml in Magento 2, you need to use block code. First, login to the admin dashboard and write the block code in the content of any CMS page. After deploying the code, the phtml appears on the CMS page. You can also call phtml on all CMS pages by using a layout file.

Technology— the only stream which advocates updating and reformation without getting too spiritually connected with it.

It’s not that technical reformations are simple.

The day when Orkut decided to pull off the internet— the founder of the Orkut— Orkut Büyükkökten left an emotional message about the journey of the once extremely popular social media giant.

But that didn’t make Orkut Büyükkökten cling to the same old-cliche platform.

In fact, he addressed the issues with his head held high by launching an upgraded social platform— “Hello.”

So, what makes these technocrats really special?

The answer is— Unity.

The technocrats observe the loopholes— in unity, they deliver the best-reformed version without sticking to the emotional semantics of the older version— in unity, and they advocate the same— in unity. 

The point of the entire gaga is to make you understand the importance of Magento 1 to Magento 2 migration.

The idea of upgradation from Magento 1 to Magento 2 is to benefit the customers more than anyone, it’s about filling the loopholes which might deplete the business relationship.

Magento 2 Briefing and statistics

There’s a saying— “For something to cement a concrete space in the market, it must rule out the existing problems.” 

And that’s what Magento 2 has been doing.

Magento 2 is the upgraded version of Magento 1 e-commerce software and platform.

In order to solidify its position, the upgraded version helps Magento developers in developing a high-moduled website with minimal efforts in comparison to Magento 1.

Let’s go through some of the crucial bullets.

  1. With the new version, there’ve been more than 102,479 Magento 2 websites across the world in which the United States of America single-handedly controls 46% of the user pie chart share.
  2. There are only 661 Magento 2 websites in India.
  3. There are 853,654 Magento 1 websites— way ahead of the Magento 2’s statistics.

It means that Magento 1 to Magento 2 migration is not sunshine and roses for everyone; however, in the years to come, it might change the dynamics of e-commerce in the way we have never seen.

Do I need Magento 1 to Magento 2 Migration?

Well, the question “do I need Magento 1 to Magento 2 migration?” sounds legit considering the excellent performance of your e-commerce store.

Why should anyone migrate to the newer version if the older version gives an agile performance and doesn’t trouble the business?

I empathize with your claims entirely; however, you should look forward to targeting the prospect.

“Advancing to the newer version doesn’t necessarily mean ruling out the older glitches, but making sure that you aren’t missing the new ones.”

But again, you may hold your horses for upgrading your estore when:

  1. Your e-commerce platform is robust and agile,
  2. Your store doesn’t have problematic features,
  3. Your e-commerce site brings business and revenue,
  4. Your website works on the non-outdated version.

The idea to wait is to check the reviews of the Magento 2, what it introduces to the industry, and how efficiently does the store operate under its roof.

You may borrow a piece of advice from the existing users and then upgrade your e-commerce site.

We advise you to look for Magento 1 to Magento 2 migration immediately when:

  1. Your e-commerce platform has a dragging performance,
  2. You’re investing in the new e-commerce store,
  3. You voluntarily want to modify your e-commerce,
  4. Your e-commerce site works on the out-of-date version.

The threshold point for migration

Let’s be honest— we all have been finding the threshold point— the push— which can make us finally switch from Magento 1 to Magento 2.

The official announcement by the Magento Community family reveals that they will support Magento 1 till June 2020.

It has undoubtedly instilled fear in the hearts of the old website holders— especially in the ones who feel caught between the fear of data loss during migration and the approaching demise date of Magento 1.

But with the Magento’s new version 2.3.x, the company is steadily pushing the e-commerce store owners to accept the change.

The fresher version implies that the company understands the importance of losing database assets.

Hence, whether you want to upgrade your Magento store or not, the policies of the company will compel you to upgrade from Magento 1 to Magento 2.

The wholesome benefits of Magento 2 over Magento 1

1. Way ahead in performance and scalability

Magento 2 outweighs Magento 1 in all the performance department, and when it comes to index management— it’s carnage from the newer version.

Index Management was a strenuous task in Magento 1. The store admins had to undergo severe headache for transforming merchant data such as users, prices, catalog data, stores, etc. into tables.

But Magento 2 excels in indexing the data as it indexes them into tables.

It has another unique reindexing feature which triggers whenever one or more items get changed.

As change takes place, it reindexes the data automatically.

With the automatic indexing, the price loading time for the products fastens.

The best part about it is— the entire reindexing process takes place in the background, and it has no effect on the front end operation of your Magento 2 store whatsoever.

It is also easy to set up Varnish Cache— the HTTP accelerator which quickens the process of caching the query by 300 to 1000 times— in Magento 2.

Here’s how Magento 2 enhances the performance and magnifies the scalability: 

  1. It optimizes the web pages for early delivery,
  2. It gives an intensified server response time to all the website activities,
  3. It strengthens the backend operations,
  4. It makes database withstand the load of peak-traffic.

The improved performance and scalability has led to

  1. Addressing 39% or more orders in 60 minutes
  2. Responding quickly to the request which demands to skim through the catalog
  3. The faster page load time by 30 to 50%.

2. The swift check-out process is the principal performer

We all want to end on a good note.

Unfortunately, the checkout processes seem to ignore the phrase.

The checkout process is the ultimate boundary between bouncing off and sales. 

The customer standing on the checkout process may go either way, that is, abandoning or purchasing.

It’s like a goat standing on the pinnacle of the mountain— waiting to go any of the sides.

As shopping cart abandonment continues to haunt the e-commerce owners, the increasing number of abandonment by intricate checkout process has caused some serious worries.

A complex checkout process kills the purpose of the concise sales funnel.

Although a lot of people desert the store because “they didn’t intend to buy, they were just surfing,” as much as 26% of the US population disappointingly leave the site because of the too long or arduous checkout process.

As checkout processes deviate more than one-fourth of the customers from the website, it’s high time we set a new checkout benchmark.

If we focus on redesigning the hassle-free checkout process, then we can definitely convert our customers.

In one of the large-scale checkout usability testings, it got revealed that improving the checkout design can alone contribute to 35% of more conversion.

Even though it takes a lot of effort to gain such a conversion, a smooth checkout flow inevitably leaves a purchasing impression on the customers.

Magento 2 gives the solution for the given problem.

Magento 2 carries the entire checkout process in a mere two steps contrary to the six-stepped Magento 1 checkout flow.

A customer mandatorily had to toil through six stages of Magento 1 checkout process. They are:

  1. Checkout method, 
  2. billing information, 
  3. shipping information, 
  4. shipping method, 
  5. payment information, and 
  6. order review. 

The Magento 2 checkout process is an enhanced two-step process which only includes shipping and reviewing the order, and completing the payment.

In addition to it, Magento 2 permits the visitors to enjoy the seamless experience by becoming guests.

It obliterates the necessity of enrolling as a new user or logging as an existing user— because registration forms are as good a pain in the neck as checkout fillings.

You can also integrate:

  1. Customized payment module
  2. Order summary 

A frictionless checkout process is one of the necessary ingredients for high turnover.

3. Easy execution of m-commerce

e-commerce is not restricted to desktops and laptops.

Our interaction point has changed over the past five decades, and today, we browse, communicate, and shop through mobile devices such as mobiles, tablets, and watches.

The truth is— more than 80% of internet usage is done on smartphones, and more than 60% of online purchases have come through mobile devices.

With m-commerce becoming the favorite hot trend, it is the perfect time for you to have mobile-friendly e-commerce.

Magento 2 vows to bring m-commerce into reality for you.

With the mobile-friendly checkouts and beautifully-catered responsive mobile ambiance, Magento 2 fits the need of the hour.

With it, you can create a homogenous channel for your e-commerce store between different devices.

Here’s the second to none quality— looking at the increased demand for mobile applications, you can build your personalized application which will give your business a new depth and your revenue a new height.

As the admin panel of Magento 2 supports surface computing (such as touch screen), you can also manage and control the workflow of your store using the mobile devices.

4. Easy to migrate from Magento 1 to Magento 2

The fear of dropping database do stop us from upgrading our e-commerce store; however, if we don’t improve, our competitors would.

By resisting to upgrade, you indirectly empower your contemporaries with added benefits and edge over you and considering e-commerce as a marathon; you’d be dead in the long run.

And a new version of the platform doesn’t always work around page load time, response time, etc.

The software update also resolves the security glitch which might otherwise rob off your store if not reformed.

Hence, risking your data assets sounds more mature than risking your e-commerce life.

The newer variant not only protects your e-commerce but your brand name.

And Magento 2 is here to protect your interest and brand name by letting off easy migration.

Magento 1 to Magento 2 migration is a bright prospect if you want an updated bug-free (minor bugs) platform.

Although it is impossible to get a bug-free platform, the developers always find conducive ways for enhancing the platform’s performance and tightening the firewalls so that the clients and customers enjoy the top of the line services.

The flow is pretty straightforward— an enhanced version attracts you, you mount it in your e-commerce, it draws your customers, and you get to improve your sales.

5. Simplified integration with extensions

Extensions are the nitric oxide of e-commerce.

Just as nitric oxide amplifies the body performance, extensions boost the store performance.

Extensions are the set of code blocks which when integrated with the store enhance the operation.

A lot of e-commerce owners use them to personalize and brush up their services.

For example,

I’d personally give up shopping if I have to select among the myriad of products.

I can’t challenge my cognitive and decision-making power with over millions of products on a single store.

But thanks to filtering and sorting extensions— they have returned my decision-making power without threatening me intellectually. 

As Magento 1 to Magento 2 migration helps you get easy extension integration, the e-commerce merchants draw huge positives in customizing their stores.

They can add extensions such as Path Finder, Free gifts and coupons, Stock and price countdown, Upsell and cross-sell popups, Gift card extensions, etc., and enrich their stores with exclusive facilities.

6. Purchase without entering the checkout phase

As discussed, nothing repels as much as normal checkout processes, e-commerce stores have finally found a way to deal with the annoying checkout friction through “instant purchase.”

Magento 2 instant purchase feature is like a bypass which guides the customers to place orders without having to enter into the checkout process.

When a customer dices into the website for making purchases, all they have to do is click on the “instant purchase button.” 

The click immediately redirects them to the final confirmation page where they can place the order.

Note: There are certain requisites which need to get fulfilled for enabling this feature. They are:

  1. Users should be signed in to their accounts.
  2. Users should have a default shipping and billing address.    
  3. The account should have the default shipping address.
  4. The account should have stored payment method.

The instant purchase button is a compelling call to action which generates the impulsiveness in the minds of the customers.

Considering 88.6% of the Americans make an impulsive buying decision, the feature by Magento 2 could mean moons and stars for your turnover.

7. Email marketing in minutes

Email is one of the most traditional and impactful marketing tools in any industry, let alone e-commerce.

With marketing getting event-centric, the automation of email marketing potentiates e-commerce merchants to localize and globalize in few minutes.

They can adhere to the phrase “localizing the global and globalizing the local” in minutes— thanks to Magento 2 email marketing automation.

With the auto-email marketing— the dotmailer email automation— the merchants can yield campaigns without dissipating their times.

Furthermore, with the chatbots in e-commerce, the chance of persuading the customers is way too narrow.

But with the auto email service, you can cater abundance of content to convert your customers.

Moreover, the automation is not limited to email as you can curate marketing content through SMS, push, and other channels by integrating them with Magento 2.

8. Advanced reports at fingertips

Reports, analytics, or in the simplest term “data” is one of the vital drivers of an e-commerce business.

The ever-renewing data helps you to assess your weak areas and insight into the business metrics where you need to improve.

Magento 2 provides a cloud-based dynamic suite of reports which enlighten about critical junctures of your e-commerce pathway.

It mainly focuses on the five key areas.

  1. Orders: The total number of order requests, Average order value, Sipping fees, Taxes, etc.
  2. Products: The review of the products, the stock of the product, the number of product orders, bestseller products, etc.
  3. Customers: The total number of registered accounts, order count report, order total report, etc.
  4. Sale reports: The total number of bills, coupon details, refunds, the charged tax, etc.
  5. Marketing reports: Products in the cart, abandoned cart report, newsletter issues, etc.

Magento 1 to Magento 2 migration allows easy management of the reports, and just by a click, get your share of beautiful reports to give e-commerce structure a new look. 

Conclusion

Magento 2 doesn’t claim to be the everlasting and permanent replacement for your e-commerce requirements.

Technology has seen reformation in the past, and it will continue to see in the future.

We will reach a time when we will be working on Magento 5 or even 10.

Depending on what technology demands, Magento is willing to mold— because it’s not a walled garden— it is not a caged animal. 

It’s an open sky which expands with the ever-expanding universe.

So, when are you choose Magento 1 to Magento 2 migration? Please contact us and choose our Magento Migration services to discuss the process and If you have already upgraded your store, let’s know about your favorite feature in the comment section.

In this post, I will be guiding you on how to move one of the shipping address fields in the checkout

Let’s do it

In your module root directory

You will have to create/update the di.xml file in frontend directory of your module:

<type name="Magento\Checkout\Block\Onepage">
   <arguments>
       <argument name="layoutProcessors" xsi:type="array">
           <item name="phoneNumberFieldChange" xsi:type="object">Aureatelabs\CheckoutDemo\Block\Checkout\LayoutProcessor</item>
       </argument>
   </arguments>
</type>

Then create a LayoutProcessor class using below contents

Path for the class: app/code/Aureatelabs/CheckoutDemo/Block/Checkout/LayoutProcessor.php

<?php
namespace Aureatelabs\CheckoutDemo\Block\Checkout;
class LayoutProcessor implements \Magento\Checkout\Block\Checkout\LayoutProcessorInterface {
    public function process($jsLayout) {
        // print_r($jsLayout) // for debug purpose
        $customAttributeCode = 'custom_field';
        $customField = ['component' => 'Magento_Ui/js/form/element/abstract', 'config' => [
        // customScope is used to group elements within a single form (e.g. they can be validated separately)
        'customScope' => 'shippingAddress.custom_attributes', 'customEntry' => null, 'template' => 'ui/form/field', 'elementTmpl' => 'ui/form/element/input', 'tooltip' => ['description' => 'this is what the field is for', ], ], 'dataScope' => 'shippingAddress.custom_attributes' . '.' . $customAttributeCode, 'label' => 'Custom Attribute', 'provider' => 'checkoutProvider', 'sortOrder' => 15, 'validation' => ['required-entry' => true], 'options' => [], 'filterBy' => null, 'customEntry' => null, 'visible' => true, 'value' => ''
        // value field is used to set a default value of the attribute
        ];
        $jsLayout['components']['checkout']['children']['steps']['children']['shipping-step']['children']['shippingAddress']['children']['shipping-address-fieldset']['children'][$customAttributeCode] = $customField;
        if (isset($jsLayout['components']['checkout']['children']['steps']['children']['shipping-step']['children']['shippingAddress']['children']['shipping-address-fieldset']['children']['telephone'])) {
            $jsLayout['components']['checkout']['children']['steps']['children']['shipping-step']['children']['shippingAddress']['children']['shipping-address-fieldset']['children']['telephone']['sortOrder'] = 1;
        }
        return $jsLayout;
    }
}

After the module is updated with the above files then you must clear Magento cache obviously to update the di.xml

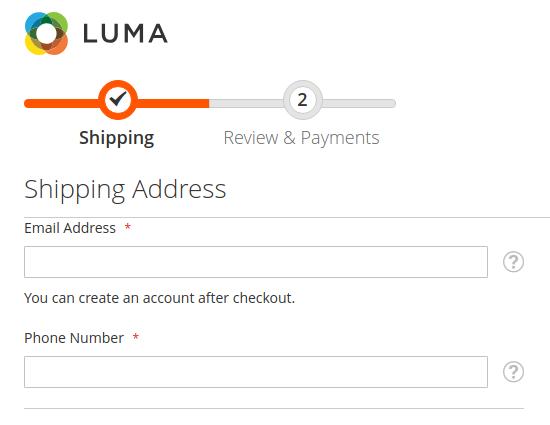
Now visit the checkout page and you will see 2 fields are added to the checkout page

Screenshots

Let’s check the screenshot of both default and IWD checkout first:

Default Magento 2 Checkout

IWD checkout

FAQ

  1. Will it be compatible with Third-party Checkout extensions?
    • Yes, I have tested on IWD checkout, firecheckout
  2. Will it be compatible with the any Magento 2 version?
    • Yes

Advantages of this approach:

  1. No need to override base checkout_index_index.xml in theme/module
  2. No need to worry about third-party checkout extensions
  3. No to flush Magento cache once setup
  4. You can design Checkout page in less time

Must have skills to customize checkout page

  1. PHP – array functions
  2. XML – di.xml
  3. Knockout Js – to understand core component js
  4. Worked on CustomerData, UiRegistry, etc. core components used on checkout page of Magento 2
  5. Use chrome KnockoutJs plugin to identify the Js used for a particular element: https://chrome.google.com/webstore/detail/knockoutjs-context-debugg/oddcpmchholgcjgjdnfjmildmlielhof

Thank you. Don’t hesitate to leave your comments below or get in touch for any help needed in Magento store development.

Grow your online business like 4,143 subscribers

    * This site is protected by reCAPTCHA and the Google Privacy Policy and Terms of Service apply.
    envelope

    Thank You!

    We are reviewing your submission, and will be in touch shortly.