Chapters Close

Preferences in Magento 2 are just like how rewrites are in Magento 1. They basically let you substitute one instance of a class for another, in the Magento 2. This is an extremely powerful feature, but also comes along with the same responsibility as of Magento 1. Basically, No two modules can rewrite the same class. If two modules attempt to do so, there will be a conflict.

Create A Sandbox Script

Create a simple sandbox script by creating a demo.php file on Magento 2 root, enter the following:

<?php
require_once 'app/bootstrap.php';
$bootstrap = \Magento\Framework\App\Bootstrap::create(BP, $_SERVER);
$sample = $bootstrap->getObjectManager()->create('\Psr\Log\LoggerInterface');
\Zend_Debug::dump(get_class($sample));

Now, go to http://www.xyz.com/demo.php. On the screen, you should see the following:

string 'Magento\Framework\Logger\Monolog' (length=32)

Now, even though you specified \Psr\Log\LoggerInterface, you were given an instance of Magento\Framework\Logger\Monolog. Why? That’s because Magento 2 specified a preference for which class is to be used whenever the LoggerInterface class is requested.  That definition is located in app/etc/di.xml.

Create a Preference

In your module, Ex:Companyname_Packagename, Create a di.xml file on the <root>/app/code/Companyname/Packagename/etc folder.

<?xml version="1.0"?>
<config xmlns:xsi="http://www.w3.org/2001/XMLSchema-instance"
        xsi:noNamespaceSchemaLocation="urn:magento:framework:ObjectManager/etc/config.xsd">
    <preference for="Magento\Framework\Logger\Monolog" type="Companyname\Packagename\Model\Log"/>
</config>

Now, let’s create a class.
Inside of app/code/Companyname/Packagename/Model/Log.php, enter the following:

<?php
namespace Companyname\Packagename\Model;
use \Magento\Framework\Logger\Monolog;
class Log extends Monolog {	
}

Now, go to http://www.xyz.com/demo.php. On the screen, you should see the following:

string 'Companyname\Packagename\Model\Log' (length=36)

When we specified the \Psr\Log\LoggerInterface:

  1. Magento 2 prompted the object manager that there was a preference for that class.
  2. That was Magento\Framework\Logger\Monolog originally.
  3. The object manager took that preference and then started all over again.
  4. When it attempted to use the Monolog class, the object manager once again declared that there was another preference for the Monolog class.
  5. This time it was for our own class, i.e. Companyname\Packagename\Model\Log

Basically, whenever the LoggerInterface class is requested, our newly created class will be used instead!

Recommended: preference should be the last option if it is not possible to make use of the plugin to rewrite the method of the class.

Thank you for reading. Your feedback is welcome in the comments section, and we’re available to assist with any Magento store development or customizations you may need

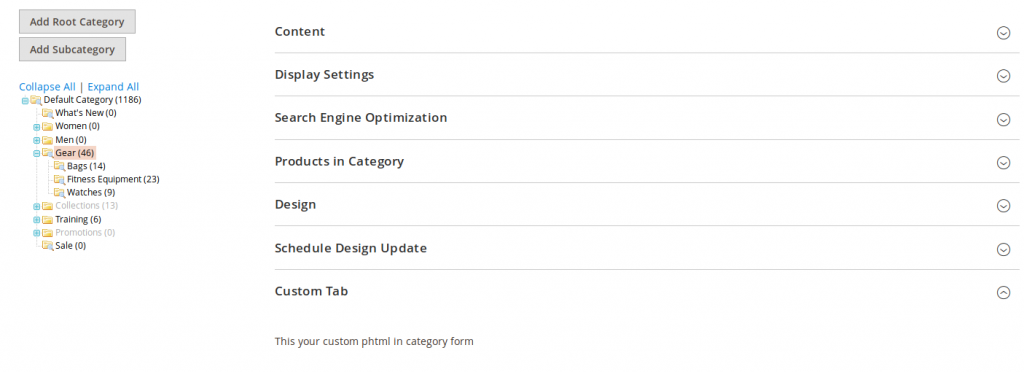
In this Magento 2 web development tip, we will be guiding you on how to create a custom tab and call custom phtml in the admin category ui-component form in Magento 2.

Here we are using Aureatelabs as the Vendor name and CustomTab as the name of the module.  You can change this according to your Vendor and Module name.

First, we will create a custom tab in category admin form after that we will call our custom block and phtml file inside our custom tab.

First you have to create category_form.xml file in app/code/Aureatelabs/CustomTab/view/adminhtml/ui_component directory

<?xml version="1.0" encoding="UTF-8"?>
<form xmlns:xsi="http://www.w3.org/2001/XMLSchema-instance" xsi:noNamespaceSchemaLocation="urn:magento:module:Magento_Ui:etc/ui_configuration.xsd">
   <fieldset name="category_custom_tab_789" sortOrder="120">
       <settings>
           <collapsible>true</collapsible>
           <label translate="true">Custom Tab</label>
       </settings>
       <container name="custom_tab_container" sortOrder="100">
           <htmlContent name="html_content">
               <block name="custom_category_tab" class="Aureatelabs\CustomTab\Block\Adminhtml\Category\CustomTab"/>
           </htmlContent>
       </container>
   </fieldset>
</form>

Here we have set custom block inside our custom tab in category_form.xml.

Next we will create CustomTab.php in  app/code/Aureatelabs/CustomTab/Block/Adminhtml/Category directory.

<?php
namespace Aureatelabs\CustomTab\Block\Adminhtml\Category;

class CustomTab extends \Magento\Backend\Block\Template
{
   /**
    * Block template.
    *
    * @var string
    */
   protected $_template = 'category/custom_tab.phtml';

}

In the block file, we have defined the phtml file.

So next we will create custom_tab.phtml in app/code/Aureatelabs/CustomTab/view/adminhtml/templates/category directory

<p>This your custom phtml in admin category form</p>

Now flush the cache and open the category admin form, there you will see the custom phtml file content in our custom tab.

Well that was an easy one, wasn’t it? Let us know in the comments section below.

Related Resources:

  1. How to display a custom admin system notification?
  2. How to change PAD length in order increment number in Magento 2?
  3. Dependency Inversion Principle and how it is used in Magento 2?
  4. What are the main benefits of the all new PHP 7.2 for Magento sites?

In this Magento web development hack, we will be guiding you on how to add custom phtml in the admin product ui-component form in the Magento 2.

Here we will be using Aureatelabs as the Vendor name and CustomTab as the name of the module.  You can change this according to your Vendor and Module name.

To start with, we will create a custom tab in the product admin form after which we will call our custom block and phtml file inside our custom tab.

Step 1: Create Product_form.xml file

For this, you have to create a product_form.xml file in app/code/Aureatelabs/CustomTab/view/adminhtml/ui_component directory


Copy Code
<?xml version="1.0" encoding="UTF-8"?>
	<!--For calling custom block -->
	<fieldset name="custom_tab">
    	<argument name="data" xsi:type="array">
        	<item name="config" xsi:type="array">
            	<item name="label" xsi:type="string" translate="true">Custom tab</item>
            	<item name="collapsible" xsi:type="boolean">true</item>
<!-- this attribute is, if you want your custom section by default opened when product form calls, if not then set the value as false -->
            	<item name="opened" xsi:type="boolean">true</item> 
            	<item name="canShow" xsi:type="boolean">true</item>
            	<item name="sortOrder" xsi:type="string">1</item>
        	</item>
    	</argument>
    	<container name="custom_tab_container">
        	<argument name="data" xsi:type="array">
            	<item name="config" xsi:type="array">
                	<item name="sortOrder" xsi:type="string">1</item>
            	</item>
        	</argument>
        	<htmlContent name="html_content">
            	<argument name="block" xsi:type="object">Aureatelabs\CustomTab\Block\Adminhtml\Product\CustomTab</argument>
        	</htmlContent>
    	</container>
	</fieldset>
</form>

Here you can see that we have set custom block inside our custom tab.

Step 2: Create Block file for custom tab

Next we will be creating CustomTab.php in  app/code/Aureatelabs/CustomTab/Block/Adminhtml/Product directory.


Copy Code
<?php
namespace Aureatelabs\CustomTab\Block\Adminhtml\Product;

class CustomTab extends \Magento\Backend\Block\Template
{
	/**
 	* Block template.
 	*
 	* @var string
 	*/
	protected $_template = 'custom_tab.phtml';

}

We have defined the phtml file in the block file.

Step 3: Create phtml file that defined in block

So next we will be creating is a  custom_tab.phtml file in app/code/Aureatelabs/CustomTab/view/adminhtml/templates directory


Copy Code
<?php
echo "Hello World";
?>

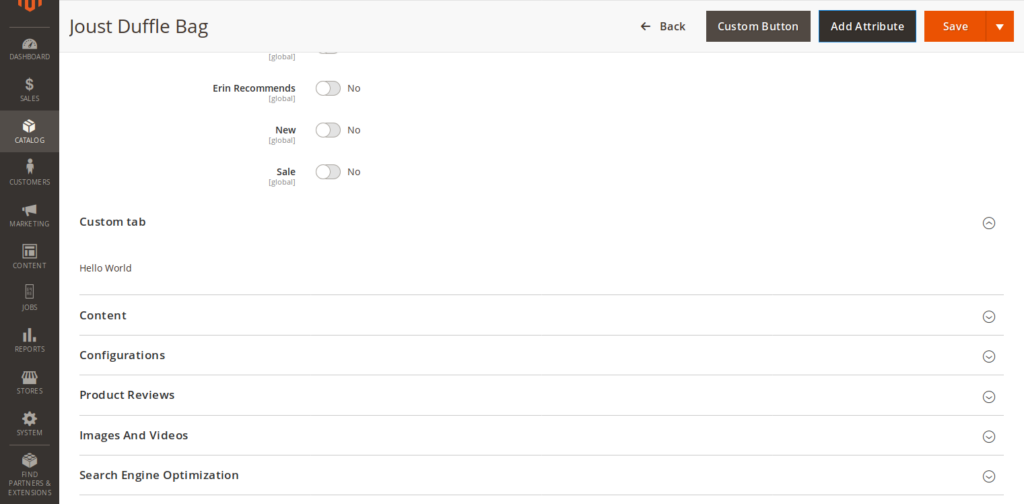
Now flush the cache and open the product admin form, now you can see the custom phtml file content in our custom tab.

Custom template in product edit form

Well, that was an easy one, wasn’t it? Let us know in the comments section below.

Related Resources:

  1. How to create an admin button in Magento 2?
  2. How to display a custom admin system notification?
  3. How to change PAD length in order increment number in Magento 2?
  4. Dependency Inversion Principle and how it is used in Magento 2?
  5. What are the main benefits of the all new PHP 7.2 for Magento sites?

In this hack of Magento web development, we will be guiding you on how to add a custom button in the admin product ui-component form in Magento 2.

Here we will be using Aureatelabs as the Vendor name and CustomButton as the name of the module.  You can change this according to your Vendor and Module name.

The product form is generated via ui-components.

To begin with, you have to create a product_form.xml file in app/code/Aureatelabs/CustomButton/view/adminhtml/ui_component directory

<?xml version="1.0" encoding="UTF-8"?>
<form xmlns:xsi="http://www.w3.org/2001/XMLSchema-instance"   xsi:noNamespaceSchemaLocation="urn:magento:module:Magento_Ui:etc/ui_configuration.xsd">
   <!--For custom button-->
   <argument name="data" xsi:type="array">
       <item name="buttons" xsi:type="array">
           <item name="customButton" xsi:type="string">Aureatelabs\CustomButton\Block\Adminhtml\Product\Edit\Button\CustomButton</item>
       </item>
   </argument>
</form>

Next you have to create is a CustomButton.php file in app/code/Aureatelabs/CustomButton/Block/Adminhtml/Product/Edit/Button directory

<?php
namespace Aureatelabs\CustomButton\Block\Adminhtml\Product\Edit\Button;

class CustomButton extends \Magento\Catalog\Block\Adminhtml\Product\Edit\Button\Generic
{
	public function getButtonData()
	{
    	return [
        	'label' => __('Custom Button'),
        	'class' => 'action-secondary',
        	'on_click' => 'alert("Hello World")',
        	'sort_order' => 10
    	];
	}
}

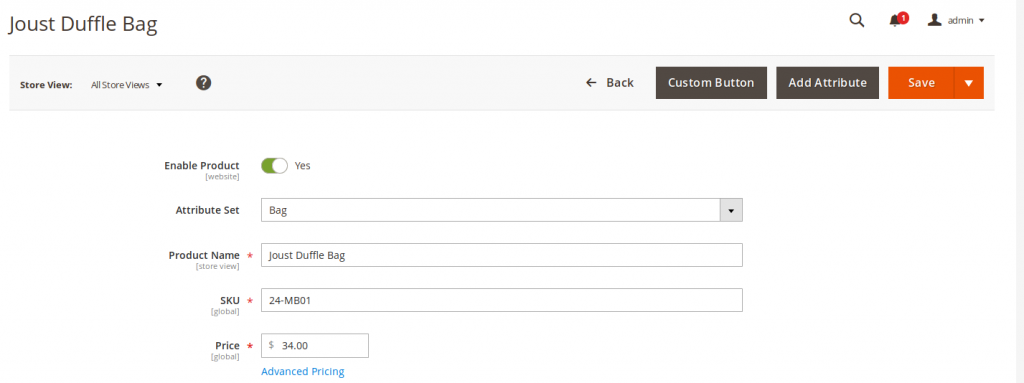
After this flush the cache and open product admin ui-component form, now you can see the custom button on the product admin form.

Related sources

  1. How to Add File Upload Field in Admin Form?

  2. Add UI Component In phtml

In this post, I work through a working example of how to create REST API in Magento 2. It seems a bit difficult and tricky when you have to work with REST web services and that too in building Magento store. However, in this tutorial, I tried to keep it as easy and understandable as possible.

Follow the below quick steps carefully and create your RESTful service in a matter of minutes.

Create a new extension:

Here I will be creating an extension under AureateLabs directory named as “ApiIntegration”. Create module configuration file & registration file under ApiIntegration directory.

Module Configuration: etc/module.xml

<?xml version="1.0"?>
<config xmlns:xsi="http://www.w3.org/2001/XMLSchema-instance" xsi:noNamespaceSchemaLocation="urn:magento:framework:Module/etc/module.xsd">
    <module name="AureateLabs_ApiIntegration" setup_version="0.0.1" />
</config>

Registration: registration.php

<?php
\Magento\Framework\Component\ComponentRegistrar::register(
    \Magento\Framework\Component\ComponentRegistrar::MODULE,
    AureateLabs_ApiIntegration,
    __DIR__
);

Here we will be creating a simple API service which will set customers’ default shipping address from the address id parameter.

Now, create a webapi.xml configuration file to configure the access rights and API interface that will specify which method it will use.

Create a webapi.xml file under the etc directory. And paste the following code into it.

<?xml version="1.0" encoding="UTF-8"?>
<routes xmlns:xsi="http://www.w3.org/2001/XMLSchema-instance" xsi:noNamespaceSchemaLocation="urn:magento:module:Magento_Webapi:etc/webapi.xsd">
<route url="/V1/customers/set-default-shipping" method="POST">
  <service class="AureateLabs\ApiIntegration\Api\AddressInterface" method="setDefaultShipping"/>
  <resources>
      <resource ref="self"/>
  </resources>
  <data>
      <parameter name="addressId" force="true">%addressId%</parameter>
  </data>
</route>
</routes>

Route tag defines an endpoint(URL) & Method (Valid values are GET, POST, PUT, and DELETE) of the REST API.

Resource tag defines what resources user needs to have to be able to access this API call.

Possible options are self, anonymous or Magento resource like Magento_Catalog::products or Magento_Customer::group.

Now, create a di.xml file to define an interface and model that defines which model will be called by the defined interface.

Create di.xml File under an etc directory and add following code into it.

<?xml version="1.0"?>
<config xmlns:xsi="http://www.w3.org/2001/XMLSchema-instance" xsi:noNamespaceSchemaLocation="../../../../../lib/internal/Magento/Framework/ObjectManager/etc/config.xsd">
  <preference for="AureateLabs\ApiIntegration\Api\AddressInterface" type="AureateLabs\ApiIntegration\Model\CustomerAddress" />
</config>

Now, we need to create an interface and model, please note that you need to take care of the comments as well.

Interface: Api/AddressInterface.php

<?php
/**
* Copyright © Magento, Inc. All rights reserved.
* See COPYING.txt for license details.
*/
namespace AureateLabs\ApiIntegration\Api;
/**
* @api
*/
interface AddressInterface
{
  /**
   * Set default shipping address
   *
   * @return boolean|array
   */
  public function setDefaultShipping();
}

Now, We will create the Model and within the model, we will add the functionality that will be executed by the call to API method.

Model: CustomerAddress.php

<?php
namespace AureateLabs\ApiIntegration\Model;
use \AureateLabs\ApiIntegration\Api\AddressInterface;
class CustomerAddress implements AddressInterface
{
  /**
   * @var \Magento\Customer\Api\Data\AddressInterfaceFactory
   */
  protected $addressFactory;
  /**
   * @var \Magento\Framework\App\RequestInterface
   */
  protected $request;
  /**
   * CustomerAddress constructor.
   * @param \Magento\Customer\Model\AddressFactory $addressFactory
   * @param \Magento\Framework\App\RequestInterface $request
   */
  public function __construct(
      \Magento\Customer\Model\AddressFactory $addressFactory,
      \Magento\Framework\App\RequestInterface $request
  )
  {
      $this->addressFactory = $addressFactory;
      $this->request = $request;
  }
  public function setDefaultShipping() {
      $array = array();
      $params = $this->request->getParams();
      $addressId = trim($params['addressId'] ?? null);
      if (empty($addressId) || !is_numeric($addressId)) {
          $arr['msg'] = 'Address ID is invalid!';
          array_push($array, $arr);
          return $array;
      }
      $address = $this->addressFactory->create()->load($addressId);
      $address->setIsDefaultShipping(1);
      if($address->save()){
          return true;
      }else{
          return false;
      }
  }
}

The above function will set the default shipping address of the customer using address id which is provided as the parameter.

This is all you need to know to create a successful RESTful web service in Magento 2. We hope you followed the above procedure carefully taking care of every bit of code. Even though you have any doubt or queries related to this, feel free to reach us.

Undoubtedly, Magento provides the store customization beyond we can think and implement. And as such comparatively, if you want to add a static block in the page content section then it’s not a big deal to achieve. However, to customize the sidebar column it requires a bit of tricky work from you.

Following such practice to manipulate the sidebar section of any page in Magento 2, we instruct a simple process to add a static block of your choice.

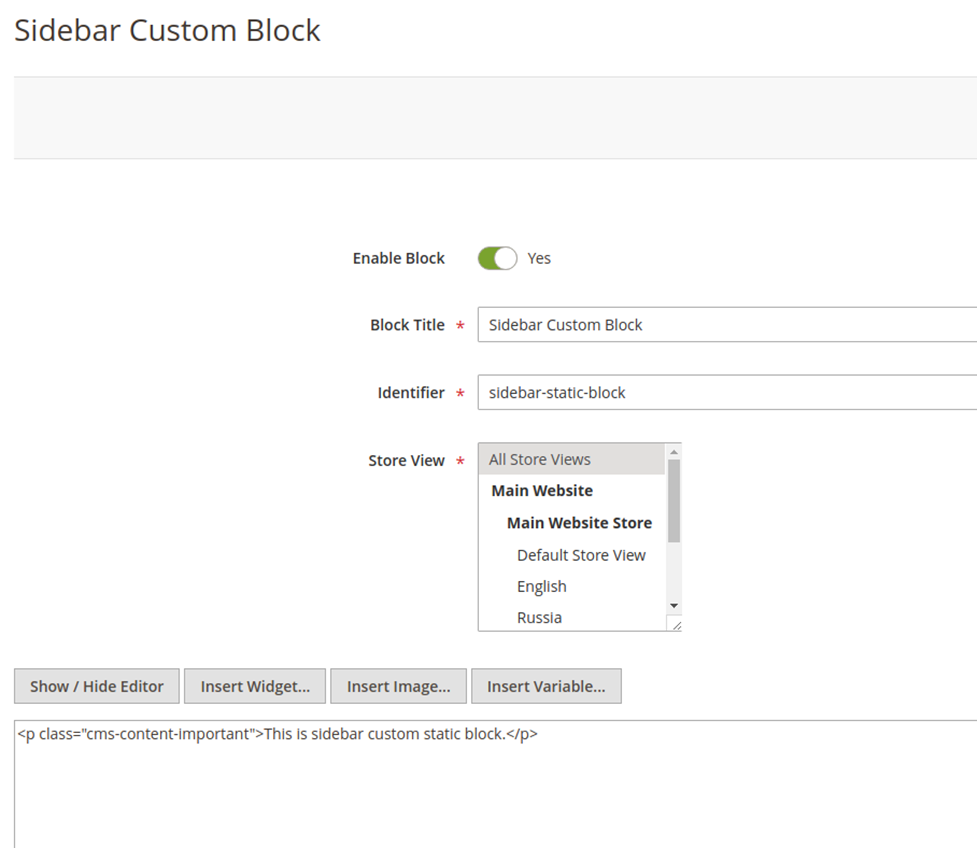
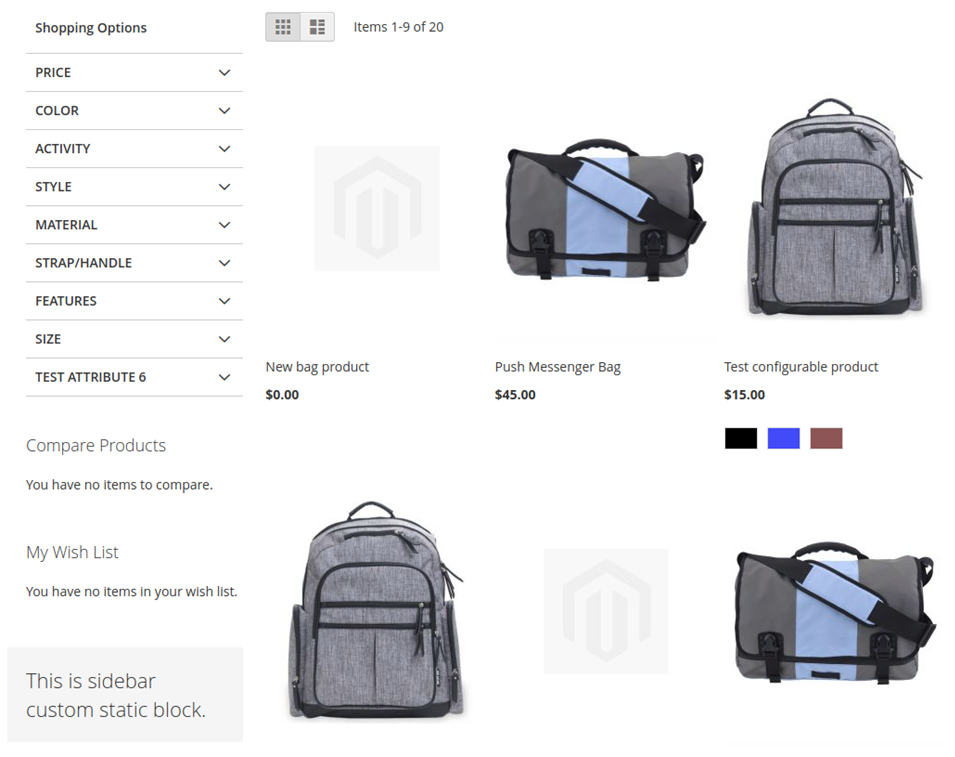
To begin with, we need to create a CMS static block on the admin side, and then we will be displaying the same on the storefront.

For example,

Looking onto the code-work, first, we need to create a module let’s say AureateLabs_Demo and add a default.xml file in your module at the below path:
app/code/AureateLabs/Demo/view/frontend/layout/default.xml

<?xml version="1.0"?>
<page xmlns:xsi="http://www.w3.org/2001/XMLSchema-instance" xsi:noNamespaceSchemaLocation="urn:magento:framework:View/Layout/etc/page_configuration.xsd">
<body>
     <referenceContainer name="sidebar.additional">
          <block class="AureateLabs\Demo\Block\Sidebar" name="sidebar_static_block" as="sidebar_static_block" template="AureateLabs_Demo::sidebar.phtml" after="wishlist_sidebar"/>
     </referenceContainer>
</body>
</page>

Now, in order to render the block which we have created in the admin panel, we need to create block class and template file

First, create a Block class Sidebar.php and add the following code in it.

File path: app/code/AureateLabs/Demo/Block/Sidebar.php

<?php
namespace AureateLabs\Demo\Block;
class Sidebar extends \Magento\Framework\View\Element\Template
{
  /**
   * @var \Magento\Store\Model\StoreManagerInterface
   */
  protected $_storeManager;
  /**
   * @var \Magento\Cms\Model\BlockFactory
   */
  protected $_blockFactory;
  /**
   * @var \Magento\Cms\Model\Template\FilterProvider
   */
  protected $filterProvider;
  /**
   * Sidebar constructor.
   * @param \Magento\Framework\View\Element\Template\Context $context
   * @param \Magento\Store\Model\StoreManagerInterface $storeManager
   * @param \Magento\Cms\Model\BlockFactory $blockFactory
   * @param \Magento\Cms\Model\Template\FilterProvider $filterProvider
   * @param array $data
   */
  public function __construct(
      \Magento\Framework\View\Element\Template\Context $context,
      \Magento\Store\Model\StoreManagerInterface $storeManager,
      \Magento\Cms\Model\BlockFactory $blockFactory,
      \Magento\Cms\Model\Template\FilterProvider $filterProvider,
      array $data = []
  ) {
      parent::__construct(
          $context,
          $data
      );
      $this->_storeManager = $storeManager;
      $this->_blockFactory = $blockFactory;
      $this->filterProvider = $filterProvider;
  }
  public function getstaticBlockContent($blockId)
  {
      $html = '';
      if ($blockId) {
          $storeId = $this->_storeManager->getStore()->getId();
          /** @var \Magento\Cms\Model\Block $block */
          $block = $this->_blockFactory->create();
          $block->setStoreId($storeId)->load($blockId);
          $html = $this->filterProvider->getBlockFilter()
                       ->setStoreId($storeId)
                       ->filter($block->getContent());
      }
      return $html;
  }
}

Now, create a template file sidebar.phtml and call getstaticBlockContent method with parameter(static block identifier) to get the block content.

File path: app/code/AureateLabs/Demo/view/frontend/templates/sidebar.phtml

<?php
/**
* @var \AureateLabs\Demo\Block\Sidebar $block
*/
echo $block->getstaticBlockContent('sidebar-static-block');

Final Output

This is all. If you’ve followed the above steps carefully then you must see your static block displayed in sidebar column as shown in below image.

Though it’s not that much complicated to create and display static block in Magento 2 still you’ve stuck somewhere in between, getting errors or having any questions, feel free to reach us by leaving a comment below. We will be happy if given a chance to resolve your queries.

Related resources:

Being the responsible Magento eCommerce development agency, we’re determined to solve your basic custom pricing queries. In this article, you will be learning how to set a custom price for a product programmatically when adding a product to the cart in Magento 2.

Here we are using Aureatelabs as Vendor name and CustomPrice as the name of module.  You can change this according to your Vendor and Module name

The first thing you need to do is to  create an events.xml file in the app/code/Aureatelabs/CustomPrice/etc/frontend folder

<?xml version="1.0"?>
<config xmlns:xsi="http://www.w3.org/2001/XMLSchema-instance" xsi:noNamespaceSchemaLocation="urn:magento:framework:Event/etc/events.xsd">
	<event name="checkout_cart_product_add_after">
    		<observer name="set_custom_price_after_add_to_cart" instance="Aureatelabs\CustomPrice\Observer\CustomPrice" />
	</event>
</config>

Here we are using checkout_cart_product_add_after event which will be called after adding a product to the cart.

Now we need to create an Observer as defined in the event.xml file

So we need to create a CustomPrice.php file in the app/code/Aureatelabs/CustomPrice/Observer folder

<?php

namespace Aureatelabs\CustomPrice\Observer;

use \Magento\Framework\Event\ObserverInterface;

/**
 * Class CustomPrice
 * @package Aureatelabs\CustomPrice\Observer
 *
 */
class CustomPrice implements ObserverInterface
{
	public function execute(\Magento\Framework\Event\Observer $observer) {
		$item = $observer->getEvent()->getData('quote_item');

		// Get parent product if current product is child product
		$item = ( $item->getParentItem() ? $item->getParentItem() : $item );

		//Define your Custom price here
		$price = 100;
	 
		//Set custom price
		$item->setCustomPrice($price);
		$item->setOriginalCustomPrice($price);
		$item->getProduct()->setIsSuperMode(true);
	}
}

Related Sources

  1. How to use Magento 2 custom price renderer
  2. Convert price to current currency in Magento 2
  3. How to Add Custom Validation Rule in Magento 2?

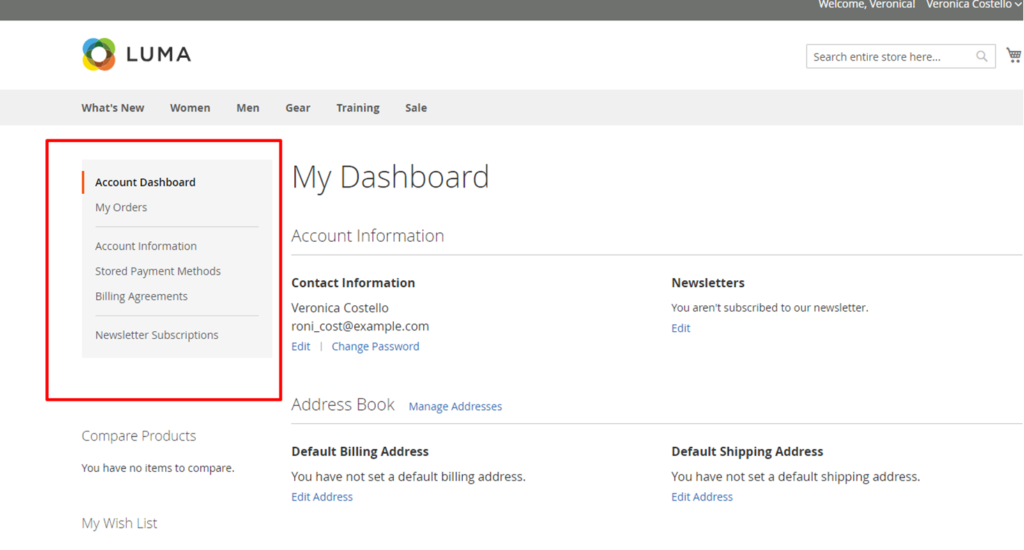
Having the default behavior, Magento provides and displays a long list of links on the customer account page. Sometimes we need to customize this default links inclusion as not all links are needed. Often it’s needed to remove a couple of links, for example, My Product Reviews or Billing Agreements.

Below is a pile of default links on the customer account screen:

  • Account Dashboard
  • Account Information
  • Address Book
  • My Downloadable Products
  • My Orders
  • Newsletter Subscriptions
  • Stored Payment Methods
  • My Product Reviews
  • Billing Agreements
  • My Wish List

In order to remove customer links we from Aureate Labs suggest some quick steps to get rid of unnecessary links:

  • Step 1: Create a custom extension or theme and override the customer layout file
  • Step 2: Use a tag to remove any extra links from my account
  • Step 3: Clear cache and check the My Account page

Step 1: Create a custom extension or theme and override customer layout file

Create an extension and override the layout XML file
app/design/frontend/[Namespace]/[Theme]/Magento_Customer/layout/customer_account.xml

Just need to use a tag to remove extra links from my account.

<page xmlns:xsi="http://www.w3.org/2001/XMLSchema-instance" xsi:noNamespaceSchemaLocation="urn:magento:framework:View/Layout/etc/page_configuration.xsd">
<body>
   <!-- Remove unwanted account navigation links -->
   <!-- Put this file in: app/design/frontend/[Namespace]/[Theme]/Magento_Customer/layout/customer_account.xml -->
   <!-- Store credit -->
   <referenceBlock name="customer-account-navigation-customer-balance-link" remove="true"/>
   <!-- Downloadable product link -->
   <referenceBlock name="customer-account-navigation-downloadable-products-link" remove="true"/>
   <!-- Subscription link -->
   <referenceBlock name="customer-account-navigation-newsletter-subscriptions-link" remove="true"/>
   <!-- Billing agreement link -->
   <referenceBlock name="customer-account-navigation-billing-agreements-link" remove="true"/>
   <!-- Product review link -->
   <referenceBlock name="customer-account-navigation-product-reviews-link" remove="true"/>
   <!-- My credit card link -->
   <referenceBlock name="customer-account-navigation-my-credit-cards-link" remove="true"/>
   <!-- Account link -->
   <referenceBlock name="customer-account-navigation-account-link" remove="true"/>
   <!-- Account edit link -->
   <referenceBlock name="customer-account-navigation-account-edit-link" remove="true"/>
   <!-- Address link -->
   <referenceBlock name="customer-account-navigation-address-link" remove="true"/>
   <!-- Orders link -->
   <referenceBlock name="customer-account-navigation-orders-link" remove="true"/>
   <!-- Wish list link -->
   <referenceBlock name="customer-account-navigation-wish-list-link" remove="true"/>
   <!-- Gift card link -->
   <referenceBlock name="customer-account-navigation-gift-card-link" remove="true"/>
   <!-- Order by SKU -->
   <referenceBlock name="customer-account-navigation-checkout-sku-link" remove="true"/>
   <!-- Gift registry -->
   <referenceBlock name="customer-account-navigation-giftregistry-link" remove="true"/>
   <!-- Reward points -->
   <referenceBlock name="customer-account-navigation-reward-link" remove="true"/>
</body>
</page>

Step 3: Clear cache and check the My Account page

The link which we have removed using tag remove=”true” will no longer be displayed on your “my account page”.

This is all to remove unwanted links from customer account navigation. Though it’s a quite simple practice to follow but if you are stuck anywhere in between please feel free to reach us by leaving a comment below or for any Magento store development needs, our team is ready to assist . We’ll be glad to entertain your queries.

Cheers!

Magento 2 is known for its Swatches feature (including the color, pattern, and texture) that enhances it and makes it more appealing. Swatches are an excellent mode of adding more competitive benefits to configurable products. The color, pattern, and texture have strongly proved to be the efficacious tools that make the product offering eye-catching and at the same time, informative.

Image Swatch
This functionality lets you increase the visual elements of the product offerings. Additionally, it gives access to users to watch product variations in multiple colors/textures.

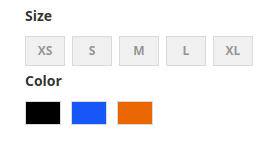
Text Swatch
The text swatch functionality enables showcasing of the sizes and other types of text-based options. It’s a sort of button with a text label.

Color Swatch
The Magento 2 swatches functionality is quite extensive as it allows you to showcase the available texture/color options. Whenever an item is showcased in different colors. It makes it easier for buyers to pick the right product variation.

Color Swatch
The Magento 2 swatches functionality is quite extensive as it allows you to showcase the available texture/color options. Whenever an item is showcased in different colors. It makes it easier for buyers to pick the right product variation.

Configure Magento 2 Swatches

In Admin panel go to Stores > Attributes > Product. Then edit Color attribute. 

From this section, you will be able to configure all the available color swatch settings:

  • Catalog Input Type for Store Owner: It enables you to select from the Dropdown Menu, Text Swatch, and Visual Swatch.
  • Update Product Preview Image: It lets you update the product image on the catalog.
  • Use Product Image for Swatch if Possible: It enables you to replace the swatch image with a base image or a product swatch.

Screenshot

Your next read is ready!! Know How to Add Custom Validation Rule in Magento 2?

Configuring the sitemap.xml in Magento 2 Admin allows you to create an awesome Magento tool with a document file which contains all of website’s URL and possibly direct people to any page on Magento stores quickly.

Magento 2 sitemap is also an easy way to point which pages are ready for crawling to any search engines.

Step 1: Configure the Frequency of Content Updates

After login into magento 2 admin panel go to Stores > Settings > Configuration > Catalog > XML Sitemap.

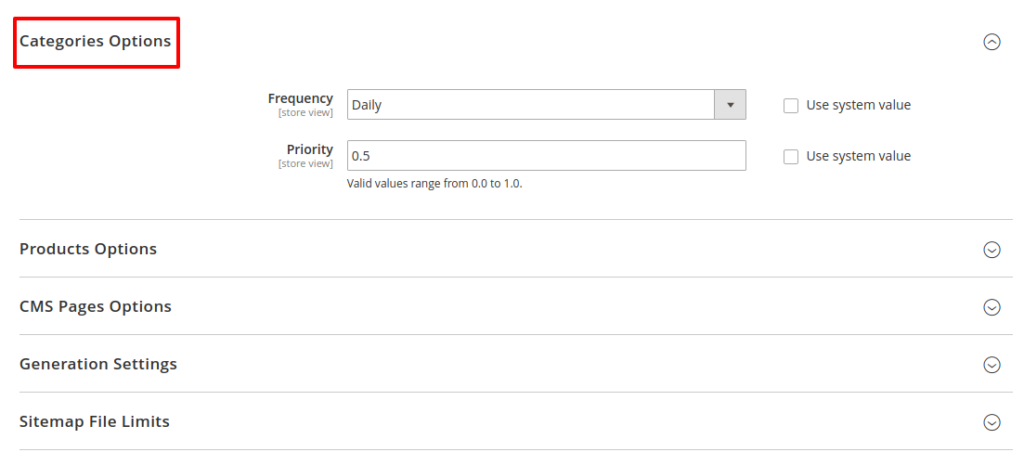
Now, Open Categories options section and change the frequency and priority as per your store needs.

In the Frequency field, select one of the following:

  • Always
  • Hourly
  • Daily
  • Weekly
  • Monthly
  • Yearly
  • Never

In the Priority field, enter a value between 0.0 and 1.0. Set Zero if the priority is the least.

Next Open the Products Options section.

In the first two fields: complete the Frequency and Priority settings as stated above.

In the Add images into Sitemap field, select one of the following to determine the extent at which the images are included in the sitemap

  • None
  • Base Only
  • All

Same way open CMS Pages Options section, complete the Frequency and Priority settings as mentioned above.

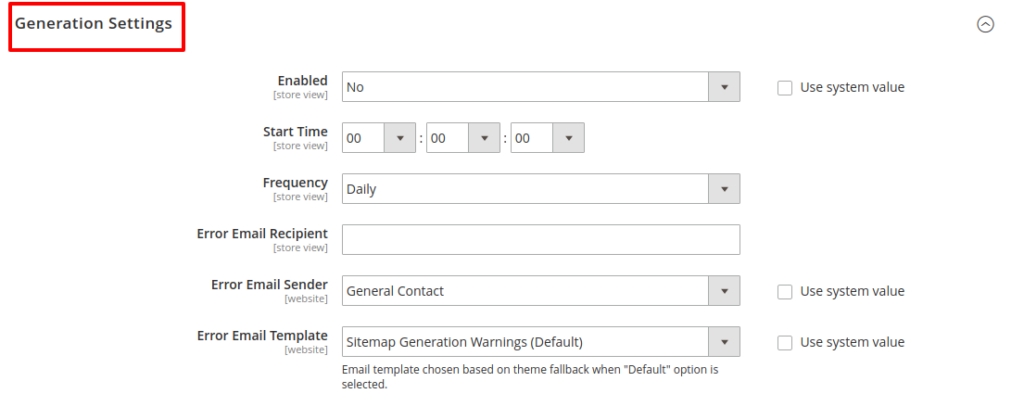
Step 2: Configure the Generation Settings

Open the Generation Settings section.

  • Set Enabled to Yes .
  • In the Start Time field, choose the hour, minute and second that updates the sitemap
  • In the Frequency field, choose one of the following
    • Daily
    • Weekly
    • Monthly
  • In the Error Email Recipient field, enter the email address of the person who will receive the notification whenever an error occurs during a sitemap update.
  • In the Error Email Sender field, choose one of the following:
    • General Contact
    • Sales representative
    • Customer support
    • Custom email
  • In the Error Email Sender field, choose the template used for the error notification.

Step 3: Configure the Sitemap File Limits

Open the Sitemap File Limits section.

  • In the Maximum No of URLs Per File field, enter the maximum number of URLs per file. The default limit is 50,000.
  • In the Maximum File Size field, enter the maximum file size in bytes. The default size is 10,485,760 bytes that’s approx. 10 Mb.

Step 4: Complete the Search Engine Submission Settings

  • Open the Search Engine Submission Settings section.
  • In the Enable Submission to Robots.txt field, select Yes to provide instructions to search engines that crawl your site by using a robots.txt file.

Grow your online business like 4,357 subscribers

    * This site is protected by reCAPTCHA and the Google Privacy Policy and Terms of Service apply.
    envelope

    Thank You!

    We are reviewing your submission, and will be in touch shortly.