

How to List a Product on Amazon: A Step-by-Step Guide for Sellers

Amazon has over 350-600 million products in its catalog (Analyzer). Most of them are invisible. Not because the products are bad, but because the listings were built incorrectly.
Whether you’re launching your first product, one of millions of independent sellers scaling an Amazon business, or a brand owner cleaning up an existing catalog, getting the listing right from day one is what separates sellers who get visibility from those who don’t.
If you’re a new seller, a brand owner expanding beyond your own website, or a merchant who suspects their existing listings aren’t pulling their weight, this guide is for you. You’ll walk away knowing exactly how to list a product on Amazon.
If you want expert eyes on your listing before or after you publish, explore our Amazon product listing optimization services.
Here’s what this guide covers:
- What an Amazon product listing actually is
- What to prepare before you open Seller Central
- A step-by-step walkthrough of the full listing process
- What to do immediately after your listing goes live
- The most common mistakes that kill a listing’s visibility from day one
Key Takeaways (TL;DR)
- An Amazon product listing has two parts: the product detail page and the offer. Both need to be right.
- Before you start, have your product identifier, seller account type, images, and fulfillment method sorted.
- Amazon Seller Central has nine tabs to complete. Skipping any of them can suppress your listing.
- Publishing is not the finish line. Your first week after going live determines early ranking signals.
- The most common listing mistakes are avoidable. Knowing them ahead of time saves you a costly relaunch.
What Is an Amazon Product Listing?
An Amazon product listing is made up of two distinct parts.
The first is the product detail page. This is everything your customer sees: your product title, images, bullet points, product description, and specifications. The second one is the offer, which is your price, condition, and fulfillment method.
If your detail page is poorly built, then it will hurt your brand’s discoverability. A poorly configured site often hurts conversion rates. So, you need both to work together. You can think of the Amazon store as your brand’s storefront; the listing is the shelf where buyers decide whether to pick your product or move on.
One thing that you should keep in mind is that listing a product and optimizing a product listing are two different things.
What do you Need Before you list a Product on Amazon?
If you’re brand new to the platform, it is important to first understand how selling on Amazon works before jumping into the listing process. Once you’re clear on the basics, make sure you have the following ready before you open your Seller Central.
Do you have the Right Seller Account?
Amazon offers two plans. The Individual plan charges $0.99 per item sold and works if you’re moving fewer than 40 units a month. The Professional plan costs $39.99 per month and gives you access to bulk listing tools, which means you can manage multiple listings efficiently as your catalog grows, advanced reports, Amazon advertising, and restricted categories. If you’re serious about Amazon sales, start with the Professional plan.
Do you have a Product Identifier?
Every product needs a unique identifier. In the US, that’s a Universal Product Code (UPC). In Europe, it’s a European Article Number (EAN). Books use an International Standard Book Number (ISBN).
If your product doesn’t have one, apply for a GTIN exemption through Seller Central under the Add Products section. Amazon will ask for your brand name and product category before approving it.
Is your Product in a Gated Category?
Some categories require approval before you can create listings. Grocery, beauty, health, and certain electronics accessories all have restrictions. Check your category’s approval status in Seller Central before you start building. Finding this out mid-listing wastes time you can’t recover during a launch.
Have you decided on FBA or FBM?
This decision affects your setup steps, fees, and whether your listing qualifies for Prime. With Fulfillment by Amazon (FBA), Amazon handles storage, packing, and shipping. With Foundation Building Materials (FBM), you handle fulfilment yourself. Make this call before you open the listing form, not during it.
Do you have your Product Details and Assets Ready?
Have your product title, brand name, manufacturer, and category confirmed. Prepare specifications like dimensions, weight, material, color, and variant details.
For images, have at minimum a main image on a white background with the product filling 85% of the frame, plus lifestyle images, infographic shots, and close-up detail images.
Also, know your pricing, list price, and inventory quantity before you start.
How to List a Product on Amazon: Step-by-Step
Once your Amazon Seller Central account is set up and your product information is ready, here is exactly how to list a product on Amazon in Seller Central.
Step 1: Log in to Seller Central
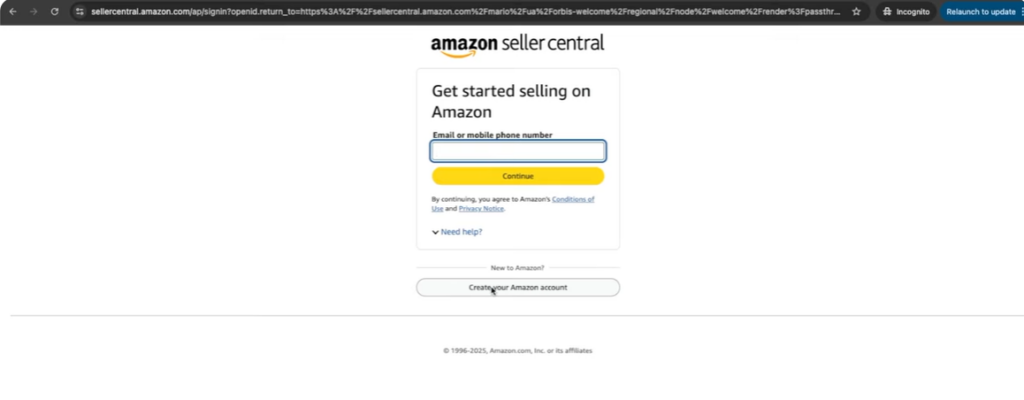
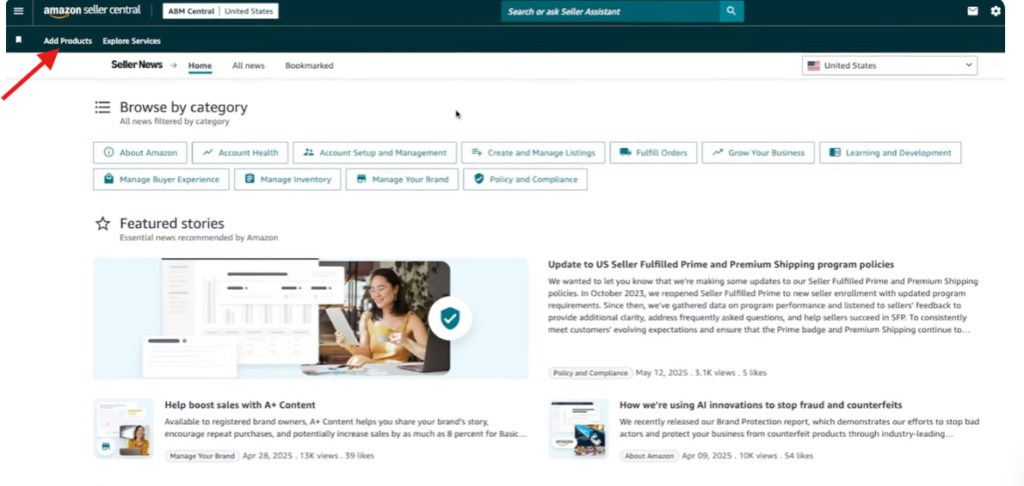
Go to sellercentral.amazon.com. From the main menu, hover over Catalog and select Add Products. This is your starting point for every new listing.
Step 2: Choose the Type of Listing
There are two paths here, depending on your product.
If your product already exists on Amazon: Search by product name, ASIN, or UPC. Find your product in the results, select your condition, and click “Sell this product.” You are joining existing listings, not creating a new one.
If your product is new to Amazon, click “Blank Form” and then Start. You will build a brand new product detail page from scratch. Most private label sellers and brands launching new products follow this path.
Step 3: Choose the Right Product Category
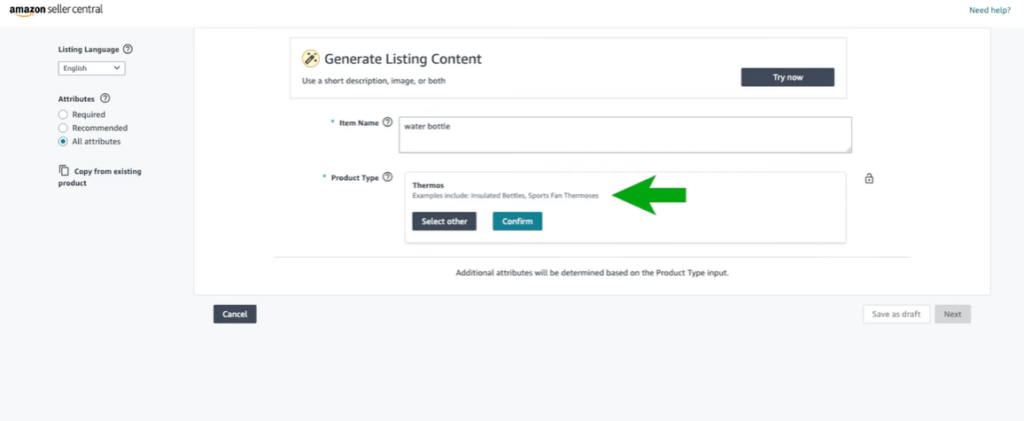
Select the category that most accurately describes your product. The category you pick determines which fields are required and which customers your product gets shown to.
Use Amazon’s search tool or Browse Tree Guide if you’re unsure. A practical shortcut: search for your top competitors and check which category their product listings sit in before making your choice.
Step 4: Fill In your Product’s Vital Information
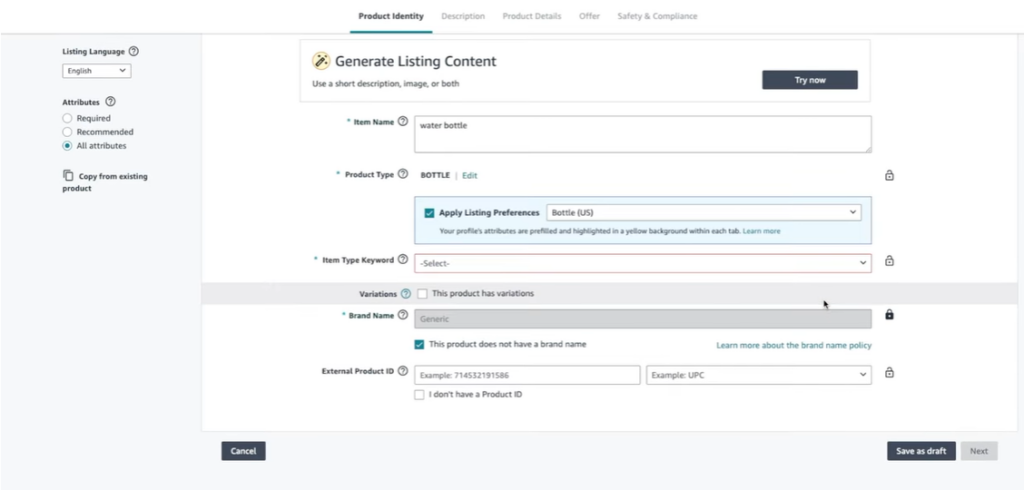
This tab is where your listing starts taking shape. It includes:
- Product title (200-character limit, enforced since January 2025)
- Brand name
- Manufacturer
- Product ID (UPC, EAN, or GTIN exemption)
Write your product title clearly. Include your primary keyword, key feature, and variant such as size, color, or pack count where relevant. Avoid keyword stuffing; Amazon’s algorithm flags and demotes listings that do this, and it was tightened further in early 2025.
Step 5: Write Your Product Copy
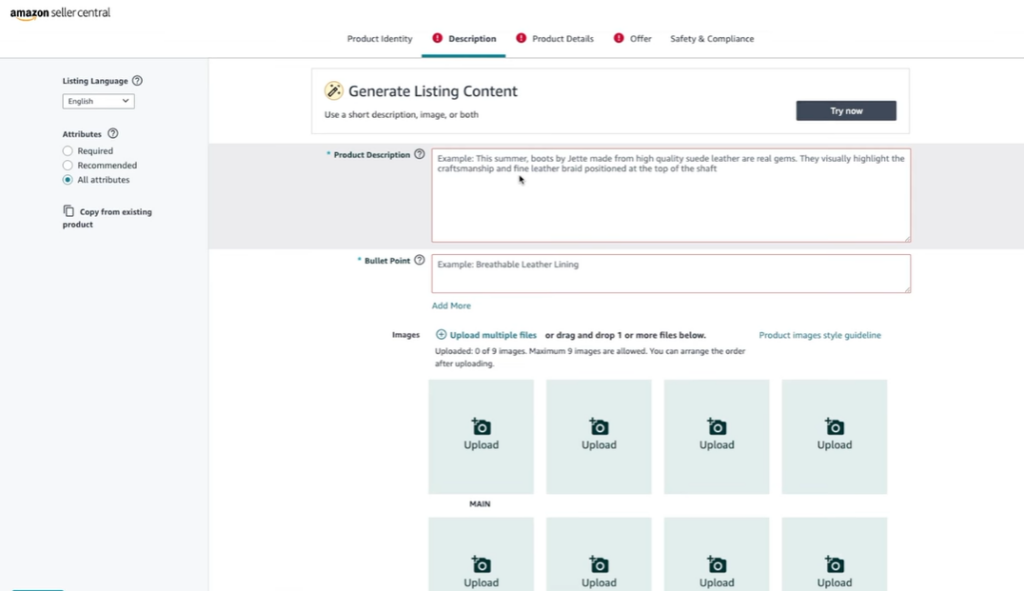
The bullet point section gives you five lines to make your case. Each one should lead with the benefit and follow with the feature that delivers it. Write for the buyer first. Include relevant keywords naturally.
The product description gives you up to 2,000 characters. Use this space to handle objections, answer common questions, and give the buyer everything they need before they click Add to Cart.
If you are enrolled in Amazon Brand Registry and brands enrolled in it consistently outperform those that aren’t, you can replace the standard description with A+ Content. If you have access to it, use it; it directly affects conversion rates, listing quality, and can meaningfully increase sales over a standard description.
Here’s a full Amazon A+ Content guide if you want to go deeper on that.
Step 6: Upload Your Product Images
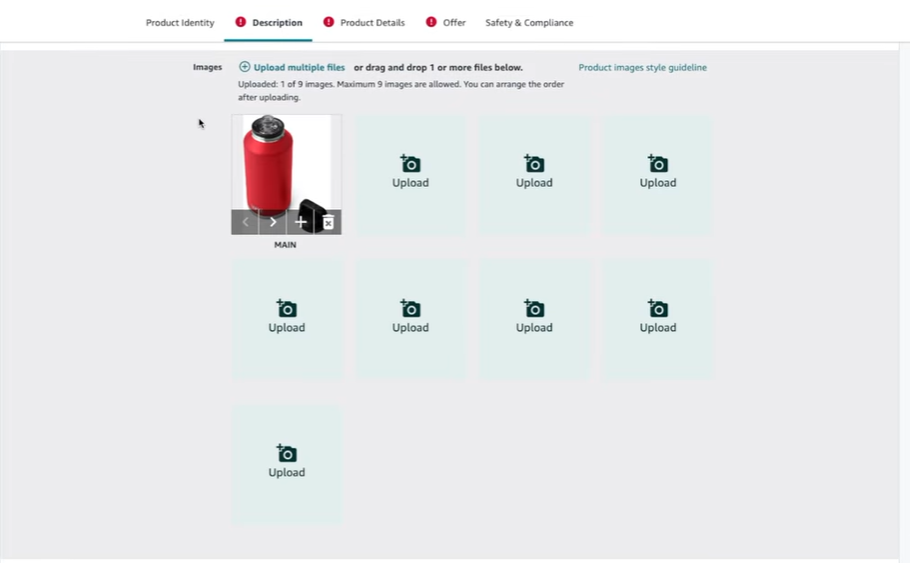
Amazon requires your main image to have a white background with the product filling at least 85% of the frame. Minimum resolution is 500 pixels – 10,000 pixels on the longest side to activate the zoom feature.
Beyond the main image, add images for:
- Lifestyle shots showing the product in real use
- Infographic images highlighting key product features
- Size or scale reference shots
- Close-up detail images showing texture, material, or finish
67% of consumers say image quality is the biggest factor in their purchase decision, and high-quality images can lift conversion rates by up to 60% (Nightjar).
And this isn’t just theory. A seller on Reddit shared a real test where changing a single listing image led to a 24.6% increase in conversions. No price change. No keyword update. Just one better image.
That’s how much your main image alone can change the conversion rate.
Amazon allows up to nine images per product listing, and treats every slot as a chance to answer a question the buyer hasn’t asked yet.
Step 7: Configure Your Offer
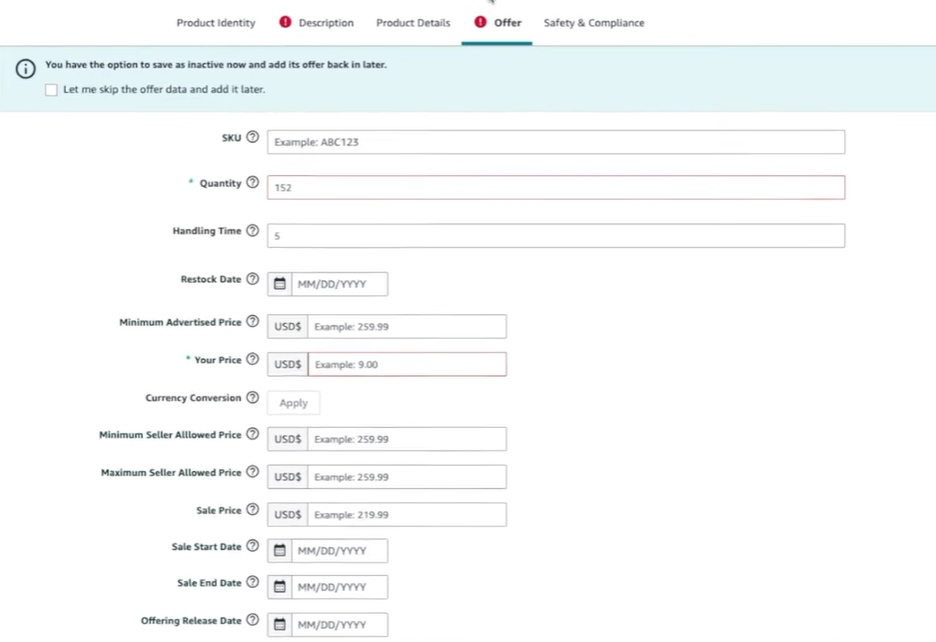
Set your sale price, select the product condition, and choose your fulfillment channel. If you are using FBA, your listing will only go active once Amazon receives your inventory at its fulfillment center. Double-check your pricing here; potential customers compare your offer directly against competitors.
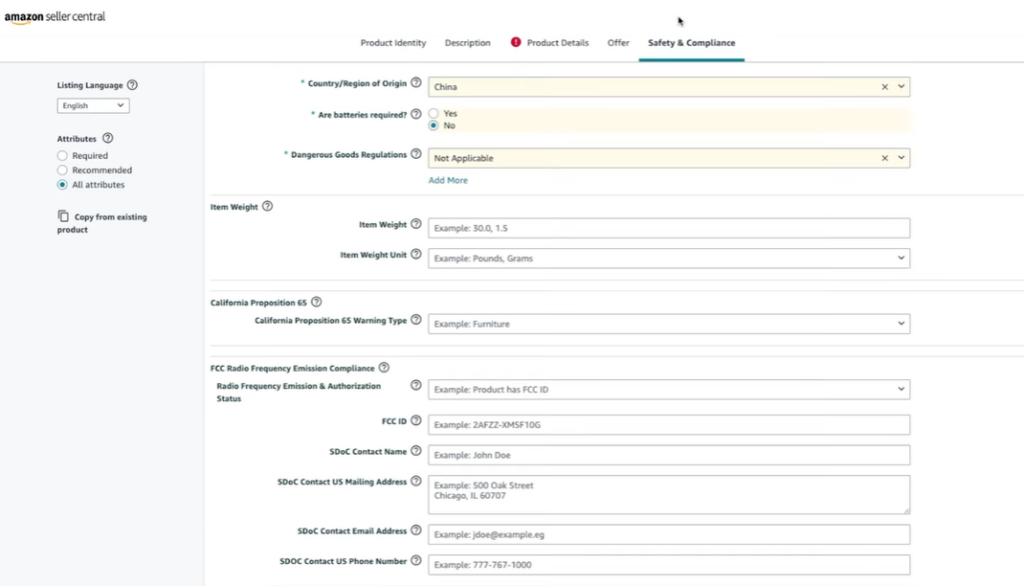
This is the final tab before publishing. Depending on your product category, Amazon may require:
- Compliance documents or certifications
- Safety warnings
- Regulatory information
Not all products require this, but skipping it when it applies will suppress your listing. Check what your specific category demands before you reach this step.
Step 9: Optimize for Better Product Discovery
Navigate to the Keywords tab to add keywords that expand where your product appears in search. You have 249 characters for backend search terms. These are invisible to shoppers but indexed by Amazon.
Here’s what’s interesting:
Nearly 80% of Amazon sellers say keyword optimization is their top listing priority, according to a Jungle Scout study of 1,000+ sellers. Yet most still leave their backend search terms half-empty. That gap is where your listing can quietly pull ahead of competitors who are doing everything else right.
Use this space for:
- Synonyms and alternate product names
- Common misspellings
- Long-tail phrases that don’t fit naturally in your product title or bullet points
Do not repeat words already in your title. Every character you repeat is a wasted ranking opportunity. Using this space strategically is one of the simplest ways to improve search rankings without touching your visible listing copy.
This is where Amazon SEO starts, and where Amazon listing optimization actually begins. Most sellers leave it half-empty.
Pro Tip: Before you hit Save and Finish, run your main keyword through Amazon’s search bar and check the autocomplete suggestions. Those phrases are what real buyers are typing right now, and the best ones belong in your backend search terms, not just your title. This is just one part of a broader approach to Amazon SEO that most sellers overlook entirely.
Step 10: Review and Publish Your Listing
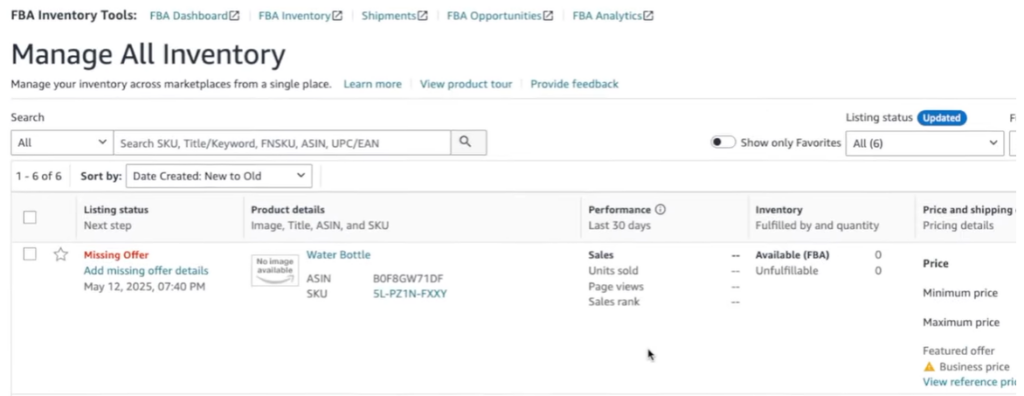
Go through each tab one final time. When everything is complete, click Save and Finish.
Existing product listings in the Amazon catalog typically go live within minutes to a few hours. New ASINs may take longer depending on category review requirements.
To check your status, go to Inventory and select Manage Inventory. Active means it’s live. Inactive or suppressed means something needs fixing before your product pages appear in search results.
What should you do after your Listing Goes Live?
Publishing is not the finish line; it’s actually the starting point. What you do in the first seven days directly determines whether your listing reaches more customers and generates more sales in the weeks ahead.
Here’s what to do in the first week:
- Check your listing status daily in Manage Inventory.
- Monitor for suppression alerts and fix them immediately.
- Review your search term data once impressions start coming in.
- Use the Request a Review button to start collecting positive feedback. Early customer engagement through reviews signals to Amazon’s algorithm that your listing is active and converting.
- Plan your first round of listing optimization: revisit keywords, update images if needed, and add A+ Content if the brand is registered.
Beyond your listing status, keep an eye on your overall account standing. Understanding your Amazon account health score tells you early if something in your account is flagged before it starts affecting your listing visibility.
For sellers who want to skip the trial and error, Aureate Labs’ Amazon listing services handle all of this with a clear, repeatable process. A well-optimized listing provides a higher return on investment on your PPC; your ad spend works harder when the listing it points to is built to convert.
What Mistakes do Sellers Make When Listing on Amazon?
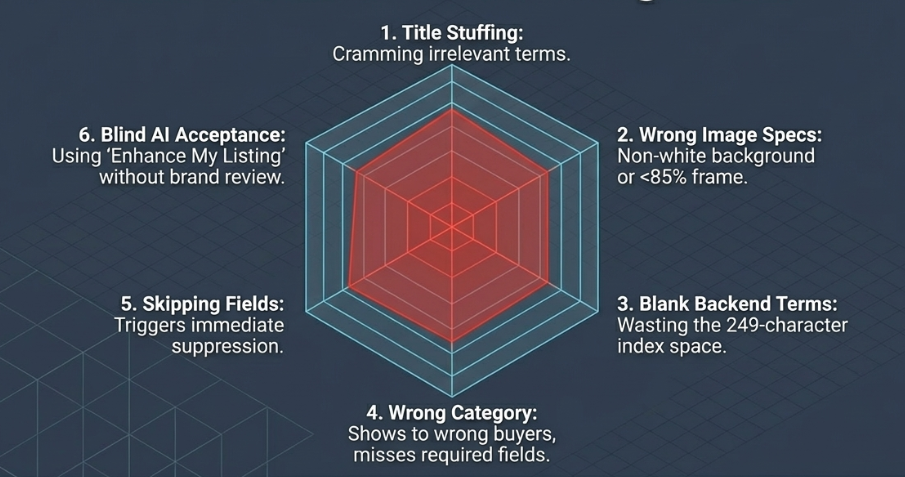
These are the most common reasons a new listing fails to get traction from day one.
- Stuffing Your Title With Keywords: Keyword stuffing gets your product title flagged. Amazon actively demotes listings that cram in irrelevant or repetitive terms. Write for the buyer, not the algorithm.
- Uploading the Wrong Images: Non-compliant product images trigger suppression instantly. Your main image needs a white background, correct resolution, and nothing but the product in the frame.
- Leaving Backend Search Terms Blank: Empty backend search terms mean fewer search results your product can appear in. It’s free ranking space; most sellers leave it untouched.
- Choosing the Wrong Category: Wrong product categories mean wrong buyers. It also affects which required fields show up in your listing form, creating gaps you might not even notice.
- Skipping Required Fields: One missing required field can suppress your entire listing. Go through every tab in Seller Central before you hit publish.
- Accepting AI Title Suggestions Blindly: The Enhance My Listing tool doesn’t know your brand or your buyer. Always review AI-generated suggestions before accepting them; they can misrepresent your product entirely.
These listing errors are just the beginning. For a broader look at what quietly costs sellers revenue across their entire account, read our breakdown of common Amazon seller mistakes worth fixing.
Conclusion
We started with a simple problem: most Amazon product listings go live and stay invisible. Now you know exactly why that happens and how to avoid it.
How to list a product on Amazon correctly comes down to preparation, following each step in Seller Central without cutting corners, and treating the post-launch window as seriously as the setup itself.
The steps are learnable. The details are what separate a listing that ranks from one that sits on page ten. And a listing that ranks is a listing that drives sales without relying entirely on paid ads.
If you’re ready to move from just being live to actually getting found. Aureate Lab’s Amazon product listing service can boost your brand sales.
Frequently Asked Questions
Can I list a product on Amazon without a UPC?
Yes. Apply for a GTIN exemption through Seller Central under the Add Products section. Amazon grants exemptions for private label products and handmade goods on a category-by-category basis.
What is a GTIN exemption, and how do I apply?
A GTIN exemption lets you list a product without a standard barcode. Go to Seller Central, select Add Products, and look for the GTIN exemption link. You’ll need your brand name and product category to apply.
How long does it take for a new Amazon listing to go live?
Existing listings typically go live within minutes to a few hours after you save. New ASINs can take longer depending on category review. FBA listings only activate once Amazon receives your inventory.
What does it mean when a listing is suppressed?
A suppressed listing exists in your account, but doesn’t appear in Amazon search results. Common reasons include missing required images, incomplete product detail fields, or policy violations. Check Manage Inventory for the specific reason.
Do I need Amazon Brand Registry to create a listing?
No. Any registered Amazon seller can create listings. However, Brand Registry gives you access to A+ Content, a Brand Story, and better protection against listing hijackers. It’s worth pursuing once you have a registered trademark.
Can I list the same product in more than one category?
Generally, no. Each ASIN lives in one primary category. You can add browse nodes to help your product appear in related areas, but Amazon assigns the main category based on your product type.
How much does it cost to have a listing on Amazon?
Creating a product listing itself is free. You pay either $0.99 per item sold on the Individual plan or $39.99 per month on the Professional plan. Referral fees apply per sale based on category, and FBA adds fulfilment fees if you use that method.
How do I rank my product after listing it on Amazon?
Focus on listing optimization first: strong product titles, properly written, add bullet points that lead with benefits, and backend search terms. Then build sales velocity through PPC, gather positive feedback through the Request a Review button, and conduct keyword research regularly to stay aligned with what buyers are actually searching for.
Resources:
- Amazon Statistics: A 2025 Look At Users, Sellers, Revenue, And Marketplace Trends
- How to Minimize Amazon Seller Fees and Boost Your Profit Margins
- Amazon and Etsy image requirements: Let’s Enhance 2026 guide
- Amazon Product Photography: Requirements, Costs, and the Best Approach for 2026
- Amazon Listing Optimization: The Ultimate 2025 Guide – Jungle Scout






Post a Comment
Got a question? Have a feedback? Please feel free to leave your ideas, opinions, and questions in the comments section of our post! ❤️