Magento to Shopify Migration Checklist
![Magento to Shopify Migration Checklist [For Beginners] Magento to Shopify Migration Checklist [For Beginners]](https://aureatelabs.com/wp-content/uploads/2024/11/Magento-to-Shopify-Migration-Checklist-For-Beginners.jpg)
Migrating from Magento to Shopify – it’s a great decision! 👍
Now what’s next? Once you’ve decided, now comes the execution part, which can be complicated based on the size of your Magento website.
Migrating from one eCommerce platform to another is not a small task, especially if your Magento store is packed with products, customer data, and custom features. We need to take care of everything, from small to big, which may result in breaking down your site if not done well.
Relax……… I didn’t mean to scare you!
The process is a little complicated, but here we’ll walk you through a comprehensive Magento to Shopify migration checklist designed to simplify the process. We have defined every step here to make sure the transition is as smooth as possible for you.
So, let’s get started!
Download the Migration Checklist
Magento to Shopify Migration Checklist
So, this detailed Magento to Shopify Migration checklist is categorized into 5 parts as follows:
- Pre-Migration Preparation
- Shopify store setup
- Data Migration
- Integration
- Testing Store Functionality
- Post-Migration Activities
Let’s start with our 30-step migration checklist here!
PART 1: Pre-Migration Preparation
1. Define what you want to achieve with the migration
Do you want to improve site speed, simplify store management, reduce operational costs, or enhance your customers’ shopping experience?
Perhaps your aim is to leverage Shopify’s user-friendly features or its extensive integrations to drive sales growth. Knowing what you want to achieve sets the foundation for every decision you make during the process.
Start by listing out your pain points with Magento.
Is it the complexity of maintenance, scalability challenges, or high development costs? Then, visualize the outcomes you expect from Shopify. For example, you might prioritize better mobile responsiveness, faster load times, or easier customization.
This exercise will help you map your migration goals to Shopify’s strengths, ensuring your store not only looks good but performs even better on the new platform.
2. Review products, customer data, and other content
As you prepare for your Magento to Shopify migration, it’s important to make a detailed list of everything you plan to transfer. This includes all product categories, individual products, customer data, order history, and more.
Jot down your data transfer requirements
Go through your current catalog and note down all relevant products, categories, and any variations that should be included. Some of the data you’ll want to migrate include:
- Products
- Customers
- Historical Orders (fulfilled ones)
- Gift Cards, Certificates, and Store Credits
- Blogs
- Pages (like your shipping policy, about us, or contact pages)
Do the same for customer profiles—ensure all important data, like contact details and purchase history, is ready to be transferred. Review past orders, too, as they may hold valuable information for your reporting or customer support.
Perform the data mapping
Also, perform the data mapping of your existing Magento store with Shopify’s default data fields. Here’s how you can do that:
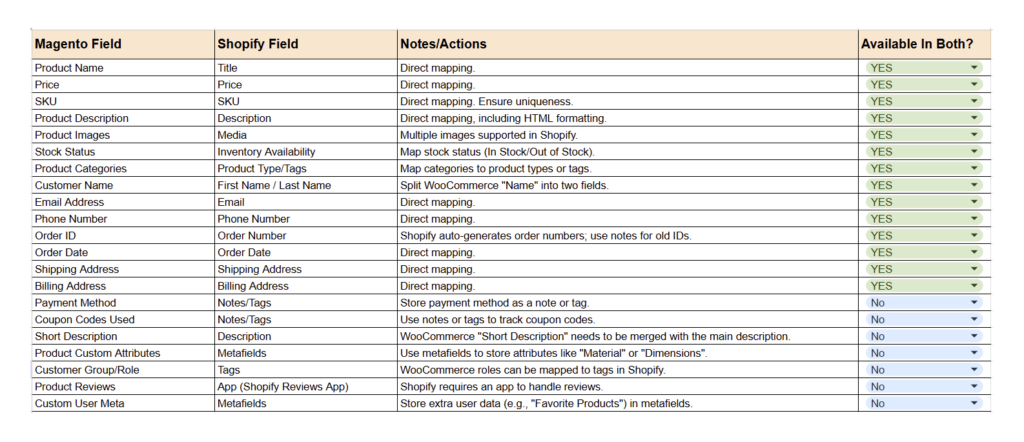
As both platforms are completely different, and so their data structures. So it’s common to find some fields of Magento with other names in Shopify or some fields that are even missing.
Check your existing store’s data fields and the existing data fields of products, customers, etc.
Here, you can find the data structure for products and customers provided in Shopify. In case, you don’t find any specific field in Shopify’s structure, you need to plan how you will achieve data transfer (like using metafields, or any other ways).
This mapping process ensures that all essential information is transferred correctly and is functional within Shopify’s framework.
Download the Migration Checklist
3. Identify top-performing areas and problem points
Before transitioning to Shopify, it’s essential to understand what’s working well in your Magento store and what isn’t. This step allows you to retain and enhance successful elements while addressing weaknesses that could hinder your new store’s performance.
Look at your store’s analytics to identify the pages, products, or campaigns driving the most traffic and conversions.
- What are your best-selling products?
- What pages or categories get the most traffic?
Pay attention to customer behavior, like popular search terms or frequently visited pages, and prioritize replicating these strengths on Shopify. On the flip side, dig into problem areas that might be costing you sales or creating friction for customers.
- Are there pages with high bounce rates?
- Do customers frequently abandon their carts at checkout?
- Are certain products underperforming despite significant traffic?
Maybe your mobile experience isn’t up to par, or your navigation feels clunky. Listing these pain points will help you plan for improvements in your Shopify setup, whether that’s using faster themes, integrating better checkout tools, or restructuring your navigation menu.
4. Remove outdated or incorrect data for easier transfer
So, this is your chance to assess what’s worth keeping, what needs updating, and what can be left behind.
Are all the products up-to-date? Check for outdated products, duplicates, or incorrect information.
Do you have items in your catalog that are discontinued, out of stock indefinitely, or no longer relevant? Ensure every product has accurate descriptions, pricing, and high-quality images that meet Shopify’s recommended dimensions.
Next, turn your attention to customer data. Your customer database is invaluable, but it’s only useful if it’s accurate. Clean, organized data is easier to migrate and enhances your ability to provide personalized experiences on Shopify.
Don’t forget about additional content like blog posts, pages, and SEO metadata. Review these assets to identify what’s still relevant and beneficial for your audience.
5. Create a secure backup of all store data
While Shopify offers robust tools to help you move data, it’s always best to have your own safety net in place. Having a full backup means you can restore data if anything goes wrong during the migration.
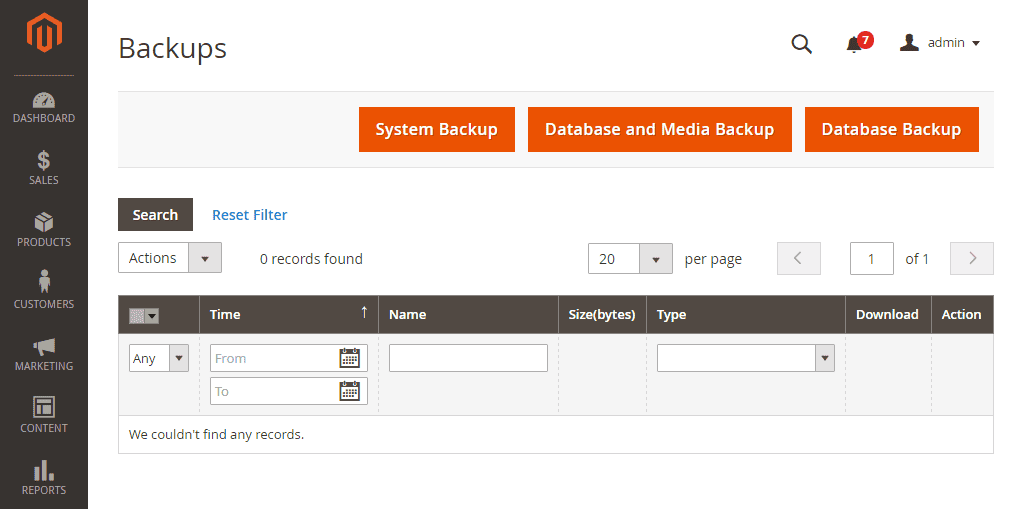
Start by backing up everything: product data, customer information, order histories, and any other essential files like images or marketing content. This also includes your themes, customizations, and any third-party integrations you’ve set up in Magento.
Don’t forget about your site configuration and settings. These may include your payment gateways, shipping preferences, tax settings, and any custom code or design elements you’ve integrated into your Magento store. Keep a record of this information so you can easily replicate the settings in Shopify.
It’s also a good idea to test the backup before moving forward. Ensure you can access the files and that all data is intact.
6. Pick a Shopify plan that fits your store’s needs
Have you finalized which Shopify plan you are targeting for your newly migrated eCommerce store? If not, here you go…
Shopify offers several plans, each designed to cater to different levels of business needs.
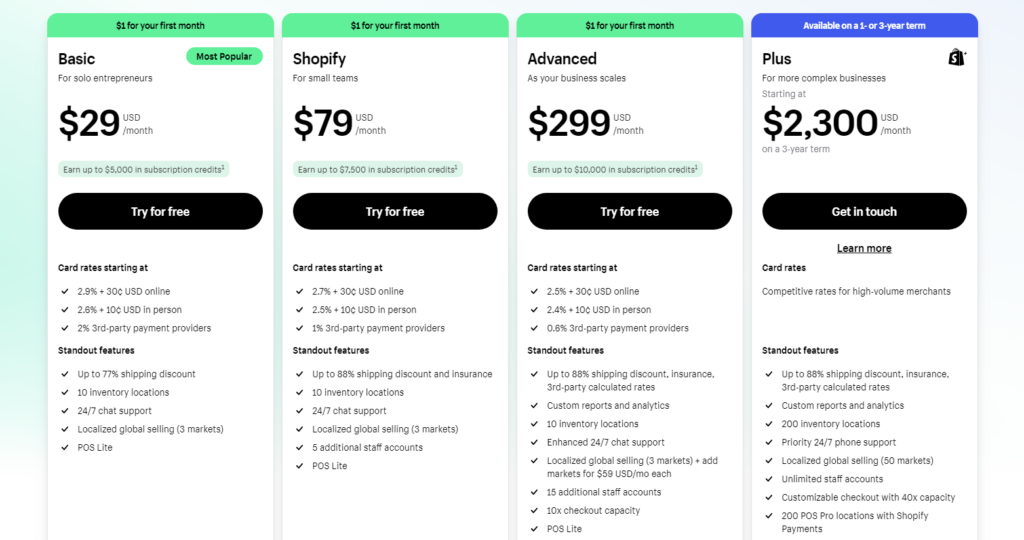
The first thing to consider is your store size and growth potential.
For smaller businesses, Shopify’s basic plan might be enough, but as your store grows and your product offerings expand, you may need more advanced features.
If you rely heavily on advanced reporting and analytics to track sales and customer behavior, Shopify’s Advanced or Plus plans might be ideal. These higher-tier plans also offer additional support, better integration options, and more powerful eCommerce features.
Download the Migration Checklist
7. Note any must-have tools or third-party apps to bring over
Before migrating, it’s important to identify the tools and apps you absolutely rely on in your current Magento store. This includes everything from inventory management systems to customer support tools, shipping integrations, or any custom apps that help streamline your operations.
Write down a list of these must-have tools and assess which ones are essential for your daily business activities.
Ask yourself:
- Are there any apps that handle your core functions, like payment processing, loyalty programs, or email marketing?
- What tools do you use for analytics, SEO, or managing large product catalogs?
- Which apps enhance your customers’ experience, like live chat or product recommendations?
Document the apps, along with how they currently support your business, so you can make sure they’re either replicated or transitioned into Shopify. This ensures that essential functionality remains intact after the migration to the new eCommerce platform, i.e. Shopify.
8. Search for apps on Shopify that replicate key features
Once you’ve identified the must-have tools, the next step is to explore the Shopify App Store to see what’s available to replicate those features. Some of the apps you use in Magento may have equivalent or even improved versions on Shopify.
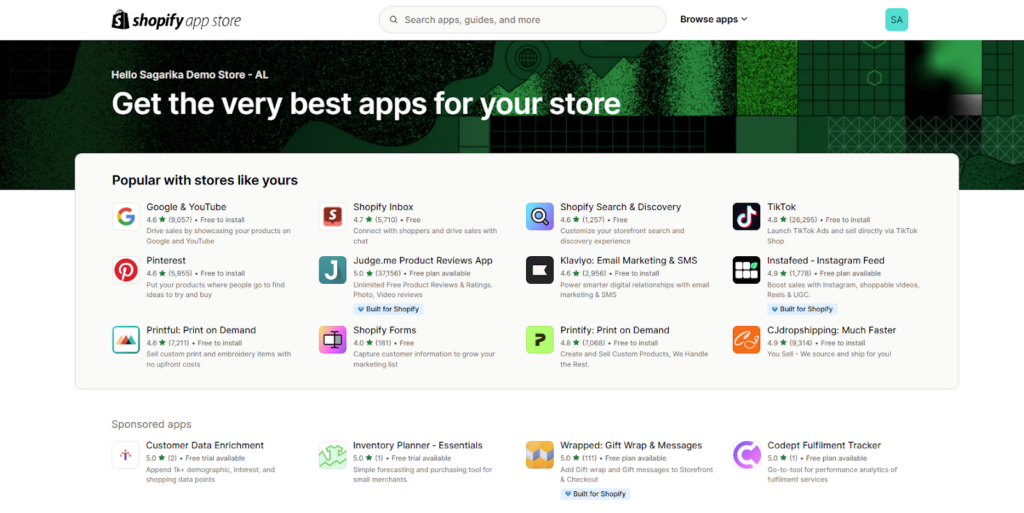
Begin by identifying the features you need. Are you looking for advanced product filtering, detailed sales reporting, or an automated email marketing solution?
Shopify also has built-in functionalities that may replace some third-party tools, so explore what’s available natively in your chosen plan. For example, Shopify offers built-in AR features, which may eliminate the need for external apps.
When searching for apps, pay attention to reviews, ratings, and support options to ensure you choose reliable ones.
PART 2: Shopify store setup
9. Create a Shopify store with a decided plan

Now that you’ve selected the right Shopify plan for your business, it’s time to officially create your store. Signing up for Shopify is straightforward—just follow the setup prompts after choosing your plan. You’ll need to fill in basic information, like your store name, email address, and business details.
Once your online store is created, Shopify will guide you through the steps to customize your store and begin adding products. Shopify store is very easy to set up. Check out the detailed checklist on Shopify store setup.
10. Choose a Shopify theme that fits to your brand
Shopify offers a wide range of themes, both free and paid, that you can browse through and test. When selecting a theme, consider your target audience and the type of products you sell.
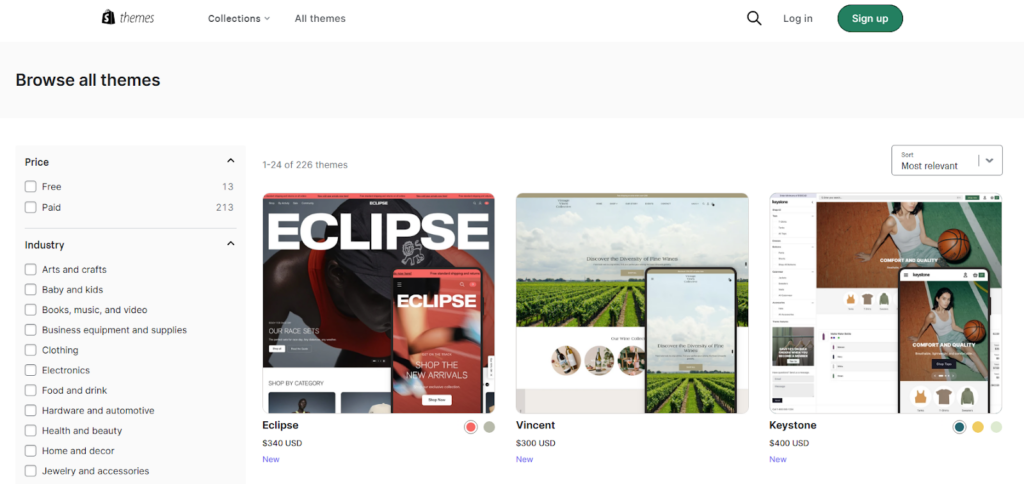
Think about user experience—your theme should have a clean, easy-to-navigate design that reflects your brand’s personality. Consider factors like your
- niche (specific industries or business models, such as fashion, electronics, or services),
- product range (e.g., does the theme showcase large catalogs well?),
- brand identity (does the theme reflect your brand’s style and values?), and
- mobile responsiveness (since most users shop on their phones).
Once you’ve selected the theme, install it, and preview how it looks. Shopify allows you to customize many aspects of the theme to make it uniquely yours, but picking a theme that matches your brand’s vibe from the start will save you time in the long run.
Read more: Shopify 2.0 themes: 10 Best Free & Paid Shopify store themes
11. Adjust colors, fonts, and layouts to match your brand
Once you’ve selected a theme, it’s time to make it uniquely yours by adjusting the colors, fonts, and layouts. Shopify offers a super easy way to customize themes as well as page layouts through the theme editor.
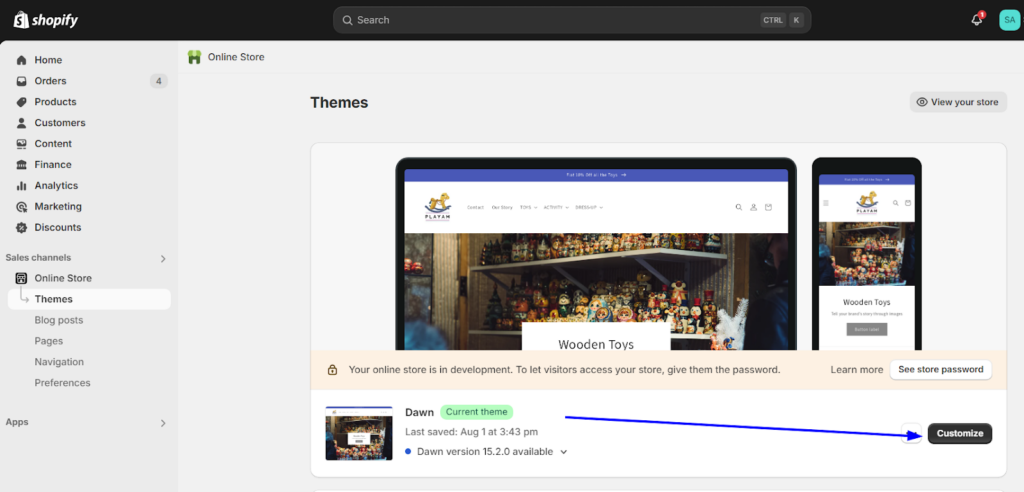
You can start by applying your brand’s color palette to buttons, headers, and backgrounds. Consistent use of colors not only enhances the store’s aesthetic but also reinforces your brand’s recognition. Next, select fonts that align with your brand’s personality. Whether you aim for modern minimalism or a classic vibe, the right typography can make all the difference.
Pay special attention to layouts. Adjust homepage sections, product pages, and category layouts to ensure customers can easily find what they’re looking for.
Download the Migration Checklist
12. Prepare all the required pages in Shopify store
When setting up your Shopify store, you’ll find that many essential pages, like the Homepage, category page, product page, cart page, checkout page, and so on.
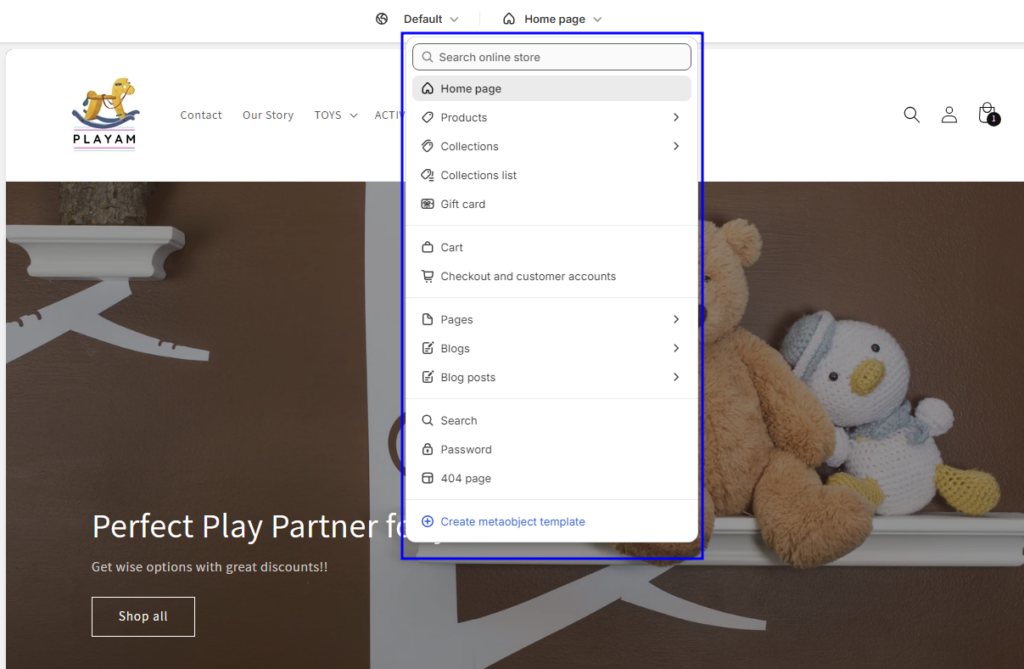
Shopify provides these foundational pages as part of its streamlined setup process, so you can focus on customizing them to suit your brand.
However, if your Magento store includes additional pages—such as policy pages (Privacy Policy, Terms and Conditions, Return Policy), a Careers page, or FAQs—you’ll need to recreate them manually in Shopify.
PART 3: Data Migration
13. Import data to your new online store
So finally, it’s time to bring in your data to your Shopify store. This is the perfect time to declutter and start fresh with only the essentials. Depending on the complexity and volume of your data, Shopify offers multiple migration methods:
- Copy and Paste: For smaller data sets, like individual pages or policies, simply copy the content from your old store and paste it into your Shopify store.
- CSV Files: Export data like products or customers into CSV files from your old platform and import them into Shopify. While effective for many data types, some content may not be transferable this way.
- Third-Party Apps: Use migration apps available in the Shopify App Store. These are especially helpful for transferring bulk data like products or orders.
- Hire Experts: A Shopify developer can handle the migration for you, ensuring a seamless transfer without losing critical data.
Always import products and categories first, followed by customers, and then historical orders. This ensures that Shopify can properly link products and customers to the orders. The rest of the content can be imported in any sequence.
14. Verify and organize your products after import
When importing the data from another eCommerce platform you can face common issues such as:
- Products were imported but marked as hidden
- Missing details like descriptions or images
- Product variants failed to import
That’s why you must verify if the product or other data are accurate and properly organized. Go through each product’s description, images, variants, and metadata. For example, make sure the product weights are correctly imported, as they impact shipping calculations.
Also, you need to update titles, meta descriptions, and alt tags for improved search visibility and user experience. With Shopify Metafields, you can add custom data about your products, orders, customers, or other content of your eCommerce store.
If your store includes digital products or services, be sure to review Shopify’s specific guidelines on selling these items. Adjust product settings as necessary to provide a seamless purchase and delivery experience for your customers.
15. Redirect old links to the new pages on Shopify
During migration, your URL structure may change, and failing to address this can lead to broken links as well as a potential drop in organic traffic.
In this situation, you can implement 301 redirects and signal to search engines that your old pages have moved permanently to a new location. This not only will preserve the SEO authority but also ensure visitors can seamlessly access the updated content.
However, keep a few key considerations in mind: You can’t redirect URLs that begin with prefixes like /apps, /cart, or /orders, and Shopify doesn’t allow redirects for fixed paths such as /products or /collections/all. Redirects only work for broken URLs that show a “404 Page Not Found” error, not for valid pages.
If you’re on a standard Shopify plan, you can create up to 100,000 redirects, but Shopify Plus allows up to 20 million. For large-scale migrations, you can use a CSV file to import redirects in bulk.
Download the Migration Checklist
PART 4: Integration
16. Make sure navigation, filters, and cart work seamlessly
After the data migration, now, you have to pay close attention to how your Shopify website functions. Take the time to fine-tune your navigation menus, product filters, shopping cart, and other core functionalities.
If your store includes advanced features like wishlists, quick view options, or recently viewed products, this is the perfect time to enable and configure them in your Shopify store. These elements directly impact how customers interact with your store and play a huge role in guiding them toward making a purchase.
So, you need to make sure the basic functionality of your website is working properly before you move ahead.
17. Set up analytics, shipping rates, taxes, etc.
Remember, you were tracking your Magento website traffic and the performance on various platforms like Google Analytics. After migrating to Shopify, you must set up your analytics tools again to ensure you capture the right data from day one.
Whether it’s integrating Google Analytics or adding Facebook pixel, it’s super easy with Shopify. Just make sure to install the necessary tracking codes to monitor user activity and gather insights into your store’s performance.
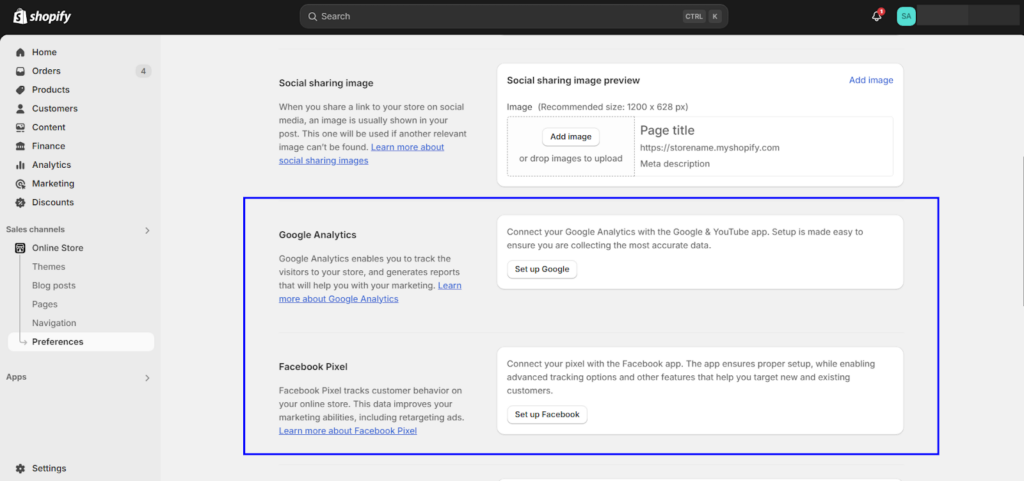
In addition to analytics, it’s time to configure your shipping settings. Shopify allows you to set up shipping zones, rates, and carrier integrations to make sure your shipping process runs smoothly. As for taxes, Shopify automatically calculates taxes based on your store’s location and the customer’s location.
However, if you need more control over the taxes you charge, you can override these default settings. For example, if you don’t need to charge sales tax, you can create overrides and set the tax rates to 0%.
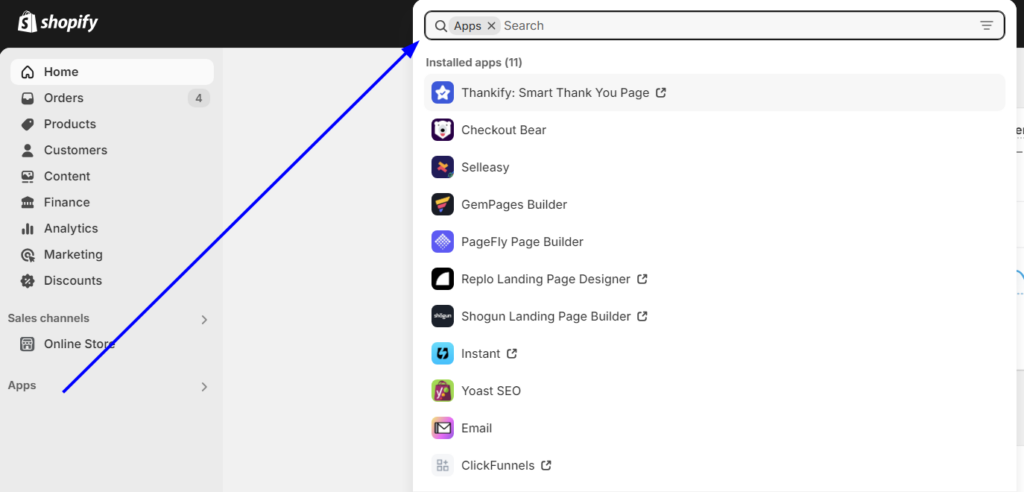
18. Install and configure the third-party apps
Now that you’ve compiled your list of essential apps (as outlined in steps 7 and 8), it’s time to install them in your Shopify store.
Many of the apps in Shopify’s App Store come with easy-to-follow installation wizards that guide you step-by-step through the setup process. As you install each app, be sure to pay close attention to its permissions and integrations with other tools you’ve already set up. This ensures everything syncs smoothly and works harmoniously together.
Once installed, test each app to make sure it functions as expected. Don’t just assume it’s ready to go—click through different features, try out key functions, and make sure it meets your store’s needs.
After testing, monitor the impact of these apps on your store’s performance. Are they improving efficiency? Helping with customer experience? If any app isn’t performing as expected or causing issues, adjust the settings or seek support from the app provider.
Installing the right third-party apps can save you time, enhance functionality, and boost customer satisfaction, all of which will contribute to the growth of your business.
19. Configure a reliable payment provider
Here you’ve got an additional option for payment gateway—Shopify payments!
Shopify Payments is the easiest to set up, as it’s integrated directly into the platform, but if you prefer another provider, make sure to follow the simple installation steps for that gateway.
Shopify supports a wide range of other payment gateways, including PayPal, Stripe, and many others, so you have the flexibility to choose the one that best suits your business needs. Take the time to review the payment options available to customers (like credit cards, digital wallets, and even local payment methods) and decide which ones to enable based on your target market.
Once configured, test the payment process from the customer’s perspective. Simulate a purchase to ensure the checkout process is smooth, and the payments are being processed correctly.
20. Link any sales channel or marketing tools
Now that your Shopify store is taking shape, it’s time to link any sales channels or marketing tools you plan to use.
If you’re planning to sell on marketplaces like Amazon, eBay, or Etsy, or through social media platforms, Shopify has built-in integrations that make syncing your products seamless. These integrations allow you to manage your products, orders, and customer data all from one place, saving you time and effort.
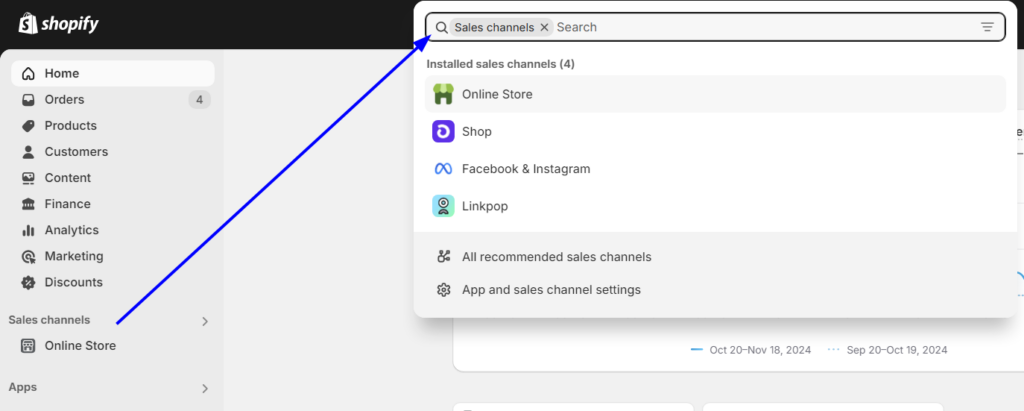
Next, connect your marketing tools to ensure you’re capturing customer insights and automating your marketing efforts. Tools like Google Ads, Facebook Ads, or marketing automation software can help you run targeted campaigns and track performance.
Also, you need to reconfigure your Shopify feed URL in tools like Google Merchant Center, advertising platforms, and Google Search Console.
After linking your sales channels and marketing tools, ensure that automated emails or promotions are being triggered as expected. Now, you’ll be able to reach a broader audience, run more effective campaigns, and ultimately drive more traffic and sales to your store.
Download the Migration Checklist
PART 5: Testing Store Functionality
21. Double-check all products and categories for accuracy
Now your Shopify store is almost ready to launch. But before making it live, thoroughly check all your products and categories for accuracy. This includes ensuring product names, descriptions, images, prices, and variants are correct.
Make sure that product categories are well-organized and that each item is placed in the right section. It’s easy to overlook small details, but an accurate product catalog ensures your customers have a smooth shopping experience.
Additionally, make sure inventory levels are correctly updated after migration, as discrepancies here can lead to stockouts or overselling.
22. Ensure all links, menus, and the footer are working
The next step is testing all the internal links, menus, and footer sections across your store. Click through every navigation link, product link, and category to confirm they lead to the right pages.
Also, you can use free online tools to find broken links on your website. Broken links can harm both user experience and SEO, so it’s important to identify and fix any issues before your store goes live.
Check the footer for accuracy as well to ensure that links to important information (like terms of service, privacy policy, and contact details) are working.
23. Verify mobile compatibility and browser consistency
A significant number of shoppers now browse and shop using mobile devices, so it’s essential that your store is mobile-friendly. Test your site on various devices, including smartphones and tablets, to ensure it adapts well to different screen sizes.
Also, test your store across multiple browsers—such as Chrome, Firefox, Safari, and Edge—to make sure it displays correctly everywhere.
Look for any layout glitches, links, or elements that might not display properly. By addressing these issues beforehand, you can ensure your customers have a smooth shopping experience, no matter how they access your site.
24. Use Google Search Console to detect and address errors
Now that your Shopify store is live, it’s time to ensure it’s not only ready for your customers but also optimized for search engines. Google Search Console is a valuable tool for this task, that allows you to monitor your site’s health and visibility in Google search results.
So, quickly connect your store to Google Search Console and submit your new sitemap to track how Google crawls and indexes your website. This will allow you to detect any errors that could affect your SEO, such as crawl errors, broken links, or missing meta tags.
If you come across issues like 404 errors or pages that are not indexed, it’s important to address them immediately. These errors can harm your store’s ranking in search results and disrupt your customers’ experience.
You can regularly check the Search Console to keep an eye on your store’s performance, fix any issues, and ensure your store is fully optimized for search engines.
25. Place a test order for demonstration
Now that you’ve set everything up, it’s time to test the entire customer journey to ensure it’s smooth and functioning as expected.
Place a test order on your store—go through the process as a customer would, from browsing products to adding items to the cart, completing checkout, and receiving the order confirmation. This simple test can help catch any problems before they affect your real customers and ensure a positive shopping experience from start to finish.
Check:
- if all payment options are working correctly,
- if shipping options are accurate, and
- if customers are receiving order confirmation emails.
It’s also important to verify that the customer experience is seamless and there are no glitches or hiccups in the flow. If any issues arise during your test order, address them promptly to ensure that when your customers start buying, their experience is flawless.
26. Ask for feedback at Shopify Community
Once you’ve tested everything on your store and you’re feeling confident, you can still ask for feedback from the Shopify community. The Shopify Community forum is full of experts, fellow merchants, and developers who can provide valuable insights.
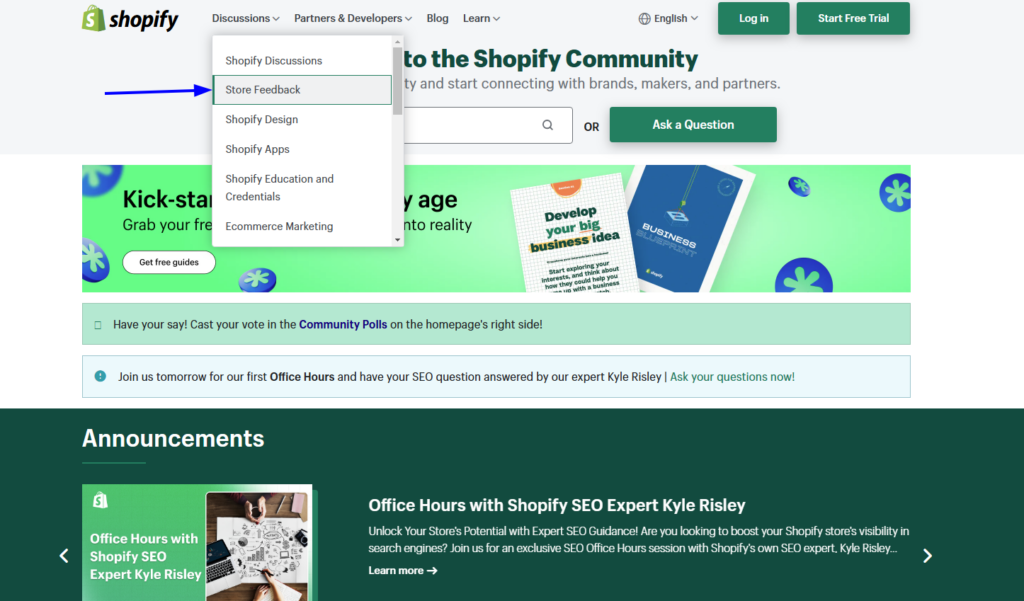
Share your store link on the forum and ask for constructive feedback about your site’s functionality, design, and user experience. The community can point out areas for improvement, suggest useful apps, or recommend best practices that you may have missed.
This way, you can gain helpful tips, fix any overlooked issues, and ensure that your store is ready to provide an excellent experience for your customers
Download the Migration Checklist
PART 6: Post-Migration Activities
27. Launch your new Shopify store
The moment has finally arrived: it’s time to launch your new Shopify store!
Now, connect your website domain to your Shopify store. Well, Shopify offers many ways, that you can find in our dedicated guide on: How to Change Domain Name in Shopify! Next, you need to perform delta/partial migration for newly added records (e.g. customers, orders, etc.).
Once that’s done, remove any password protection from your store and let your shoppers visit your newly created store.
Also, notify your existing customers about the migration and ask them to reset their password and reactivate their accounts at the new platform.
Once your store is up and running, keep a close watch on its performance. Are your customers experiencing any issues? Are there any hiccups in the checkout process? Address any problems swiftly to ensure your first interactions with your new customers are nothing short of seamless.
28. Track speed and analytics to catch any issues
After launching, one of your top priorities should be monitoring the speed and performance of your new Shopify store. A fast website not only enhances the user experience but also improves your search engine rankings. Use tools like Google PageSpeed Insights to ensure your site loads quickly and efficiently.
In addition to speed, check out Shopify Analytics, Google Analytics, and any other tracking tools you’ve integrated to monitor how visitors are interacting with your site.
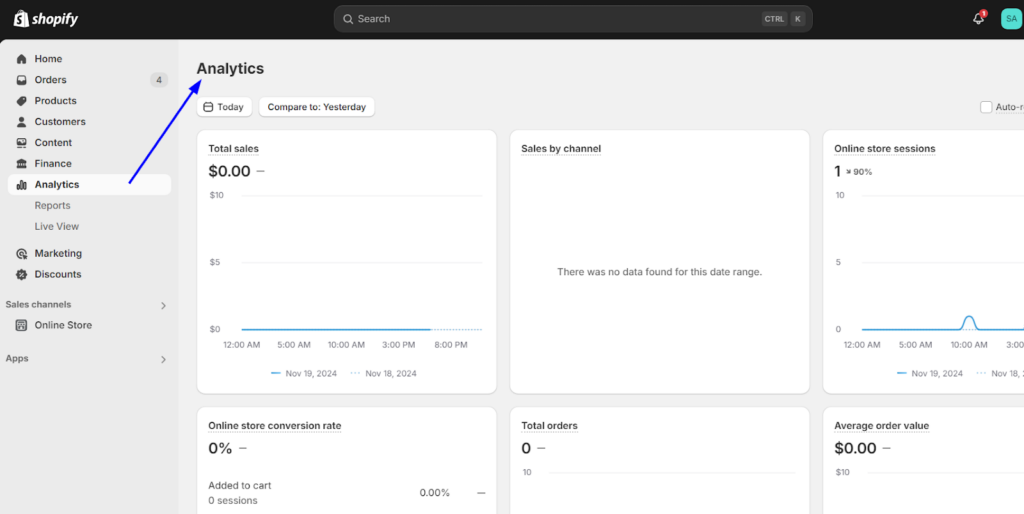
Watch for key metrics such as bounce rates, page loading times, and the paths customers are taking through your store.
If you notice any high bounce rates on certain pages or slow loading times on key sections, dig deeper to pinpoint the issue and resolve it as soon as possible.
29. Regularly update and refine features based on user data
Your Shopify store is live, but the work doesn’t stop there!
Now, it’s essential to regularly update and refine your store based on real user data. Monitor how customers are interacting with your site—are they abandoning their carts on checkout? Do they seem to spend more time on certain product pages?
Use the insights from analytics tools like Google Analytics or Shopify’s built-in reports to identify any trends, opportunities, and areas for improvement.
Based on this data, make necessary adjustments, whether that means optimizing the product page, reorganizing your navigation, improving mobile usability, or fine-tuning your checkout process.
Customer feedback also plays a vital role—whether it’s through reviews, surveys, or support tickets, take their input seriously and use it to make data-driven decisions that enhance their shopping experience.
30. Lastly, deactivate your Magento store
Congratulations! You’ve successfully transitioned to Shopify!
Once everything is running smoothly on Shopify and you’ve ensured that your customers are experiencing no disruptions, it’s time to deactivate your old Magento store. This is a significant step, signaling the completion of your migration process.
Now you can say goodbye to your Magento store and fully focus on your high-performing Shopify store!
Download the Migration Checklist
Let’s Summarize the Migration to Shopify!
Here we come to the end of the migration process.
Migrating from Magento to Shopify is undoubtedly a smart move for growing your eCommerce business—but it’s full of challenges. That’s why having a clear plan, like our step-by-step migration checklist, is important to keep things organized and minimize disruptions.
By now, you’ve seen how every phase—planning, execution, and post-migration—requires attention to detail. Even with the best intentions, challenges like data loss, functionality mismatches, or SEO disruptions can arise—especially for larger, more complex Magento stores.
That’s why you should consult a Shopify expert before you start the actual migration process. Our Magento to Shopify migration team specializes in both platforms and knows how to preserve the unique aspects of your store while enhancing its functionality on Shopify.


Post a Comment
Got a question? Have a feedback? Please feel free to leave your ideas, opinions, and questions in the comments section of our post! ❤️