Chapters Close

To expand the awareness of your brand, Magento 2 allows inviting friends to use your products via email by setting up the Refer Email to a Friend in the configuration.

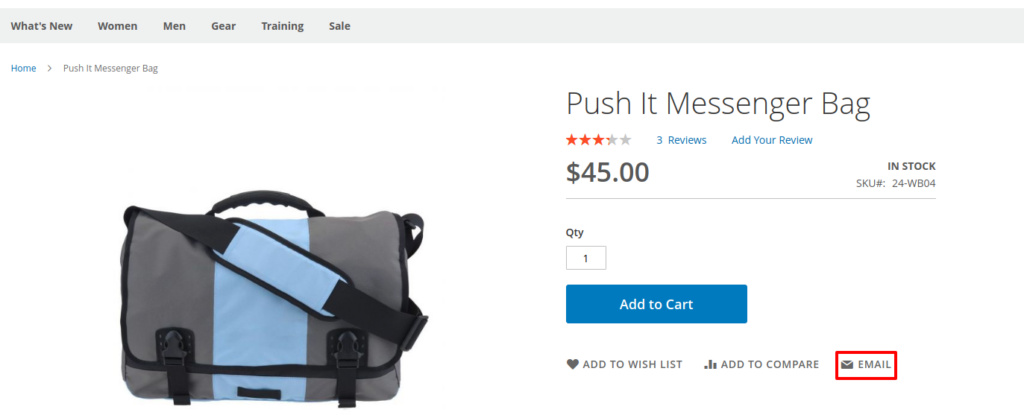
For a more straightforward approach, Email a Friend link appears along with an envelope icon instantly on the products page. By clicking on the link, customers are redirected to the Email to a Friend page, then fill in all the required information for the email.

It is possible to send mail to multiple recipients; however, to avoid spam, you should limit the number of sharing products per hour and the number of recipients per email. There is a complete Affiliate solution for Magento 2.

The Refer Email is a great way to help you drive traffic to your store while saving much more money on other modes of promotions.

Besides, sharing of your products by the customers will make your brand trustworthy in the marketplace. To ensure the delivery of your mail you should enable SMTP.

Setup Refer Email a Friend

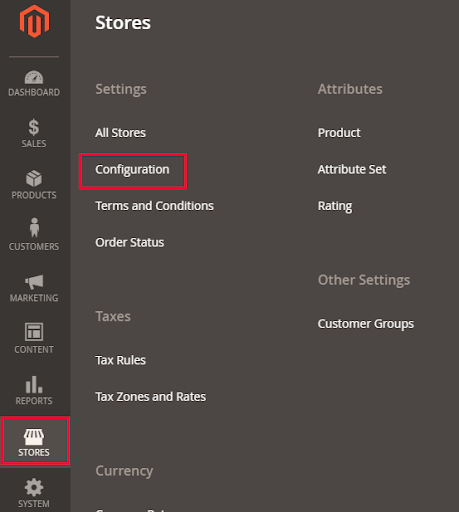
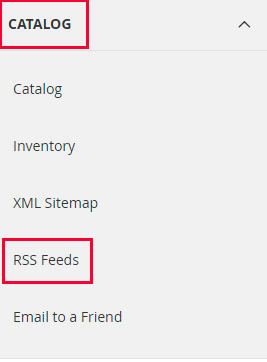
  • On the Admin Panel Go to Stores > Settings > Configuration > Catalog > Email to a Friend.
  • Open the Email Templates section,
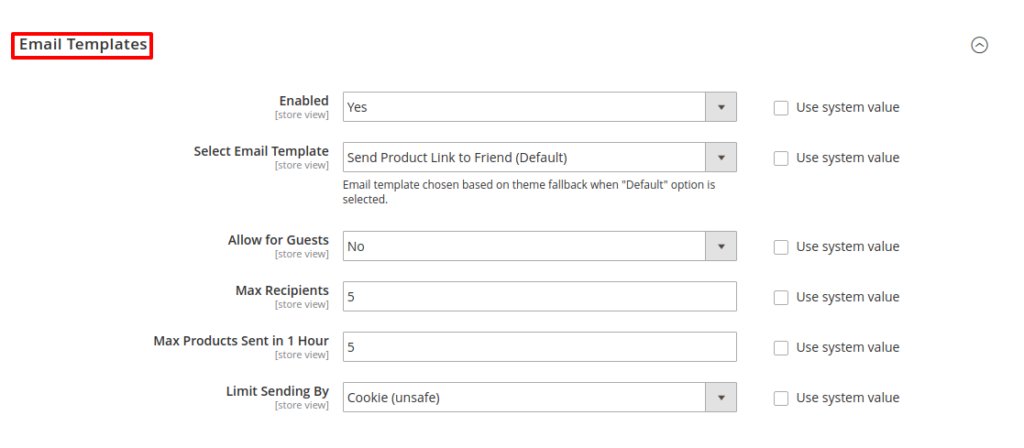
  • In the Enable field, choose Yes to apply email template.
  • Select the Email Template that you need from the drop-down menu. This email template is enabled as default now. 
  • Set the Max Recipient to the maximum number of friends who are on the delivery list of an email.
  • Set the Max Products Sent in 1 Hour to the maximum number of products that can be sent by the sender to friends per hour.
  • The Limit Sending By allows you to detect the sender of a mail in two ways:
    • IP Address: the number address of the computer.
    • Cookies: Counting the number of times the mail is sent through browser cookies. This approach is not safe because the sender can erase the cookie before sending.

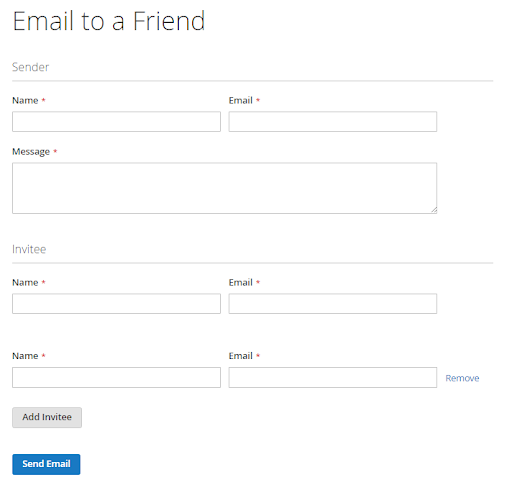
Send an email to a friend

  • Email a Friend link is now available to tap on the products page.
    • The login information is required if not logged in.
    • Create a new account if a user does not have an account on your store.
  • Enter Name and Email of the sender.
  • Enter Name and Email of the invitee. If sending to multiple friends at the same time, click the Add Invitee button.
  • Send the Email once it is ready.

This article will help you to understand how to set up RSS feed in Magento 2.

RSS (Rich Site Summary) summarises the latest information published on a website through the list of headlines, update notices, helps to distribute content to a wide number of people at the same time. 

It is one of the most important factors of Magento 2 SEO. To build and run a successful Magento store, it is essential to make your Magento website easily accessible. RSS feeds are very useful for this to happen.

Step 1: Open Configuration from Magneto 2 Admin.

Open admin panel of Magento 2 and then go to Stores -> Configuration.

Scroll down and go to the CATALOG tab, and navigate to the RSS Feeds.

Step 2: Enable RSS Configuration.

Go to the RSS config section and select Enable from the drop-down menu.

Now go to Wish List. By enabling it, RSS feed link will appear at the top of your customer’s wishlist pages. To enable this setting, select Enable from the drop-down menu.

Now go to the Catalog section where you can enable the Catalog feeds. These Catalog feeds are:

  • New Products: Recently added products
  • Special Products: Products that have special prices.
  • Coupons/Discounts: Special coupons or discounts available in the store.

Top Level Category: Any new or changed top-level category of the catalog.

Now go to the last section – Order. By enabling this, customers can track their order status through the feed. If you want to do that, then select Enable from the drop-down menu.

Now save the configuration using the Save Config button from the top of this configuration page. 

This piece of information will throw some light on to how to send an order email to a custom email address in Magento 2.

To achieve this, you just have to follow a couple of steps mentioned below:

  • Step 1: Set an email form
  • Step 2: Create a Controller file


Step 1: Set an email form

Set the email form with the input field line as given below:

<form id="send-order-email" action="<?php $block->getUrl('demomodule/order/sendemail'); ?>">
   <label>Email Address</label>
   <input type="text" class="input-text" id="email">
</form>

Step 2: Create a Controller file

Create a controller file at the path given below and add the following code: app\code\Aureatelabs\DemoModule\Controller\Order\Email
This file is based on the class \Magento\Framework\App\Action\Action and it will take the submit action from the form created in the first step.

public function execute()
{
   $email = $this->getRequest()->getParam('email');
   $order = $this->_objectManager->create('Magento\Sales\Model\Order')->load(1); // this is entity id
   $order->setCustomerEmail($email);
   if ($order) {
       try {
           $this->_objectManager->create('\Magento\Sales\Model\OrderNotifier')
               ->notify($order);
           $this->messageManager->addSuccess(__('You sent the order email.'));
       } catch (\Magento\Framework\Exception\LocalizedException $e) {
           $this->messageManager->addError($e->getMessage());
       } catch (\Exception $e) {
           $this->messageManager->addError(__('We can\'t send the email order right now.'));
           $this->_objectManager->create('Magento\Sales\Model\OrderNotifier')->critical($e);
       }
   }
}

Feel free to leave the comments below and contact us if you need any help to customize your Magento store.

Happy coding!

Magento 2 is known for its Swatches feature (including the color, pattern, and texture) that enhances it and makes it more appealing. Swatches are an excellent mode of adding more competitive benefits to configurable products. The color, pattern, and texture have strongly proved to be the efficacious tools that make the product offering eye-catching and at the same time, informative.

Image Swatch
This functionality lets you increase the visual elements of the product offerings. Additionally, it gives access to users to watch product variations in multiple colors/textures.

Text Swatch
The text swatch functionality enables showcasing of the sizes and other types of text-based options. It’s a sort of button with a text label.

Color Swatch
The Magento 2 swatches functionality is quite extensive as it allows you to showcase the available texture/color options. Whenever an item is showcased in different colors. It makes it easier for buyers to pick the right product variation.

Color Swatch
The Magento 2 swatches functionality is quite extensive as it allows you to showcase the available texture/color options. Whenever an item is showcased in different colors. It makes it easier for buyers to pick the right product variation.

Configure Magento 2 Swatches

In Admin panel go to Stores > Attributes > Product. Then edit Color attribute. 

From this section, you will be able to configure all the available color swatch settings:

  • Catalog Input Type for Store Owner: It enables you to select from the Dropdown Menu, Text Swatch, and Visual Swatch.
  • Update Product Preview Image: It lets you update the product image on the catalog.
  • Use Product Image for Swatch if Possible: It enables you to replace the swatch image with a base image or a product swatch.

Screenshot

Grow your online business like 3,838 subscribers

    * This site is protected by reCAPTCHA and the Google Privacy Policy and Terms of Service apply.
    envelope

    Thank You!

    We are reviewing your submission, and will be in touch shortly.