What is Shopify PWA Connector? Benefits, Installation, and Configuration!
")
The eCommerce world is changing rapidly, we can say it lost its head or got a new one. With this, the new generation of online retailers is impacted by design and experience like a revolution in the industry with a modern frontend approach. The modern PWA approach increases the conversions and the overall revenue.
To dive more into the lucrative headless commerce & headless platforms is the endless opportunities that outreach the business goals with a profound understanding that makes the customers enjoy the shopping trend.
In the aspect of believing in a fast-paced eCommerce store, VSF Shopify integration is among the exceptional with advanced functionalities. Let’s understand how it makes things easy for Shopify as well as Shopify 2.0 stores on the go.
Introduction to Alokai (Formerly Vue Storefront)
Alokai (Formerly Vue Storefront), the world’s fastest-growing open-source eCommerce frontend, is coded in the modern JavaScript framework Vue.js. The idea of having Alokai (Formerly Vue Storefront) development is to support the modular method of constructing eCommerce frontends.
Industry uses Vue as a
- PWA frontend for Magento
- PWA frontend for Shopify
- BigCommerce
- WooCommerce
- other platforms
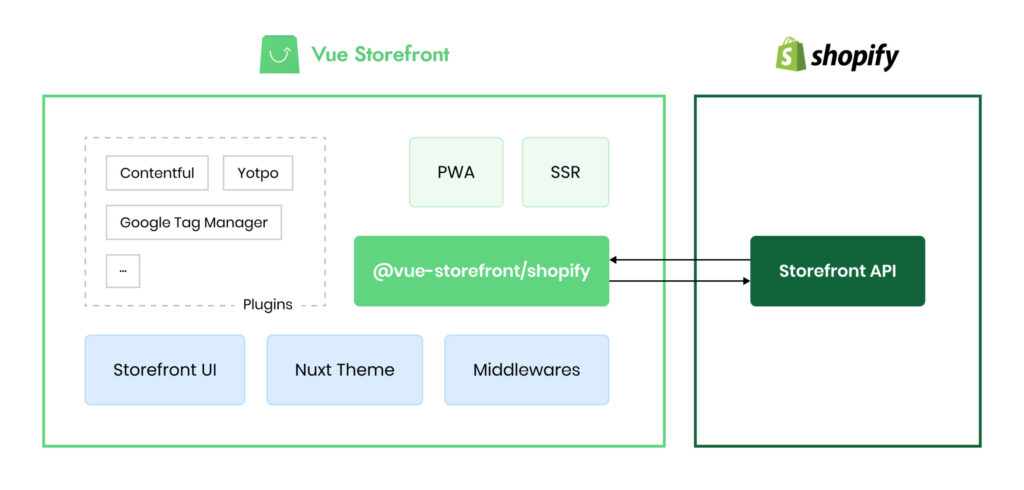
Built to work with headless Shopify and being a backend-agnostic platform, the eCommerce storefront seamlessly connects with any eCommerce platform through GraphQL & REST API.
The project “Alokai (Formerly Vue Storefront)” itself is just a set of independent NPM packages. That said, it provides a variety of essential eCommerce/CMS/app functionalities in several combinations.
If you are looking to hire a Alokai (Formerly Vue Storefront) developer & build an eCommerce store, pick the package which matches the requirements of your business project.
As being standalone packages of Alokai (Formerly Vue Storefront), it allows us to use them in any Vue.js environment. Hence, merchants are not bound to use Nuxt. Merchant / Developer can use Alokai (Formerly Vue Storefront) packages with Vue CLI or even within custom build Vue.js codebase.
What Is Alokai (Formerly Vue Storefront) and Shopify Integration
During progressive web app development, the traverse connects Shopify’s backend with the Alokai (Formerly Vue Storefront)’s PWA frontend.
Alokai (Formerly Vue Storefront) and Shopify integrator is a bridge, which allows Shopify developers to connect the Shopify backend with Alokai (Formerly Vue Storefront) on the go.
The store administrators can manage the catalog data, customers, orders, and CMS pages from the Shopify backend.
The connection between Shopify and Alokai (Formerly Vue Storefront) is established using Shopify’s Storefront API. The given API is only accessed through GraphQL. GraphQL teaches a way to talk to API and helps load data from the server to the client’s computer.
Developers need to understand the crux of GraphQL before dealing with APIs. We encourage them to visit the GraphQL guide before proceeding further.
The Storefront API provides unauthorized access to customers, checkouts, product collections, and other store resources. They are collectively used to build customer-centric experiences on the Alokai (Formerly Vue Storefront) storefronts.
Features
- Limitless customization
- Open Source with MIT license
- Progressive Web Apps
- Lightweight structure
- Advanced developer experience
- Performance-focused
- Mobile-first approach
- Platform independent
- Server-side rendering
- Massive flexibility in changing third-party services
Benefits of VSF and Shopify Integration
Business End:
- Modern Storefront
- Blazing fast store speed
- Cross-border selling
- SEO-Friendly (Core Web Vitals)
- Flexible to experiment
- Faster-to-market
User End:
- Interactional UI
- The frictionless shopping experience on Mobile and Desktop
- Offline access
- Single page checkout
Technology stack
- Vue.js
- Nuxt.js
- CSS
- Storefront UI
- TypeScript
How do the Alokai (Formerly Vue Storefront) and Shopify Integrator work?
To start working with Alokai (Formerly Vue Storefront) for Shopify, begin with installing two core packages: Shopify JS Buy SDK and Shopify Composition Functions. The packages integrate Shopify PWA instances with Alokai (Formerly Vue Storefront).
It uses the official Shopify client library to prepare and execute GraphQL queries and fetch information from the Shopify store backend. The domain name and API token are mandatory to make API calls.
Workflow
Step-by-step guide of integrating Alokai (Formerly Vue Storefront) with Shopify
The Storefront API provides customer-facing access to a shop’s data. The data hands over the power to manage the customer’s cart, access the product view at the storefront and create checkouts.
Developers and management teams leverage the power to weave customer-facing shopping experiences.
The Storefront API is composed of the following data:
- Customers- Personal information of Shopify customers such as shipping address and display name
- Nodes- Set of Shopify Storefront API root nodes, including Checkouts, Collections, Orders, Payments, etc. See a complete list of nodes here.
- Shops- Shop information such as billing address, currency code, and domain
As the Storefront API is GraphQL-based, pass GraphQL queries to fetch any data representation. Also, mutate GraphQL to modify data.
How to integrate Alokai (Formerly Vue Storefront) with Shopify?
Getting started with Shopify-Vue Connector. As mentioned— to start working with Alokai (Formerly Vue Storefront) for Shopify, we need to have two core packages installed:
Shopify JS Buy SDK:
The JS Buy is a lightweight library that allows you to build eCommerce into any website. It’s based on Shopify’s Storefront API and comes with lots of facilities. It enables users to retrieve products and catalogs from your shop, & most importantly, it helps add products to the cart and checkouts.
Using the Storefront API, you can:
- Fetch data about a single product or a collection of products to display on any website or touchpoint.
- Create unique checkout experiences with full control over the shopping cart.
- Create new customers or modify existing ones, including address information.
- Let customers select unique product options.
Shopify Composition Functions:
It’s a set of declarative composition API functions that lets you interact with eCommerce logic in your Vue application. The API function enriches additional functionalities like Vue reactivity, SSR support, client-side request caching, etc. to name a few. It is the main integration package and uses an API client under the hood.
Prerequisite
Before initiating the installation and configuration process— you need two domains or one domain with one subdomain.
- Two domains: In this case, you need two domain names, i.e., domain1.com and domain2.com. Setup Vue-Storefront on the primary domain and Shopify on the secondary domain. The primary domain is reserved for the frontend website and secondary domain for Shopify backend.
- One domain & One sub-domain: In this case, you have to set up Vue-Storefront on the domain and Shopify backend on sub-domain, i.e., domain.com will render the front end website and api.domain.com for Shopify backend.
Installation
Clone the repository of Alokai (Formerly Vue Storefront) and switch to “the next” branch
git clone https://github.com/DivanteLtd/vue-storefront.git
cd vue-storefront/
git fetch && git checkout next
Install dependencies:
yarn installBuild product version
yarn buildRun production version
yarn startBuild development version
yarn dev
Obtain Shopify API token
Generate credentials in the Partner dashboard
To generate private API credentials in the Partner dashboard:
- Log in to the Partner dashboard.
- Click Development stores.
- Click the name of the store you want to build for.
- From your Shopify admin, go to Apps.
- Click Manage private apps.
- Click Create a new private app.
- Enter the private app name and developer email.
- Give full access for Storefront API
- Click Save.
After you click Save, you’ll see the storefront access token.
Generate credentials in the Shopify admin
To generate private API credentials for the Shopify admin:
- From your Shopify admin, go to Apps.
- Click Manage private apps.
- Click Create a new private app.
- Enter the private app name and developer email.
- Give full access for Storefront API
- Click Save.
After you click Save, you’ll see the storefront access token.
Configuration
After getting a storefront access token, set a token in the Shopify package. Create a “.env” file at “packages/shopify/theme/” and set Shopify domain name and access token. Add the following content in the .env file.
SHOPIFY_STORE_URL=example.myshopify.com
SHOPIFY_STORE_TOKEN=28d86b7cb13a0b128fb61e48c6358845
Go to the “/packages/theme/middleware.config.js“ and set the value of “domain” and “storefrontAccessToken” as below
api:{
domain: 'process.env.SHOPIFY_STORE_URL',
storefrontAccessToken: 'process.env.SHOPIFY_STORE_TOKEN
},
const CustomClient = require('shopify-buy/index.unoptimized.umd.min.js');

const onCreate = (settings) => {
return({
config:{
...defaultSettings,
...settings
},
client: CustomClient.buildClient(settings.api),
})
};
The Shopify’s Storefront API uses the leaky bucket algorithm to serve and manage the rate limit for API calls.
It limits customer interaction (unique IP addresses) time with the app to 60 seconds, rather than the ID of the shop. So, there won’t be any bottleneck due to a sudden spike in website traffic.
For example, Suppose an API call request takes 0.5 seconds. And each call costs a minimum of 0.5 seconds. In a particular case, the store can handle a maximum of 120 parallel requests.
Examples
Fetching Product:
Now we have all the information including connection client and configuration with context.
Let’s see API-CLIENT method to fetchAll products from Shopify:
return await context.client.product.fetchAll().then((products) => {
console.log(products);
});
Fetch specific product by handle
return await context.client.product.fetchByHandle(handle).then((product) => {
console.log(product);
});
Theme: Here is the sample code on how to use product API and utilize product information in components.
import { useProduct } from '@vue-storefront/shopify';
import { onSSR } from '@vue-storefront/core';

export default {
 ...
 setup(props, context) {

   const { slug } = context.root.$route.params;

   const { products, search } = useProduct('products');
   const product = computed(() => productGetters.getFiltered(products.value, { master: true, attributes: context.root.$route.query })[0]);

   onSSR(async () => {
     await search({ slug });
   });

   return {
     product
   };
 },
 ...
};
Fetching CMS page
Now, let’s try to implement something interesting. Let’s fetch CMS page data from Shopify. Click on the query root API to know more about the query parameters and response fields. The syntax information will help you prepare the GraphQL queries. Here is the GraphQL query to fetch a CMS page information:
query {
  pages(first: 1, query: "handle:'return-policy'") {
    pageInfo {
      hasNextPage
      hasPreviousPage
    }
    edges {
      cursor
      node {
        id
        title
        body
        handle
      }
    }
  }
}
Now, convert this GraphQL query into a Shopify client object.
import {_shopifyCustomClient} from '../../index';

const pagesQuery = _shopifyCustomClient.graphQLClient.query((root) => {
	root.addConnection('pages', {args: {first: 1, query: "handle:'return-policy'"}}, (page) => {
		page.add('title');
		page.add('body');
		page.add('handle');
	});
});
And fetch the CMS page data.
const page = await _shopifyCustomClient
        .graphQLClient
        .send(pagesQuery)
        .then(({model, data}) => {
            return data.pages.edges[0].node;
        });

return page;
Take a look at the full source code:
import {_shopifyCustomClient} from '../../index';
import { Content } from "../../types";

async function fetchByHandle(options): Promise<Content> {

    const pagesQuery = _shopifyCustomClient.graphQLClient.query((root) => {
        root.addConnection('pages', {args: {first: 1, query: "handle:'"+options.slugs"'"}}, (page) => {
            page.add('title');
            page.add('body');
            page.add('handle');
        });
    });

    const page = await _shopifyCustomClient
        .graphQLClient
        .send(pagesQuery)
        .then(({model, data}) => {
            return data.pages.edges[0].node;
        });

    return page;
}

export default fetchByHandle;
Custom Module: To develop your custom module, you’ve to add api-client, composable, and use them in theme.
Api-client: (Location: packages/shopify/api-client/src/api/) Create a folder, name it based on your module, and implement all your API calls.
Composable: (Location: packages/shopify/composables/src/composables/) Create a folder and name it with prefix “use” keyword and add a getter file with postfix like “Getters.ts” in “getters” folder. Implement your composable methods inside your folder.
Hope you got a better understanding of the topic and learned what Alokai (Formerly Vue Storefront) + Shopify integration works. Later you learned the benefits, installation guide, configuration, and everything else. If you have any queries or suggestions, feel free to use the comment box, I will be more than happy to reply to you back.


Post a Comment
Got a question? Have a feedback? Please feel free to leave your ideas, opinions, and questions in the comments section of our post! ❤️