How to create a Splide js custom slider in Hyva themes?
Chapters Close

Welcome, Today, we’re diving into the realm of Hyva themes and exploring a powerful new tool for crafting dazzling sliders: Splide.js. This library lets you build sliders beyond imagination, and integrating it into your Hyva theme is surprisingly straightforward.

Why Splide?

Magento 2 offers built-in slider options, but Splide brings a whole new level of creative freedom.

Apart from this, there are so many slider extensions available in the market. So what is the reason to use Splide? Just because Splide is a lightweight, flexible, and accessible slider/carousel written in TypeScript. Splide has No dependencies and no Lighthouse errors.

It helps you to create various kinds of sliders by just changing options, such as multiple slides, thumbnails, nested sliders, vertical direction, and more. Also, you can enhance the slider capability by using APIs or building extensions.

Features

Here are some magical features of Splide.

Lightweight: Say goodbye to bulky libraries! Splide packs a punch without weighing down your website.

Flexible: Want fade transitions, thumbnails, or even nested sliders? Slide your genie in a bottle, granting your slider wishes.

Accessible: Splide cares about everyone, ensuring your sliders are inclusive and usable for all.

Customizable: Dive into Splide’s extensive options and APIs to craft sliders that are uniquely yours.

To learn about more features of the Splide, then go to https://splidejs.com/ and check the About Splide section.

New to Hyvä?? Learn about the Hyvä Theme from basics!

Let’s Build

Let’s Build! Here’s a crash course on building a custom slider in your Hyva theme.

Follow the below steps to implement a slider in your Hyva theme.

1) Create a new XML file inside the layout directory of your child theme to add CSS and JS of the Splide.

Here we have created splide_js_css.xml in the child theme.

File Path: app/design/frontend/[Vendor]/[Theme]/Magento_Theme/layout/splide_js_css.xml

There are two ways to include CSS and JS in Magento. The first one is to add the CND of both files in the <head></head> tag of the XML file and the other way is to Download CSS and JS files, put them in your theme, and give a static path to CSS and JS. Both are valid ways to include custom CSS/JS in Magento 2.

To know more check this guide

Here we are using the first way and below is the code for that.


     <?xml version="1.0"?>
     <page xmlns:xsi="http://www.w3.org/2001/XMLSchema-instance" xsi:noNamespaceSchemaLocation="urn:magento:framework:View/Layout/etc/page_configuration.xsd">
        <head>
            <css src="https://cdn.jsdelivr.net/npm/@splidejs/splide@4.1.4/dist/css/splide.min.css" src_type="url"  />
            <script src="https://cdn.jsdelivr.net/npm/@splidejs/splide@4.1.4/dist/js/splide.min.js" src_type="url"  />
        </head>
     </page>

2) Include a Layout for the page on which we are going to add our Splide slider.

Here we will include them in the default.xml so we can use the Splide slider globally.

File Path: app/design/frontend/[Vendor]/[Theme]/Magento_Theme/layout/default.xml

Here we will use an update handle. It will include a layout in the default head of the page.

To know more check this guide.
Now, add the below code before the <head> tag in the default.xml

<update handle="splide_js_css"

In above code splide_js_css is the name of our XML file without extension.

3). Add HTML and <script> of the slider to the Page.

HTML: https://splidejs.com/guides/getting-started/#html

Script: https://splidejs.com/guides/getting-started/#applying-splide

We can copy HTML and <script> from the above links of the Splide documentation. After that, we can add desired slider content like images, text, etc. to our HTML.

Check the below code In which I have added some Images to the slide content.

Code:

     <section class="splide">
      <div class="splide__track">
        <ul class="splide__list">
          <li class="splide__slide"><img src="https://images.pexels.com/photos/257699/pexels-photo-257699.jpeg" alt="" height="" width=""/></li>
          <li class="splide__slide"><img src="https://images.pexels.com/photos/4114787/pexels-photo-4114787.jpeg" alt="" height="" width=""/></li>
          <li class="splide__slide"><img src="https://images.pexels.com/photos/326502/pexels-photo-326502.jpeg" alt="" height="" width=""/></li>
          <li class="splide__slide"><img src="https://images.pexels.com/photos/3766189/pexels-photo-3766189.jpeg" alt="" height="" width=""/></li>
        </ul>
      </div>
     </section>
     <script>
        var splide = new Splide( '.splide' );
        splide.mount();
     </script>

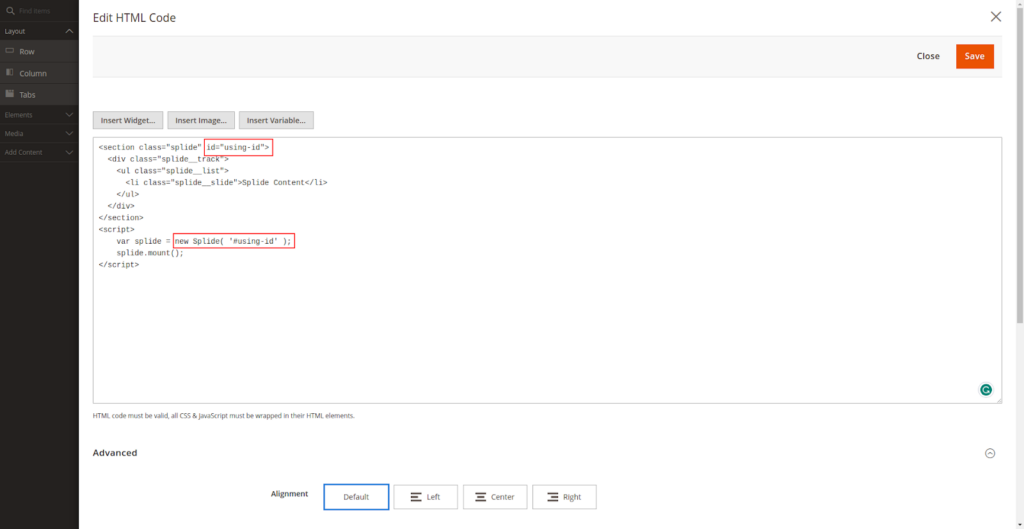
We can also use different Classes or IDs instead of splide in the <script> as well as in HTML.

Using different  Class
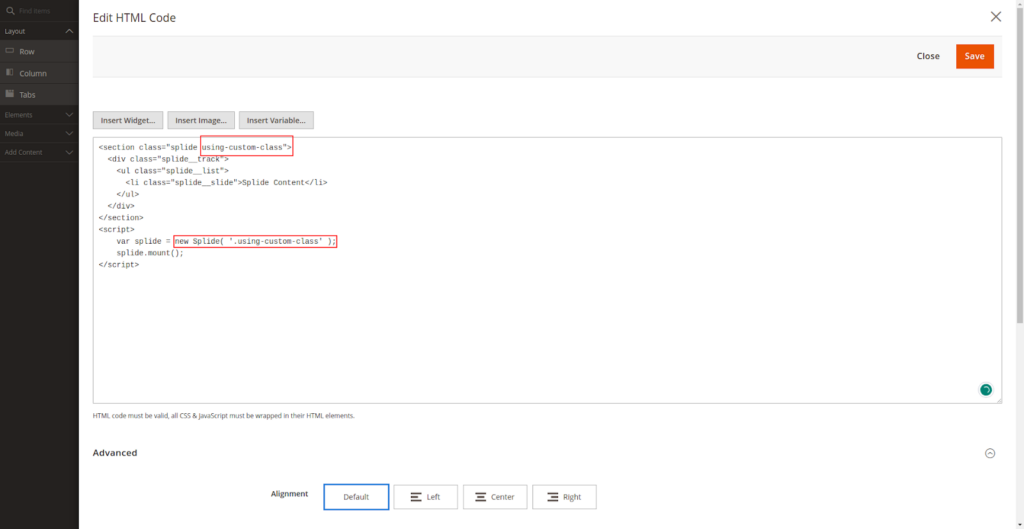
Using different Class

Using ID

Using ID

Follow the below steps to add HTML and <script> to your page.

  1. Just go to the page on which you want to add the Splide slider or create a new page.
  2. Select the Content tab of the page.
  3. Add your HTML and <script> to the content.
  4. If you are using Page Builder, click on the Edit with Page Builder button. Drag the HTML Element from the left Bar. Click on the setting icon and add your HTML and <script>. (To know more about page builder check here)
  5. Save the page and check your page.

Code:
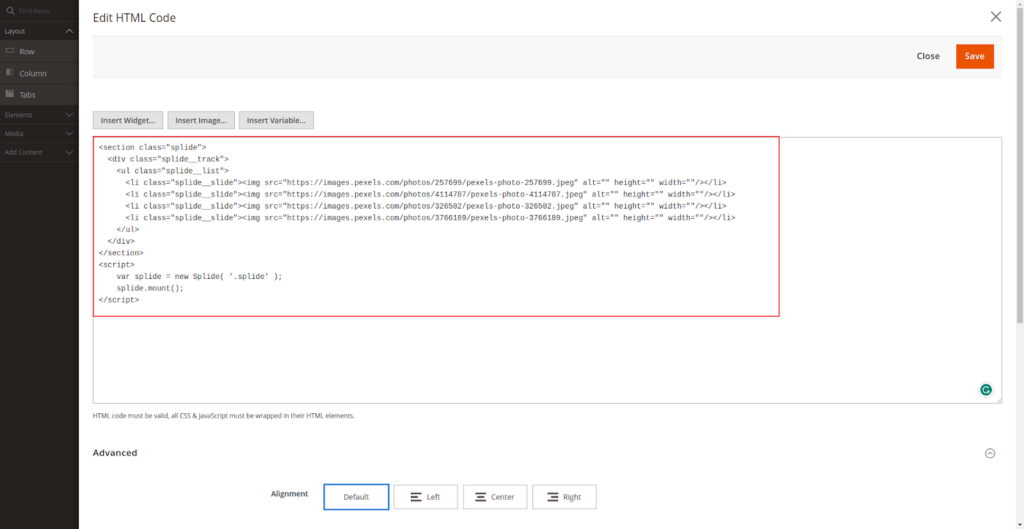
Edit html code

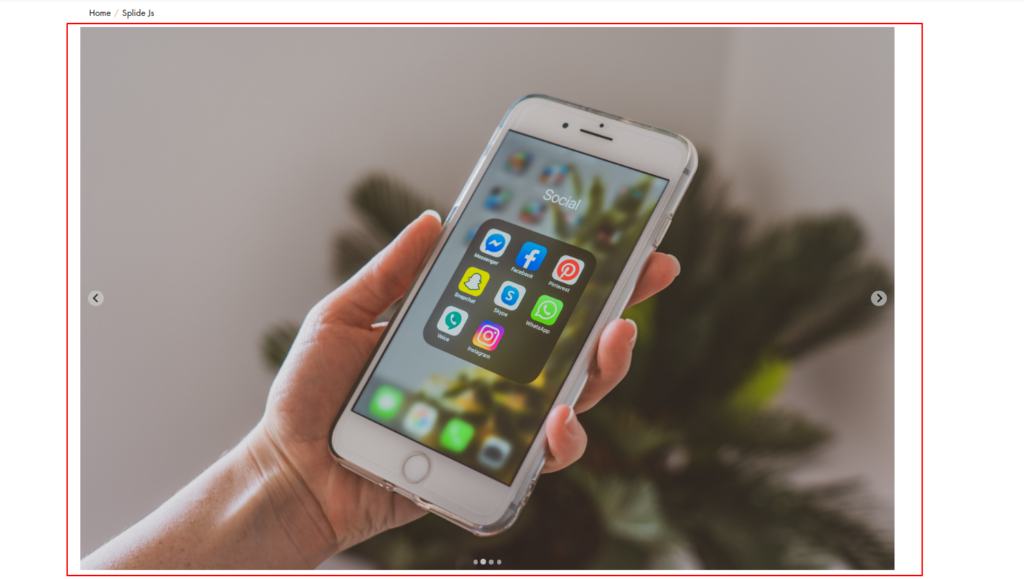
Output

html output

Splide takes a lot of options that make it very flexible. We can simply apply to the <script>. In the below code, I have made the slider continuous using the loop, shown 3 slides, moved 1 slide at a time, and also added spacing of 20px between slides.

<script>
   var splide = new Splide( '.splide', {
     type   : 'loop',
     perPage: 3,
     perMove: 1,
     gap: '20px'
   });
   splide.mount();
 </script>

Output

Slider output

If you want to make your slider more flexible or want to make more customization then visit this guide.

Note: We can also do this using CMS Block/Widgets. Simply create CMS Block/Widgets, add HTML and <script> inside it, and insert CMS Block/Widgets to the page.

Use on Particular page

Above, we have included CSS/JS layout in default.xml to use Splide globally. But in case we have only used Splide on particular pages like Home, Products, CMS, etc. Then this will impact the page performance of other pages.

For example, if we have only used Splide on the Home page and our Splide CSS/JS is called on every other page then that is not good for the page performance.

To overcome that we can include calling Splide CSS/JS on the particular page’s XML instead of default.xml.

Below is the list of XML file paths for the particular page. Just add the update handle code to the file before the <head> tag.

Homa Page File Path: app/design/frontend/[Vendor]/[Theme]/Magento_Theme/layout/cms_index_index.xml

Catgory Page File Path: app/design/frontend/[Vendor]/[Theme]/Magento_Catalog/layout/catalog_category_view.xml

Product Page File Path: app/design/frontend/[Vendor]/[Theme]/Magento_Catalog/layout/catalog_product_view.xml

CMS Pages File Path: app/design/frontend/[Vendor]/[Theme]/Magento_Cms/layout/cms_page_view.xml

Cart Page File Path: app/design/frontend/[Vendor]/[Theme]/Magento_Checkout/layout/checkout_cart_index.xml

Note: Apart from this, there are so many other XMLs available for different pages. These are the common files that are used for the content like slider.

Related Sources

Splide Docs: https://splidejs.com/documents/

That’s it!

With Splide.js and Hyva’s theme magic, crafting stunning, custom sliders is now within your grasp. So, unleash your creativity, experiment with Splide’s features, and let your sliders become the stars of your Hyva storefront! Remember, the possibilities are endless, so go forth with confidence!

Thanks for reading, I hope this blog will help you with frontend development. Don’t forget to share your Splide creations in the comments below!

Cheers 🙂

More resources on Hyva themes:

In today’s article, we will guide you on how to make Alpine v2 and v3 compatible code in Hyva themes.

The developer who developed the extension has a question about which Alpine.js version is supported.

Creating Alpine components that seamlessly function with both version 2 and version 3 is relatively straightforward. This page provides valuable insights on key considerations to ensure your extensions remain compatible with any version of Hyvä.

To ensure compatibility with both Alpine.js versions 2 and 3, incorporate the directives x-spread and x-bind into your code.

To ensure seamless compatibility across Alpine.js versions 2 and 3, include both x-spread for v2 and x-bind for v3 in your codebase.

Example:

<div x-data="{ attributes: { class: 'bg-blue-500', style: 'color: white;' } }">
    <div x-spread="attributes">
        <p x-bind:title="attributes['class']">Hover over me!</p>
    </div>
</div>

In this above example:

  • x-data initializes a data object with an attributes property containing an object with some CSS attributes.
  • x-spread directive spreads the attributes from the attributes object onto the parent <div>. This allows the dynamic addition of attributes to the element based on the data object.
  • x-bind:title dynamically binds the title attribute of the <p> element to the value of attributes[‘class’]. This means that when you hover over the paragraph, you’ll see a tooltip with the value of the class attribute.
  • This code is compatible with both Alpine.js v2 and v3, as it uses commonly supported directives and syntax for data manipulation and attribute binding.

New to Hyvä?? Learn about the Hyvä Theme from basics!

Use of $el

  • In Alpine.js v2, $el consistently points to the root DOM element of the component. However, in Alpine.js v3, $el now refers to the DOM element on which the current binding is being evaluated.
  • To ensure compatibility with both Alpine.js versions 2 and 3, limit the use of $el solely to the base element of the component.
  • If you require a reference to another element within your component, adhere to these guidelines:
  1. Alpine.js v2: Use x-ref to assign a reference to the element.
  2. Alpine.js v3: Utilize querySelector() in vanilla JavaScript to fetch the desired element.

By following this approach, your components will remain compatible across both Alpine.js versions.

Example: 

  • In Alpine.js version 2, you would typically use $el to reference the root DOM element of the component.
<div x-data="{ isOpen: false }">
    <button x-on:click="isOpen = !isOpen">Toggle</button>
    <div x-show="isOpen" x-ref="myDiv">Content</div>
</div>
  • In Alpine.js version 3, $el refers to the DOM element currently being evaluated within the binding context.

<div x-data="{ isOpen: false }">
    <button x-on:click="isOpen = !isOpen">Toggle</button>
    <div x-show="isOpen" x-ref="myDiv" x-init="$el.classList.add('initialized')">Content</div>
</div>

In the above Alpine.js v3 example, $el in x-init refers to the <div> element with the x-ref=”myDiv” attribute.

Using $root

In Alpine.js v2, it’s advisable to avoid using $root altogether. However, if you do need to use it, you can create an alias to $root in an initialization method to ensure compatibility with Alpine.js v2.

Certainly! If you need to use $root in Alpine.js v2 but want to ensure compatibility with Alpine.js v3, you can alias it to $root in an initialization method. Here’s how you can do it:

<div x-data="initComponent()">
    <button @click="$root.someMethod()">Click me</button>
</div>

<script>
    function initComponent() {
        return {
            $root: Alpine.version.startsWith('3') ? this : window.Alpine,
            // Other component properties and methods
        };
    }
</script>

In this example:

  • The initComponent function is used as the x-data value. This function returns an object that contains the component’s properties and methods.
  • Inside initComponent, $root is aliased to either this (the component itself) or window. Alpine depending on whether the current Alpine.js version starts with ‘3’.
  • This ensures that $root is available and points to the correct object regardless of the Alpine.js version being used.

By using this approach, you can write code that is compatible with both Alpine.js v2 and v3 while still being able to use $root when needed.

Using x-init

To ensure compatibility with Alpine.js v2 while using Alpine.js v3, make sure not to rely on the automatic invocation of the init method. Instead, explicitly specify x-init=”init” to ensure consistent behavior across both versions.

Usage of @click.away or @click.outside

To accommodate both Alpine.js versions in your component utilize both modifiers for handling clicks outside elements. Use click.away for Alpine.js v2 and click.outside for Alpine.js v3.

<div x-data="initComponent()">
    <div x-show="open" @click.away="closeDropdown" @click.outside="closeDropdown">
        Dropdown content
    </div>
    <button @click="toggleDropdown">Toggle Dropdown</button>
</div>

<script>
    function initComponent() {
        return {
            open: false,
            toggleDropdown() {
                this.open = !this.open;
            },
            closeDropdown() {
                this.open = false;
            }
        };
    }
</script>

In this example:

  • The initComponent function initializes the component with a data property open to control the visibility of the dropdown.
  • The toggleDropdown method toggles the value of open when the button is clicked.
  • Both @click.away and @click.outside directives are included in the <div> element. Alpine.js v2 will use click.away while Alpine.js v3 will use click.outside. They both call the closeDropdown method when a click occurs outside the dropdown, effectively closing it.

This setup ensures compatibility with both Alpine.js v2 and v3, allowing the component to handle clicks outside the dropdown element regardless of the Alpine.js version being used.

We use 

<div @click.away.outside="open = false"> … </div>

Instead of 

<div x-show="open" @click.away="callFunction" @click.outside="callFunction">
        Dropdown content
    </div>

Using Alpine plugins

  • To ensure cross-version compatibility with Alpine.js components, it’s recommended to refrain from using plugins unless they are available for both Alpine.js versions. For instance, the intersect plugin is native to Alpine.js v3, and a backport for v2 is provided as part of Hyvä. Thus, you can safely utilize x-intersect=”…” regardless of the Alpine version.
  • If you opt to rely on other plugins, you’ll likely need to backport them to version 2 yourself and ensure the correct version is loaded. The have-libraries.json file specifies the versions of libraries to load, and you can access these versions using the getVersionIdFor method in the view model. This approach ensures the appropriate versions of Alpine.js and intersect plugins are loaded into your theme.

<?php
/** @var Template $block */
/** @var ViewModelRegistry $viewModels */
use Hyva\Theme\Model\ViewModelRegistry;
use Hyva\Theme\ViewModel\ThemeLibrariesConfig;
use Magento\Framework\View\Element\Template;

$themeLibrary = $viewModels->require(ThemeLibrariesConfig::class);
$version = $themeLibrary->getVersionIdFor('intersect-plugin')
   ?: $themeLibrary->getVersionIdFor('alpine') ?: '2';?>
<?= /** @noEscape */ $block->fetchView($block->getTemplateFile("Hyva_Theme::page/js/plugins/v${version}/intersect.phtml")) ?>

The provided code dynamically determines the version of the intersect plugin or Alpine.js configured for the theme. If no specific version for the intersect plugin is specified, it checks if an Alpine.js version is provided. If neither is specified, it defaults to version 2. 

It then uses this version information to construct the fully qualified path to render the appropriate template file. This pattern can similarly be utilized to render custom JavaScript code based on the Alpine version of a theme.

Warning if the Alpine version is too old

If your module only supports one version of Alpine.js, it’s crucial to clearly state this in the module README and documentation. However, in scenarios where a Magento instance has multiple store views with different themes, each theme might utilize a different Alpine version. 

To specify a dependency on a minimum Alpine version, modules can employ layout XML to add a child to the require-alpine-v3 block. This ensures proper management of dependencies and compatibility across different themes within the Magento instance.

<body>
   <referenceBlock name="require-alpine-v3">
       <block name="My_Module"/>
   </referenceBlock>
</body>

If this module is used with a theme that employs a lower version of Alpine.js, a warning will be logged to the browser console.

The current Alpine.js version is 2.8.2, but version >= 3 is required by the following extensions:
[
   'My_Module'
]

The name of the child block should match the module name, since it will be listed in the error message.

More resources on Hyva themes:

In this post, I will explain the most Useful Hyva JavaScript helper functions in Hyva themes.

In hyva theme, window.hyva JavaScript object is available on every page with some Useful helper functions.

You can find these helper functions defined in vendor/hyva-themes/magento2-theme-module/src/view/frontend/templates/page/js/hyva.phtml file.

hyva.getFormKey()

The hyva.getFormKey method returns the current form key value directly from the form_key cookie, or is generated when that cookie does not exist.

When you use <?php echo $block->getBlockHtml(‘formkey’)?> form key is getting cached and sometimes you will get an “invalid form key” error while submitting the form.

You should use the form key in the below way to prevent an invalid form key issue.

<input type="hidden" name="form_key" :value="hyva.getFormKey()" />

hyva.getCookie(name)

hyva.getCookie method is used for getting the cookie value by cookie name. 

This method has one argument. 

  • name:  First argument is the cookie name and it is required. 

You need to pass the cookie name in hyva.getCookie method and it will return the cookie value.

let cookieName = 'my_cookie_name';
hyva.getCookie(cookieName);

hyva.setCookie(name, value, days, skipSetDomain)

hyva.setCookie method is used for setting the cookie. 

This method has four arguments:

  • name: First argument is cookie name and it is required. 
  • value: Second argument is cookie value and it is required.
  • days: Third argument is days which is optional, here you need to add the cookie expiry value in days.
  • skipSetDomain: Forth argument is skipSetDomain which is optional, This will skip setting the domain on the cookie. Magento is inconsistent in its backend behavior, not always setting the domain on the cookie. 
let cookieName = 'my_cookie_name';
let cookieValue = 'test';
let cookieExpireDays = 7;
hyva.setCookie(cookieName, cookieValue, cookieExpireDays);

hyva.setSessionCookie(name, value, skipSetDomain)

hyva.setSessionCookie method is identical to hyva.setCookie method with one difference, that the cookie will have no expiry set, so it will be deleted when no more windows or tags with the site are opened in the browser.

This method has three arguments:

  • name: First argument is cookie name and it is required. 
  • value: Second argument is cookie value and it is required.
  • skipSetDomain: Third argument is skipSetDomain which is optional, This will skip setting the domain on the cookie. Magento is inconsistent in its backend behavior, not always setting the domain on the cookie. 
let cookieName = 'my_ses_cookie_name';
let cookieValue = 'test value';
hyva.setSessionCookie(cookieName, cookieValue);

New to Hyvä?? Learn about the Hyvä Theme from basics!

hyva.formatPrice(value, showSign)

The hyva.formatPrice method formats and returns the given value using the current currency

This method has showSign argument is optional. If it is set to true, a + or – symbol is always rendered.

Otherwise, by default only – is rendered for negative values.

<script>
let price = 20;
let priceWithCurrency = hyva.formatPrice(price);
console.log(priceWithCurrency); // => $20.00
</script>

Output:

hyva formarPrice

hyva.str(string, …args)

The hyva.str function replaces positional parameters like %1 with the additional argument in the matching position.

The first additional argument replaces %1, the second %2, and so on.

Example:

hyva.str('%2 %1 %3', 'a', 'b', 'c') // => "b a c"

The behavior of hyva.str is similar to the Magento PHP function __() in regard to the positional parameters.

This allows using some translation phrases with positional parameters in PHP and in JavaScript.

// JavaScript
hyva.str('Welcome %1', customer.firstName);
// PHP
__('Welcome %1', $customer->getFirstname())

hyva.strf(string, …args)

The hyva.strf function replaces positional parameters like %0 in the first argument with additional arguments in the matching position.

The first additional argument replaces %0, the second %1, and so on.

Note: The hyva.strf is almost identical to hyva.str, except that for hyva.strf the first additional argument replaces %0, while for hyva.str it replaces %1.

Example:

hyva.strf('%1 %0 %2', 'a', 'b', 'c') // => "b a c"

hyva.replaceDomElement(targetSelector, content)

The hyva.replaceDomElement method replaces the DOM element specified by targetSelector with the innerHTML of the same selector from the string content.

This is useful to replace a part of the page with the same part from a HTML response to an Ajax request.

The function extracts <script> tags from the returned content and adds them to the page head to ensure they are executed.

Example:

window.fetch(url, {
  method: 'POST',
  body: payload
})
.then(result => result.text())
.then(body => {
  hyva.replaceDomElement('#maincontent', body)
})
.catch(error => {
  console.error(error);
  window.location.reload()
})

hyva.getUenc()

The getUenc method is intended to be used to supply the value for the uenc query arguments that are commonly used in Magento.

It allows Magento to redirect the visitor back to the previous page.

"body": "form_key=" + hyva.getFormKey() + "&uenc=" + hyva.getUenc(),

hyva.alpineInitialized(callback)

The alpineInitialized method takes a callback argument that is executed after Alpine.js is loaded and initialized, regardless of the Alpine version.

<script>
    const myTestFunction = () => {
        console.log("myTestFunction executed");
    };
    hyva.alpineInitialized(myTestFunction);
</script>

hyva.postForm(postParams)

The hyva.postForm method first creates a new <form> element, then adds hidden fields for a given data object, and finally submits the created form.

It automatically adds the uenc and the form_key parameters (uenc is often used by Magento to redirect the visitor back to the page).

The argument postParams is an object with form configuration:

{
  action: "the form action url to post to",
  data: {
    field_a: "value A",
    field_b: "value B"
  },
  skipUenc: false,
}

Example: Post form data by clicking a link (using Alpine.js)

<a href="#" x-data="" @click.prevent="hyva.postForm({
  action: BASE_URL+'custom_quote/move/inQuote/',
  data: { id: '3' }
})">
  Request a Quote
</a>

hyva.getBrowserStorage()

The hyva.getBrowserStorage method returns either the native localStorage, if it is available, or tries to fall back to the sessionStorage object.

If neither is available (most notably with IOS Safari in private mode), a warning is logged to the console, and false is returned.

Example:

const browserStorage = hyva.getBrowserStorage();
if (browserStorage) {
    const private_content_expire_key = 'mage-cache-timeout';
    const cacheTimeout = browserStorage.getItem(private_content_expire_key);
    browserStorage.removeItem(private_content_expire_key);
    browserStorage.setItem(private_content_expire_key, 3600);
}

More resources on Hyva themes:

In Hyva theme, it uses Alpine JS for DOM reactivity and tailwind for CSS styling.

Alpinejs is a lightweight JavaScript framework that contains the same kind of data binding that we love in other JS frameworks. 

Hyvä Themes uses only Alpine JS as its single JS dependency.

What is Alpine.js?

Alpine is a rugged, minimal tool for composing behavior directly in your markup. Think of it like jQuery for the modern web. Plop in a script tag and get going.

AlpineJS homepage: https://alpinejs.dev/

It comprises 15 attributes, 6 properties, and 2 methods.

There is no build process unlike of VueJS, React, many nodeJS based frameworks.

Though, it is similar to VueJS when writing syntax.

If you have the latest version of Hyva theme, then you can take advantage of AlpineJS v3. Though, if your hyva theme is older than you have to use AlpineJS V2.

In a seminar, William Wigwam said that by dropping jQuery and replacing it with AlpineJS changed the performance of the page. They do not recommend using jQuery and jQuery plugins in hyva themes.

They recommend using AlpineJS, so the DOM is reactive with the component. Either pure JavaScript if AlpineJS is not possible.

Like every programming language, AlpineJS has state, templating, events, and lifecycle.

Benefits of Alpine Js

  • lightweight JS framework
  • easy to learn and understand
  • low file size, having 15.6KB
  • AlpineJs syntax is very much inspired by Vue
  • Plugin extensible
  • Reusable UI components

New to Hyvä?? Learn about the Hyvä Theme from basics!

x-data

We can declare a new Alpine Component scope and its data for the HTML block.

It tells the framework to initialize a new component with the following data object.

<div x-data="{ open: false }">
   ...
</div>

X-init

It will initialize the component after x-data is triggered.

<div
   x-data="{ posts: [] }"
   x-init="posts = await (await fetch('/posts')).json()"
>...</div>

x-bind

x-bind allows you to set HTML attributes on elements based on the result of JavaScript expressions.

x-on

It can attach events with the elements like button, Input, etc.

<button x-on:click="alert('Hello World!')">Say Hi</button>

x-text

It can show text data stored in a component to any element.

<div x-data="{ username: 'calebporzio' }">
   Username: <strong x-text="username"></strong>
</div>

x-html

It can show HTML data in a component to any element.

<div x-data="{ username: '<strong>calebporzio</strong>' }">
   Username: <span x-html="username"></span>
</div>

x-model

It binds the value of an input element to Alpine data.

<div x-data="{ message: '' }">
  <input type="text" x-model="message">

  <span x-text="message">
</div>

X-for

It creates DOM elements by iterating through a list of arrays or objects.

<ul x-data="{ colors: ['Red', 'Orange', 'Yellow'] }">
   <template x-for="color in colors">
       <li x-text="color"></li>
   </template>
</ul>
<ul x-data="{ car: { make: 'Jeep', model: 'Grand Cherokee', color: 'Black' } }">
   <template x-for="(value, index) in car">
       <li>
           <span x-text="index"></span>: <span x-text="value"></span>
       </li>
   </template>
</ul>

x-if

It shows/hides the DOM element on the condition matching with the variable in the data.

Here to use x-if, <template> tag is required otherwise it will throw errors.

<template x-if="open">
   <div>Contents...</div>
</template>

x-show

It shows/hide the DOM element with inline display CSS. It works without a template tag.

<div x-data="{ open: false }">
   <button x-on:click="open = ! open">Toggle Dropdown</button>
 
   <div x-show="open">
       Dropdown Contents...
   </div>
</div>

x-ref

It will create a ref to a DOM element with an alias name. It can be used in any component.

<button @click="$refs.text.remove()">Remove Text</button>
<span x-ref="text">Hello 👋</span>

x-cloak

Sometimes, your component’s HTML is showing before AlpineJS is initialized, so we can hide it with this.

After the AlpineJS is initialized, it will remove the x-clock and show your components.

CSS:

[x-cloak] { display: none !important; }

Your HTML here

<span x-cloak x-show="false">This will not 'blip' onto screen at any point</span>

x-ignore

By default, Alpine will crawl and initialize the entire DOM tree of an element containing x-init or x-data.

If for some reason, you don’t want Alpine to touch a specific section of your HTML, you can prevent it from doing so using x-ignore.

<div x-data="{ label: 'From Alpine' }">
   <div x-ignore>
       <span x-text="label"></span>
   </div>
</div>

For writing AlpineJS in your favourite editor like PHP Storm, or VS Code, you can try these plugins:

Here are some tools to debug AlpineJS in the browser:

Thank you.

More resources on Hyva themes:

Apart from JavaScript, all Luma CSS must be transformed to Tailwind CSS to function with Hyvä.

There are various methods modules use to apply CSS styles in Luma, and therefore the appropriate method to convert them may vary.

First and foremost, developers must thoroughly understand the structure and design principles of the Luma CSS. It’s crucial to refer to the Tailwind documentation for guidance on class names, customization options, and best practices to ensure a seamless adaptation. 

Once the analysis is complete, the focus shifts to integrating Tailwind CSS into the project.

Replacing Luma Styles

When migrating .phtml templates originally crafted for Luma to Hyvä, it is imperative to exchange all CSS styles with Tailwind CSS classes.

If you’re unfamiliar with this CSS utility class framework, please check out the “Working with TailwindCSS” guide to help you get started.

Example

Luma Code:

<button type="submit" title="Add to Cart" class="action tocart primary">
   <span>Add to Cart</span>
</button>

Hyva Code:

<button type="submit" title="Add to Cart" class="text-sm font-medium py-2 px-4 border bg-primary">
   <span>Add to Cart</span>
</button>

New to Hyvä?? Learn about the Hyvä Theme from scratch!

Remove additional .less styles

Some modules include additional CSS files compiled by the Magento LESS compiler.

These CSS files are usually included with layout XML. They need to be removed and replaced with inline Tailwind CSS classes.

Example removal of an additional LESS based CSS file with layout XML:

You can remove CSS in the below path: 

app/design/frontend/Your_Vendor/Your_Theme/Magento_Theme/layout/default_head_blocks.xml

<?xml version="1.0"?>
<page xmlns:xsi="http://www.w3.org/2001/XMLSchema-instance" xsi:noNamespaceSchemaLocation="urn:magento:framework:View/Layout/etc/page_configuration.xsd">
   <head>
       <remove src="Some_Module::css/styles.css"/>
       <remove src="Magetop_Brand::css/styles.css" />
       <remove src="MageArray_News::css/category_sidebar.css" />
       <remove src="Bss_SocialLogin::css/jquery.fancybox.min.css" />
       <remove src="Mageplaza_ShareCart::css/style.css" />
       <remove
src="https://cdnjs.cloudflare.com/ajax/libs/font-awesome/5.12.0-2/css/all.min.css"/>
   </head>
</page>

External Non-Luma CSS

Certain extensions incorporate CSS files that operate independently of Magento and the Magento LESS system. Typically, these styles are packaged alongside JavaScript libraries.

When determining how to address them, various factors must be considered:

  • Is the file part of an external JavaScript library and the library will be removed by the compatibility module? If yes, remove the CSS file, too.
<remove src="Some_Module::css/some.css"/>
  • Is the CSS part of the Critical Rendering Path? If yes, consider removing the file and using inline Tailwind CSS classes instead.   
<remove src="Some_Module::css/some.min.css"/>
  • Is the CSS NOT used in the Critical Rendering Path and independent of Magento Luma? In this case, we suggest using the external CSS inside of Hyvä but consider loading it when needed instead of always loading it automatically.

The following example loads the CSS file on demand on the first user interaction with the page. 

<script>
   document.addEventListener('DOMContentLoaded', function () {
   function init() {
       const link = document.createElement('link')
       link.rel = 'stylesheet';
       link.type = 'text/css';
       link.href = '<?= $escaper->escapeUrl($block->getViewFileUrl('Some_Module::css/custom.css')) ?>';
       document.head.append(link);
   }
   document.body.addEventListener('touchstart', init, {once: true});
   document.body.addEventListener('mouseover', init, {once: true});
}, {once: true});
</script>

Useful extension/tools for Conversion of styles to Tailwind CSS:

CSS to Tailwind Converter tool: 

CSS to TailwindCSS converter (VS Code extension):

Conclusion

The process of converting Luma CSS to Tailwind involves a systematic approach to replace existing styles with Tailwind CSS utility classes. Understanding the structure of Luma CSS is key, followed by integrating Tailwind and referring to its documentation for guidance. 

Converting Luma CSS to Tailwind is not just a technical task but also a strategic decision to enhance maintainability and leverage the benefits of a utility-first CSS framework. 

Read more resources on Hyva themes:

  1. Check out the InstaBuild for Hyvä Themes: Ready-made Hyva theme templates for faster storefront development!
  2. Hyva Themes Development – For Online Merchants
  3. Hyvä Theme Benefits that your store needs
  4. 10 Best Hyva Compatibility Extension Providers For Magento 2 Stores
  5. Hyvä VS PWA: Where to Invest?
  6. How a Slow Magento Website Can Cost You Advertising Dollars
  7. Mobile Commerce: How Hyva Themes Boost Mobile Conversions

Email templates play a crucial role in any online business. They are the first point of contact with customers and can greatly impact their perception of your brand. In the case of Hyva Theme, a popular Magento 2 theme, customizing email templates allows you to create a unique and personalized experience for your customers. 

In this blog post, we will explore the steps involved in customizing email templates in Hyva Theme.

At present, Hyvä does not handle the styling of emails.

However, you can customize the styles using the hyva-themes/magento2-email-module. This module is automatically installed as a dependency when you install the hyva-themes/magento2-default-theme package.

The hyva-themes/magento2-email-module re-enables the luma CSS functionality specifically for emails within themes based on Hyvä. It’s important to note that this functionality differs from the luma-checkout or theme-fallback modules, which employ a Luma theme rather than Hyvä.

Method 1: Add custom Email Styling with less CSS

To apply customizations, follow these steps:

  1. Copy the file vendor/hyva-themes/magento2-email-module/src/view/frontend/web/css/email.less to the web/css/ directory of your active Hyvä theme.
  2. Additionally, copy the two files _email-extend.less and _email-variables.less from vendor/hyva-themes/magento2-email-module/src/view/frontend/web/css/source to the web/css/source/ directory of your Hyvä theme.

Your directory structure might look something like this:

app/design/frontend/Your_Vendor/Your_Theme/
|-- web/
|   |-- css/
|   |   |-- email.less
|   |   |-- source/
|   |       |-- _email-extend.less
|   |       |-- _email-variables.less

By copying these files into your Hyvä theme, you’ll be able to apply and customize styles for emails in your Magento 2 store. 

3. Last step is to run the below command on this path: app/design/frontend/Your_Vendor/Your_Theme/

php bin/magento setup:upgrade && php bin/magento c:f

Remember to clear your Magento cache after making these changes to ensure the new styles are applied. 

Add custom Email Styling for sales emails

To apply styling for sales emails, follow these steps:

  1. Copy the files _email.less and _module.less from the following path:
vendor/magento/theme-frontend-luma/Magento_Sales/web/css/source/

2. to your Hyvä theme directory:

app/design/frontend/Your_Vendor/Your_Theme/web/css/source/

Your directory structure should look like this:

app/design/frontend/Your_Vendor/Your_Theme/
|-- Magento_Sales/
|   |-- web/
|   |   |-- css/
|   |   |   |-- source/
|   |   |   |   |-- _email.less
|   |   |   |   |-- _module.less

After making CSS changes, please run the following command and check the preview.

php bin/magento setup:upgrade && php bin/magento c:f 

Customizing the Email Header

To customize the email header, add a Magento_Email/email/header.html template to your Hyvä theme.

For reference, here is the default header.html file from the Magento_Email module:

<!--
/**
* Copyright © Magento, Inc. All rights reserved.
* See COPYING.txt for license details.
*/
-->
<!--@subject {{trans "Header"}} @-->
<!--@vars {
"var logo_url":"Email Logo Image URL",
"var logo_alt":"Email Logo Alt Text",
"var logo_height":"Email Logo Image Height",
"var logo_width":"Email Logo Image Width",
"var template_styles|raw":"Template CSS"
} @-->


<!DOCTYPE html PUBLIC "-//W3C//DTD XHTML 1.0 Strict//EN" "http://www.w3.org/TR/xhtml1/DTD/xhtml1-strict.dtd">
<html xmlns="http://www.w3.org/1999/xhtml">
<head>
   <meta http-equiv="Content-Type" content="text/html; charset=utf-8" />
   <meta name="viewport" content="initial-scale=1.0, width=device-width" />
   <meta http-equiv="X-UA-Compatible" content="IE=edge" />
   <style type="text/css">
       {{var template_styles|raw}}


       {{css file="css/email.css"}}
   </style>
</head>
<body>
{{inlinecss file="css/email-inline.css"}}


<!-- Begin wrapper table -->
<table class="wrapper" width="100%">
   <tr>
       <td class="wrapper-inner" align="center">
           <table class="main" align="center">
               <tr>
                   <td class="header">
                       <a class="logo" href="{{store url=""}}">
                           <img
                               {{if logo_width}}
                                   width="{{var logo_width}}"
                               {{else}}
                                   width="180"
                               {{/if}}


                               {{if logo_height}}
                                   height="{{var logo_height}}"
                               {{/if}}


                               src="{{var logo_url}}"
                               alt="{{var logo_alt}}"
                               border="0"
                           />
                       </a>
                   </td>
               </tr>
               <tr>
                   <td class="main-content">
                   <!-- Begin Content -->

A logo image for emails can be placed into your theme at Magento_Email/web/logo_email.png.

For reference, the default email logo can be found at vendor/magento/module-email/view/frontend/web/logo_email.png.

To customize the email header, add a Magento_Email/email/footer.html template to your Hyvä theme.

For reference, here is the default footer.html file from the Magento_Email module:

<!--
/**
* Copyright © Magento, Inc. All rights reserved.
* See COPYING.txt for license details.
*/
-->
<!--@subject {{trans "Footer"}} @-->
<!--@vars {
"var store.frontend_name":"Store Name"
} @-->

                   <!-- End Content -->
                   </td>
               </tr>
               <tr>
                   <td class="footer">
                       <p class="closing">{{trans "Thank you, %store_name" store_name=$store.frontend_name}}!</p>
                   </td>
               </tr>
           </table>
       </td>
   </tr>
</table>
<!-- End wrapper table -->
</body>

OR

To add a custom footer, add a Magento_Email/email/footer.html template to your theme.

For reference, here is the default footer.html file from the Magento_Email module:

<!--
/**
* Copyright © Magento, Inc. All rights reserved.
* See COPYING.txt for license details.
*/
-->
<!--@subject {{trans "Footer"}} @-->
<!--@vars {
"var store.frontend_name":"Store Name",
"var url_about_us":"About Us URL",
"var url_customer_service":"Customer Service URL",
"var store_phone":"Store Phone",
"var store_hours":"Store Hours",
"var store.formatted_address|raw":"Store Address"
} @-->

                   <!-- End Content -->
                   </td>
               </tr>
               <tr>
                   <td class="footer">
                       <table>
                           <tr>
                               <td>
                                   {{depend url_about_us}}
                                   <p>
                                       {{trans '<a href=%url_about_us>About Us</a>' url_about_us=$url_about_us |raw}}
                                   </p>
                                   {{/depend}}
                                   {{depend url_customer_service}}
                                   <p>
                                       {{trans '<a href=url_customer_service>Customer Service</a>' url_customer_service=$url_customer_service |raw}}
                                   </p>
                                   {{/depend}}
                               </td>
                               <td>
                                   {{depend store_phone}}
                                       <p class="phone">
                                           {{trans '<a href="tel:%store_phone">%store_phone</a>' store_phone=$store_phone |raw}}
                                       </p>
                                   {{/depend}}
                                   {{depend store_hours}}
                                       <p class="hours">
                                           {{trans 'Hours of Operation:<br /><span class="no-link">%store_hours</span>.' store_hours=$store_hours |raw}}
                                       </p>
                                   {{/depend}}
                               </td>
                               <td>
                                   <p class="address">
                                       {{var store.formatted_address|raw}}
                                   </p>
                               </td>
                           </tr>
                       </table>
                   </td>
               </tr>
           </table>
       </td>
   </tr>
</table>
<!-- End wrapper table -->
</body>

New to Hyvä?? Learn about the Hyvä Theme from scratch!

Method 2: Add custom Email Styling with Tailwind.

1. Create a Folder for Tailwind CSS Files

In your theme directory (app/design/frontend/Your_Vendor/Your_Theme), create a new folder named web/tailwind/emails:

app/design/frontend/Your_Vendor/Your_Theme/
|-- web/
|   |-- tailwind/
|   |   |-- emails

2. Create a Custom PostCSS Configuration

Inside the “emails” folder, create a custom PostCSS configuration file named postcss.config.js:

app/design/frontend/Your_Vendor/Your_Theme/
|-- web/
|   |-- tailwind/
|   |   |-- emails/
|   |   |    |-- postcss.config.js

Open the postcss.config.js file and add the following content:

module.exports = {
  plugins: [
    require('postcss-import'),
    require('tailwindcss/nesting'),
    require('tailwindcss')({ config: './emails/tailwind.email.config.js' }),
  ]
};

3. Create Tailwind CSS Configuration: 

Inside the “emails” folder, create a file named tailwind.email.config.js:

app/design/frontend/Your_Vendor/Your_Theme/
|-- web/
|   |-- tailwind/
|   |   |-- emails/
|   |   |    |-- postcss.config.js
|   |   |    |-- tailwind.email.config.js

Open the tailwind.email.config.js file and add the following content:

const defaultConfig = require('../tailwind.config.js');

module.exports = {
  ...defaultConfig,
  corePlugins: {
    backdropOpacity: false,
    backgroundOpacity: false,
    borderOpacity: false,
    divideOpacity: false,
    ringOpacity: false,
    textOpacity: false
  }
};

4. Install postcss-cli Plugin

Run the following command to install the postcss-cli plugin as a development dependency on this app/design/frontend/Your_Vendor/Your_Theme/web/tailwind/emails path:

npm install --save-dev postcss-cli

5. Edit app/design/frontend/Your_Vendor/Your_Theme/web/tailwind/package.json:

Open your theme’s package.json file and add the following script under the “scripts” section:

"scripts": {
  "build-email": "npx postcss --config ./emails theme/email.css -o ../css/source/_theme.less",
}

6. Create email.css

Inside your web/tailwind/emails directory, create a file named email.css. This file will contain your Tailwind CSS styles for emails.

app/design/frontend/Your_Vendor/Your_Theme/
|-- web/
|  |-- tailwind/
|  |  |  |-- theme/
|  |  |  |   |-- email.css

Open the theme/email.css file and add the following content:

.footer {
   @apply bg-gray-300 p-5 border-2 border-solid border-gray-500;
}

7. Run the Build Script

Execute the build script using the following command on this path: app/design/frontend/Your_Vendor/Your_Theme/web/tailwind/emails

This command will trigger the PostCSS build process, applying Tailwind CSS styles to email.css and outputting the result to ../css/source/_theme.less.

8. Clear your Magento cache

Last step in Run the below command on this path app/design/frontend/Your_Vendor/Your_Theme/

php bin/magento setup:upgrade && php bin/magento c:f

Remember to clear your Magento cache after making these changes to ensure the new styles are applied. 

Conclusion

Customizing email templates in Hyva Theme allows you to create a unique and personalized experience for your customers. By following the steps outlined in this blog post, you can easily customize email templates, modify their content and layout, and apply them to your store. 

Remember to thoroughly test your customized email templates before making them live and keep them updated as your business evolves.

Read more resources on Hyva themes:

  1. Check out the InstaBuild for Hyvä Themes: Ready-made Hyva theme templates for faster storefront development!
  2. Hyva Themes Development – For Online Merchants
  3. Hyvä Theme Benefits that your store needs
  4. 10 Best Hyva Compatibility Extension Providers For Magento 2 Stores
  5. Hyvä VS PWA: Where to Invest?
  6. How a Slow Magento Website Can Cost You Advertising Dollars
  7. Mobile Commerce: How Hyva Themes Boost Mobile Conversions

There are multiple methods to integrate a custom font into the theme, each viable. 

However, if implemented without due diligence, it may adversely affect Google ranking metrics.

The impact on performance is contingent not solely on the inclusion method but also on factors such as server setup and caching configuration. Generally, the disparities in performance among the choices are minimal, occasionally scarcely perceptible within the typical Pagespeed fluctuations.

Tailwind configuration

Irrespective of the method employed for adding font files, it is imperative to utilize the font within your CSS files by specifying the font-family, such as font-family: ‘Inter’,.

To integrate it with Tailwind, include the font in your tailwind.config.js file. Refer to the Tailwind documentation for various methods to declare the font, especially for utilizing it as the default font-sans, for example:

theme: {
   extend: {
     fontFamily: {
       sans: ['Roboto', ...defaultTheme.fontFamily.sans]
    }
  }
}

To enable this functionality, it’s essential to import the defaultTheme object. Insert the following at the beginning of the file to accomplish this:

const defaultTheme = require('tailwindcss/defaultTheme');

Google fonts

When choosing a Google Font on fonts.google.com, an initial implementation is provided by default:

<head>
   <link rel="preconnect" href="https://fonts.googleapis.com">
   <link rel="preconnect"href="https://fonts.gstatic.com" crossorigin>
   <link href="https://fonts.googleapis.com/css2?family=Inter&display=swap" rel="stylesheet">

   <!-- Occasionally, certain Google Fonts may fail to load through the link tag, prompting the need to apply CSS directly through the 'src' attribute.-->
   <css src="https://fonts.googleapis.com/css2?family=Inter&display=swap" rel="stylesheet" type="text/css" />
</head>

You can incorporate a slightly modified version in your Magento_Theme/layout/default_head_blocks.xml file.

Please be aware that in the URL, the ampersand is represented as the HTML & notation.

<link href="https://fonts.googleapis.com/css2?family=Inter&display=swap" rel="stylesheet" type="text/css" src_type="url">

To include the preconnect resources, append a custom block to the head. 

For example:

<referenceBlock name="head.additional">
   <block class="Magento\Framework\View\Element\Text" name="custom.fonts">
       <arguments>
           <argument name="text" xsi:type="string">
               <![CDATA[
               <link rel="preconnect" href="https://fonts.googleapis.com">
               <link rel="preconnect" href="https://fonts.gstatic.com" crossorigin>
               ]]>
           </argument>
       </arguments>
   </block>
</referenceBlock>

New to Hyvä?? Learn about the Hyvä Theme from scratch!

Local font files

You have the flexibility to employ custom font files or utilize downloaded Google font files, incorporating them directly from your web server.

Utilize @font-face CSS rules to officially register the desired fonts and specify the precise location of the font files.

For Example:

@font-face {
   font-family: 'Inter';
   font-style: normal;
   font-weight: 400;
   font-display: swap;
   src: url(../fonts/Inter-Bold.woff2) format('woff2');
}

Each variant within the font family, distinguished by differences in font-weight and font-style, necessitates its individual declaration. It’s important to note that these declarations do not trigger automatic font loading. The font is loaded exclusively when referenced in the CSS through the ‘font-family’ property, such as ‘font-family: “Inter”;’ or by applying the corresponding Tailwind CSS class.

Although there were previously various formats for font files (.ttf, .otf, .eot), it is now advisable to exclusively utilize woff2 or woff files. 

To implement this, follow these steps:

  1. Place the font files into a ‘fonts/’ directory within your theme’s ‘web/’ folder.
  2. Integrate the @font-face styles into a CSS file, such as ‘web/tailwind/components/typography.css’.
  3. Ensure the accuracy of the file paths. Given that the generated CSS file will reside in ‘web/css,’ references to ‘../fonts/’ will correctly point to ‘web/fonts/’.

Preloading/preconnect

It is commonly advised to preload fonts utilized in the above-the-fold content to optimize delivery speed, minimizing the potential for layout shifts. 

To preload local fonts, incorporate the following snippet into the <head> section of your Magento_Theme/layout/default_head_blocks.xml file:

<font src="fonts/inter.woff2"/>

This action preloads the specified URL. When employing files containing multiple font formats, it is preferable to utilize preconnect. To implement this, you need to employ a custom block:

<referenceBlock name="head.additional">
   <block class="Magento\Framework\View\Element\Template"
          name="custom.fonts"
          template="Magento_Theme::head.phtml" />
</referenceBlock>

Where in head.phtml you can use something like:

<link rel="preconnect” href="<?= $block->getViewFileUrl('fonts/inter.woff2') ?>">

Diverse perspectives exist regarding the use of preloading. Conduct thorough testing in your environment to confirm that it yields the intended results.

That’s it !!

Thanks & Happy Coding!

Read more resources on Hyva themes:

  1. Check out the InstaBuild for Hyvä Themes: Ready-made Hyva theme templates for faster storefront development!
  2. Hyva Themes Development – For Online Merchants
  3. Hyvä Theme Benefits that your store needs
  4. 10 Best Hyva Compatibility Extension Providers For Magento 2 Stores
  5. Hyvä VS PWA: Where to Invest?
  6. How a Slow Magento Website Can Cost You Advertising Dollars
  7. Mobile Commerce: How Hyva Themes Boost Mobile Conversions

The Hyva theme for Magento 2 is a popular choice for creating visually appealing and user-friendly online stores. One of the key features of the Hyva theme is its flexibility and customization options, including the ability to add and modify SVG icons. 

In this blog post, we will provide a comprehensive guide on how to add and modify SVG icons in the Hyva theme.

The icon set can be configured with di.xml or by extending the class. The module ships with Heroicons and two matching view models:

  • HeroiconsSolid
  • HeroiconsOutline

You can find and preview these icons by visiting the website: https://v1.heroicons.com/

Here’s how to locate the icons from Heroicons. 👇

Check the SVG file name and open vendor/hyva-themes/magento2-theme-module/src/ViewModel/Heroicons.php file. Then, match the file name with the corresponding function and utilize the function as needed.

How to use SVG Icons in the template using View Models in Hyvä

To add SVG icons to the Hyva theme, you need to follow a few simple steps. Let’s walk through the process:

  1. Require one of the Heroicons view models in your template:
// For Heroicons Outline 
/** @var Hyva\Theme\ViewModel\HeroiconsOutline $heroicons */
$heroicons = $viewModels->require(\Hyva\Theme\ViewModel\HeroiconsOutline::class);


//For Heroicons Solid
/** @var Hyva\Theme\ViewModel\HeroiconsSolid $HeroiconsSolid */
$heroiconsSolid = $viewModels->require(\Hyva\Theme\ViewModel\HeroiconsSolid::class);
  1. Then render the icons like this:
<?= $heroicons->arrowLeftHtml('w-8 h-8') ?>
  1. All parameters are optional, and change the class , width and height attributes of the SVG element, or add additional HTML attributes. To render an SVG without a width and a height attribute, pass null as the second and third arguments.
<?= $heroicons->arrowLeftHtml('w-8 h-8', null, null) ?>

New to Hyvä?? Learn about the Hyvä Theme from scratch!

How to use SVG icons in Magento admin CMS content in Hyvä

The Hyvä theme module introduces an icon directive, enabling the rendering of any SVG icon in filtered content, such as CMS blocks or pages.

To add SVG icons in Magento CMS content, follow these few simple steps below.

{{icon "heroicons/solid/shopping-cart" classes="w-6 h-6" wid	th=12 height=12}}

Custom icons stored in web/svg/ such as app/design/frontend/[Vendor]/[Theme]/web/svg/cart.svg can be referenced as

{{icon "cart" classes="w-6 h-6" width=12 height=12}}

How to use Overriding heroicons in your theme

The SVGs are stored in web/svg/heroicons/outline and web/svg/heroicons/solid. Magento’s theme fallback mechanism applies, allowing you to override these files in your theme.

To use the custom icons you will need to create a subdirectory in the theme like “Hyva_Theme/web/svg/heroicons/outline” and “Hyva_Theme/web/svg/heroicons/solid” and place your SVG icons there.

Note: Ensure that the SVG file name matches the Hyva vendor icon file name.

To find the SVG icon name, go to the icon function and follow the pattern as shown in the example: userCircleHtml() corresponds to user-circle.svg. You can find this icon from vendor/hyva-themes/magento2-theme-module/src/view/frontend/web/svg/heroicons/outline/user-circle.svg path.

<?= $heroicons->userCircleHtml(
    'h-6 w-6 text-slate-800 hover:text-black',
    32,
    32,
    ['aria-hidden' => 'true']
); ?>
hyva vendor iconOld Icon
hyva theme old icon
Updated Icon
hyva theme updated icon

How to add new heroicons in your theme

To use the icons, you can instantiate the view model, and to render the icon, utilize the renderHtml function with the icon name as one of the parameters or use the magic method matching the desired icon name.

To add a new SVG: Go to Hyva_Theme/web/svg/heroicons/solid OR Hyva_Theme/web/svg/heroicons/outline path and add the SVG file here.

Note: When using the same SVG in multiple places with different colors, please ensure to include fill=”none” and stroke=”currentColor” attributes in the <svg> tag.

$heroicons->renderHtml('magic-wand', $class, $width, $height) // either
<?= $heroicons->renderHtml('search', 'text-black', 24, 24) ?>
$heroicons->magicWandHtml($class, $width, $height) // or

Accessibility

If you use an icon for decorative purposes, hide it from assistive technologies (ATs), using aria-hidden=”true”.

Alternatively, if both of the following conditions are met:

  1. No role=”img” attribute is present.
  2. No aria-hidden=”true” attribute is present.

The \Hyva\Theme\ViewModel\SvgIcons will add an <title>Icon Name</title> node within the <svg> tag, positioned before the <path>. This ensures that assistive technologies can deliver relevant information about the icon to the visitor.

Read more resources on Hyva themes:

  1. Check out the InstaBuild for Hyvä Themes: Ready-made Hyva theme templates for faster storefront development!
  2. Hyva Themes Development – For Online Merchants
  3. Hyvä Theme Benefits that your store needs
  4. 10 Best Hyva Compatibility Extension Providers For Magento 2 Stores
  5. Hyvä VS PWA: Where to Invest?
  6. How a Slow Magento Website Can Cost You Advertising Dollars
  7. Mobile Commerce: How Hyva Themes Boost Mobile Conversions

In this blog, we will provide an overview of how to create a custom module/extension in the Hyva Theme that is compatible with Hyva.

The module that is based on the Luma or Blank theme must be compatible with the Hyva theme. Additionally, it is important to ensure that a custom-created module is also compatible with the Hyva theme when working with Hyva.

Before we begin discussing how to make a custom module/extension Hyva-compatible, let’s first understand what Hyva compatibility means.

Hyva does not support code based on jQuery, Knockout, or any third-party scripts that rely on jQuery. Additionally, styling using Less is not supported. 

To ensure Hyva theme compatibility, it is essential to make the jQuery or Knockout code compatible with Hyva by rewriting it in Alpine.js or native JavaScript. Moreover, the frontend visualization should be designed using TailwindCSS.

So, next, let’s explore the prerequisites required to work with a Hyva-compatible module in Magento 2. 

Please check the following prerequisites:

Now, a question arises in your mind: How is the process of creating compatibility for third-party modules different from creating a custom module with Hyva compatibility? 

The answer should include a couple of points as outlined below.

1. Naming Conventions

  • Third-party module naming conventions include the Hyva namespace along with the original module namespace and module name. For example:
    • Original: Aureatelabs_HyvaCompatibleModule
    • Compat Module: Hyva_AureatelabsHyvaCompatibleModule
  • But in the case of creating a custom module with the Hyva theme, there is no need for the Hyva namespace in naming conventions. For example:
    • Consider your own compatibility module, such as: Aureatelabs_HyvaCompatibleModule

2. Automatic Template Overrides

  • When making a third-party module compatible, your modules must be registered as compatibility modules using frontend/di.xml. This registration allows for overriding templates without the need to declare layout XML files in the compatibility module.
  • In custom module/extension development, there is no need to register it using frontend/di.xml. This is because your module focuses on specific functionality and contains its own files.

Let’s begin by creating a simple custom module/extension that is compatible only with Hyva, this is similar to creating modules in default Magento. 

New to Hyvä?? Learn about the Hyvä Theme from scratch!

Steps to Create a Custom Module/extension in Hyva Theme

In this example, we are going to create a module that displays a static list of points about products on the product view page using Alpine.js and Tailwind CSS.

Step 1: Begin by creating the module directory ‘Aureatelabs/CustomHyvaCompatibleModule.’ in the ‘app/code/’ directory.

Step 2: Next, create the ‘registration.php’ file.

<?php
\Magento\Framework\Component\ComponentRegistrar::register(
   \Magento\Framework\Component\ComponentRegistrar::MODULE,
   'Aureatelabs_CustomHyvaCompatibleModule',
   __DIR__
);

Step 3: Create a ‘module.xml’ file in the ‘app/code/Aureatelabs/CustomHyvaCompatibleModule/etc/’ directory.

<?xml version="1.0" ?>
<config xmlns:xsi="http://www.w3.org/2001/XMLSchema-instance" xsi:noNamespaceSchemaLocation="urn:magento:framework:Module/etc/module.xsd">
   <module name="Aureatelabs_CustomHyvaCompatibleModule" setup_version="1.0.0" />
</config>

Step 4: Create the empty ‘product-points.phtml’ file in the path ‘app/code/Aureatelabs/CustomHyvaCompatibleModule/view/frontend/templates/’ directory. Insert the following code into it:

<?php
use Magento\Framework\View\Element\Template;

/** @var Template $block */
?>

<p>Your content goes here.</p>

Step 5: Now, create the layout file ‘hyva_catalog_product_view.xml’ in the ‘app/code/Aureatelabs/CustomHyvaCompatibleModule/view/frontend/layout/’ directory, and insert the following code into it:

Here, we’ve utilized the ‘hyva’ prefix in the ‘hyva_catalog_product_view.xml’ layout file, as we intend to showcase this layout content exclusively for the Hyva theme. 

Alternatively, you can use the ‘catalog_product_view.xml’ layout file without the ‘hyva’ prefix, but be aware that this layout will be applied to both the Hyva theme and Luma-based themes.

<?xml version="1.0"?>
<page xmlns:xsi="http://www.w3.org/2001/XMLSchema-instance" layout="1column" xsi:noNamespaceSchemaLocation="urn:magento:framework:View/Layout/etc/page_configuration.xsd">
   <body>
       <referenceContainer name="product.info.main">
           <block class="Magento\Framework\View\Element\Template" name="Aureatelabs_CustomHyvaCompatibleModule_option_list" template="Aureatelabs_CustomHyvaCompatibleModule::product-points.phtml" after="product.info.main" />
       </referenceContainer>
   </body>
</page>

Step 6: Now, let’s modify the ‘product-points.phtml’ file to include Hyva compatibility modules such as Alpine.js and Tailwind CSS to finalize the custom Hyva compat module.

First, add the Alpine.js stuff. Please insert the following code into the ‘product-points.phtml’ file:

<?php
use Magento\Framework\View\Element\Template;

/** @var Template $block */
?>

<div x-data="customHyvaCompactModule()">
   <template x-if="has_product_points">
       <ul>
           <template x-for="point in product_points">
               <li x-text="point"></li>
           </template>
       <ul>
   </template>

   <template x-if="!has_product_points">
       <p><?= __("No product points list exists.") ?></p>
   </template>
</div>

<script>
   function customHyvaCompactModule() {
       return {
           has_product_points: false,
           product_points: [
               "This product has custom points-1.",
               "This product has custom points-2.",
               "This product has custom points-3."
           ],
           init: function() {
               this.has_product_points = this.product_points.length > 0;
           }
       }
   }
</script>

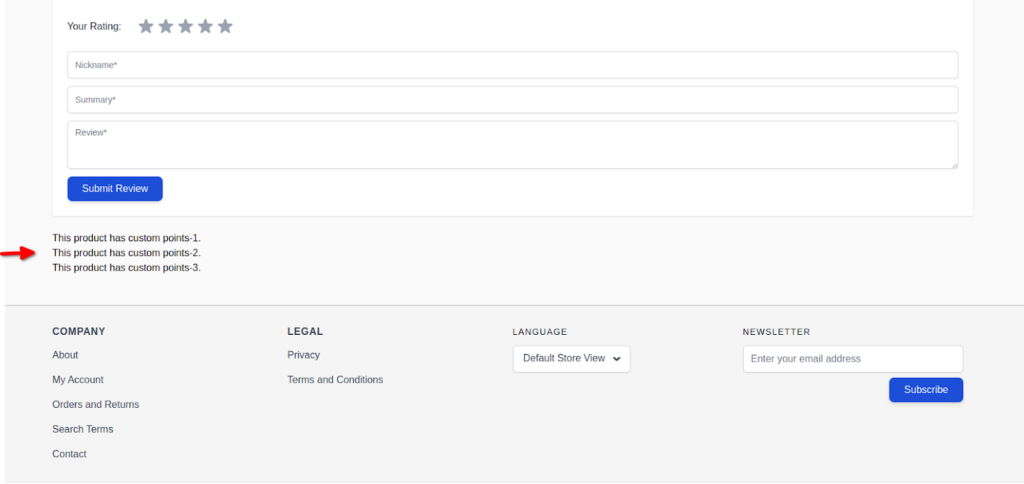
This code displays as shown in the screenshot at the end of the product view page.

custom Hyva compat product pagemodule

Step 7: The final steps are to add Tailwind CSS. Please replace the code below with the ‘product-points.phtml’ file:

<?php
use Magento\Framework\View\Element\Template;


/** @var Template $block */
?>


<div class="mx-auto py-6 items-center">
   <div class="container mx-auto flex pt-6 pb-3 mb-6 md:flex-row border-b-2 border-gray-300">
       <h2 class="text-gray-900 text-2xl title-font font-base text-center md:text-left w-full">
           Product Custom Points, created with the Custom Compatible Hyva Module.
       </h2>
   </div>
   <div x-data="customHyvaCompactModule()" class="card w-full">
       <template x-if="has_product_points">
           <ul>
               <template x-for="point in product_points">
                   <li x-text="point" class="col label py-2 text-left text-gray-700 font-normal"></li>
               </template>
           <ul>
       </template>


       <template x-if="!has_product_points">
           <p class="col label py-2 text-left text-red-700 font-normal">
               <?= __("No product points list exists.") ?>
           </p>
       </template>
   </div>
</div>


<script>
   function customHyvaCompactModule() {
       return {
           has_product_points: false,
           product_points: [
               "This product has custom points-1.",
               "This product has custom points-2.",
               "This product has custom points-3."
           ],
           init: function() {
               this.has_product_points = this.product_points.length > 0;
           }
       }
   }
</script>

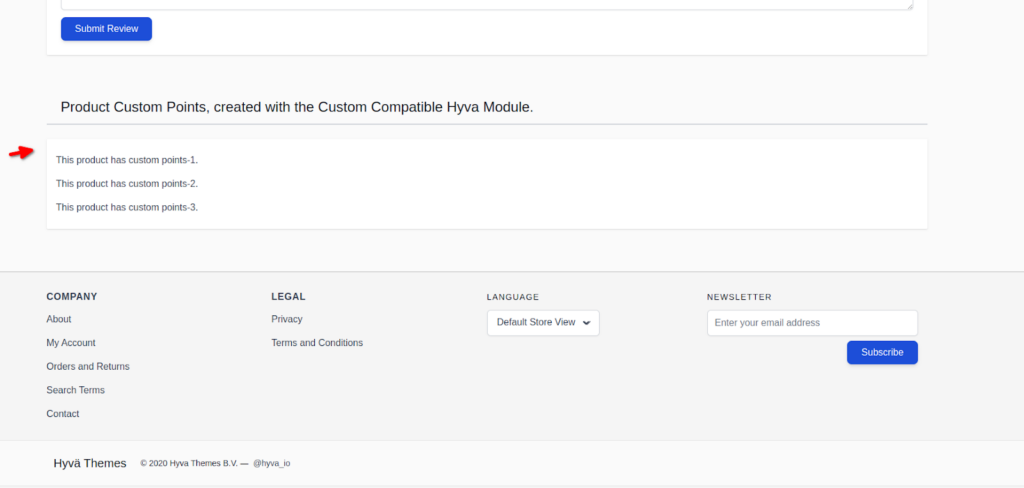
Here we’ve added some Tailwind CSS classes, and it is now displayed as nicely as shown in the screenshot below.

add custom product in Hyva module

By wrapping this module with Alpine.js and Tailwind CSS, we generate lightweight sections exclusively for the Hyva base theme.

This process is explained in detail in this blog through the creation of a custom Hyva-compatible module or extension. Hope this guide was helpful. Let me know if you have any questions in the comment section. I will be happy to answer! 🙂

Read more resources on Hyva themes:

  1. Check out the InstaBuild for Hyvä Themes: Ready-made Hyva theme templates for faster storefront development!
  2. Hyva Themes Development – For Online Merchants
  3. Hyvä Theme Benefits that your store needs
  4. 10 Best Hyva Compatibility Extension Providers For Magento 2 Stores
  5. Hyvä VS PWA: Where to Invest?
  6. How a Slow Magento Website Can Cost You Advertising Dollars
  7. Mobile Commerce: How Hyva Themes Boost Mobile Conversions

A Compat module is installed and used to override a third-party module’s template and frontend files, something not fully supported out of the box in Magento 2’s theme fallback system.

Suppose you have an extension that works in the default Magento theme but when it comes to hyva, it stops working. In this case, we will need to create a Hyva compatibility extension to make it work.

Let’s understand why it stopped working. Suppose you have a free shipping bar on the top of the page and there are many JavaScript/jQuery works on it. For example, hide/show bar, hide bar automatically after a while, Close bar upon click, etc…

Hyva does not support jQuery and RequireJS. This is the reason we need to create a compatibility extension in Hyva.

Steps to Create a Hyva Compatibility Extension

So, now let’s create a compatibility extension.

Step 1: Install the Compat Module Fallback repo

We would need to install the Compat Module Fallback repo first composer require hyva-themes/magento2-compat-module-fallback. It is recommended to install compat module via composer.

Step 2: DI Configuration

The initial configuration is automatically included in the compatibility module skeleton.

Create an extension the same as we do in the default Magento theme. Now create di.xml in etc/frontend/di.xml and define the structure as given below:

<type name="Hyva\CompatModuleFallback\Model\CompatModuleRegistry">
	<arguments>
    	<argument name="compatModules" xsi:type="array">
        	<item name="orig_module_map" xsi:type="array">
            	<item name="original_module" xsi:type="string">Orig_Module</item>
            	<item name="compat_module" xsi:type="string">Hyva_OrigModule</item>
        	</item>
    	</argument>
	</arguments>
</type>

New to Hyvä?? Learn about the Hyvä Theme from scratch!

Step 3: Overriding a compatibility template in a theme

Now override the template as per the directory structure.

For Example:

Template declaration:

  • Mirasvit_Gdrp::cookie_bar.phtml

Original Module Template:

  • Mirasvit/Gdpr/view/frontend/templates/cookie_bar.phtml

Compat Module Template:

  • Hyva/MirasvitGdpr/view/frontend/templates/cookie_bar.phtml

Theme Override:

  • app/design/frontend/Vendor/theme/Mirasvit_Gdpr/templates/cookie_bar.phtml

Step 4: Adding a module to the tailwind purge config

Create the tailwind.config.js file at view/frontend/tailwind/tailwind.config.js and add the below content.

Any paths are specified relative to this file. For example, to include the modules *.phtml templates into the tailwind config, use the code below:

module.exports = {
  purge: {
	content: [
  	'../templates/**/*.phtml',
	]
  }
}

Step 5: Adding a module to the tailwind CSS source

If there is custom CSS needed in your extension then, create the tailwind-source.css file at view/frontend/tailwind/tailwind-source.css.

Note: If you are creating a fresh extension/module then you don’t need to create Compat module/extension.

Read more resources on Hyva themes:

  1. Check out the InstaBuild for Hyvä Themes: Ready-made Hyva theme templates for faster storefront development!
  2. Hyva Themes Development – For Online Merchants
  3. Hyvä Theme Benefits that your store needs
  4. 10 Best Hyva Compatibility Extension Providers For Magento 2 Stores
  5. Hyvä VS PWA: Where to Invest?
  6. How a Slow Magento Website Can Cost You Advertising Dollars
  7. Mobile Commerce: How Hyva Themes Boost Mobile Conversions

Grow your online business like 3,998 subscribers

    * This site is protected by reCAPTCHA and the Google Privacy Policy and Terms of Service apply.
    envelope

    Thank You!

    We are reviewing your submission, and will be in touch shortly.