How to Create Hyva Admin Grid?
Chapters Close

Creating an Admin grid using the Magento 2 UI component is too lengthy and complex. To overcome these issues Hyva team has launched the Hyva admin Grid module. It is open source now.

Hyva Admin is a Magento 2 module that offers a new way to create admin grids. It improves the developer experience while creating new grids. Existing grids and forms are not affected by installing this module they remain unchanged.

Requirements

  • Magento Community Edition: 2.4.0 or higher version
  • PHP >= 7.3

Installation of Hyva Admin Module

To create a custom Hyva admin grid, you have to install the Hyva admin module using the following command:

composer require hyva-themes/module-magento2-admin

You can also install the Hyva Admin test module to check the demo of the Hyva admin grid using the following command:

composer require hyva-themes/module-magento2-admin-test

Please perform deployment after installing the packages.

New to Hyvä?? Learn about the Hyvä Theme from scratch!

Prerequisites for a Grid

Please create a new Magento 2 module or use the existing one. Make sure you have a custom admin route available. For creating the admin route you can check this blog.

Please create the admin layout XML file. I have created this one: app/code/Aureatelabs/HyvaAdminGrid/view/adminhtml/layout/aureatelabs_product_grid.xml file, where 

  • aureatelabs is my admin router 
  • product is my controller name and 
  • grid is my action name.

To load alpine.js and tailwind you need to add the layout update handle hyva_admin_grid.

Please add the block for the custom Hyva Grid with the Hyva\Admin\Block\Adminhtml\HyvaGrid class and their name should be the name of the grid in the content area using referenceContaine as per the below screenshot.

Grid Block

Please create the Grid XML file in this location: app/code/Aureatelabs/HyvaAdminGrid/view/adminhtml/hyva-grid/aureatelabs-products-grid.xml. The grid file name should be the name of the block that we specified in the aureatelabs_product_grid.xml.

The XML file is declared with the <grid> root element with the hyva-grid.xsd for more references please check the following code.

<?xml version="1.0"?>
<grid xmlns:xsi="http://www.w3.org/2001/XMLSchema-instance" xsi:noNamespaceSchemaLocation="urn:magento:module:Hyva_Admin:etc/hyva-grid.xsd">
</grid>

Grid Data Source Processors

Now grid needs to fetch data for displaying. Hyva admin grids support the following grid source types. For more references, you can check here.

  • Array Grid Source Type: To set an array provider, use the <arrayProvider> element
  • Repository Grid Source Type: To set a repository source type, use the <repositoryListMethod> element
  • Collection Grid Source Type: collection source type specified using the <collection> element
  • Query Grid Source Type: The query source type allows configuring a SQL select query in the grid XML using the <query> element

I have gone with the Repository Grid Source Type so I have declared the source with the repository list method. For more references please check the following code. 

I am creating the grid of the product data so I am fetching the data from the \Magento\Catalog\Api\ProductRepositoryInterface::getList method like the below example. 

Need to put this code into the app/code/Aureatelabs/HyvaAdminGrid/view/adminhtml/hyva-grid/aureatelabs-products-grid.xml

<source>
<repositoryListMethod>\Magento\Catalog\Api\ProductRepositoryInterface::getList</repositoryListMethod>
</source>

And finally, after following all of the above steps, the grid output looks like this:
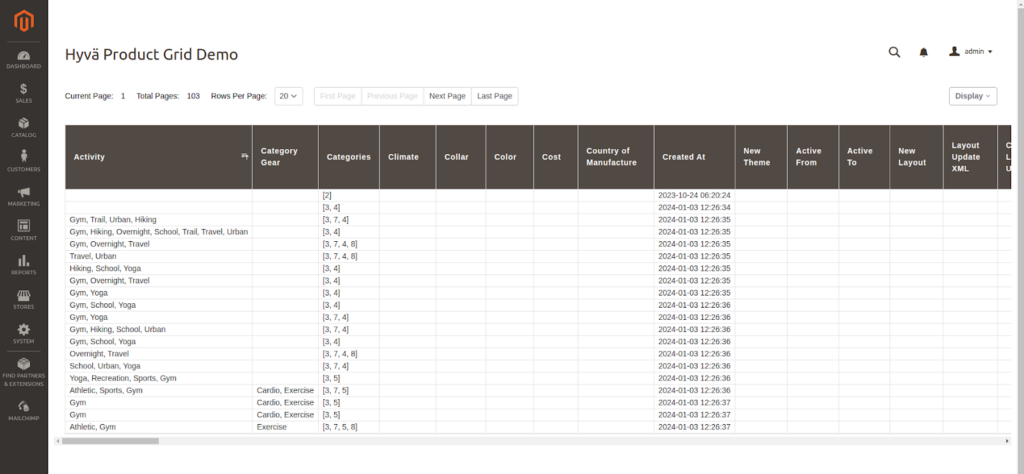
Hyva product grid demo output

If you want to create a grid for a custom table then you need to create a custom repository to use the Search Criteria in the custom module. For more references please check this blog.

Columns

Hyva admin tries to extract the available columns from the Grid source. Without any configuration, all columns are shown. But it is good to configure the grid column order-wise.

To specify which columns to display, use the <columns><include/></columns> tags. For more references please check the following code:

<columns>
       <include>
           <column name="id"/>
           <column name="sku"/>
           <column name="name"/>
       </include>
</columns>

Please put the below code into the app/code/Aureatelabs/HyvaAdminGrid/view/adminhtml/hyva-grid/aureatelabs-products-grid.xml inside the  <grid> root element 

It will display only the id and SKU and Name columns on the grid. For more references please check the following screenshot:
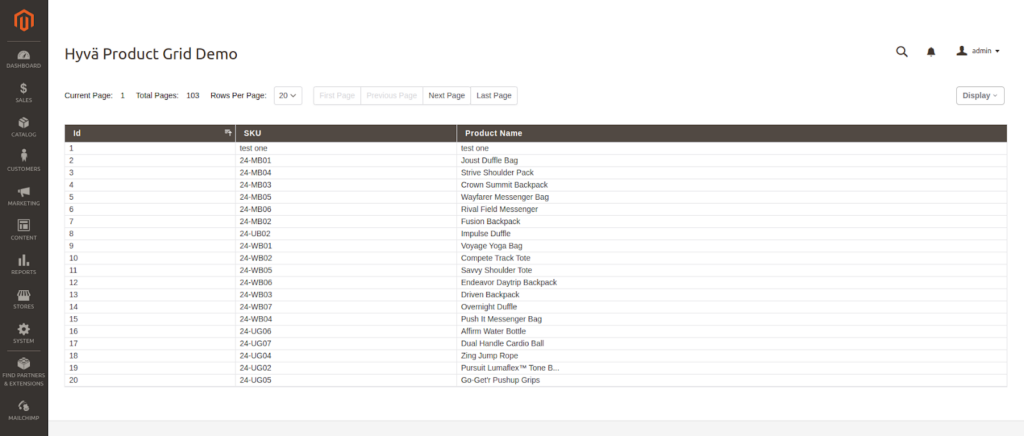
Hyva SKU and product name display

To hide columns, use the <columns><exclude/><columns> branch. For more references please check the following code:

<columns>
    <exclude>
        <column name="category_gear"/>
    </exclude>
</columns>

There are the following attributes that can be used in the include column. For more references, you can check this blog.

  • initiallyHidden
  • label
  • name
  • renderAsUnsecureHtml
  • rendererBlockName
  • sortable
  • sortOrder
  • source
  • template
  • type

Configuring Row Action

Each row has more than one action like delete row or edit row. We need to configure it.

Actions are configured in a <actions> tag. For more references please check the following code or this blog:

<actions idColumn="id">
       <action id="edit" label="Edit" url="catalog/product/edit"/>
</actions>

idColumn will pass the id with the action URL. You have to add the id column’s field name there.

All actions are displayed in the action column with the action links. Here in edit action, I have added the catalog/product/edit URL it will redirect that particular product edit form.

To make grid rows clickable, You can assign the rowAction=”edit” to the columns tag.
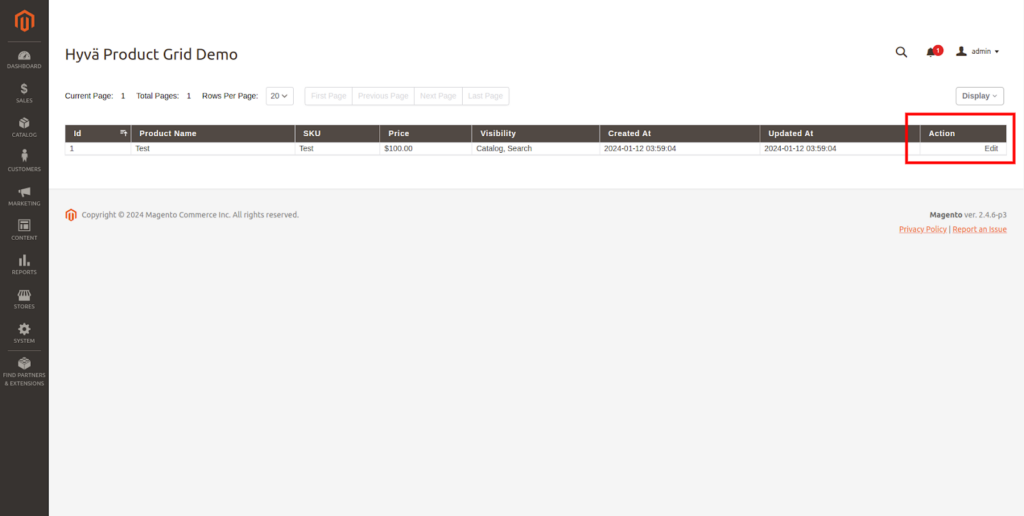
Configuring Row Action

Configuring Mass Action

Mass action allows the user to select multiple records and perform operations like deleting records, updating records, etc. Mass Action is configured in a <massActions> tag.

For more references please check the following code or this blog:

<massActions idColumn="id" idsParam="ids">
<action id="delete" label="Delete" url="*/massAction/delete" requireConfirmation="true"/>
</massActions>
  • In idColumn attribute, you have to pass your id selector field.
  • You have to create the controller for deleting the records with the aureatelabs/massAction/delete path.
  • The requireConfirmation attribute will take the confirmation regarding whether the mentioned operation is performed or not.

For more references please check the following screenshot:

Hyva Filtering Section

Pagination

Hyva admin grids use a default page size but we can change it to as per our requirements using the  <navigation><pager/></navigation> branch. 

For more references please check the following code:

<navigation>
    <pager>
        <defaultPageSize>5</defaultPageSize>
        <pageSizes>2,5,10</pageSizes>
    </pager>
</navigation>

Where,

  • defaultPageSize attribute will take input for how many records you want to display in the grid when the page is loaded.
  • pageSizes attribute will take input for how many records you want to show in the grid. 

Sort Order

The default sort order can be configured in the <navigation><sorting/></navigation> part of a grid XML file. 

For more references please check the following code:

<sorting>
    <defaultSortByColumn>created_at</defaultSortByColumn>
    <defaultSortDirection>desc</defaultSortDirection>
</sorting>
  • The above code will fetch the latest products.
  • Users can update the sort order by clicking on the column titles.

Filtering

Filtering is used to get the searched data. It is the main part of the Grid.

In Hyva Admin Grid, By default columns are not filterable. We need to make the column filterable. Using  <navigation><filters/></navigation> section of a grid XML file. 

For more references please check the following code:

<filters>
            <filter column="sku"/>
            <filter column="name"/>
            <filter column="id"/>
</filters>
  • The above code enabled filtering for the SKU, name, and id fields. For more references please check the following screenshot.
  • The filter is applied depending on the type of column. For the int column, it will apply from and to. 
Hyva Filtering Section

Buttons

To add buttons above the grid, The Buttons tag will be used. It is added by the <navigation><buttons/></navigation> section of a grid XML file. 

For more references please check the following code:

<buttons>
<button id="add" label="Add" url="catalog/product/new/set/4/type/simple"/>
</buttons>

The above code is for creating a new product. For more references please check the following screenshot:

Hyva Navigation Buttons

Exports

Export functionality allows admin users to export the grid data. It can be filtered/sorted data.

Hyva admin grid supports the following export formats:

  • CSV
  • XML
  • XLSX

It is added by the <navigation><exports/></navigation> section of a grid XML file. For more references please check the following code:

<exports>
        <export type=”csv” label=”Export as CSV”/>
        <export type=”xml” label=”Export as XML” />
        <export type=”xlsx” label=”Export as XLSX”/>
</exports>

For more references please check the following screenshot:

Hyva Navigation Export

In conclusion, you can use the Hyva admin grid to create admin grids easily and quickly.

Read more resources on Hyva themes:

  1. Check out the InstaBuild for Hyvä Themes: Ready-made Hyva theme templates for faster storefront development!
  2. Hyva Themes Development – For Online Merchants
  3. Hyvä Theme Benefits that your store needs
  4. 10 Best Hyva Compatibility Extension Providers For Magento 2 Stores
  5. Hyvä VS PWA: Where to Invest?
  6. How a Slow Magento Website Can Cost You Advertising Dollars
  7. Mobile Commerce: How Hyva Themes Boost Mobile Conversions

In this article, I am trying to explain how to upgrade Hyvä themes. Hyvä Themes offers a brand-new Magento frontend built from scratch, using the Magento templating system but written entirely from the ground up.

Hopefully, you have already gone through our blog on ‘A Step-by-Step Guide to Installing Hyva Themes in Magento 2.’ So let’s start now by exploring how to upgrade Hyva themes.

Requirements

  • Already installed the Hyva theme with a previous version on Magento 2.4.3 CE or higher.
  • PHP 7.4, 8.1 or 8.2

Main Hyva Theme Components

Hyvä has two main components, as outlined below:

  1. hyva-themes/magento2-default-theme
  2. hyva-themes/magento2-theme-module

The default theme components contain templates, styles, and layout instructions that represent the frontend presentation.

Obviously, when you want to customize templates, layouts, etc., in your new theme, then this customization is done based on the method outlined below.

  • First, find any specific files that you want to customize or change from the default theme (vendor/hyva-themes/magento2-default-theme/ folder)
  • Then, you copy this file and paste it into your theme by following the same directory path.
  • And then, you make your changes to these files in your custom theme.

So, the files that are not customized are loaded from the default theme through the Magento theme fallback.

So, in that way, the customization of Hyva theme files takes place. The reason I am discussing theme customization is that the more files are customized, the more challenging an upgrade becomes.

And usually, you only have to update customized templates with DOM structure changes that are relevant or are breaking some new feature. A diff will allow you to quickly scan the changes made to a file and move on to the next if only class name changes were made.

The theme-module components provide utilities and necessary infrastructure code used by all Hyvä-based themes.

The files within the theme module are seldom customized when creating a custom theme. Additionally, Hyva makes significant efforts to avoid backward compatibility-breaking changes for the theme module.

It means that updating the theme module to the latest version is generally considered safe, as Hyva strives to maintain backward compatibility and minimize the risk of breaking changes.

Steps to Upgrade Hyva Themes

Step 1: Check version-specific upgrade notes in the Hyva docs here. If there are any backward incompatible changes, they will be listed there.

Here, you can review the bug fixes, improvements, and other instructions related to upgrading the Hyva theme.

Step 2: Additionally, you can check the changelog for the new version of both the theme module and the default theme separately either in the Hyva docs or on GitLab.

For the default theme, you can find the changelogs here. And for the theme module, you can find the changelogs here

Step 3: Upgrade the theme module.

To upgrade Hyva, you need to update the default theme using the following command.

  • composer update hyva-themes/magento2-default-theme
composer update hyva-themes

Also, you can update the theme module using the following command:

  • Composer update hyva-themes/magento2-theme-module

Step 4: Furthermore, as the next step, make sure to update any 3rd-party extensions related to the Hyva theme, with extension names starting with the ‘hyva’ prefix, to their latest versions using the composer update <composer-package-name> command.

Here is a list of some commonly used extensions for your reference:

  1. hyva-themes/magento2-compat-module-fallback
  2. hyva-themes/magento2-luma-checkout
  3. hyva-themes/magento2-cms-tailwind-jit
  4. hyva-themes/magento2-theme-fallback

Step 5: And you have successfully upgraded the Hyva theme. Now, ensure that your customizations and custom code are compatible with the latest version of the Hyva theme.

In this last step, you need to review and make corrections in your custom theme files that were derived and customized from the Hyva default theme component. Ensure they align with the new Hyva theme changes or deprecated functionality, including any potential breaking changes like Alpine.js related modifications, etc.

Additionally, you also need to make corrections and changes in the custom files you have created within your custom theme. Apply the necessary adjustments according to the new Hyva theme changes or deprecated functionality, such as Alpine.js related modifications, etc.

In your mind, a question may arise about how to check for changes or deprecations that come with upgrading the Hyva theme. I have addressed this in the  Hyva Themes Upgrade Process Step-2, where I’ve provided information on checking changelogs.

You can find relevant links there to review the updates and understand any modifications or deprecations introduced with the upgraded Hyva theme.

Learn about the Hyvä Theme from scratch!

Steps to Check How Many Files Are Affected with Hyva Theme Update

Additionally, another option to track changes is by using the following steps to check how many files are changed or added, and what specific modifications have been made:

Step 1: Create a new directory anywhere or in the root of the project directory. In my example, I have named the directory “CheckHyvaUpdateChanges.

directory folders in hyva theme

Step 2: Then, copy the old Hyva theme folder from the path “vendor/hyva-themes” (where “old” refers to the Hyva theme folder before the upgrade. In my case this is the Hyva theme version 1.2.9) and paste it into the newly created directory “CheckHyvaUpdateChanges”.

Hyva theme folder

Step 3: Then, run the git init command from the newly created directory CheckHyvaUpdateChanges.

newly created directory for hyva theme

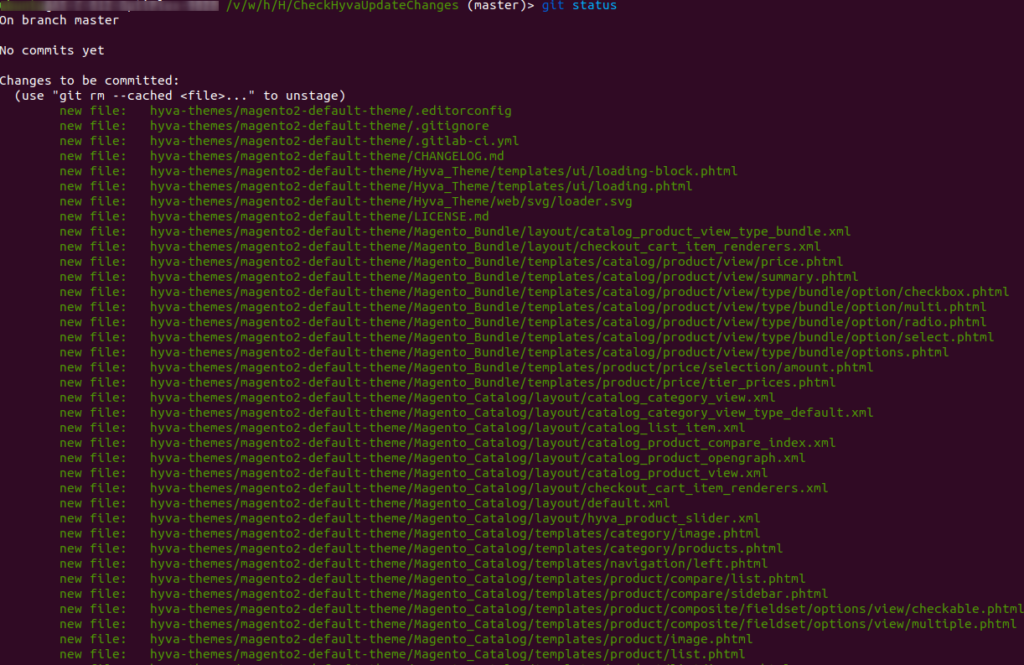
Step 4: Then, run the git add . command from the same directory “CheckHyvaUpdateChanges.”. This command will add all the old Hyva theme files to the Git index. You can check the status of these files using the git status command.

git add command for hyva theme
git status command hyva theme

Step 5: Now delete the “hyva-themes” directory from the “CheckHyvaUpdateChanges” directory. Now this directory contains only the “.git” directory

delete hyva themes directory

Step 6: Now, copy the “vendor/hyva-themes” folder again and paste it into the “CheckHyvaUpdateChanges” directory. However, in this step, the hyva-themes folder reflects the Hyva theme after the upgrade (in this my case the Hyva theme version is 1.3.5).

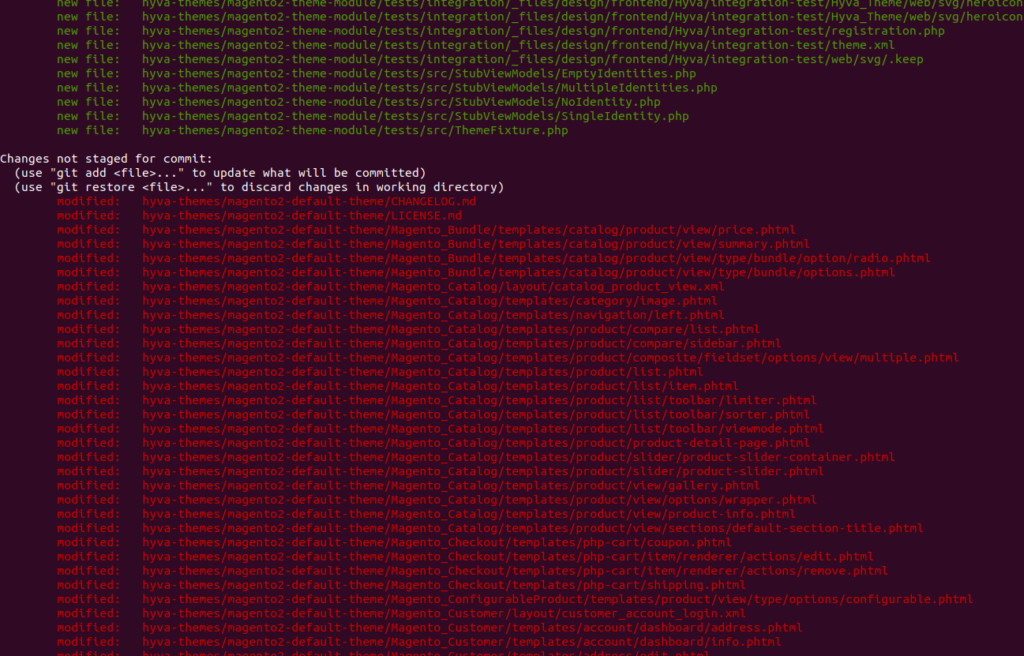
Step 7: Finally, you can run the git status command to check the modified, deleted, or newly added files resulting from the upgrade of the Hyva theme. This will provide you with a clear overview of the changes made during the upgrade process.

git status command to check hyva theme

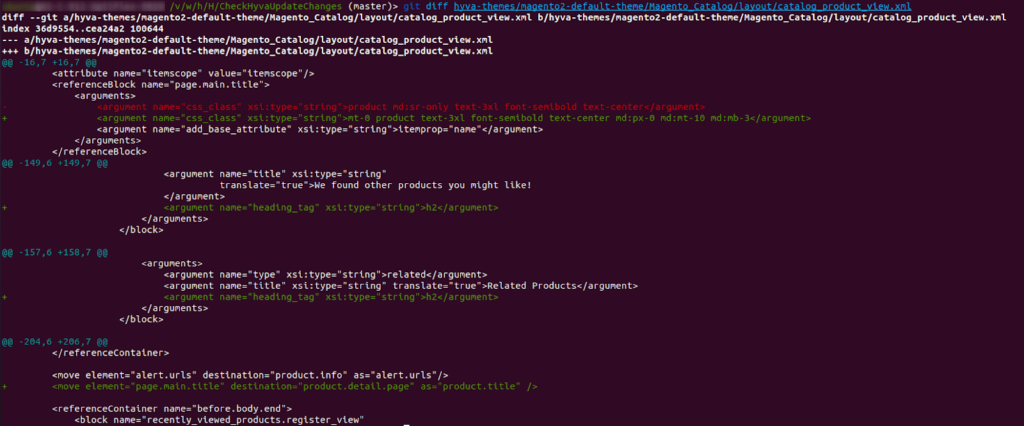
Step 8: And finally, you can check the changes nicely using the git diff <file path> command.

For example, git diff hyva-themes/magento2-default-theme/Magento_Catalog/layout/catalog_product_view.xm.

git command for file path in hyva theme

So, following the above steps, you can find the newly updated theme changes and make adjustments accordingly in your custom theme folder, fixing any breaking things and addressing issues.

And that’s it! The upgrade of the Hyva theme is now complete!

In conclusion, it is recommended to always upgrade the Hyva theme when a new version is released. This ensures the implementation of bug fixes, performance improvements, and new features, which is crucial for clients to enhance their website’s performance and contribute to revenue growth.

Read more resources on Hyva themes:

  1. Check out the InstaBuild for Hyvä Themes: Ready-made Hyva theme templates for faster storefront development!
  2. Hyva Themes Development – For Online Merchants
  3. Hyvä Theme Benefits that your store needs
  4. 10 Best Hyva Compatibility Extension Providers For Magento 2 Stores
  5. Hyvä VS PWA: Where to Invest?
  6. How a Slow Magento Website Can Cost You Advertising Dollars
  7. Mobile Commerce: How Hyva Themes Boost Mobile Conversions

In today’s article, I will be guiding you on how to run JavaScript only on mobile in Hyva themes.

Sometimes we need some components to Display on Desktop Devices and hidden on Mobile Devices and vice versa. 

In this situation, Generally, everyone uses the CSS Display property to Display that component on Desktop Devices and hide it on Mobile Devices. But when a component is only hidden with CSS, all DOM elements still count to the total DOM size by Google and decrease the page speed, even though they serve no purpose and are hidden for the visitor.

So, To hide the component on Mobile Devices and to avoid counting in the DOM by browser, we need to use matchMedia with Alpine JS “X-if” template syntax. If the condition is not fulfilled then the HTML content inside the “X-if” template is not rendered on the page and it is not counted as DOM elements by Google or the browser.

<script>
  function initSomeComponent() {
    return {
      isMobile: true,
      init() {
        const matchMedia = window.matchMedia('(max-width: 768px)');
        // set the initial value
        this.isMobile = matchMedia.matches;
        // trigger update value on changes
        if (typeof matchMedia.onchange !== 'object') {
          // fallback for iOS 12/13, where addEventListener does not accept an event type parameter
          matchMedia.addListener((event) => this.isMobile = event.matches);
        } else {
          matchMedia.addEventListener("change",
            (event) => this.isMobile = event.matches)
        }
      }
    }
  }
</script>
<div x-data="initSomeComponent()" x-init="init()">
  <!--    This HTML element will be render on Desktop and will not be rendered on the Mobile Devices  -->
  <template x-if="!isMobile">
    <div>None of the HTML elements within this <code><template></code> is counted as DOM elements by Google or the browser on <strong>Mobile Devices</strong>. </div>
  </template>
  <!--    This HTML element will be render on Mobile Devices and will not be rendered on the Desktop Devices  -->
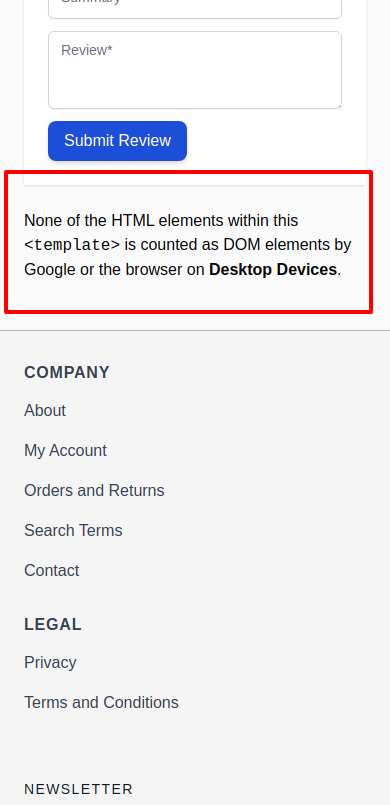
  <template x-if="isMobile">
    <div>None of the HTML elements within this <code><template></code> is counted as DOM elements by Google or the browser on <strong>Desktop Devices</strong>. </div>
  </template>
</div>

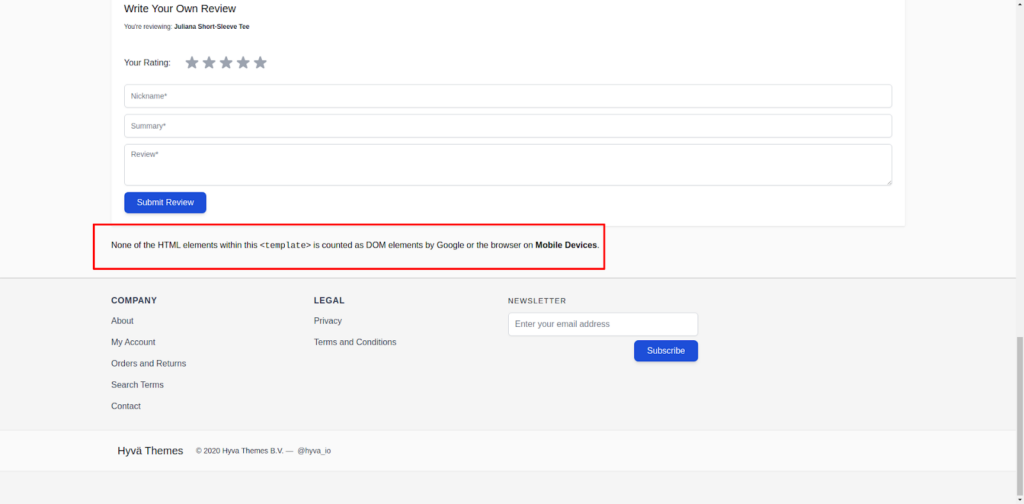
Output: Desktop Devices

Javascript Desktop Devices Output

Output: Mobile Devices

Javascript Mobile Devices Output

Learn about the Hyvä Theme from scratch!

We can use matchMedia with any port size required and we can create conditions as needed and use this instead of using the “Display:none” property of CSS. 

For more information on the window.matchMedia, please refer to the mdn documentation.

For more information on Alpine JS x-if template syntax, you can read the below Alpine JS documentation.

Read more resources on Hyva themes:

  1. Check out the InstaBuild for Hyvä Themes: Ready-made Hyva theme templates for faster storefront development!
  2. Hyva Themes Development – For Online Merchants
  3. Hyvä Theme Benefits that your store needs
  4. 10 Best Hyva Compatibility Extension Providers For Magento 2 Stores
  5. Hyvä VS PWA: Where to Invest?
  6. How a Slow Magento Website Can Cost You Advertising Dollars
  7. Mobile Commerce: How Hyva Themes Boost Mobile Conversions

In the fast-paced world of e-commerce, providing a seamless user experience is paramount. In this blog post, we’ll explore how to implement loading indicators in a Magento 2 Hyva theme to signify ongoing processes, such as data fetching or form submissions. 

Loading indicators not only inform users that an action is in progress but also contribute to a more polished and professional user interface.

The Hyvä theme comes with an animated full-page loader that can be used with custom Alpine.js components.

Understanding the Importance of Loading Indicators

Loading indicators play a crucial role in enhancing user experience by providing feedback on ongoing processes. They reduce user frustration by clearly indicating that an action is being processed, fostering a sense of transparency and responsiveness.

Let’s integrate the hyva loader step-by-step!

Steps to Implement Loading Indicators in a Magento 2 Hyva Theme

For the loader, we will create a sample extension as follows.

Step 1:  First, Inside the app/code directory, create a new directory with your vendor and module name.

app/code/Vendor_Name/Module_Name
Eg. app/code/AureateLabs/HyvaLoader

Step 2: Create a registration.php file at app/code/Vendor_Name/Module_Name/ in the module directory.

Path: app/code/Vendor_Name/Module_Name/ registration.php

Eg. app/code/AureateLabs/HyvaLoader/registration.php

<?php
\Magento\Framework\Component\ComponentRegistrar::register(
   \Magento\Framework\Component\ComponentRegistrar::MODULE,
   'AureateLabs_HyvaLoader',
   __DIR__
);

Step 3: Create a module.xml file at app/code/Vendor_Name/Module_Name/etc/ in the /etc directory of your module.

Eg. app/code/AureateLabs/HyvaLoader/etc/module.xml

<?xml version="1.0" ?>
<config xmlns:xsi="http://www.w3.org/2001/XMLSchema-instance" xsi:noNamespaceSchemaLocation="urn:magento:framework:Module/etc/module.xsd">
    <module name="AureateLabs_HyvaLoader" setup_version="1.0.0"/>
</config>

New to Hyvä?? Learn about the Hyvä Theme from scratch!

Step 4: Create a default.xml file at app/code/Vendor_Name/Module_Name/view/frontend/layout in the /view directory of your module.

Eg. app/code/AureateLabs/HyvaLoader/view/frontend/layout/default.xml

  • Inside the “content” container, a new block named “modal-dialog” is declared. It uses the Magento\Framework\View\Element\Template class, suggesting that it’s a basic template block. The template attribute specifies the PHTML template file that will be used to render the content. In this case, it is AureateLabs_HyvaLoader::loader.phtml.
  • Within the “modal-dialog” block, another block named “loading” is declared. This nested block also uses the Magento\Framework\View\Element\Template class and has a template file specified at Hyva_Theme::ui/loading.phtml.
  • Hyva_Theme::ui/loading.phtml refers to the PHTML template file for the loading indicator component in the Hyva theme’s UI, responsible for visually representing ongoing processes on the Magento 2 frontend. It is likely used to display a loader animation during actions like data fetching or form submissions for an improved user experience.
<?xml version="1.0" encoding="UTF-8"?>
<page layout="1columns" xmlns:xsi="http://www.w3.org/2001/XMLSchema-instance"   xsi:noNamespaceSchemaLocation="urn:magento:framework:View/Layout/etc/page_configuration.xsd">
    <body>
        <referenceContainer name="content">
            <block class="Magento\Framework\View\Element\Template" name="modal-dialog" template="AureateLabs_HyvaLoader::loader.phtml">
                 <block class="Magento\Framework\View\Element\Template" name="loading" template="Hyva_Theme::ui/loading.phtml"/>
            </block>
        </referenceContainer>
    </body>
</page>

Step 5: Create a loader.phtml template file in the app/code/Vendor_Name/Module_Name/view/frontend/templates directory of your module.

Eg. app/code/AureateLabs/HyvaLoader/view/frontend/templates/loader.phtml

  • The JavaScript code creates an Alpine.js component named initMyComponent() in a script block. 
  • It starts with isLoading set to true. 
  • The component has extractSectionData(cartData) to handle data, setting isLoading to false when done. 
  • A section element with Alpine.js (x-data=”initMyComponent()”) and an event listener (@private-content-loaded.window) is defined. 
  • The template shows a loading indicator (<?= $block->getChildHtml(‘loading’) ?>) and displays content inside a <div> only when isLoading is false.
<script>
   'use strict';
   function initMyComponent() {
       return {
           isLoading: true,
           extractSectionData(cartData) {
               // When ready, hide the loader
               this.isLoading = false;
           }
       }
   }
</script>
<section x-data="initMyComponent()" @private-content-loaded.window="extractSectionData($event.detail.data)"
>
   <?= $block->getChildHtml('loading') ?>
</section>

Step 6: Run the following commands to set up the created module.

bin/magento setup:upgrade
bin/magento setup:di:compile
bin/magento c:f

Output

Hyva theme default loader will show on page load until the content completely loads or is visible on the screen.

Hyva theme default loader

Conclusion

By incorporating loading indicators into your Magento 2 Hyva theme, you can significantly improve the user experience by providing visual feedback on ongoing processes. Whether it’s during AJAX requests, form submissions, or other asynchronous operations, loading indicators contribute to a polished and responsive interface.

Customize the loading indicators to align with your theme’s design, adhere to best practices, and optimize for performance to deliver a seamless and enjoyable shopping experience for your users.

Read more resources on Hyva themes:

  1. Check out the InstaBuild for Hyvä Themes: Ready-made Hyva theme templates for faster storefront development!
  2. Hyva Themes Development – For Online Merchants
  3. Hyvä Theme Benefits that your store needs
  4. 10 Best Hyva Compatibility Extension Providers For Magento 2 Stores
  5. Hyvä VS PWA: Where to Invest?
  6. How a Slow Magento Website Can Cost You Advertising Dollars
  7. Mobile Commerce: How Hyva Themes Boost Mobile Conversions

To work with the Hyva themes, Developers should know Alpine.js and Tailwind CSS

Set up a Luma Reference Store View

It is beneficial to have a second store view running with a Magento Luma theme alongside the store view using Hyvä.

This allows you to check exactly how some aspects of a module work in Luma while ensuring compatibility with Hyvä.

Extensions for Alpine.js

Please check the following useful extensions for Alpine.js:

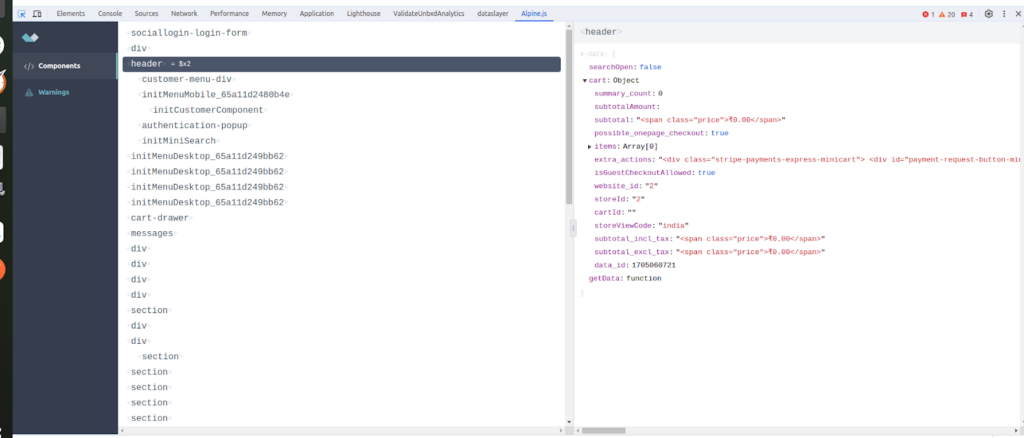
1. Alpine.js dev tools for Google Chrome and Firefox

  • This extension is for debugging Alpine.js applications.
  • It allows you to detect, inspect, and edit Alpine.js data and components. 
  • This extension is available on the following browsers:

For more references please check the following screenshot:

Extensions for Alpinejs

2. Alpine.​js Support for PHPStrom

  • This plugin adds support for the following Alpine.js features:
    • Auto-complete Alpine directives such as x-data
    • Set the language to JavaScript inside your directives so that you have full syntax highlighting and code complete
  • For more references please check here.
  • Please check this blog for installing the extension on the PHPStrom.

3. Alpine.js IntelliSense for Visual Studio

  • This plugin supports the following features of Alpine.js:
    • Provides syntax highlighting for Alpine.js directives along with autocomplete for all base directives and modifiers.
    • This extension aims to keep as small a footprint as possible by injecting a simple grammar to provide JavaScript highlighting rather than implementing an entirely new language and by using the Custom Data Extension to add custom HTML attributes. 
    • Snippets are provided through the default API via VS Code.
  • For more references please check here.
  • Please check this blog for installing the extension on Visual Studio.

4. AlpineJS for SublimeText

  • This plugin highlights the Alpine.js’ syntaxes.
  • For more references please check here.
  • Please check this blog for installing the extension on the Sublime Text.

New to Hyvä?? Learn about the Hyvä Theme from scratch!

Extensions of the Tailwind CSS

Please check the following useful extensions of the Tailwind CSS:

1. PostCSS for PHPStorme

  • This plugin supports the following features of Tailwind CSS:
    • Syntax highlighting for PostCSS syntax. You can additionally configure it in Preferences | Editor | Colors & Fonts.
    • Intelligent code completion.
    • Intelligent code completion.
    • Go to declaration, Go to symbol, and Find usages actions are available for custom selectors and custom media queries.
    • Rename custom selectors and custom media queries with ease.
  • For more references please check here:
  • Please check this blog for installing the extension on the PHPStrom.

2. PostCSS for Visual Studio

  • This plugin supports the following features of Tailwind CSS:
    • Nesting rules, including the nesting selector (&), the nesting at-rule (@nest), and @media and @supports at-rules.
    • :blank pseudo-class, as well as the :is() and :where functional pseudo-classes.
    • prefers-color-scheme and prefers-reduced-motion within media queries.
    • place-self property.
    • the env() function, as well as the hwb(), lab(), and lch() color functions.
    • emoji, fangsong, and system-ui font families.
    • the border-block, border-inline, margin-block, margin-inline, padding-block, and padding-inline logical properties.
    • @custom-media and @custom-selector at-rules.
    • nesting @extend and @extends at-rules.
    • functional selectors (%placeholder).
    • the CSS Modules :global rule, as well as the composes declaration, and also @value declarations.
    • sass $variables.
    • single-line comments (//).
    • @custom-env at-rules.
    • unknown nesting at-rules, as well as unknown @custom- prefixed at-rules.
  • For more references please check here:
  • Please check this blog for installing the extension on Visual Studio.

Alpine.js and Tailwind CSS IntelliSense VS code extensions (if you use VS code).

Tailwind CSS IntelliSense enhances the development experience with Tailwind by providing Visual Studio Code users advanced features such as autocomplete, syntax highlighting, and linting.

You can find the details of this extension here.

3. Commercial Tools

Additionally, there are some commercial tools available that require a purchase for use. Please check out a couple of these commercial tools:

By using these tools, you can enhance your efficiency when working with the Hyva theme, integrating Alpine.js, and Tailwind CSS.

Read more resources on Hyva themes:

  1. Check out the InstaBuild for Hyvä Themes: Ready-made Hyva theme templates for faster storefront development!
  2. Hyva Themes Development – For Online Merchants
  3. Hyvä Theme Benefits that your store needs
  4. 10 Best Hyva Compatibility Extension Providers For Magento 2 Stores
  5. Hyvä VS PWA: Where to Invest?
  6. How a Slow Magento Website Can Cost You Advertising Dollars
  7. Mobile Commerce: How Hyva Themes Boost Mobile Conversions

Configuring Tailwind for Hyvä Theme

In order to ensure the seamless integration of Hyvä theme, it is imperative to fine-tune the Tailwind Purge settings. To accomplish this, follow the outlined steps below:

  1. Adjust the Tailwind Purge settings to optimize compatibility.
  2. Execute the following steps to ensure a smooth integration of Hyvä theme.

First, you will need to install all required node packages.

cd /path/to/project/app/design/frontend/vendor/theme/web/tailwind/ 
 npm install

We advise utilizing Node.js version 16 or a more recent release. 

Depending on the Hyvä release, the minimum required versions are as follows: Hyvä 1.2.x necessitates Node.js 14.0.0, while Hyvä 1.1.x requires Node.js 12.13.0. 

For the minimum Node.js version required by any Tailwind CSS release, refer to the engines.node section in the tailwindCSS packages.json file.

Tailwind Purge Content settings

The standard size for a Hyvä Theme stylesheet is approximately 100kb, which translates to roughly 17kb when transmitted over the network with HTTP compression.

This efficiency is achieved because Tailwind selectively compiles only the CSS that is actively utilized within a theme.

To facilitate this, the build script must be directed to the specific directories housing the .phtml files. Typically, this would be located at app/design/frontend/vendor/theme/templates/.

If your .phtml files containing TailwindCSS classes are dispersed in app/code or vendor/, these directories must also be incorporated into your tailwind configuration.

New to Hyvä?? Learn about the Hyvä Theme from scratch!

Hyvä 1.1.14 and newer

Hyvä 1.1.15

Starting from release 1.1.15 of the hyva-themes/magento2-theme-module, the file app/etc/hyva-themes.json is employed to automatically integrate pertinent modules into the configuration for purging content paths. 

This file is regenerated automatically each time a module is enabled or disabled.

If needed, it can also be manually generated using the command…

bin/magento hyva:config:generate

Once a module is added to the list, its templates will be automatically scanned for Tailwind CSS classes.

Hyvä 1.1.14

Starting from release 1.1.14 of the hyva-themes/magento2-theme-module, the file app/etc/hyva-themes.json is utilized to automatically integrate pertinent modules into the purge content paths configuration. 

The configuration file needs to be regenerated each time a Hyvä compatibility module is installed or removed.

bin/magento hyva:config:generate

Once a module is added to the list, its templates will be automatically scanned for Tailwind CSS classes.

Hyvä 1.1.13 and before

Themes preceding Hyvä release 1.1.13 need to guarantee the discovery of all classes by manually incorporating all pertinent paths into the theme’s purge content configuration. 

Alternatively, we suggest updating the hyva-themes/magento2-theme-module to version 1.1.14 or later and leveraging the automated Tailwind purge content configuration merging.

In the absence of an upgrade, include the module paths manually in the theme’s purge content configuration, as elaborated below in the Purge Content Details section.

Purge Content Details

The purging configuration is located in your theme’s tailwind.config.js file. For instance, you can find it at app/design/frontend/vendor/theme/web/tailwind/tailwind.config.js.

Tailwind v2 vs. v3

The content settings structure underwent changes with Tailwind v3. Subsequently, the content property is now specified at the top level of the module.exports. The purge property is no longer applicable. For comprehensive details, refer to the Tailwind v3 documentation.

Exercise caution and ensure awareness of the Tailwind version implemented in your theme while making configuration adjustments.

Please note that the configuration is not restricted solely to .phtml templates. For instance, layout XML files might also reference Tailwind CSS classes and can be included in the content configuration.

Tailwind v2 purge config example

module.exports = {
  ...
  purge: {
    content: [
      // this theme's phtml files
      '../../**/*.phtml',
      // parent theme in vendor/
      '../../../../../../../vendor/hyva-themes/magento2-default-theme/**/*.phtml',
      // hyva theme-module templates (only necessary for Hyva themes before 1.1.15)
      '../../../../../../../vendor/hyva-themes/magento2-theme-module/src/view/frontend/templates/**/*.phtml',
      // app/code phtml files (if you need tailwind classes from app/code modules)
      //'../../../../../../../app/code/**/*.phtml',
      // react app src files (if Hyvä Checkout is installed in app/code)
      //'../../../../../../../app/code/**/src/**/*.jsx',
      // react app src files in vendor (If Hyvä Checkout is installed in vendor)
      //'../../../../../../../vendor/hyva-themes/magento2-hyva-react-checkout/src/reactapp/src/**/*.jsx',
      //'../../../../../../../vendor/hyva-themes/magento2-hyva-react-checkout/src/view/frontend/templates/react-container.phtml',
      // widget block classes from app/code
      //'../../../../../../../app/code/**/Block/Widget/**/*.php'
    ]
  }
}

Tailwind v3 config example

 module.exports = { 
...
  content: [
    // this theme's phtml files
    '../../**/*.phtml',
    // parent theme in vendor/
    '../../../../../../../vendor/hyva-themes/magento2-default-theme/**/*.phtml',
    // hyva theme-module templates
    '../../../../../../../vendor/hyva-themes/magento2-theme-module/src/view/frontend/templates/**/*.phtml',
  ]
}

Generating CSS during development

You can generate the styles using below command

cd /path/to/project/app/design/frontend/Aureatelabs/hyva/web/tailwind/
npm run watch

Generating CSS for production

First, you will need to install all required node packages. 

You can generate the styles using the below command:

cd /path/to/project/app/design/frontend/Aureatelabs/hyva/web/tailwind/
npm run build-prod

Initiating this command activates the continuous operation of the Tailwind compiler. Any CSS classes incorporated into templates within the specified purge configuration will promptly be appended to the styles.css file.

Example:

<button class="inline-flex justify-center rounded-lg text-sm font-semibold py-3 px-4 btn-primary text-white hover:bg-slate-700">
   Buy Hyvä themes
</button>

Please flush the Magento cache & check it.

php bin/magento cache:flush

Check Output :

Buy hyva themes button

That’s it !!

More resources on Hyva themes:

  1. Check out the InstaBuild for Hyvä Themes: Ready-made Hyva theme templates for faster storefront development!
  2. Hyva Themes Development – For Online Merchants
  3. Hyvä Theme Benefits that your store needs
  4. 10 Best Hyva Compatibility Extension Providers For Magento 2 Stores
  5. Hyvä VS PWA: Where to Invest?
  6. How a Slow Magento Website Can Cost You Advertising Dollars
  7. Mobile Commerce: How Hyva Themes Boost Mobile Conversions

Stay tuned for more insightful articles on Magento and web development best practices.

In today’s article, I will guide you through the procdasess of integrating Google reCAPTCHA into custom forms with Hyva Theme.

I know you are all aware that the Hyva theme is a brand-new Magento frontend theme built from scratch. It is lightweight, flexible, and offers high-speed performance.

As you are all aware, Google reCAPTCHA plays a crucial role in securing online forms. In essence, reCAPTCHA is a free service offered by Google to safeguard websites from spam and abuse. 

Preventing automated attacks has become paramount in ensuring the integrity of online interactions. This powerful tool serves as a guardian for custom forms on the web, enhancing their security. 

In simple terms, ever wondered how websites confirm you’re a genuine person and not a sneaky robot? Well, that’s where reCAPTCHA steps in – acting as a superhero for online forms, ensuring the security of your information.

Let’s explore the process of integrating Google reCAPTCHA into custom forms using the Hyva theme.

Captcha support in Hyvä

Hyvä only supports the following reCaptcha versions:

Pre-Requirements for Using Google reCAPTCHA

  1. Google Account: Ensure that you have a Google account. If you don’t have one, you’ll need to create it before proceeding.
  2. API Keys: Generate Google reCAPTCHA API keys from the reCAPTCHA website to authenticate your website’s interaction with Google’s reCAPTCHA service. You’ll get both a site key (used in your HTML) and a secret key (used for server-side verification).
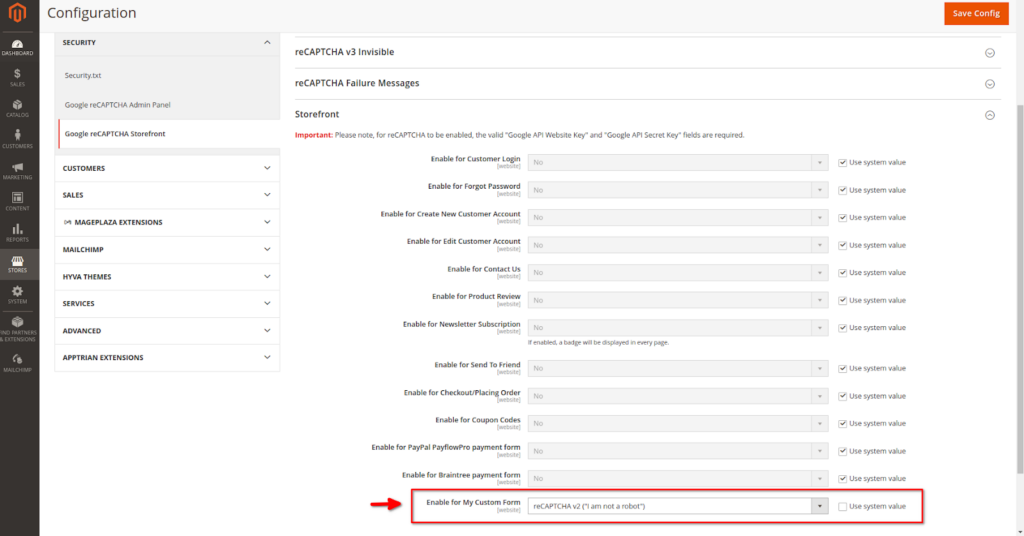
  3. Configuring Google reCAPTCHA keys in Magento 2: Lastly, let’s go through the steps to configure Google reCAPTCHA in Magento 2 through the Admin panel.
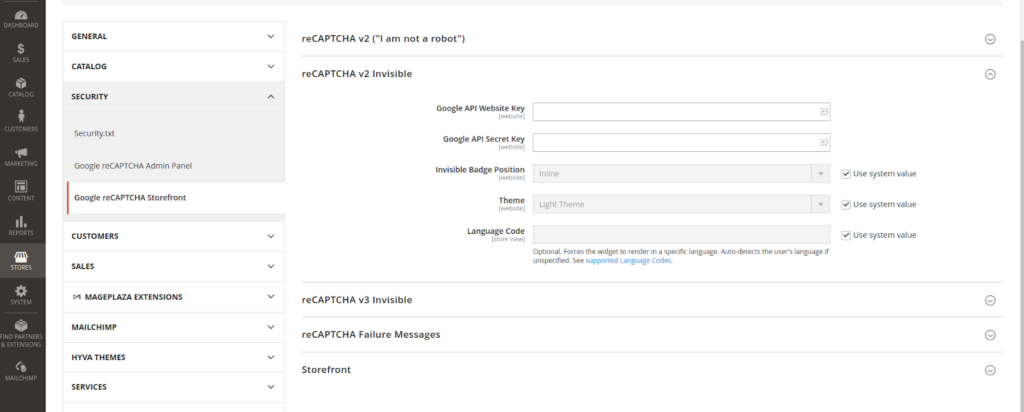
    1. On the Admin sidebar, go through the path Stores > Settings > Configuration.
    2. Next, expand the Security section and select Google reCAPTCHA Storefront.
    3. Here, you will find three options to configure Google reCAPTCHA. You can select the Google reCAPTCHA type and configure it with the previously generated Google reCAPTCHA keys
    4. And finally, save the configuration. Please check the attached screenshot for the Magento configuration.
Google reCAPTCHA Storefront

Now that we have everything we need, let’s begin implementing Google reCAPTCHA in the form. So, let’s get started!

In this example code, we are using the reCAPTCHA v2 (‘I am not a robot’) version provided by Google reCAPTCHA.

Steps to Create a Module with Render a Basic HTML Form

Follow the below steps to create a module with render a basic HTML form on the frontend.

1. Created a module with registration.php

Create a file in app/code/Aureatelabs/CustomForm/registration.php and add the        

following code.

<?php
\Magento\Framework\Component\ComponentRegistrar::register(
   \Magento\Framework\Component\ComponentRegistrar::MODULE,
   'Aureatelabs_CustomForm',
   __DIR__
);

2. Create a module.xml

Create a file app/code/Aureatelabs/CustomForm/etc/module.xml and add the        

following code

<?xml version="1.0" ?>
<config xmlns:xsi="http://www.w3.org/2001/XMLSchema-instance" xsi:noNamespaceSchemaLocation="urn:magento:framework:Module/etc/module.xsd">
   <module name="Aureatelabs_CustomForm" setup_version="1.0.0">
       <sequence>
           <module name="Magento_ReCaptchaFrontendUi"/>
       </sequence>
   </module>
</config>

3. Create a Router

Create a file in the app/code/Aureatelabs/CustomForm/etc/frontend/routes.xml and put the following code

<?xml version="1.0"?>
<config xmlns:xsi="http://www.w3.org/2001/XMLSchema-instance" xsi:noNamespaceSchemaLocation="urn:magento:framework:App/etc/routes.xsd">
   <router id="standard">
       <route id="aureatelabs_customform" frontName="customform">
           <module name="Aureatelabs_CustomForm" />
       </route>
   </router>
</config>

4. Create the controller for the view form on the frontend

Create a file app/code/Aureatelabs/CustomForm/Controller/Index/Index.php and put the following code

<?php
namespace Aureatelabs\CustomForm\Controller\Index;

use Magento\Framework\App\Action\Context;
use Magento\Framework\View\Result\PageFactory;

class Index extends \Magento\Framework\App\Action\Action
{
   /** @var  \Magento\Framework\View\Result\Page */
   protected $resultPageFactory;

   /**
    * @param Context $context
    * @param PageFactory $resultPageFactory
    */
   public function __construct(
       \Magento\Framework\App\Action\Context $context,
       \Magento\Framework\View\Result\PageFactory $resultPageFactory
   ) {
       $this->resultPageFactory = $resultPageFactory;
       parent::__construct($context);
   }

   /**
    * Custom Form Index
    *
    * @return \Magento\Framework\View\Result\PageFactory
    */
   public function execute()
   {
       $resultPage = $this->resultPageFactory->create();
       $resultPage->getConfig()
           ->getTitle()
           ->prepend(__('Custom Form View'));
       return $resultPage;
   }
}

5. Create a Layout file

Create a file app/code/Aureatelabs/CustomForm/view/frontend/layout/aureatelabs_customform_index_index.xml and put the following code

<?xml version="1.0"?>
<page xmlns:xsi="http://www.w3.org/2001/XMLSchema-instance" layout="1column" xsi:noNamespaceSchemaLocation="urn:magento:framework:View/Layout/etc/page_configuration.xsd">
   <body>
       <referenceContainer name="content">
          <block class="Magento\Framework\View\Element\Template" name="aureatelabs_customform" template="Aureatelabs_CustomForm::form.phtml" />
       </referenceContainer>
   </body>
</page>

6. Create a Basic form file form.phtml

Create a file app/code/Aureatelabs/CustomForm/view/frontend/templates/form.phtml and put the following code.

<?php
/**
* @var \Magento\Framework\View\Element\Template $block
* @var \Magento\Framework\Escaper $escaper
*/
?>
<form action="<?= $escaper->escapeUrl($block->getUrl('customform/action/post')) ?>"
     method="post"
     id="my_custom_form"
>
   <?= $block->getBlockHtml('formkey') ?>

   <div class="field field-reserved w-full required">
       <label class="label" for="firstname">
           <span>First Name</span>
       </label>
       <div class="control">
           <input type="text" id="name" name="name" title="Your Name" class="form-input required-entry">
       </div>
   </div>

   <div class="field field-reserved w-full">
       <label class="label" for="note">
           <span>Your Note</span>
       </label>
       <div class="control">
           <textarea id="note" name="note" rows="4" cols="50"></textarea>
       </div>
   </div>

   <div class="actions-toolbar">
       <div class="primary">
           <button type="submit" class="action submit primary">
               <?= $escaper->escapeHtml(__('Submit')) ?>
           </button>
       </div>
   </div>
</form>

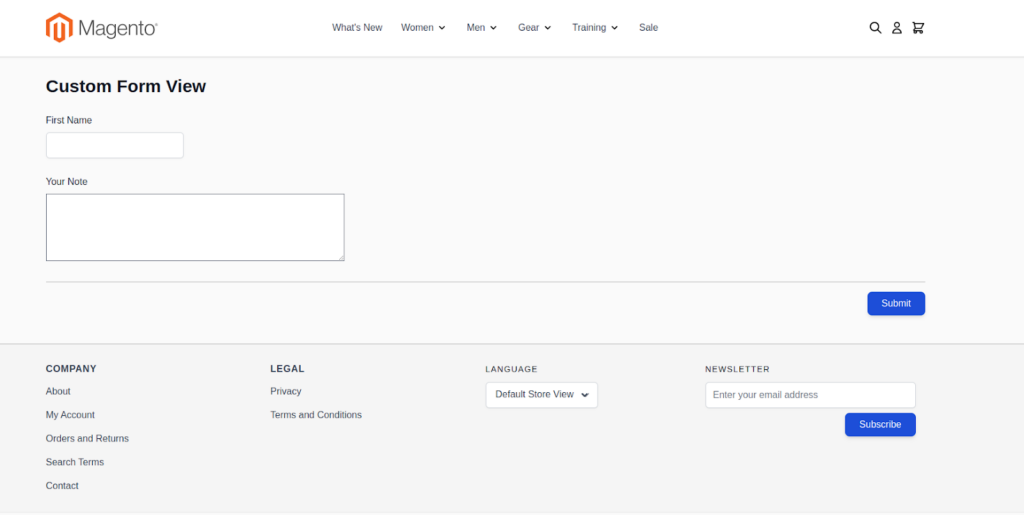
Now that we have completed a minimal module with a basic form, you can access it using the following URLs:

http://<yourhost.com>/customform/index/index

Or

http://<yourhost.com>/customform/

create basic form file

Learn about the Hyvä Theme from scratch!

Steps to Add Google reCAPTCHA to the Form

Follow the steps below to add Google reCAPTCHA to the form that we have created in the previous steps.

1. Render the reCAPTCHA field

Please add the following line to the app/code/Aureatelabs/CustomForm/view/frontend/templates/form.phtml file for the form that we created in the previous steps.

<!-- Render the Google reCAPTCHA field  -->
   <?= $block->getBlockHtml(ReCaptcha::RECAPTCHA_INPUT_FIELD_BLOCK.'_recaptcha') ?>

Additionally, please declare the following class at the top of this file.

use Hyva\Theme\ViewModel\ReCaptcha;

So, now this form code looks like the following:

<?php
use Hyva\Theme\ViewModel\ReCaptcha;

/**
* @var \Magento\Framework\View\Element\Template $block
* @var \Magento\Framework\Escaper $escaper
*/
?>
<form action="<?= $escaper->escapeUrl($block->getUrl('customform/action/post')) ?>"
     method="post"
     id="my_custom_form"
>
   <?= $block->getBlockHtml('formkey') ?>

   <div class="field field-reserved w-full required">
       <label class="label" for="firstname">
           <span>First Name</span>
       </label>
       <div class="control">
           <input type="text" id="name" name="name" title="Your Name" class="form-input required-entry">
       </div>
   </div>

   <div class="field field-reserved w-full">
       <label class="label" for="note">
           <span>Your Note</span>
       </label>
       <div class="control">
           <textarea id="note" name="note" rows="4" cols="50"></textarea>
       </div>
   </div>

   <!-- Render the Google reCAPTCHA field  -->
   <?= $block->getBlockHtml(ReCaptcha::RECAPTCHA_INPUT_FIELD_BLOCK.'_recaptcha') ?>

   <div class="actions-toolbar">
       <div class="primary">
           <button type="submit" class="action submit primary">
               <?= $escaper->escapeHtml(__('Submit')) ?>
           </button>
       </div>
   </div>
</form>

As mentioned at the beginning of the blog, Google reCAPTCHA provides three types of versions, as listed below:

  1. reCAPTCHA v2 (“I am not a robot”)
  2. reCAPTCHA v2 Invisible
  3. reCAPTCHA v3 Invisible

Considering the various version types, add the Google reCAPTCHA field in the following manner for each type.

  1. reCAPTCHA v2 (“I am not a robot”)
<!-- Render the Google reCAPTCHA field  -->
   <?= $block->getBlockHtml(ReCaptcha::RECAPTCHA_INPUT_FIELD_BLOCK.'_recaptcha') ?>
  1. reCAPTCHA v2 Invisible
<!-- Render the Google reCAPTCHA field  -->
   <?= $block->getBlockHtml(ReCaptcha::RECAPTCHA_INPUT_FIELD_BLOCK.'_invisible') ?>
  1. reCAPTCHA v3 Invisible
<!-- Render the Google reCAPTCHA field  -->
   <?= $block->getBlockHtml(ReCaptcha::RECAPTCHA_INPUT_FIELD_BLOCK) ?>

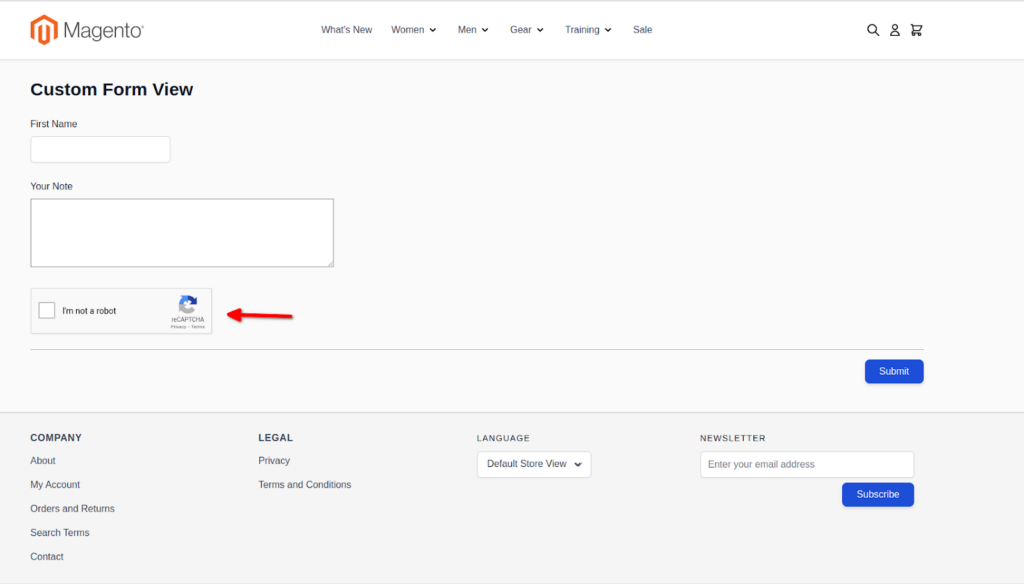
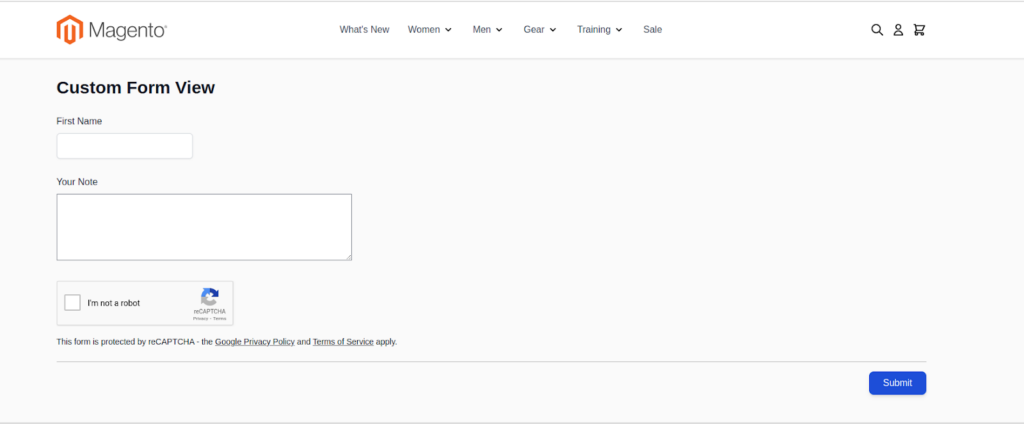
Now, the form in the frontend will be displayed as shown in the screenshot, including the rendering of the Google reCAPTCHA field.

Render the reCAPTCHA field

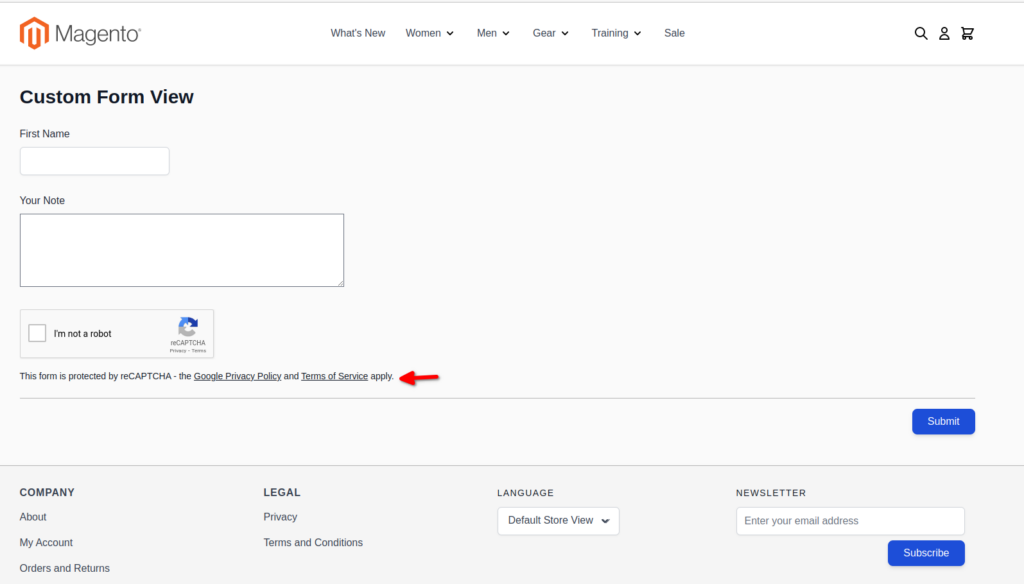
This is an optional step, but if you want to add the notice block in the form, please include the following code in the app/code/Aureatelabs/CustomForm/view/frontend/templates/form.phtml file.

<!-- Render the legal notice block -->
   <div class="w-full grecaptcha-legal">
       <?= $block->getBlockHtml(ReCaptcha::RECAPTCHA_LEGAL_NOTICE_BLOCK) ?>
   </div>

Now, this notice will be displayed as shown in the screenshot below.

add the legal notice block

3. Add client side reCAPTCHA validation

Please add the below code into the app/code/Aureatelabs/CustomForm/view/frontend/templates/form.phtml file.

And this code validates the Google reCAPTCHA on the client side.

  1. First, add the following code inside the <form> element. This Alpine.js code defines the Alpine component with a submit form event to validate Google reCAPTCHA before submitting the form.
x-data="initMyForm()"
@submit.prevent="submitForm()"
  1. Secondly, add the following Alpine.js script. This script implements the validation of Google reCAPTCHA before submitting the form.
<script>
 function initMyForm() {
   return {
      errors: 0,
     submitForm() {
       // Do not rename $form!
       // In recaptcha_validation it is expected to be declared

       const $form = document.getElementById('my_custom_form');
       <?= $block->getBlockHtml(ReCaptcha::RECAPTCHA_SCRIPT_TOKEN_BLOCK.'_recaptcha'); ?>

       if (this.errors === 0) {
         $form.submit();
       }
     }
   }
 }
</script>

Here the form element must be assigned to a variable $form.

And any errors will be declared on the this.errors property of the component.

And then, render the recaptcha_validation child block. Please ensure to include this block based on the type of Google reCAPTCHA version you are using for the form. Depending on the version, add the validation block in the Alpine.js script. Please review the code below for different version types of Google reCAPTCHA.

  1. reCAPTCHA v2 (“I am not a robot”)
<?= $block->getBlockHtml(ReCaptcha::RECAPTCHA_SCRIPT_TOKEN_BLOCK.'_recaptcha'); ?>
  1. reCAPTCHA v2 Invisible
<?= $block->getBlockHtml(ReCaptcha::RECAPTCHA_SCRIPT_TOKEN_BLOCK.'_invisible'); ?>
  1. reCAPTCHA v3 Invisible
<?= $block->getBlockHtml(ReCaptcha::RECAPTCHA_SCRIPT_TOKEN_BLOCK); ?>
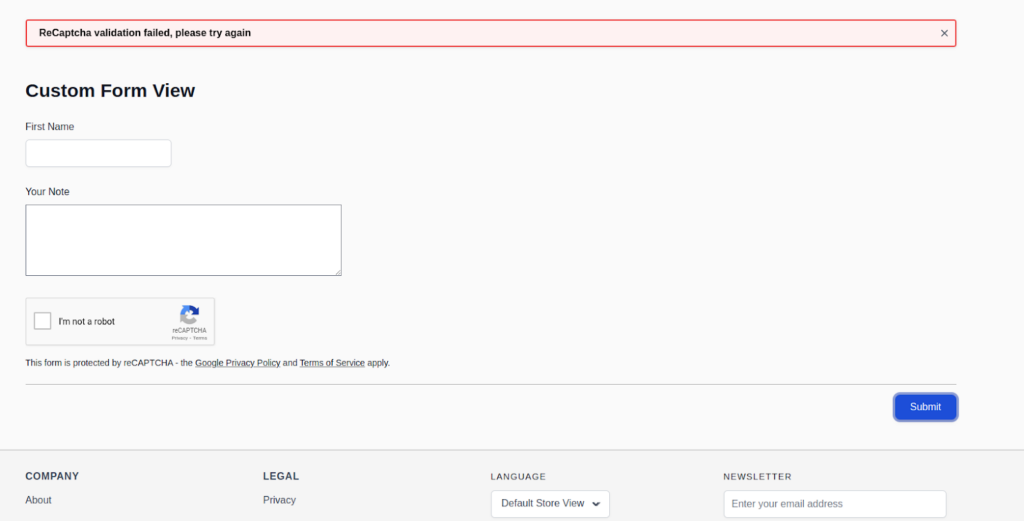
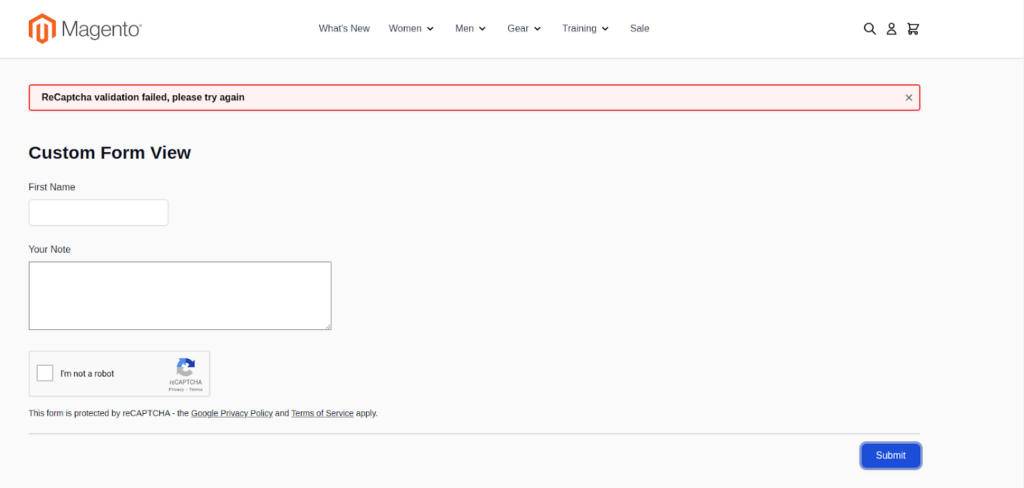
  1. And finally, this validation message displays as shown in the screenshot below if the form does not pass with Google reCAPTCHA:
validation message displays

Google reCAPTCHA validation is now completed at the client side. Then finally the app/code/Aureatelabs/CustomForm/view/frontend/templates/form.phtml file. Code look like the below

<?php
use Hyva\Theme\ViewModel\ReCaptcha;

/**
* @var \Magento\Framework\View\Element\Template $block
* @var \Magento\Framework\Escaper $escaper
*/
?>
<form action="<?= $escaper->escapeUrl($block->getUrl('customform/action/post')) ?>"
     method="post"
     id="my_custom_form"
     x-data="initMyForm()"
     @submit.prevent="submitForm()"
>
   <?= $block->getBlockHtml('formkey') ?>

   <div class="field field-reserved w-full required">
       <label class="label" for="firstname">
           <span>First Name</span>
       </label>
       <div class="control">
           <input type="text" id="name" name="name" title="Your Name" class="form-input required-entry">
       </div>
   </div>

   <div class="field field-reserved w-full">
       <label class="label" for="note">
           <span>Your Note</span>
       </label>
       <div class="control">
           <textarea id="note" name="note" rows="4" cols="50"></textarea>
       </div>
   </div>

   <!-- Render the Google reCAPTCHA field  -->
   <?= $block->getBlockHtml(ReCaptcha::RECAPTCHA_INPUT_FIELD_BLOCK.'_recaptcha') ?>

   <!-- Render the legal notice block -->
   <div class="w-full grecaptcha-legal">
       <?= $block->getBlockHtml(ReCaptcha::RECAPTCHA_LEGAL_NOTICE_BLOCK) ?>
   </div>

   <div class="actions-toolbar">
       <div class="primary">
           <button type="submit" class="action submit primary">
               <?= $escaper->escapeHtml(__('Submit')) ?>
           </button>
       </div>
   </div>
</form>

<script>
 function initMyForm() {
   return {
      errors: 0,
     submitForm() {
       // Do not rename $form!
       // Here, it is necessary to declare the reCAPTCHA validation as per the version you are using. For V3, use recaptcha_validation, for V2 ('I am not a robot'), use recaptcha_validation_recaptcha, and for V2 Invisible, use recaptcha_validation_invisible

       const $form = document.getElementById('my_custom_form');
       <?= $block->getBlockHtml(ReCaptcha::RECAPTCHA_SCRIPT_TOKEN_BLOCK.'_recaptcha'); ?>

       if (this.errors === 0) {
         $form.submit();
       }
     }
   }
 }
</script>

Now that everything is completed, the last step is to add server-side validation for Google reCAPTCHA.

Steps to Add Server-side Validation for Google reCAPTCHA

Follow the steps to validation that validate the Google reCAPTCHA on the server side when the form is submitted and throws an error when the validation fails.

Let’s create a store configuration to enable Google reCAPTCHA for my custom form.

  1. Create a file at app/code/Aureatelabs/CustomForm/etc/adminhtml/system.xml and insert the following code into it.
<?xml version="1.0"?>
<config xmlns:xsi="http://www.w3.org/2001/XMLSchema-instance" xsi:noNamespaceSchemaLocation="urn:magento:module:Magento_Config:etc/system_file.xsd">
   <system>
       <section id="recaptcha_frontend">
           <group id="type_for">
               <field id="my_custom_form" translate="label" type="select" sortOrder="210" showInDefault="1"
                      showInWebsite="1" showInStore="0" canRestore="1">
                   <label>Enable for My Custom Form</label>
                   <source_model>Magento\ReCaptchaAdminUi\Model\OptionSource\Type</source_model>
               </field>
           </group>
       </section>
   </system>
</config>

Above code the new store config to the path Stores > Settings > Configuration > Security > Google reCAPTCHA Storefront > Storefront.

Add Server-side Validation for Google reCAPTCHA
  1. Create a file at app/code/Aureatelabs/CustomForm/Controller/Action/Post.php and add the following code to this file.
<?php
namespace Aureatelabs\CustomForm\Controller\Action;

use Magento\Framework\App\Action\Context;
use Magento\Framework\App\Action\HttpPostActionInterface;
use Magento\ReCaptchaUi\Model\RequestHandlerInterface;
use Magento\Framework\App\Action\Action;

class Post extends Action implements HttpPostActionInterface
{
   /**
    * @var RequestHandlerInterface
    */
   private $requestHandler;

   /**
    * @param Context $context
    * @param RequestHandlerInterface $requestHandler
    */
   public function __construct(
       \Magento\Framework\App\Action\Context $context,
       RequestHandlerInterface $requestHandler
   ) {
       $this->requestHandler = $requestHandler;
       parent::__construct($context);
   }

   /**
    * Custom Form Index
    *
    * @return \Magento\Framework\View\Result\PageFactory
    */
   public function execute()
   {
      try {

            //Google reCAPTCHA Server Side Validation
            $key = "my_custom_form";
            $request = $this->getRequest();
            $response = $this->getResponse();

            $redirectOnFailureUrl = $this->_redirect->getRedirectUrl();
            $this->requestHandler->execute($key, $request, $response, $redirectOnFailureUrl);

            //Do your custom code after reCaptcha Server validation complete successfully

            //Redirect to Form
            return $this->resultRedirectFactory->create()->setPath('customform/index');

        } catch (\Exception $e) {

            // if there any issue in reCaptcha Server validation it will automatically redirect to the form page with error message
            return $this->resultRedirectFactory->create()->setPath('customform/index');

        }

   }
}

In the above file, we have added the below code that is responsible to validate the passed Google reCAPTCHA.

//Google reCAPTCHA Server Side Validation
 $key = "my_custom_form";
 $request = $this->getRequest();
       $response = $this->getResponse();
       $redirectOnFailureUrl =
$this->_redirect->getRedirectUrl();
       $this->requestHandler->execute($key, $request, $response, $redirectOnFailureUrl);
       //End

The $key value corresponds to the field ID we established in the store configuration during the previous step. In our example case, this is my_custom_form.

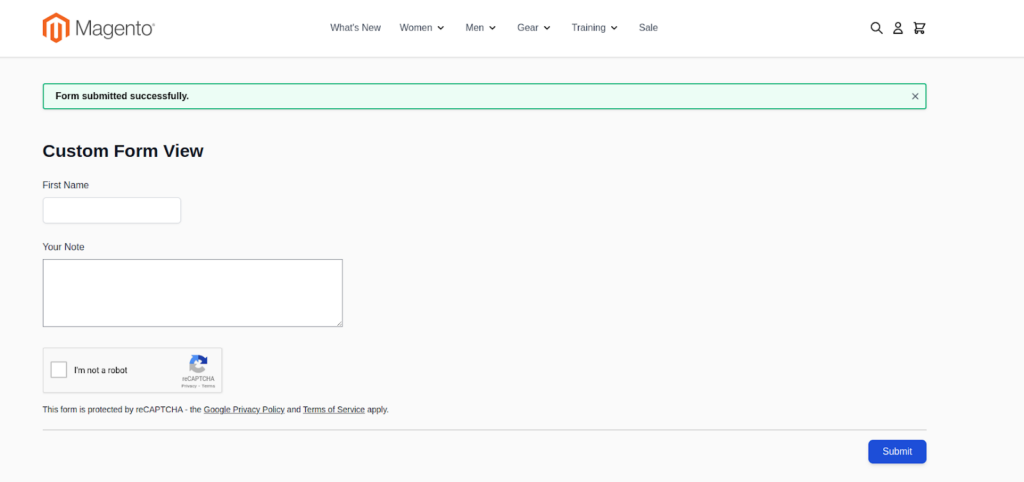
Finally, we have successfully integrated Google reCAPTCHA into the custom form using the Hyva theme. Please review the attached screenshot to see how it works.

custom form using the Hyva theme
form recaptcha error
form submit record message

Hopefully, this blog helps you easily add Google reCAPTCHA to your custom form. Google reCAPTCHA serves as the bodyguard for your website, preventing spam and bots, and ensuring a safe and seamless experience for genuine users online.

Read more resources on Hyva themes:

  1. Check out the InstaBuild for Hyvä Themes: Ready-made Hyva theme templates for faster storefront development!
  2. Hyva Themes Development – For Online Merchants
  3. Hyvä Theme Benefits that your store needs
  4. 10 Best Hyva Compatibility Extension Providers For Magento 2 Stores
  5. Hyvä VS PWA: Where to Invest?
  6. How a Slow Magento Website Can Cost You Advertising Dollars
  7. Mobile Commerce: How Hyva Themes Boost Mobile Conversions

In today’s article, I will explain to you how to create a Popup Modal in Magento 2 Hyva Theme.

Within the Hyva theme for Magento 2, popup modals serve as dynamic elements that cater to diverse functionalities, enhancing the overall user experience. These modals are adept at showcasing promotional offers, displaying subscription forms, presenting detailed product information, streamlining login processes, summarizing cart contents, and conveying other important details. 

By seamlessly integrating these popup modals, Hyva aims to elevate user engagement, ensuring that users can interact with the website seamlessly while preserving the fluidity of their ongoing browsing session. The use of popup modals in the Hyva theme aligns with the broader goal of providing a user-friendly and aesthetically pleasing online shopping experience.

Steps to Open Hyvä Popup Modal in Magento 2:

Step 1: Setting up the Layout for Magento 2 Hyva Theme Popup Modal

Create the Module Directory:

Inside the app/code directory, create a directory for your module. Replace [VendorName] and [ModuleName] with your desired values.

app/code/[VendorName]/[ModuleName]

Create Module Registration File: 

Create a registration.php file in the module directory.

<!– app/code/[VendorName]/[ModuleName]/registration.php  –>
<?php
\Magento\Framework\Component\ComponentRegistrar::register(
    \Magento\Framework\Component\ComponentRegistrar::MODULE,
    ‘[VendorName]_[ModuleName]’,
    __DIR__
);

Create Module Configuration File:

Create a module.xml file in the etc directory of your module.

<!– app/code/[VendorName]/[ModuleName]/etc/module.xml –>
<?xml version=”1.0″ ?>
<config xmlns:xsi=”http://www.w3.org/2001/XMLSchema-instance” xsi:noNamespaceSchemaLocation=”urn:magento:framework:Module/etc/module.xsd”>
    <module name=”[VendorName]_[ModuleName]” setup_version=”1.0.0″/>
</config>

Inside the layout folder, create a default.xml file and add the following code.

app/code/[VendorName]/[ModuleName]/view/frontend/layout/default.xml

Use block default class (class=”Magento\Framework\View\Element\Template”)

<!–app/code/[VendorName]/[ModuleName]/view/frontend/layout/default.xml–><?xml version=”1.0″?>
<page xmlns:xsi=”http://www.w3.org/2001/XMLSchema-instance” layout=”1column” xsi:noNamespaceSchemaLocation=”urn:magento:framework:View/Layout/etc/page_configuration.xsd”>
  <body>
      <referenceContainer name=”content”>
<block class=”[VendorName]\[ModuleName]\Block\[YourBlockClass]” name=”[your_block_name]” after=”-“
template=”[VendorName]_[ModuleName]::modal.phtml” />
      </referenceContainer>
  </body>
</page>

New to Hyvä?? Learn about the Hyvä Theme from scratch!

Step 2: Creating the Template for Magento 2 Hyva Theme Popup Modal

To generate a template for a Magento 2 popup modal within the Hyva Theme, proceed as follows:
1. Establish a template directory at the subsequent location: app/code/[VendorName]/[ModuleName]/view/frontend/templates/

2. Integrate a modal.phtml file into the templates directory and inject the provided code.

<?php
$heroicons = $viewModels->require(\Hyva\Theme\ViewModel\HeroiconsOutline::class);
$modal = $viewModels->require(\Hyva\Theme\ViewModel\Modal::class)
  ->createModal()
  ->withDialogRefName(‘popup-dialog’)
  ->withContent(‘
  <div class=”w-2/3 h-px max-w-1xl md:h-auto”>
      <div class=”absolute top-4 right-4 rounded-t dark:border-gray-600″>
          <button @click=”hideModal” type=”button” class=”h-10 w-10 rounded-full bg-gray-200 p-2″>’.$heroicons->renderHtml(‘x’).'</button>
    </div>
   
  <!– Modal body –>
      <div class=”p-6 space-y-6″>
          <h1>Hyva Popup Modal</h1>
      </div>
  </div>’
  )->addDialogClass(‘relative sm:w-1/2 md:w-1/2 lg:w-1/3 xl:1/3 2xl:1/3′,’m-2’);
?>
<div x-data=”{
  showModal: false,
  hideModal() {
      this.showModal = false;
  },
  openModal() {
      this.showModal = true;
  }
}” x-init=”init()”>
  <button @click=”openModal”>Open Modal</button>
  <template x-if=”showModal”>
      <?= $modal ?>
  </template>
</div>

This PHP and Alpine.js code creates a modal with a close button, a title, and dynamic styles using Tailwind CSS classes. The modal is hidden by default and becomes visible when clicking the “Open Modal” button. The provided PHP code configures the modal, and Alpine.js handles its visibility based on user interactions.

Following this, we create a primary <div> element with the x-data attribute, establishing a connection between the modal and the page. Inside this div, a button is created to trigger the display of the modal upon clicking. The modalViewModel->createModal()->withContent() function is employed to instantiate the modal and incorporate its content.

Within a script tag, the handleModal function is defined. This function returns an object with a single property, hideModal, which, when invoked, subsequently hides the modal.

Upon clicking the “Open Modal” button, the generated modal becomes visible.

For scenarios with multiple modal dialogs on a single page, the $modalViewModel->createModal()->withDialogRefName(popup-dialog’) function creates a unique dialog reference name. To open the modal, you can use show(‘popup-dialog’).

bin/magento setup:upgrade
bin/magento setup:di:compilebin/magento c:f

To apply CSS changes need to run (npm run build-prod) at (app/design/frontend/vendor/module/web/tailwind)

Please check its output “Happy coding”.

Output

Hyva Popup model

Read more resources on Hyva themes:

  1. Check out the InstaBuild for Hyvä Themes: Ready-made Hyva theme templates for faster storefront development!
  2. Hyva Themes Development – For Online Merchants
  3. Hyvä Theme Benefits that your store needs
  4. 10 Best Hyva Compatibility Extension Providers For Magento 2 Stores
  5. Hyvä VS PWA: Where to Invest?
  6. How a Slow Magento Website Can Cost You Advertising Dollars
  7. Mobile Commerce: How Hyva Themes Boost Mobile Conversions

In today’s article, I will explain to you how to create a Confirmation Dialog in Hyva Theme.

With the default Magento Luma/Blank theme, we can add a Confirmation Dialog using jQuery or Knockout.js. However, as you may already be aware, jQuery and Knockout.js do not work with the Hyva theme. 

Let’s delve into understanding how to add a Confirmation Dialog in the Hyva theme.

Steps to Open Hyvä  Confirmation Dialog in Magento 2

Step 1: Setting up the Layout for Magento 2 Hyva Theme Popup Modal

Create the Module Directory:

Inside the app/code directory, create a directory for your module. Replace [VendorName] and [ModuleName] with your desired values.

app/code/[VendorName]/[ModuleName]

Create Module Registration File:

Create a registration.php file in the module directory.

<?php
\Magento\Framework\Component\ComponentRegistrar::register(
    \Magento\Framework\Component\ComponentRegistrar::MODULE,
    '[VendorName]_[ModuleName]',
    __DIR__
);

Create Module Configuration File:

Create a module.xml file in the etc directory of your module. (app/code/[VendorName]/[ModuleName]/etc/module.xml)

<?xml version="1.0" ?>
<config xmlns:xsi="http://www.w3.org/2001/XMLSchema-instance" xsi:noNamespaceSchemaLocation="urn:magento:framework:Module/etc/module.xsd">
    <module name="[VendorName]_[ModuleName]" setup_version="1.0.0"/>
</config>

Inside the layout folder, create a default.xml file and add the following code And add the code as follows

app/code/[VendorName]/[ModuleName]/view/frontend/layout/default.xml

Use block default class (class=”Magento\Framework\View\Element\Template”)

<?xml version="1.0" encoding="UTF-8"?>
<page layout="3columns" xmlns:xsi="http://www.w3.org/2001/XMLSchema-instance"
  xsi:noNamespaceSchemaLocation="urn:magento:framework:View/Layout/etc/page_configuration.xsd">
  <body>
       <referenceContainer name="content">
           <block class="[VendorName]\[ModuleName]\Block\[YourBlockClass]" name="[your_block_name]" after="-"
               template="[VendorName]_[ModuleName]::confirmation-box.phtml" />
       </referenceContainer>
  </body>
</page>

New to Hyvä?? Learn about the Hyvä Theme from scratch!

Step 2: Creating the Template for Magento 2 Hyva Theme Confirmation box.

To generate a template for a Magento 2 popup modal within the Hyva Theme, proceed as follows:
1. Establish a template directory at the subsequent location: app/code/[VendorName]/[ModuleName]/view/frontend/templates/

2. Integrate a confirmation-box.phtml file into the templates directory and inject the provided code.

<div x-data="{ isOpen: false }">
   <button @click="isOpen = true" class="btn">Open Confirmation Dialog</button>

   <div x-show="isOpen" class="fixed inset-0 overflow-y-auto">
       <!-- Dialog Overlay -->
       <div class="flex items-end justify-center min-h-screen pt-4 px-4 pb-20 text-center sm:block sm:p-0">
           <!-- Background Overlay -->
           <div x-show="isOpen" class="fixed inset-0 transition-opacity" @click="isOpen = false">
               <div class="absolute inset-0 bg-gray-500 opacity-75"></div>
           </div>

           <!-- Dialog Content -->
           <div x-show="isOpen" class="inline-block align-bottom bg-white rounded-lg text-left overflow-hidden shadow-xl transform transition-all sm:my-8 sm:align-middle sm:max-w-lg sm:w-full">
               <!-- Your Confirmation Dialog Content Goes Here -->
               <div class="p-6">
                   <p class="text-lg text-gray-700">Are you sure you want to perform this action?</p>
               </div>

               <div class="bg-gray-50 px-4 py-3 sm:px-6 sm:flex sm:flex-row-reverse">
                   <button @click="isOpen = false" type="button" class="w-full inline-flex justify-center rounded-md border border-transparent shadow-sm px-4 py-2 bg-primary text-base font-medium text-black hover:bg-primary-dark focus:outline-none focus:ring-2 focus:ring-offset-2 focus:ring-primary sm:ml-3 sm:w-auto sm:text-sm">
                       Confirm
                   </button>
                   <button @click="isOpen = false" type="button" class="mt-3 w-full inline-flex justify-center rounded-md border border-gray-300 shadow-sm px-4 py-2 bg-white text-base font-medium text-gray-700 hover:bg-gray-50 focus:outline-none focus:ring-2 focus:ring-offset-2 focus:ring-gray-300 sm:mt-0 sm:w-auto sm:text-sm">
                       Cancel
                   </button>
               </div>
           </div>
       </div>
   </div>
</div>

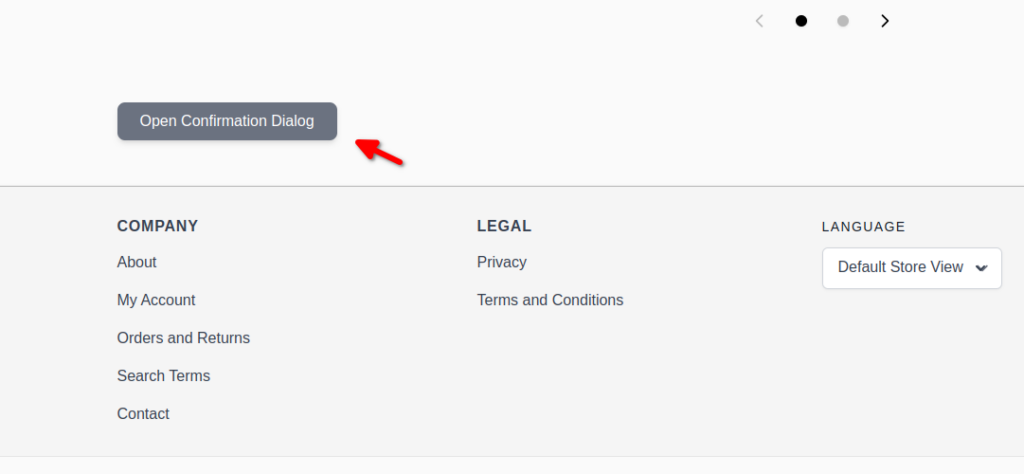
This code uses Alpine.js to create a simple confirmation dialog. When you click the “Open Confirmation Dialog” button, a modal appears with the message “Are you sure you want to perform this action?” along with “Confirm” and “Cancel” buttons. Clicking “Confirm” or “Cancel” closes the modal. 

The code provides a clean and interactive way to confirm user actions on a web page.

bin/magento setup:upgrade
bin/magento setup:di:compile
bin/magento c:f

Output: 

Magento 2 Hyva Theme Confirmation box
perform action

Read more resources on Hyva themes:

  1. Check out the InstaBuild for Hyvä Themes: Ready-made Hyva theme templates for faster storefront development!
  2. Hyva Themes Development – For Online Merchants
  3. Hyvä Theme Benefits that your store needs
  4. 10 Best Hyva Compatibility Extension Providers For Magento 2 Stores
  5. Hyvä VS PWA: Where to Invest?
  6. How a Slow Magento Website Can Cost You Advertising Dollars
  7. Mobile Commerce: How Hyva Themes Boost Mobile Conversions

In this post, I will be guiding you on: 

  • How Private section data is initialized?
  • How can we get Private Section Data in Alpine.js components?
  • How can we get Private Section Data in native JavaScript?
  • Reloading / Invalidating Section Data on the Client side
  • Reloading / Invalidating Section Data on the Server side 

In the Hyva theme, the logic of private section data is much simplified than what we used in Default Luma Magento. 

Since private content is specific to individual users, it’s reasonable to handle it on the client side i.e. web browser. A section data is a piece of customer data grouped together and each section is represented by the key.

Initialization of Private section data

Initialization of Private section data is triggered in the footer of every page. You can check the below code on how Section Data is triggered in the footer.

// this happens in the footer of every page

{
  function dispatchPrivateContent(data) {
    const privateContentEvent = new CustomEvent("private-content-loaded", {
      detail: {
        data: data
      }
    });
    window.dispatchEvent(privateContentEvent);
  }

  function loadSectionData() {
    // 1. load privateContent from localStorage.
    //
    // 2. determine if privateContent is valid.
    //    invalidation happens after 1 hour,
    //    or if the private_content_version cookie changed.
    //
    // 3. fetch privateContent from /customer/section/load if needed
    //
    // 4. dispatch privateContent event
    dispatchPrivateContent(hyva.getDummyPrivateContent());
  }

  window.addEventListener("load", loadSectionData);
  window.addEventListener("reload-customer-section-data", loadSectionData);
}

If there is no data present in LocalStorage, or one hour has passed or the private_content_version cookie is changed then fresh section data will be requested from /customer/section/load on when the next page loads and data stored in LocalStorage.

You can find the /customer/section/load request in the Browser’s Network tab on page load. You can also check the section data manually from the below URL.

{store_url}/customer/section/load/?sections=

Learn about the Hyvä Theme from scratch!

Get Private Section Data in Alpine.js components

We can receive the private section data in Alpine.js by listening to the “private-content-loaded” event on the window.

You can add the below code to get the private section data in the browser console.

<div x-data="" @private-content-loaded.window="console.log($event.detail.data)">
</div>

You will get the below response in the browser console when private section data is loaded.

Get Private Section Data in Alpine.js components

 Image URL: https://www.screencast.com/t/txpJEAR46

As you can see when private section data is loaded, with the private-content-loaded event you will get all section data like customer, cart, wishlist, etc. 

Note: In Hyvä it is not possible to subscribe to specific sections. All sections are always combined in one data object.

Let’s understand this with an example of getting customer data in Alpine js.

<script>
    "use strict";

    function initComponent() {
        return {
            customer: false,
            getCustomerData(data) {
                if (data.customer) {
                    this.customer = data.customer;
                }
            }
        }
    }
</script>

<div x-data="initComponent()"
     @private-content-loaded.window="getCustomerData($event.detail.data)"
>
    <template x-if="customer.fullname">
        <div>Welcome, <span x-text="customer.fullname"></span></div>
    </template>

    <template x-if="!customer.fullname">
        <div>Welcome Guest</div>
    </template>

</div>

Output

  • Guest user:
Guest user
  • Logged-in user:
Logged-in user

Get Private Section Data in native JavaScript

We can also get the section data using private-content-loaded events in native JavaScript.

<script>
    "use strict";

    function getCustomerData(event) {
        const sectionData = event.detail.data;

        if (sectionData.customer && sectionData.customer.fullname) {
            console.log('Welcome, ' + sectionData.customer.fullname);
        }

    }

    window.addEventListener("private-content-loaded", getCustomerData);

</script>

Output

You will get the below response in the browser console.

Reloading/Invalidating Section Data on the Client side

Reloading/Invalidating Section Data on the client side can be done with the dispatching “reload-customer-section-data” event.

window.dispatchEvent(new CustomEvent("reload-customer-section-data"));

Note: 

  • In contrast to Magento Luma themes, in Hyvä private content sections data are not invalidated/reloaded individually.
  • The whole section data is only reloaded from the server if the current data is older than 1 hour, or the “private_content_version” cookie is changed.
  • This can be either after a POST-request, or when the data is over 1 hour old.

When we dispatch the “reload-customer-section-data” event, it will cause the Section Data to be reloaded if it is expired or the “private_content_version” cookie is changed, then the private-content-loaded event will be triggered again.

If you want to force-reload the Section Data, we can do this by removing the “mage-cache-sessid cookie” before dispatching the “reload-customer-section-data” event.

// remove the mage-cache-sessid cookie
hyva.setCookie('mage-cache-sessid', '', -1, true);
// reload the section data
window.dispatchEvent(new CustomEvent("reload-customer-section-data"));

The private-content-loaded event will always be triggered after reloading the section data, regardless of whether it was requested from the server or read from local storage.

Reloading/Invalidating Section Data on the Server side

If you want to refresh the Section Data from the Server side(Backend) then the mage-cache-sessid cookie or the private_content_version cookie needs to be deleted.

Magento has done this to refresh the Section Data on any frontend or GraphQL POST request (but not for the REST API). You can check the “process” function in the Magento\Framework\App\PageCache\Version class.

public function process()
    {
        if ($this->request->isPost()) {
            $publicCookieMetadata = $this->cookieMetadataFactory->createPublicCookieMetadata()
                ->setDuration(self::COOKIE_PERIOD)
                ->setPath('/')
                ->setSecure($this->request->isSecure())
                ->setHttpOnly(false)
                ->setSameSite('Lax');
            $this->cookieManager->setPublicCookie(self::COOKIE_NAME, $this->generateValue(), $publicCookieMetadata);
        }
    }

You can do the same thing in custom PHP code during any POST request, inject class Magento\Framework\App\PageCache\Version, and call $version->process().

You can force the refresh in a GET request, and copy the code from Version::process. Keep in mind that GET request responses are usually cached in the FPC.

Read more resources on Hyva themes:

  1. Check out the InstaBuild for Hyvä Themes: Ready-made Hyva theme templates for faster storefront development!
  2. Hyva Themes Development – For Online Merchants
  3. Hyvä Theme Benefits that your store needs
  4. 10 Best Hyva Compatibility Extension Providers For Magento 2 Stores
  5. Hyvä VS PWA: Where to Invest?
  6. How a Slow Magento Website Can Cost You Advertising Dollars
  7. Mobile Commerce: How Hyva Themes Boost Mobile Conversions

Grow your online business like 4,060 subscribers
    * This site is protected by reCAPTCHA and the Google Privacy Policy and Terms of Service apply.
    envelope

    Thank You!

    We are reviewing your submission, and will be in touch shortly.