Chapters Close

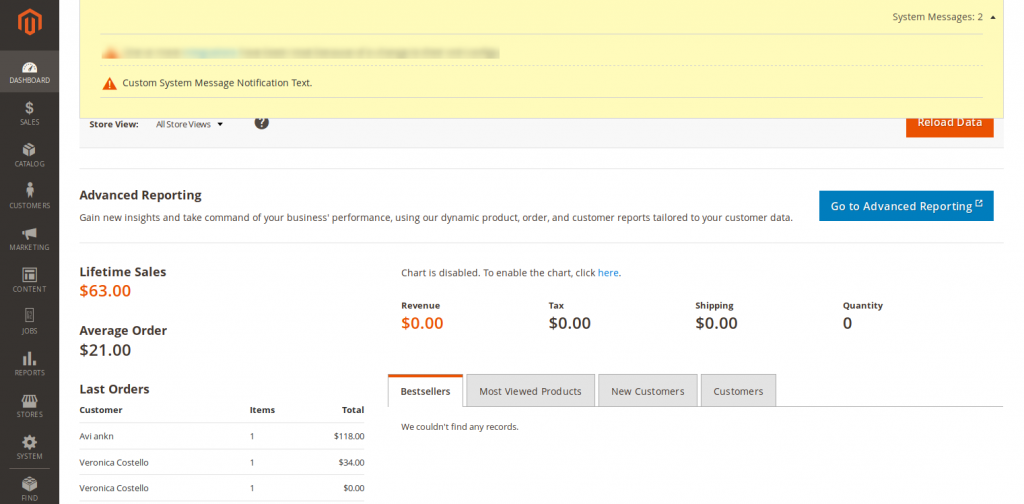
In this magento web development tip, we will be guiding you on how to display a custom admin system message in the backend.

One of the most useful default functionality is the admin notification. Magento uses this functionality to notify admin user of various errors, warning, upgrade and patch information. Whenever you log in to the admin panel, such notifications may appear giving you some vital information. These notifications can vary from messages about invalidated indexes to vulnerability issues. Adding custom system messages can be helpful and we are going to show you how to do it in a few simple steps.

There are four types of system admin notification that Magento uses which are listed below.

Notice: updates, releases, and other Magento news
Minor: minor updates and other messages
Major: important notifications, which you should check shortly
Critical: vulnerability issues and other most important notifications

Here we are using Aureatelabs as the Vendor name and CustomNotification as the name of the module.  You can change this according to your Vendor and Module name.

First you have to create a di.xml file in app/code/Aureatelabs/CustomNotification/etc/adminhtml/ directory

<?xml version="1.0"?>
<config xmlns:xsi="http://www.w3.org/2001/XMLSchema-instance" xsi:noNamespaceSchemaLocation="urn:magento:framework:ObjectManager/etc/config.xsd">
   <type name="Magento\Framework\Notification\MessageList">
       <arguments>
           <argument name="messages" xsi:type="array">
               <item name="customMessageNotification" xsi:type="string">Aureatelabs\CustomNotification\Model\System\Message\CustomMessageNotification</item>
           </argument>
       </arguments>
   </type>
</config>

Next we will be creating CustomMessageNotification.php in  app/code/Aureatelabs/CustomNotification/Model/System/Message directory.

This class must implement the “\Magento\Framework\Notification\MessageInterface” interface.

<?php
namespace Aureatelabs\CustomNotification\Model\System\Message;

use Magento\Framework\Notification\MessageInterface;

class CustomMessageNotification implements MessageInterface {

   /**
    * Message identity
    */
   const MESSAGE_IDENTITY = 'custom_system_notification';

   /**
    * Retrieve unique system message identity
    *
    * @return string
    */
   public function getIdentity()
   {
       return self::MESSAGE_IDENTITY;
   }

   /**
    * Check whether the system message should be shown
    *
    * @return bool
    */
   public function isDisplayed()
   {
       // return true will show the system notification, here you have to check your condition to display notification and base on that return true or false
       return true;
   }

   /**
    * Retrieve system message text
    *
    * @return \Magento\Framework\Phrase
    */
   public function getText()
   {
       return __('Custom System Message Notification Text.');
   }

   /**
    * Retrieve system message severity
    * Possible default system message types:
    * - MessageInterface::SEVERITY_CRITICAL
    * - MessageInterface::SEVERITY_MAJOR
    * - MessageInterface::SEVERITY_MINOR
    * - MessageInterface::SEVERITY_NOTICE
    *
    * @return int
    */
   public function getSeverity()
   {
       return self::SEVERITY_MAJOR;
   }

}

Possible default system message types are

SEVERITY_CRITICAL – to add a critical message
SEVERITY_MAJOR – to add a major message
SEVERITY_MINOR – to add a minor message
SEVERITY_NOTICE – to add a notice

 Now, execute the two commands given below:

php bin/magento setup:di:compile
php bin/magento cache:flush

And that’s it. Log in into the admin panel and you will see a custom system admin message notification.

Custom system admin message notification screenshot

Related Sources

  1. How to Call Custom phtml in UI-Component Form in Magento 2?
  2. How to create a custom tab and call custom phtml in the admin category

PAD length refers to the minimum number of additional zeros assigned to each order number as “padding” until the order number becomes higher than the chosen increment pad length. For example:

  • Pad 3 = 001, 012, 123, 1234, 12345, 123456
  • Pad 4 = 0001, 0012, 0123, 1234, 12345, 123456
  • Pad 6 = 000001, 000012, 000123, 001234, 012345, 123456

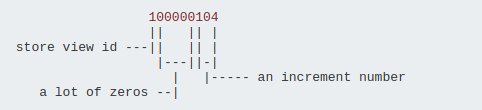
In the above order increment ID consist of following parts:

  1. Prefix (store view id)
  2. Pad-length
  3. Suffix (Actual Increment id)

In Magento\SalesSequence\Model\Sequence the getCurrentValue() method set the pattern of the increment id number.

/**
* Retrieve current value
*
* @return string
*/
public function getCurrentValue()
{
   if (!isset($this->lastIncrementId)) {
       return null;
   }

   return sprintf(
       $this->pattern,
       $this->meta->getActiveProfile()->getPrefix(),
       $this->calculateCurrentValue(),
       $this->meta->getActiveProfile()->getSuffix()
   );
}

$this->pattern initially get value %s%’.09d%s from the constant DEFAULT_PATTERN.

/**
* Default pattern for Sequence
*/
const DEFAULT_PATTERN  = "%s%'.09d%s";

%’.09d sets 0 as the padding character and sets the number of digits to display as the value that follows, in this case, is 9. The d presents the number as a [signed] decimal. This means that by default, the increment-ID number will be a signed decimal with 9 digits, padded with 0s.

If you want to customize order’s Increment id PAD-length to be different than Magento 2 produces by default.

You can configure the class constructor arguments in your etc/di.xml in the argument node. The object manager injects these arguments into the class during creation. The name of the argument configured in the XML file must correspond to the name of the parameter in the constructor in the configured class.

<?xml version="1.0"?>
<config xmlns:xsi="http://www.w3.org/2001/XMLSchema-instance"
       xsi:noNamespaceSchemaLocation="urn:magento:framework:ObjectManager/etc/config.xsd">
   <type name="Magento\SalesSequence\Model\Sequence">
       <arguments>
           <argument name="pattern" xsi:type="string">%s%'.05d%s</argument>
       </arguments>
   </type>
</config>

The following example creates instances of Magento\SalesSequence\Model\Sequence with the class constructor argument $pattern set to a value %s%’.05d%s

Finally, run php bin/magento setup:di:compile command and test by placing a new order, increment id will be changed from 9 to 5 digits.

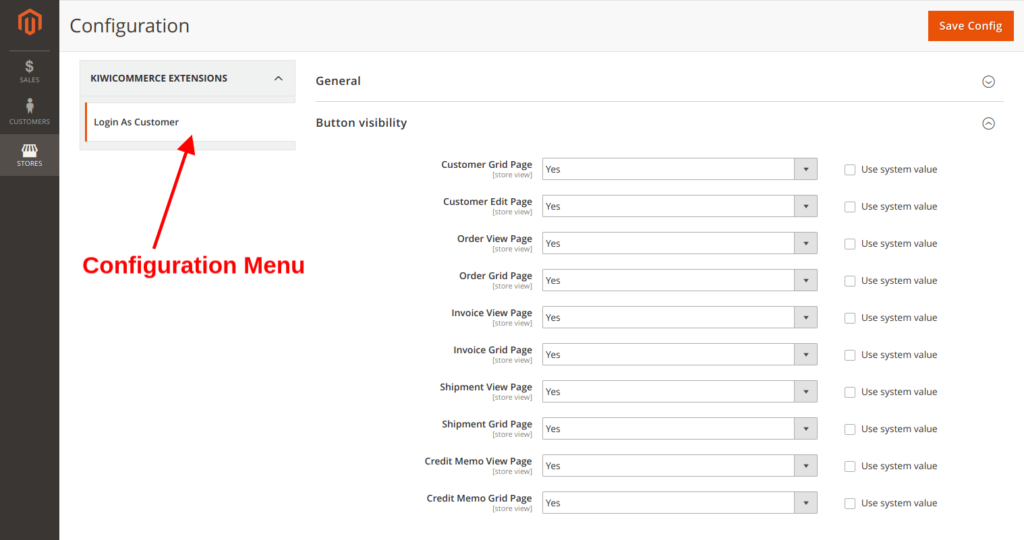
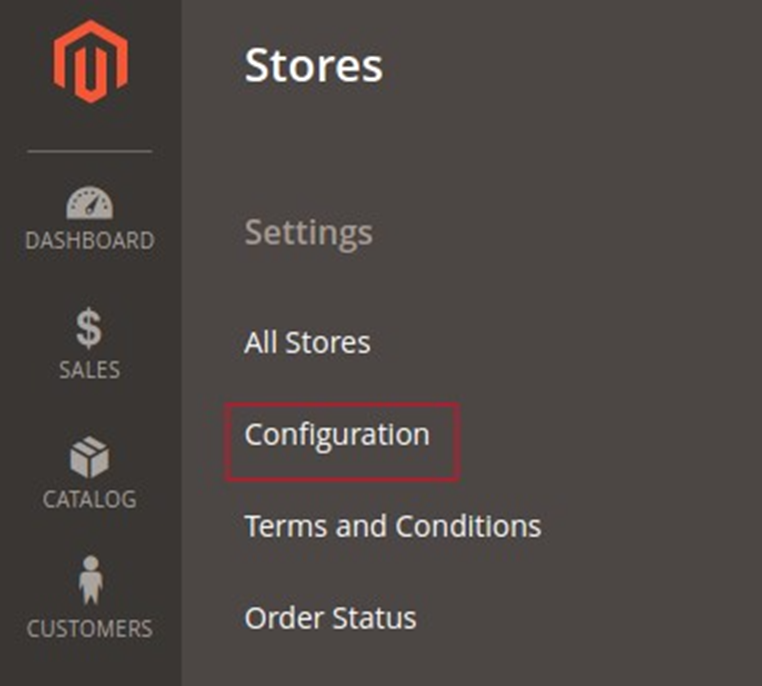
Magento 2 provides a configuration system in its backend where we can create our own configuration setting as per the module requirement.

We can go to Store->Setting->Configuration and check all the stored Magento configuration there. We can also add our own configuration menu and use them.

Table: core_config_data

  • All records of configuration are stored in the table mentioned above.
  • By default, there is no entry in the table when we create any configuration field.
  • However, when we save the configuration there will be an entry in this table with its respective value so that we can trace the actual configuration value from this table.

Step 1: Create system.xml file
Step 2: Set default configuration value
Step 3: Flush Magento cache
Step 4: Use configurations

Note: Replace Aureatelabs/LoginAsCustomer from entries in this article to your module name.

Step 1: Create system.xml file

Create a file at the path given below and add the following code:
app/code/VendorName/ThemeDirectoryName/etc/adminhtml/system.xml

<config xmlns:xsi="http://www.w3.org/2001/XMLSchema-instance"
       xsi:noNamespaceSchemaLocation="urn:magento:module:Magento_Config:etc/system_file.xsd">
   <system>
       <tab id="aureate_tab" translate="label" sortOrder="1">
           <label>Aureate Labs</label>
       </tab>
       <section id="aureatelabs" translate="label" type="text" sortOrder="100" showInDefault="1"
                showInWebsite="1" showInStore="1">
           <label>Login As Customer</label>
           <tab>aureate_tab</tab>
           <resource>Aureatelabs_LoginAsCustomer::config</resource>
           <group id="general" translate="label" type="text" sortOrder="10" showInDefault="1" showInWebsite="1"
                  showInStore="1">
               <label>General</label>
               <field id="login_as_customer_enabled" translate="label" type="select" showInDefault="1" canRestore="1"
                      showInWebsite="1" showInStore="1">
                   <label>Enabled</label>
                   <source_model>Magento\Config\Model\Config\Source\Yesno</source_model>
               </field>
           </group>
           <group id="button_visibility" translate="label" type="text" sortOrder="10" showInDefault="1"
                  showInWebsite="1" showInStore="1">
               <label>Button visibility</label>
               <field id="customer_grid_page" translate="label" type="select" showInDefault="1" canRestore="1"
                      showInWebsite="1" showInStore="1">
                   <label>Customer grid page</label>
                   <source_model>Magento\Config\Model\Config\Source\Yesno</source_model>
               </field>
           </group>
       </section>
   </system>
</config>

An overview of the code that you just saw:

In the above code, we have two groups
General and Button visibility
Below is the brief description of some of the tags we have used:

<system>: This tag is the starting tag to indicate that we are going to system settings.

Tab elements:

This tag is used to create our custom menu in configuration options.

  • id: unique tab id
  • label: tab title

Section Attributes:

  • id: unique section id
  • sortOrder: set the position of our configuration menu in the list.
  • showInDefaultconfiguration scope
  • showInWebsite: configuration scope
  • showInStore: configuration scope

Section elements:

  • Label: configuration menu title (In the example it’s Aureate Labs)
  • Tab: tab_id to display this configuration
  • Resource: ACL rule to access this configuration (In the example it’s Aureatelabs_LoginAsCustomer::config) 
  • Group: group of some configurations (In the example we created two groups general and  Button visibility)
  • Fields: configuration field to store dropdown or text or radio button. The field also has some attributes and elements.  

Fields Elements:

  • Label: field title (In Example for general we have Enabled text)
  • Source_model: store data of this field, we can use it for select, multi-select type (In the example we have used Magento\Config\Model\Config\Source\Yesno For Yes/No Dropdown)
  • We can use our own source_model for options in this example we are using yesno model provided by Magento. If you want to add our own you can add.

Step 2: Set default configuration value

Each field in system.xml after its creation will not have any value.

When we call them it will return Null value because at the time of field creation there is no entry in the core_config_data table. When we click on save config button then there is an entry as per the default value of the field.

If we have Yes/No field then it will show default No value (We will see how we can change it in the steps given below) but there is no entry in database level until we click on the save config button.

To set our default value for the field let’s consider in our example we have enabled the field for values Yes/No.

After the first step when we visit the admin configuration section then we have the default value set in the field as “No”.  Now we can change it as shown below:

Create a config.xml file at the path given below and add the following code:
app/code/VendorName/ThemeDirectoryName/etc/config.xml

Syntax:

<default>
<section>
   <group>
       <field>{value}</field>
   </group>
</section>
</default>

For our example:

<config xmlns:xsi="http://www.w3.org/2001/XMLSchema-instance"
       xsi:noNamespaceSchemaLocation="urn:magento:module:Magento_Store:etc/config.xsd">
   <default>
       <aureatelabs>
           <general>
               <login_as_customer_enabled>1</login_as_customer_enabled>
           </general>
           <button_visibility>
               <customer_grid_page>1</customer_grid_page>
               <customer_edit_page>1</customer_edit_page>
           </button_visibility>
       </aureatelabs>
   </default>
</config>
  • <default>: default field value
  • <aureatelabs>: section id
  • <general>: group id
  • <login_as_customer_enabled>: field id which sets a default value for the field

For our example we have considered the field and its value as shown below:

  • <section>: <aureatelabs>
  • <group>: <general>
  • <field>: <login_as_customer_enabled> set this value 1 to show yes by default.

Step 3: Flush Magento cache

Now we need to clear the cache of Magento. Using the commands given below we can clear and flush our Magento cache:

  • For Clear cache : php bin\magento cache:clear OR php bin\magento c:c
  • For Flush cache : php bin\magento cache:flush OR php bin\magento c:f

Or we can also clear and flush the cache from the admin panel: System->tools->cache management

Step 4: Get value from the configuration

There are two ways to get value of the configuration

1. By simply calling it:

$this->scopeConfig->getValue(aureatelabs/general/login_as_customer_enabled
,\Magento\Store\Model\ScopeInterface::SCOPE_STORE);

Above code will return value of configuration value stored in the table for that field
Where:

  • Aureatelabs: Section id
  • General: Group id
  • Login_as_customer_enabled: Field id

2. Using the Helper Class (Recommended):

Create a file at the path given below and add the following code:
app/code/Vendor/module/Helper/Data.php

namespace Aureatelabs\LoginAsCustomer\Helper;
use Magento\Framework\App\Helper\AbstractHelper;
use Magento\Store\Model\ScopeInterface;
class Data extends AbstractHelper
{
  const XML_PATH_FIELD = aureatelabs/general/';
   public function getConfigValue($field, $storeId = null)
   {
       return $this->scopeConfig->getValue(
           $field, ScopeInterface::SCOPE_STORE, $storeId
       );
   }
   public function getFieldConfig($code, $storeId = null)
   {
       return $this->getConfigValue(self::XML_PATH_FIELD.$code, $storeId);
   }
}

Now, we try to get it in the controller:

Create a file at the path given below and add the following code:
app/code/Aureatelabs/LoginAsCustomer/Controller/Login/index.php

namespace Aureatelabs\LoginAsCustomer\Controller\Login;
class Index extends \Magento\Framework\App\Action\Action
{
   protected $helperData;
   public function __construct(
       \Magento\Framework\App\Action\Context $context,
    \Aureatelabs\LoginAsCustomer\Helper\Data $helperData
   )
   {
       $this->helperData = $helperData;
       return parent::__construct($context);
   }
   public function execute()
   {
       // TODO: Implement execute() method.
       $CheckEnable=$this->helperData->getFieldConfig('enable');
      // You can check value of result by printing $CheckEnable value
   }
}

Hope this was helpful. If you have any queries regarding the same feel free to write to us in the comments section given below!

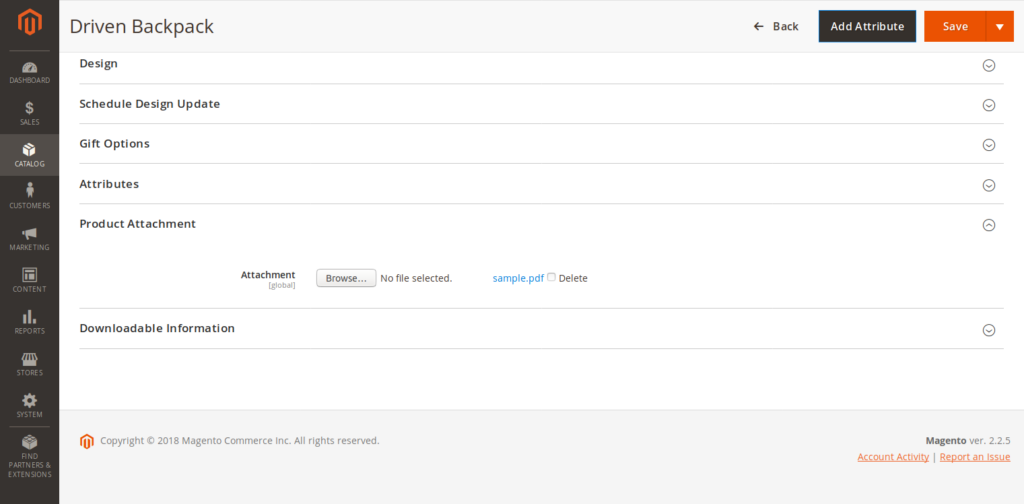
Time for another Magento web development hack. I will be guiding you on how to attach a file in the product admin form and display the attachment on the product detail page.

Here we will be using Aureatelabs as the Vendor name and ProductAttachment as the module’s name.  You can change this according to your Vendor and Module name.

Step 1: Create module registration file

First, create a registration.php file in app/code/Aureatelabs/ProductAttachment directory


Copy Code
<?php

\Magento\Framework\Component\ComponentRegistrar::register(
   \Magento\Framework\Component\ComponentRegistrar::MODULE,
   'Aureatelabs_ProductAttachment',
   __DIR__
);

Next create a module.xml file in app/code/Aureatelabs/ProductAttachment/etc directory.


Copy Code
<?xml version="1.0"?>
<config xmlns:xsi="http://www.w3.org/2001/XMLSchema-instance"
       xsi:noNamespaceSchemaLocation="urn:magento:framework:Module/etc/module.xsd">
   <module name="Aureatelabs_ProductAttachment" setup_version="1.0.0" />
</config>

Step 2: Create InstallData script to add product attachment attribute

Next, we will create a script to add product attribute. So create an InstallData.php in app/code/Aureatelabs/ProductAttachment/Setup directory.


Copy Code
<?php
namespace Aureatelabs\ProductAttachment\Setup;

use Magento\Framework\Setup\ModuleContextInterface;
use Magento\Framework\Setup\ModuleDataSetupInterface;
use Magento\Framework\Setup\InstallDataInterface;
use Magento\Eav\Setup\EavSetupFactory;

/**
 * Class InstallData
 * @package Aureatelabs\ProductAttachment\Setup
 *
 * @codeCoverageIgnore
 */
class InstallData implements InstallDataInterface
{
    /**
     * @var EavSetupFactory
     */
    protected $_eavSetupFactory;

    public function __construct(
        EavSetupFactory $eavSetupFactory
    ) {
        $this->_eavSetupFactory = $eavSetupFactory;
    }

    /**
     * {@inheritdoc}
     * @SuppressWarnings(PHPMD.CyclomaticComplexity)
     * @SuppressWarnings(PHPMD.ExcessiveMethodLength)
     * @SuppressWarnings(PHPMD.NPathComplexity)
     */
    public function install(ModuleDataSetupInterface $setup, ModuleContextInterface $context)
    {
        $eavSetup = $this->_eavSetupFactory->create(["setup"=>$setup]);
        $eavSetup->addAttribute(
            \Magento\Catalog\Model\Product::ENTITY,
            'attachment',
            [
                'group' => 'Product Attachment',
                'type' => 'varchar',
                'label' => 'Attachment',
                'input' => 'file',
                'backend' => 'Aureatelabs\ProductAttachment\Model\Product\Attribute\Backend\File',
                'frontend' => '',
                'class' => '',
                'source' => '',
                'global' => \Magento\Eav\Model\Entity\Attribute\ScopedAttributeInterface::SCOPE_GLOBAL,
                'visible' => true,
                'required' => false,
                'user_defined' => true,
                'default' => '',
                'searchable' => false,
                'filterable' => false,
                'comparable' => false,
                'visible_on_front' => false,
                'unique' => false,
                'apply_to' => 'simple,configurable', // applicable for simple and configurable product
                'used_in_product_listing' => true
            ]
        );
    }
}

Here attachment is product attribute code.

  • group: Here we have used Product Attachment in the group. So new attribute created in product admin form will be added in a new tab named  Product Attachment.
  • type: Here we will define varchar in type. We will save file name in attribute so we need varchar in type.
  • label: Define the product attribute label, this label will be shown in product admin form.
  • input: Define file to display file type input in product admin form.
  • backend: In this define the backend model path. This backend model will handle the file upload and will save the value of the attribute when saving the product.
  • user_defined: It is custom attribute so will use true in this column.
  • apply_to: In this column define different product type so this attribute will work with only these product types.
  • used_in_product_listing: To use this attribute value in the frontend in product listing set this to true.

Next, we will create a backend model file to save uploaded file in the media folder and save the file name to this attribute value.

Step 3: Create backend model file to upload product attachment file and save value in attachment attribute

So create File.php in app/code/Aureatelabs/ProductAttachment/Model/Product/Attribute/Backend directory


Copy Code
<?php
namespace Aureatelabs\ProductAttachment\Model\Product\Attribute\Backend;

use Magento\Framework\App\Filesystem\DirectoryList;
use Magento\Eav\Model\Entity\Attribute\Backend\AbstractBackend;

class File extends AbstractBackend
{
    /**
     * @var \Magento\Framework\Filesystem\Driver\File
     */
    protected $_file;

    /**
     * @var \Psr\Log\LoggerInterface
     */
    protected $_logger;

    /**
     * @var \Magento\Framework\Filesystem
     */
    protected $_filesystem;

    /**
     * @var \Magento\MediaStorage\Model\File\UploaderFactory
     */
    protected $_fileUploaderFactory;


    /**
     * Construct
     *
     * @param \Psr\Log\LoggerInterface $logger
     * @param \Magento\Framework\Filesystem $filesystem
     * @param \Magento\MediaStorage\Model\File\UploaderFactory $fileUploaderFactory
     */
    public function __construct(
        \Psr\Log\LoggerInterface $logger,
        \Magento\Framework\Filesystem $filesystem,
        \Magento\Framework\Filesystem\Driver\File $file,
        \Magento\MediaStorage\Model\File\UploaderFactory $fileUploaderFactory
    ) {
        $this->_file = $file;
        $this->_filesystem = $filesystem;
        $this->_fileUploaderFactory = $fileUploaderFactory;
        $this->_logger = $logger;
    }

    public function afterSave($object)
    {

        $path = $this->_filesystem->getDirectoryRead(
            DirectoryList::MEDIA
        )->getAbsolutePath(
            'catalog/product/attachment/'
        );
        $delete = $object->getData($this->getAttribute()->getName() . '_delete');

        if ($delete) {
            $fileName = $object->getData($this->getAttribute()->getName());
            $object->setData($this->getAttribute()->getName(), '');
            $this->getAttribute()->getEntity()->saveAttribute($object, $this->getAttribute()->getName());
            if ($this->_file->isExists($path.$fileName))  {
                $this->_file->deleteFile($path.$fileName);
            }

        }

        if (empty($_FILES['product']['tmp_name'][$this->getAttribute()->getName()])) {
            return $this;
        }

        try {
            /** @var $uploader \Magento\MediaStorage\Model\File\Uploader */
            $uploader = $this->_fileUpzloaderFactory->create(['fileId' => 'product['.$this->getAttribute()->getName().']']);
            $uploader->setAllowRenameFiles(true);
            $result = $uploader->save($path);
            $object->setData($this->getAttribute()->getName(), $result['file']);
            $this->getAttribute()->getEntity()->saveAttribute($object, $this->getAttribute()->getName());
        } catch (\Exception $e) {
            if ($e->getCode() != \Magento\MediaStorage\Model\File\Uploader::TMP_NAME_EMPTY) {
                $this->_logger->critical($e);
            }
        }

        return $this;
    }

}

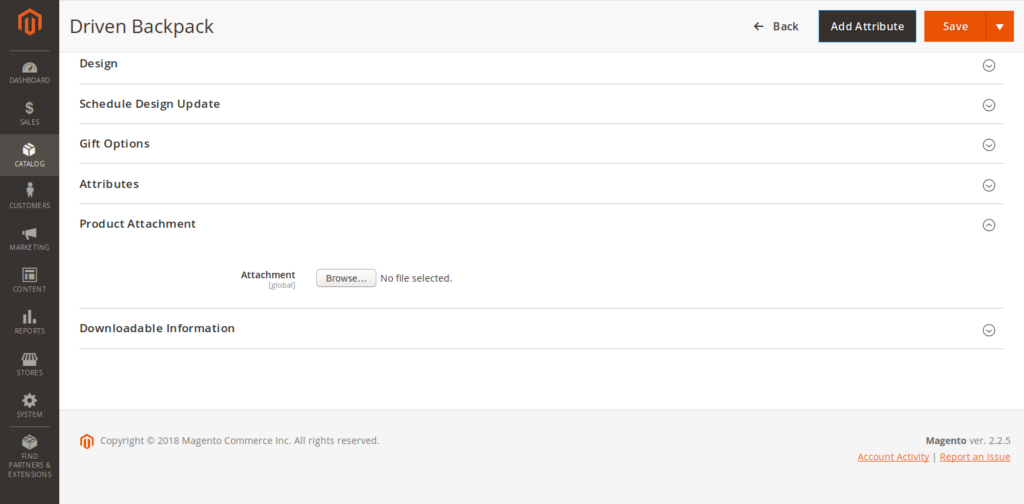
Now you can see the product attachment tab and input type file attribute in a new tab in product admin form.

Now after attaching file and save the product, the file is uploaded in pub/media/catalog/product/attachment directory and file name stored in attachment attribute value.

But after saving the product in product attachment tab file name is not showing up or how to remove file checkbox is not showing up.

So we will display an anchor tag that contains the file path and we will also add delete checkbox to remove the file in the product attachment tab.

We will use a modifier to add these changes in product attachment tab.

So we will create a di.xml in app/code/Aureatelabs/ProductAttachment/etc/adminhtml directory.


Copy Code
<?xml version="1.0"?>
<config xmlns:xsi="http://www.w3.org/2001/XMLSchema-instance" xsi:noNamespaceSchemaLocation="urn:magento:framework:ObjectManager/etc/config.xsd">
   <virtualType name="Magento\Catalog\Ui\DataProvider\Product\Form\Modifier\Pool" type="Magento\Ui\DataProvider\Modifier\Pool">
       <arguments>
           <argument name="modifiers" xsi:type="array">
               <item name="attachment" xsi:type="array">
                   <item name="class" xsi:type="string">Aureatelabs\ProductAttachment\Ui\DataProvider\Product\Form\Modifier\File</item>
                   <item name="sortOrder" xsi:type="number">1000</item>
               </item>
           </argument>
       </arguments>
   </virtualType>
</config>

Next, we will create File.php in app/code/Aureatelabs/ProductAttachment/Ui/DataProvider/Product/Form/Modifier directory.


Copy Code
<?php
namespace Aureatelabs\ProductAttachment\Ui\DataProvider\Product\Form\Modifier;

use Magento\Framework\Stdlib\ArrayManager;
use Magento\Store\Model\StoreManagerInterface;
use Magento\Catalog\Ui\DataProvider\Product\Form\Modifier\AbstractModifier;

class File extends AbstractModifier
{
    /**
     * @var ArrayManager
     */
    protected $arrayManager;

    /**
     * @var StoreManagerInterface
     */
    protected $storeManager;

    /**
     * @param ArrayManager $arrayManager
     * @param StoreManagerInterface $storeManager
     */
    public function __construct(
        ArrayManager $arrayManager,
        StoreManagerInterface $storeManager
    ) {
        $this->arrayManager = $arrayManager;
        $this->storeManager = $storeManager;
    }

    public function modifyMeta(array $meta)
    {
        $fieldCode = 'attachment';
        $elementPath = $this->arrayManager->findPath($fieldCode, $meta, null, 'children');
        $containerPath = $this->arrayManager->findPath(static::CONTAINER_PREFIX . $fieldCode, $meta, null, 'children');

        if (!$elementPath) {
            return $meta;
        }

        $mediaUrl =  $this->storeManager->getStore()
            ->getBaseUrl(\Magento\Framework\UrlInterface::URL_TYPE_MEDIA);

        $meta = $this->arrayManager->merge(
            $containerPath,
            $meta,
            [
                'children'  => [
                    $fieldCode => [
                        'arguments' => [
                            'data' => [
                                'config' => [
                                    'elementTmpl'   => 'Aureatelabs_ProductAttachment/elements/file',
                                    'media_url' => $mediaUrl
                                ],
                            ],
                        ],
                    ]
                ]
            ]
        );
        return $meta;
    }

    public function modifyData(array $data)
    {
        return $data;
    }
}

We have defined an HTML template file in the modifier.

So next we will create file.html in app/code/Aureatelabs/ProductAttachment/view/adminhtml/web/template/elements diectory.


Copy Code
<input class="admin__control-file" type="file" data-bind="
    hasFocus: focused,
    attr: {
        name: inputName,
        placeholder: placeholder,
        'aria-describedby': noticeId,
        id: uid,
        disabled: disabled,
        form: formId
    }"
/>
<!-- ko if: $parent.source.data.product[code] -->
<span>
    <a attr="href: media_url+'catalog/product/attachment/'+$parent.source.data.product[code]" text="$parent.source.data.product[code]" target="_blank"></a>
    <label attr="for: uid+'_delete'">
        <input type="checkbox" attr="name: 'product['+code + '_delete]', id: uid+'_delete', form: formId">
        <span data-bind="i18n:'Delete'"></span>
    </label>
</span>
<!-- /ko -->

Now after saving the product, it will display anchor tag with attachment file path and delete checkbox.

We have already added define delete file code in backend model app/code/Aureatelabs/ProductAttachment/Model/Product/Attribute/Backend/File.php.

Step 5: Display product attachment in product detail page in frontend

Next, we will create a new product attachment tab in the product detail page and will show product attachment for that product.

So next we will create a catalog_product_view.xml in app/code/Aureatelabs/ProductAttachment/view/frontend/layout directory.


Copy Code
<?xml version="1.0"?>
<page xmlns:xsi="http://www.w3.org/2001/XMLSchema-instance" xsi:noNamespaceSchemaLocation="urn:magento:framework:View/Layout/etc/page_configuration.xsd">
	<body>
    	<referenceBlock name="product.info.details">
        	<block class="Aureatelabs\ProductAttachment\Block\Attachment" name="product.attachment.tab" template="Aureatelabs_ProductAttachment::product_attachment.phtml" group="detailed_info">
            	<arguments>
                	<argument translate="true" name="title" xsi:type="string">Product Attachment</argument>
            	</arguments>
        	</block>
    	</referenceBlock>
	</body>
</page>

As we have defined in layout file we will create block and phtml file.

So next we will create an Attachment.php in app/code/Aureatelabs/ProductAttachment/Block directory.


Copy Code
<?php
namespace Aureatelabs\ProductAttachment\Block;

class Attachment extends \Magento\Catalog\Block\Product\View {

	public function getMediaUrl() {
    	return $this->_storeManager->getStore()
        	->getBaseUrl(\Magento\Framework\UrlInterface::URL_TYPE_MEDIA);
	}

	public function getProductAttachmentUrl($attachment) {

    	return $this->getMediaUrl()."catalog/product/attachment/".$attachment;

	}
}

Next we will create a product_attachment.phtml in app/code/Aureatelabs/ProductAttachment/view/frontend/templates directory.


Copy Code
<?php
// get current product data
$product = $block->getProduct();


if (!empty($product->getAttachment())) {

	$attachmentUrl = $block->getProductAttachmentUrl($product->getAttachment());
	?>
	<a href="<?php echo $attachmentUrl ?>" target="_blank"><?php echo $product->getAttachment() ?></a>
<?php
}

Now flush cache and open the product detail page. Now you can see the product attachment tab.

Also read:

  1. Add view button in admin grid
  2. Magento 2 Create Admin Button

FAQs

How to upload image in admin form Magento 2?


To upload image in admin form Magento 2, open the admin panel. Navigate to Products>Catalog tab and click on the product to which you add an image. Then, navigate to the Images and Videos tab and click on the camera icon. Here, you can select the required image from your local storage. Click on the orange save button to save all the images.

How do I display data in frontend in Magento 2?


To display data in frontend in Magento 2, follow the below steps:
1. Create a Resource Model for the data in the required table.
2. Create a collection model to fetch data from the table.
3. Extend the model by creating a data interface.
4. Implement the model and locate a block file. 
5. Input data in the phtml file and utilize commands to manage the data.

How to save admin form data in Magento 2?


To save admin form data in Magento 2, check the following steps:
1. Create a submit.php file to save form input data.
2. Locate the file in app\code\Extension\Controller\Index\Submit.php
3. Enter data saved message in the code to display when necessary.
4. Implement the code and test it to save data in the database.

How to upload image in Magento 2 backend?


To upload an image in Magento 2, follow the below-mentioned steps –

1. Inject the Magento\Framework\File\UploaderFactory class in your constructor –
protected $_uploaderFactory;
public function __construct(
// …
\Magento\Framework\File\UploaderFactory $uploaderFactory,
// …
) {
// …
$this->_uploaderFactory = $uploaderFactory;
// …
}

2. Now, use the create() function of the $_uploaderFactory object to create an instance of the \Magento\Framework\File\Uploader class -
$uploader = $this->_uploaderFactory->create(['fileId' => 'image']);

3. Next, set the path to the media folder where you want to upload the image –
$path = 'path/to/media/folder';
$uploader->setAllowCreateFolders(true);
$uploader->setAllowedExtensions(['jpg', 'jpeg', 'gif', 'png']);
$uploader->save($path);

4. Once the image is uploaded, you can use it in your products or pages.

Hello, if you want to learn regarding the configuration creation in Magento 2 then you are at the right place. In this blog, we will cover how to add custom system configuration located in Stores > Configuration

Config.xml in Magento 2

XML is a configuration file that creates configuration fields in Magento 2 System Configuration. You can create config.xml in Magento 2 in 3 simple steps. First, create a custom configuration field with Magento 2. Second, create ACL. And finally, add the default config value on Magento 2 module.

Now we will show you how to execute it in three steps with examples.

Note: Replace Aureatelabs/Jobs from entries in this article with your module name.

Step 1: Create a custom configuration field with Magento 2

Let’s assume that we have created a module for jobs. Now let’s create the system.xml file.

The system.xml file will be located at: app/code/Aureatelabs/Jobs/etc/adminhtml/system.xml

<?xml version="1.0"?>
<config xmlns:xsi="http://www.w3.org/2001/XMLSchema-instance" xsi:noNamespaceSchemaLocation="urn:magento:module:Magento_Config:etc/system_file.xsd">
<system>
   <tab id="jobs" translate="label" sortOrder="1000">
       <label>Jobs</label>
   </tab>
   <section id="jobs" translate="label" type="text" sortOrder="10" showInDefault="1" showInWebsite="1" showInStore="1">
       <label>Jobs</label>
       <tab>jobs</tab>
       <resource>Aureatelabs_Jobs::jobs</resource>
       <group id="department" translate="label" type="text" sortOrder="10" showInDefault="1" showInWebsite="1" showInStore="1">
           <label>Job configuration</label>
           <field id="view_list" translate="label comment" type="select" sortOrder="10" showInDefault="1" showInWebsite="1" showInStore="1">
               <label>Show list</label>
               <comment>Show job list of the viewing department</comment>
               <source_model>Magento\Config\Model\Config\Source\Yesno</source_model>
           </field>
       </group>
   </section>
</system>
</config>
  • tab node creates a new tab. The attribute sortOrder allows you to change its position on the list.
  • section node adds a new element to our tab. You can change the text with the label value.
  • group node creates a group of the field on the form. We will create one group with the label Job configuration.
  • We have to set the select type and define the label. We will be using a native object from Magento which will return values “Yes/No”.

Step 2: ACL Creation

Next step is to create ACL for displaying the Configuration. Let’s create acl.xml file.

The acl.xml file will be located at: app/code/Aureatelabs/Jobs/etc/acl.xml

<?xml version="1.0"?>
<config xmlns:xsi="http://www.w3.org/2001/XMLSchema-instance" xsi:noNamespaceSchemaLocation="urn:magento:framework:Acl/etc/acl.xsd">
<acl>
   <resources>
       <resource id="Magento_Backend::admin">
           <resource id="Aureatelabs_Jobs::job_head" title="Jobs" sortOrder="100" >
               <resource id="Aureatelabs_Jobs::department" title="Departments" sortOrder="10">
                   <resource id="Aureatelabs_Jobs::department_save" title="Save Department" sortOrder="10" />
                   <resource id="Aureatelabs_Jobs::department_delete" title="Delete Department" sortOrder="20" />
               </resource>
               <resource id="Aureatelabs_Jobs::job" title="Jobs" sortOrder="20">
               <resource id="Aureatelabs_Jobs::job_save" title="Save Job" sortOrder="10" />
                   <resource id="Aureatelabs_Jobs::job_delete" title="Delete Job" sortOrder="20" />
               </resource>
           </resource>
           <resource id="Magento_Backend::stores">
               <resource id="Magento_Backend::stores_settings">
                   <resource id="Magento_Config::config">
                       <resource id="Aureatelabs_Jobs::jobs" title="Jobs Section" />
                   </resource>
               </resource>
           </resource>
       </resource>
   </resources>
</acl>
</config>
  • We have added a new node named “Magento_Backend::stores”
  • The last node will be our module node : Aureatelabs_Jobs::jobs
  • The id is equal to the resource node in the system.xml file.

After performing the above steps you need to execute the commands given below:
php bin/magento cache:flush
php bin/magento setup:di:compile

Now refresh the store configuration page and you will find that the admin configuration will be available now.

Step 3: Add default config value on Magento 2 module

Let’s create a config.xml file. The config.xml file will be located at: app/code/Aureatelabs/Jobs/etc/config.xml

<?xml version="1.0"?>
<config xmlns:xsi="http://www.w3.org/2001/XMLSchema-instance" xsi:noNamespaceSchemaLocation="urn:magento:module:Magento_Store:etc/config.xsd">
<default>
   <jobs>
       <department>
           <view_list>1</view_list>
       </department>
   </jobs>
</default>
</config>
  • The default node states that it is the default scope.
  • The next nodes are section, group and field names that are set in system.xml
  • Here we set our default value to 1.

You can check DB value for configuration. Now find core_config_data MySQL table in Magento database. You can find the jobs/department/view_list inside path column in the MySQL table.

This is all. If you follow the above steps carefully you can certainly go live with the customs entry in the system configuration in Magento2. Even if you have any query or doubt regarding this article, you can reach us to make it clear.

Happy Customizing!

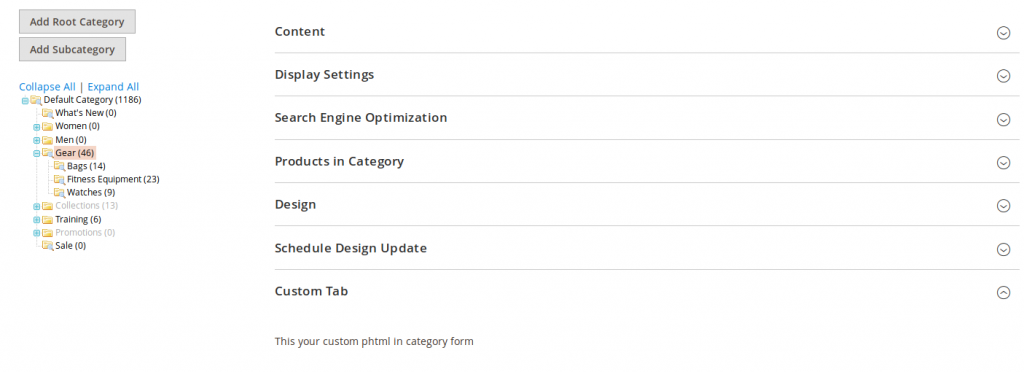
In this Magento 2 web development tip, we will be guiding you on how to create a custom tab and call custom phtml in the admin category ui-component form in Magento 2.

Here we are using Aureatelabs as the Vendor name and CustomTab as the name of the module.  You can change this according to your Vendor and Module name.

First, we will create a custom tab in category admin form after that we will call our custom block and phtml file inside our custom tab.

First you have to create category_form.xml file in app/code/Aureatelabs/CustomTab/view/adminhtml/ui_component directory

<?xml version="1.0" encoding="UTF-8"?>
<form xmlns:xsi="http://www.w3.org/2001/XMLSchema-instance" xsi:noNamespaceSchemaLocation="urn:magento:module:Magento_Ui:etc/ui_configuration.xsd">
   <fieldset name="category_custom_tab_789" sortOrder="120">
       <settings>
           <collapsible>true</collapsible>
           <label translate="true">Custom Tab</label>
       </settings>
       <container name="custom_tab_container" sortOrder="100">
           <htmlContent name="html_content">
               <block name="custom_category_tab" class="Aureatelabs\CustomTab\Block\Adminhtml\Category\CustomTab"/>
           </htmlContent>
       </container>
   </fieldset>
</form>

Here we have set custom block inside our custom tab in category_form.xml.

Next we will create CustomTab.php in  app/code/Aureatelabs/CustomTab/Block/Adminhtml/Category directory.

<?php
namespace Aureatelabs\CustomTab\Block\Adminhtml\Category;

class CustomTab extends \Magento\Backend\Block\Template
{
   /**
    * Block template.
    *
    * @var string
    */
   protected $_template = 'category/custom_tab.phtml';

}

In the block file, we have defined the phtml file.

So next we will create custom_tab.phtml in app/code/Aureatelabs/CustomTab/view/adminhtml/templates/category directory

<p>This your custom phtml in admin category form</p>

Now flush the cache and open the category admin form, there you will see the custom phtml file content in our custom tab.

Well that was an easy one, wasn’t it? Let us know in the comments section below.

Related Source

  1. How to display a custom admin system notification

In this hack of Magento web development, we will be guiding you on how to add a custom button in the admin product ui-component form in Magento 2.

Here we will be using Aureatelabs as the Vendor name and CustomButton as the name of the module.  You can change this according to your Vendor and Module name.

The product form is generated via ui-components.

To begin with, you have to create a product_form.xml file in app/code/Aureatelabs/CustomButton/view/adminhtml/ui_component directory

<?xml version="1.0" encoding="UTF-8"?>
<form xmlns:xsi="http://www.w3.org/2001/XMLSchema-instance"   xsi:noNamespaceSchemaLocation="urn:magento:module:Magento_Ui:etc/ui_configuration.xsd">
   <!--For custom button-->
   <argument name="data" xsi:type="array">
       <item name="buttons" xsi:type="array">
           <item name="customButton" xsi:type="string">Aureatelabs\CustomButton\Block\Adminhtml\Product\Edit\Button\CustomButton</item>
       </item>
   </argument>
</form>

Next you have to create is a CustomButton.php file in app/code/Aureatelabs/CustomButton/Block/Adminhtml/Product/Edit/Button directory

<?php
namespace Aureatelabs\CustomButton\Block\Adminhtml\Product\Edit\Button;

class CustomButton extends \Magento\Catalog\Block\Adminhtml\Product\Edit\Button\Generic
{
	public function getButtonData()
	{
    	return [
        	'label' => __('Custom Button'),
        	'class' => 'action-secondary',
        	'on_click' => 'alert("Hello World")',
        	'sort_order' => 10
    	];
	}
}

After this flush the cache and open product admin ui-component form, now you can see the custom button on the product admin form.

Related sources

  1. How to Add File Upload Field in Admin Form?

  2. Add UI Component In phtml

It’s tough when you’re dealing with Magento 1 custom grid view and you have to display EAV attribute data in grid. Right?

After tweaking the minds for hours, we at Aureate Labs would like to present a best and easy go solution that can work without a single error.

Let’s make it happen in a couple of minutes,

In a very short journey before we jump on actual code, make sure you’ve needed table structure same as displayed below:

First, create two tables related to the testimonial.
1.  testimonial table (parent table): stores All testimonial data.
2.  testimonial_product_customer (child table): stores Testimonial_id (FK), Product_id(FK), Customer_ID(FK) relational data.

Here is the detailed table structure with the required columns:

testimonial

  • Id (Primary key)
  • company_name
  • name
  • message
  • post
  • profile_pic
  • status
  • created_at
  • Updated_at

testimonial_product_customer

  • Id (Primary key)
  • testimonial_id (Foreign key – testimonial)
  • product_id (Foreign key – product)
  • customer_id (Foreign key – customer)

Now, all we need is to display these products and customers related data in testimonial grid without breaking any functionality of searching or sorting the data. And that can be easily done with the help of LEFT JOIN (EAV TABLES).

Coming to code, we have to update _prepareCollection() the method of testimonial grid block class (Grid.php) placed at  app/code/local/{Namespace}/Testimonials/Block/Adminhtml/Testimonials/

protected function _prepareCollection()
{
    $collection = Mage::getModel('testimonials/testimonial')
                 ->getCollection();
    $productsTableName = Mage::getSingleton('core/resource')
                 ->getTableName('catalog/product');
    $productCustomerTableName = Mage::getSingleton('core/resource')
                 ->getTableName('testimonials/testimonial_product_customer');
    $entityTypeId = Mage::getModel('eav/entity')
        ->setType('catalog_product')
        ->getTypeId();
    $entityCustTypeId = Mage::getModel('eav/entity')
        ->setType('customer')
        ->getTypeId();
    $prodNameAttrId = Mage::getModel('eav/entity_attribute')
        ->loadByCode($entityTypeId, 'name')
        ->getAttributeId();
    $custNameAttrId = Mage::getModel('eav/entity_attribute')
        ->loadByCode($entityCustTypeId, 'firstname')
        ->getAttributeId();
    $collection->getSelect()
        ->joinLeft(
            array('testproduct' => $productCustomerTableName),
            'main_table.id = testproduct.testimonial_id',
            array('product_id','testimonial_id','customer_id')
        )
        ->joinLeft(
            array('prod' => 'catalog_product_entity'),
            'prod.entity_id = testproduct.product_id',
            array('sku')
        )
        ->joinLeft(
            array('cpev' => 'catalog_product_entity_varchar'),
            'cpev.entity_id=prod.entity_id AND cpev.attribute_id='.$prodNameAttrId.'',
            array('cpev.value' => 'value')
        )
        ->joinLeft(
            array('ccev' => 'customer_entity_varchar'),
            'ccev.entity_id=testprodcust.customer_id AND ccev.attribute_id='.$custNameAttrId.'',
            array('ccev.value' => 'value')
        );
    $this->setCollection($collection);
    return parent::_prepareCollection();
}

Next, to display product and customer-related columns in grid view,  add them to the method_prepareColumns as defined below.

protected function _prepareColumns()
{
    $this->addColumn('pro_name', array(
        'header'    => Mage::helper('testimonials')->__('Product'),
        'align'     =>'right',
        'index'     => 'cpev.value',
        'width'     => '50px',
    ));
    $this->addColumn('cust_name', array(
        'header'    =>Mage::helper('testimonials')->__('Customer'),
        'align'     =>'right',
        'index'     => 'ccev.value',
        'width'     => '50px',
    ));
    return parent::_prepareColumns();
}

That is all! Now you can check for the EAV attributes data displayed successfully in the custom grid. If you encountered any error, don’t hesitate to connect us by leaving the comment below. We will be glad to help you.

Happy coding 🙂

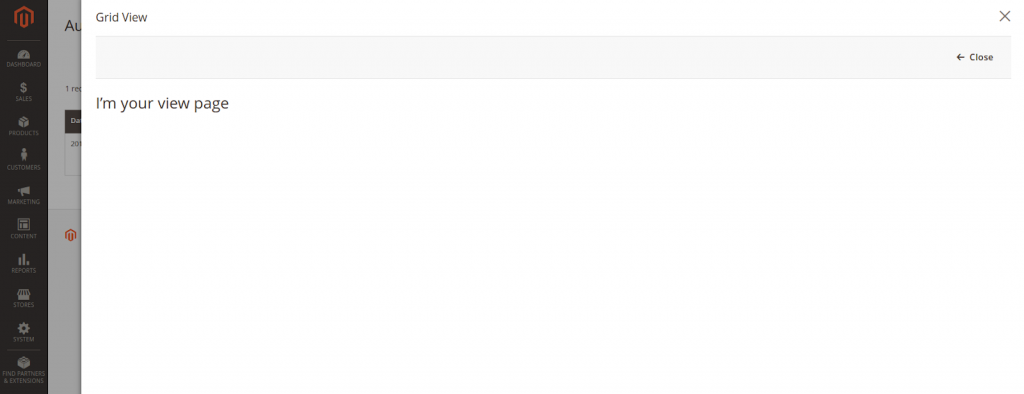
We have another hack to Magento web development queries. And it’s about adding a view button in the admin grid. Follow the steps given below to add a view button in the admin grid:

1. Add the <actionColumn> tag in your admin grid UI component file as given below:

<?xml version="1.0" encoding="UTF-8"?>
<listing xmlns:xsi="http://www.w3.org/2001/XMLSchema-instance" xsi:noNamespaceSchemaLocation="urn:magento:module:Magento_Ui:etc/ui_configuration.xsd">
   <columns name="aureatelabs_grid_columns">
      <actionsColumn name="entity_id" class="Aureatelabs\Grid\Ui\Component\Listing\Column\ViewAction">
         <argument name="data" xsi:type="array">
            <item name="config" xsi:type="array">
               <item name="bodyTmpl" xsi:type="string">ui/grid/cells/html</item>
               <item name="viewUrlPath" xsi:type="string">aureatelabs/grid/view</item>
               <item name="urlEntityParamName" xsi:type="string">id</item>
            </item>
         </argument>
      </actionsColumn>
   </columns>
</listing>

2. Next, we need to create is a UI component class: Aureatelabs\Grid\Ui\Component\Listing\Column\ViewAction.php

<?php
namespace Aureatelabs\Grid\Ui\Component\Listing\Column;

use Magento\Framework\UrlInterface;
use Magento\Framework\View\Element\UiComponent\ContextInterface;
use Magento\Framework\View\Element\UiComponentFactory;
use Magento\Ui\Component\Listing\Columns\Column;

class ViewAction extends Column
{
   public $urlBuilder;

   public $layout;

   public function __construct(
       ContextInterface $context,
       UiComponentFactory $uiComponentFactory,
       UrlInterface $urlBuilder,
       \Magento\Framework\View\LayoutInterface $layout,
       array $components = [],
       array $data = []
   ) {
       	$this->urlBuilder = $urlBuilder;
      	 $this->layout = $layout;
       	parent::__construct($context, $uiComponentFactory, $components, $data);
   }

   public function getViewUrl()
   {
       return $this->urlBuilder->getUrl(
           $this->getData('config/viewUrlPath')
       );
   }
  
   public function prepareDataSource(array $dataSource)
   {
       if (isset($dataSource['data']['items'])) {
           foreach ($dataSource['data']['items'] as & $item) {
               if (isset($item['entity_id'])) {
                   $item[$this->getData('name')] = $this->layout->createBlock(
                       \Magento\Backend\Block\Widget\Button::class,
                       '',
                       [
                           'data' => [
                               'label' => __('View'),
                               'type' => 'button',
                               'disabled' => false,
                               'class' => 'aureatelabs-grid-view',
                               'onclick' => 'aureatelabsView.open(\''. $this->getViewUrl().'\', \''.$item['entity_id'].'\')',
                           ]
                       ]
                   )->toHtml();
               }
           }
       }

       return $dataSource;
   }
}

3. Add the code given below in Aureatelabs/Grid/view/adminhtml/layout/aureatelabs_grid_index.xml file.

<?xml version="1.0" encoding="UTF-8"?>
<page xmlns:xsi="http://www.w3.org/2001/XMLSchema-instance" xsi:noNamespaceSchemaLocation="urn:magento:framework:View/Layout/etc/page_configuration.xsd">
   <body>
      <referenceContainer name="js">
         <block class="Aureatelabs\Grid\Block\Adminhtml\Selector" template="Aureatelabs_Grid::view/js.phtml" name="aureatelabs.view.model.js" />
      </referenceContainer>
   </body>
</page>

4. Create a template file js.phtml in path Aureatelabs/Grid/view/adminhtml/templates/view/js.phtml

<script>
   require([
       "jquery",
       "Magento_Ui/js/modal/modal",
       'mage/backend/notification',
       "prototype"
   ], function(jQuery, modal, notification) {

//<![CDATA[
       Window.keepMultiModalWindow = true;
       var aureatelabsView = {
           overlayShowEffectOptions : null,
           overlayHideEffectOptions : null,
           modal: null,
           open : function(viewUrl, elementId) {
               if (viewUrl && elementId) {
                   jQuery.ajax({
                       url: viewUrl,
                       data: {
                           id: elementId
                       },
                       showLoader: true,
                       dataType: 'html',
                       success: function(data, textStatus, transport) {
                           this.openDialogWindow(data, elementId);
                       }.bind(this)
                   });
               }
           },
           openDialogWindow : function(data, elementId) {
               var self = this;
               if (this.modal) {
                   this.modal.html(jQuery(data).html());
               } else {
                   this.modal = jQuery(data).modal({
                       title: '<?= /* @escapeNotVerified */ __('Grid View'); ?>',
                       modalClass: 'magento',
                       type: 'slide',
                       firedElementId: elementId,
                       buttons: [{
                           text: jQuery.mage.__('Close'),
                           class: 'action- scalable back',
                           click: function () {
                               self.closeDialogWindow(this);
                           }
                       }],
                       close: function () {
                           self.closeDialogWindow(this);
                       }
                   });
               }
               this.modal.modal('openModal');
           },
           closeDialogWindow : function(dialogWindow) {

               jQuery('body').trigger('processStop');
               dialogWindow.closeModal();
               Windows.overlayShowEffectOptions = this.overlayShowEffectOptions;
               Windows.overlayHideEffectOptions = this.overlayHideEffectOptions;
           }
       };

       window.aureatelabsView = aureatelabsView;
//]]>
   });
</script>

5. Create a block class:
Aureatelabs\Grid\Block\Adminhtml\Selector.php

<?php
namespace Aureatelabs\Grid\Block\Adminhtml;

class Selector extends \Magento\Backend\Block\Template
{
}

6. Create controller’s action class:
Aureatelabs/Grid/Controller/Adminhtml/Grid/View.php

<?php
namespace Aureatelabs\Grid\Controller\Adminhtml\Grid;

use Magento\Backend\App\Action\Context;
use Magento\Backend\App\Action;

class View extends Action
{
   protected $resultRawFactory;
   protected $layoutFactory;

   public function __construct(
       Context $context,
       \Magento\Framework\Controller\Result\RawFactory $resultRawFactory,
       \Magento\Framework\View\LayoutFactory $layoutFactory
   ) {
       $this->resultRawFactory = $resultRawFactory;
       $this->layoutFactory = $layoutFactory;
       parent::__construct($context);
   }

   public function execute()
   {
       $content = $this->layoutFactory->create()
           ->createBlock(
               \Aureatelabs\Grid\Block\Adminhtml\View::class
           );

       /** @var \Magento\Framework\Controller\Result\Raw $resultRaw */
       $resultRaw = $this->resultRawFactory->create();
       return $resultRaw->setContents($content->toHtml());
   }
}

7. Lastly, you need to create a block class and it’s template file:
Aureatelabs/Grid/Block/Adminhtml/View.php

<?php
namespace Aureatelabs\Grid\Block\Adminhtml;

use Magento\Backend\Block\Template;

class View extends Template
{
   public $_template = 'Aureatelabs_Grid::view.phtml';

     public function __construct(
       \Magento\Backend\Block\Template\Context $context
   ) {
       parent::__construct($context);
   }
}

8. Create a template file as shown below:
Aureatelabs/Grid/view/adminhtml/templates/view.phtml

<h1>I’m your view page</h1>


Also read: How to file upload in admin form in Magento 2

FAQs

How do I get data in admin grid in Magento 2?


To get data in the admin grid in Magento 2, use a Collection class. Follow these steps:
1. Create a new collection class in your module’s Model\ResourceModel directory as Magento\Framework\Model\ResourceModel\Db\Collection\AbstractCollection.
2. Now, define the _init method in your module’s Model\Items class. It will set the primary key, entity table name, and resource model class name.
3. Next, define the _prepareCollection method in your Grid class to load the data from the Collection class.
4. At last, define the _prepareColumns method to define the columns and display them in the grid.

How to create a tab and load grid in Magento 2 customer admin edit page?


To create a tab and load a grid in the Magento 2 customer admin edit page, follow these steps –

1. Create a new module in the app/code directory of your Magento installation.
2. Next, create a new module.xml file in the module’s etc directory.
3. Now, in the above file, add the following code to register the module with Magento –
<?xml version="1.0"?>
<config xmlns:xsi="http://www.w3.org/2001/XMLSchema-instance" xsi:noNamespaceSchemaLocation="urn:magento:framework:Module/etc/module.xsd">
<module name="Vendor_Module" setup_version="1.0.0"/>
</config>

4. Further, create a new layout file in view/adminhtml/layout directory, and name it as customer_edit.xml.
5. In the above file, use the following code to create a new tab in the customer edit page:
<page xmlns:xsi="http://www.w3.org/2001/XMLSchema-instance" xsi:noNamespaceSchemaLocation="urn:magento:framework:View/Layout/etc/page_configuration.xsd">
<update handle="customer_edit"/>
<body>
<referenceBlock name="customer_edit_tabs">
<block class="Vendor\Module\Block\Adminhtml\Tab\Grid" name="customer_edit_tab_grid">
<arguments>
<argument name="config_grid_id" xsi:type="string">customer_edit_tab_grid</argument>
<argument name="config_grid_url" xsi:type="string">customer/index/grid</argument>
</arguments>
</block>
<action method="addTab">
<argument name="name" xsi:type="string">customer_edit_tab_grid</argument>
<argument name="block" xsi:type="string">customer_edit_tab_grid</argument>
</action>
</referenceBlock>
</body>
</page>

6. Thereafter, create a new block file in Block/Adminhtml/Tab directory, and name it Grid.php. Inside it, define the _prepareCollection and _prepareColumns methods.
7. Then, create a new controller file in Controller/Adminhtml/Index directory, and name it Grid.php. Inside it, define the execute method.
8. At last, run the command php bin/magento setup:upgrade in your Magento root directory to enable the module.

How do I access Magento 2 Admin panel?


To access your Magento 2 admin panel, you need to use the command php bin/magento info:adminuri. Then, add the result to your main URL and you will get the admin login page. After entering your Magento admin username and password you will login to the admin panel and will be able to access the admin dashboard.

How do I add an edit action in admin grid in Magento 2?


To add an edit action in the admin grid in Magento 2, use the following steps:
1. Change the admin grid with XML file.
2. Add an edit action column in the UI.
3. Write the code for the edit action class.
4. Implement the code and verify it by flushing cache and reloading the page.

Grow your online business like 3,286 subscribers

    * This site is protected by reCAPTCHA and the Google Privacy Policy and Terms of Service apply.
    envelope

    Thank You!

    We are reviewing your submission, and will be in touch shortly.