Chapters Close

Hello readers, how’s your Magento development going, I hope it’s going fine.

You must have landed this post, because you are looking for solutions on how you can override reorder functionality in Magento 2 by disabling core plugin. No worries I will be guiding you through this solution.

So first of all, I will show you from the last two days the things that I have done to override the reorder functionality in Magento 2, then I will give you the final solutions.

Steps I took to override the reorder functionality in Magento 2

1. To override the functionality, I created around plugin which didn’t work because one of core magento extensions was already used around plugin for that and they are not using callable($proceed) function in around plugin so that the function process terminated there.

2. Tried to override core magento extension plugin files through preference which didn’t work because we can’t override the core plugins through preference.

3. Tried to change the sequence of core magento extension through custom extension and tried to load custom extension first but didn’t work because we can’t load core extension after custom extension. We can add dependency in our custom extension but that dependency calls core extension first.

4. Finally I disabled core magento extension plugin through custom extension and then call my custom plugin after it. This trick works like a charm.
(Please find the code below)

Please create a custom extension and write the below code in etc/di.xml.

<config xmlns:xsi="http://www.w3.org/2001/XMLSchema-instance" xsi:noNamespaceSchemaLocation="urn:magento:framework:ObjectManager/etc/config.xsd">
    <type name="Magento\Sales\Controller\Order\Reorder">
        <plugin name="replaceQuoteItems" type="Magento\NegotiableQuote\Plugin\Sales\Controller\Order\ReorderPlugin" disabled="true" />
        <plugin name="replaceOrderItem" type="VendorName\ModuleName\Plugin\Sales\Controller\Order\ReorderPlugin" />
    </type>
</config>

Now, Please run the DI compile process: php bin/magento setup:di:compile

I hope this post can save someone’s valuable time and help him/her to understand the basic concepts of the Magento 2 framework.

Thanks for reading and comment down if you have any query, will be more than happy to help you. You can also follow us on twitter and share your queries there as well.

Preferences in Magento 2 are just like how rewrites are in Magento 1. They basically let you substitute one instance of a class for another, in the Magento 2. This is an extremely powerful feature, but also comes along with the same responsibility as of Magento 1. Basically, No two modules can rewrite the same class. If two modules attempt to do so, there will be a conflict.

Create A Sandbox Script

Create a simple sandbox script by creating a demo.php file on Magento 2 root, enter the following:

<?php
require_once 'app/bootstrap.php';
$bootstrap = \Magento\Framework\App\Bootstrap::create(BP, $_SERVER);
$sample = $bootstrap->getObjectManager()->create('\Psr\Log\LoggerInterface');
\Zend_Debug::dump(get_class($sample));

Now, go to http://www.xyz.com/demo.php. On the screen, you should see the following:

string 'Magento\Framework\Logger\Monolog' (length=32)

Now, even though you specified \Psr\Log\LoggerInterface, you were given an instance of Magento\Framework\Logger\Monolog. Why? That’s because Magento 2 specified a preference for which class is to be used whenever the LoggerInterface class is requested.  That definition is located in app/etc/di.xml.

Create a Preference

In your module, Ex:Companyname_Packagename, Create a di.xml file on the <root>/app/code/Companyname/Packagename/etc folder.

<?xml version="1.0"?>
<config xmlns:xsi="http://www.w3.org/2001/XMLSchema-instance"
        xsi:noNamespaceSchemaLocation="urn:magento:framework:ObjectManager/etc/config.xsd">
    <preference for="Magento\Framework\Logger\Monolog" type="Companyname\Packagename\Model\Log"/>
</config>

Now, let’s create a class.
Inside of app/code/Companyname/Packagename/Model/Log.php, enter the following:

<?php
namespace Companyname\Packagename\Model;
use \Magento\Framework\Logger\Monolog;
class Log extends Monolog {	
}

Now, go to http://www.xyz.com/demo.php. On the screen, you should see the following:

string 'Companyname\Packagename\Model\Log' (length=36)

When we specified the \Psr\Log\LoggerInterface:

  1. Magento 2 prompted the object manager that there was a preference for that class.
  2. That was Magento\Framework\Logger\Monolog originally.
  3. The object manager took that preference and then started all over again.
  4. When it attempted to use the Monolog class, the object manager once again declared that there was another preference for the Monolog class.
  5. This time it was for our own class, i.e. Companyname\Packagename\Model\Log

Basically, whenever the LoggerInterface class is requested, our newly created class will be used instead!

Recommended: preference should be the last option if it is not possible to make use of the plugin to rewrite the method of the class.

Thank you for reading. Your feedback is welcome in the comments section, and we’re available to assist with any Magento store development or customizations you may need

PHP is the most favourite programming language at present for building websites on the internet. Majority of the websites and e-commerce solutions are in love with the PHP technology and why not? After all, it is the most secure programming language that is utilized to build trustworthy web applications.

And when it comes to developing e-commerce websites, Magento is the most successful framework. Magento extends many excellent features like Inventory management, Payment Gateway integration, SEO management, mobile-friendly interface, and product management etc., which makes it the preferred framework for designing e-commerce sites. If you want to operate Magento, then it is important for you to know how to formulate codes in the PHP language.

We all are enthusiastic about Magento 2 and all its new announcements. With each new update, the platform brings in innovative features that overhaul the default e-commerce experience completely. Today we will be talking about the latest major update, yes you guessed it right, get set to leverage the new update of PHP version! With PHP 7.2, you can execute new advancement features while operating on your Magento 2 projects. And this development will influence performance and security in a positive way!

Why You Should Be Using PHP 7.2

PHP lately released the next update in their PHP 7 series. The all-new PHP 7.2 delivers crisp updates which include significant security measures, advanced cryptography, enhancements to the core and faster loading of websites. To ease it for you, our Magento web development experts have broken down the newest attributes and benefits of PHP 7.2 below.

Libsodium is Part of the Core

Who doesn’t know about the application-layer cryptography library, Libsodium? It is now a part of the core in PHP 7.2. Earlier, the library was made accessible from PECL, an abbreviation of “PHP Extension Community Library.” With the addition of Libsodium, PHP becomes the first-ever programming language that adds advanced cryptography to its conventional library. With this, it assures the cross-platform and cross-language library, enables signatures, encryption, decryption, password hashing, and many more.

Argon 2 in Password Hash

Argon 2 is well-known for winning the 2015 Password Hashing Competition and also for introducing a reliable alternative to the Bcrypt algorithm used on the earlier version of PHP. Despite having the highest memory filling rate and effective use of various computing units, it provides defence against tradeoff attacks. When compared to Bcrypt which allows for one cost factor, Argon 2 exercises three cost factors: memory cost, time cost, and parallelism factor. The memory cost factor plays an important role in defining the amount of KiB that should be utilized during hashing. Whereas the time cost is crucial in defining the number of iterations of the hashtag algorithm. Lastly, the parallelism factor estimates the number of parallel threads that will be utilized during the hashtag.

Performance

According to a paper from Phoronix, PHP 7.2 works 13% faster than 7.1 and 20% faster than 7.0. This makes it the fastest as compared to PHP 5.6, which is still being used by a majority of the WordPress users. There are many other tests that warrant the above findings. As per the benchmarks set by the Official PHP, the PHP 7 is twice as fast as its 5.6 version with half the latency, while there are other benchmarks that prove it to be three times faster.

Deprecations

As we all know that with each new update, there is a depreciation of several features and functions. The same goes for this new update, you can find the complete list of the deprecated functions over here. All these features will run in PHP 7.2, except an error message will appear while use in log files. Developers should make it a point to inspect the code and update any deprecated functions before it becomes impossible for them to revert back.

Support

If we talk about the support, we know that PHP 7.0 brought an end to its security support on December 3rd, 2017. Well don’t panic, the critical support will still be open till the end of 2018, but the PHP association will no longer be rendering help for bugs or minor concerns.
PHP 7.1 will implement the above resolution from December 1st, 2018 thus go and upgrade to PHP 7.2 and rest assured, the latest security updates will be sustained by the community.

Summary

With important security updates, Libsodium in the core, and immensely enhanced performance features moving on from older versions of PHP to PHP 7.2 is a useful and valuable update. To finish with, we cannot thank Magento enough for making the patches available for everyone!  You can find the patches for Magento 1 here.

In this post, I work through a working example of how to create REST API in Magento 2. It seems a bit difficult and tricky when you have to work with REST web services and that too in building Magento store. However, in this tutorial, I tried to keep it as easy and understandable as possible.

Follow the below quick steps carefully and create your RESTful service in a matter of minutes.

Create a new extension:

Here I will be creating an extension under AureateLabs directory named as “ApiIntegration”. Create module configuration file & registration file under ApiIntegration directory.

Module Configuration: etc/module.xml

<?xml version="1.0"?>
<config xmlns:xsi="http://www.w3.org/2001/XMLSchema-instance" xsi:noNamespaceSchemaLocation="urn:magento:framework:Module/etc/module.xsd">
    <module name="AureateLabs_ApiIntegration" setup_version="0.0.1" />
</config>

Registration: registration.php

<?php
\Magento\Framework\Component\ComponentRegistrar::register(
    \Magento\Framework\Component\ComponentRegistrar::MODULE,
    AureateLabs_ApiIntegration,
    __DIR__
);

Here we will be creating a simple API service which will set customers’ default shipping address from the address id parameter.

Now, create a webapi.xml configuration file to configure the access rights and API interface that will specify which method it will use.

Create a webapi.xml file under the etc directory. And paste the following code into it.

<?xml version="1.0" encoding="UTF-8"?>
<routes xmlns:xsi="http://www.w3.org/2001/XMLSchema-instance" xsi:noNamespaceSchemaLocation="urn:magento:module:Magento_Webapi:etc/webapi.xsd">
<route url="/V1/customers/set-default-shipping" method="POST">
  <service class="AureateLabs\ApiIntegration\Api\AddressInterface" method="setDefaultShipping"/>
  <resources>
      <resource ref="self"/>
  </resources>
  <data>
      <parameter name="addressId" force="true">%addressId%</parameter>
  </data>
</route>
</routes>

Route tag defines an endpoint(URL) & Method (Valid values are GET, POST, PUT, and DELETE) of the REST API.

Resource tag defines what resources user needs to have to be able to access this API call.

Possible options are self, anonymous or Magento resource like Magento_Catalog::products or Magento_Customer::group.

Now, create a di.xml file to define an interface and model that defines which model will be called by the defined interface.

Create di.xml File under an etc directory and add following code into it.

<?xml version="1.0"?>
<config xmlns:xsi="http://www.w3.org/2001/XMLSchema-instance" xsi:noNamespaceSchemaLocation="../../../../../lib/internal/Magento/Framework/ObjectManager/etc/config.xsd">
  <preference for="AureateLabs\ApiIntegration\Api\AddressInterface" type="AureateLabs\ApiIntegration\Model\CustomerAddress" />
</config>

Now, we need to create an interface and model, please note that you need to take care of the comments as well.

Interface: Api/AddressInterface.php

<?php
/**
* Copyright © Magento, Inc. All rights reserved.
* See COPYING.txt for license details.
*/
namespace AureateLabs\ApiIntegration\Api;
/**
* @api
*/
interface AddressInterface
{
  /**
   * Set default shipping address
   *
   * @return boolean|array
   */
  public function setDefaultShipping();
}

Now, We will create the Model and within the model, we will add the functionality that will be executed by the call to API method.

Model: CustomerAddress.php

<?php
namespace AureateLabs\ApiIntegration\Model;
use \AureateLabs\ApiIntegration\Api\AddressInterface;
class CustomerAddress implements AddressInterface
{
  /**
   * @var \Magento\Customer\Api\Data\AddressInterfaceFactory
   */
  protected $addressFactory;
  /**
   * @var \Magento\Framework\App\RequestInterface
   */
  protected $request;
  /**
   * CustomerAddress constructor.
   * @param \Magento\Customer\Model\AddressFactory $addressFactory
   * @param \Magento\Framework\App\RequestInterface $request
   */
  public function __construct(
      \Magento\Customer\Model\AddressFactory $addressFactory,
      \Magento\Framework\App\RequestInterface $request
  )
  {
      $this->addressFactory = $addressFactory;
      $this->request = $request;
  }
  public function setDefaultShipping() {
      $array = array();
      $params = $this->request->getParams();
      $addressId = trim($params['addressId'] ?? null);
      if (empty($addressId) || !is_numeric($addressId)) {
          $arr['msg'] = 'Address ID is invalid!';
          array_push($array, $arr);
          return $array;
      }
      $address = $this->addressFactory->create()->load($addressId);
      $address->setIsDefaultShipping(1);
      if($address->save()){
          return true;
      }else{
          return false;
      }
  }
}

The above function will set the default shipping address of the customer using address id which is provided as the parameter.

This is all you need to know to create a successful RESTful web service in Magento 2. We hope you followed the above procedure carefully taking care of every bit of code. Even though you have any doubt or queries related to this, feel free to reach us.

This piece of information will throw some light on how one can configure URL Rewrites in Magento 2.

When the rewrite goes into effect, any links that points to the previous URL are redirected to the new address. URL rewrites make the existing URLs more “search engine friendly” and also easier for humans to read.

Enabling Web Server Apache/Nginx Rewrites is a part of the initial Magento 2 store development setup. Magento 2 uses URL rewrites to remove the file name “index.php” that normally appears in the URL just after the root folder. When Web Server Rewrites are enabled, the system rewrites each URL to omit “index.php.” The rewrite removes words that convey nothing of value to the search engines or the customers.

How to enable URL rewrites?

Step 1:

In the Admin login go to path Stores > Configuration > Web.

Step 2:

After that, expand the Search Engine Optimization section.

Step 3:

Set Use Web Server Rewrites to ‘Yes’.

And save the config.

Set up automatic redirects

To set up automatic redirects we need to follow the steps given below:

Step 1:

In the Admin login go to path Stores > Configuration > Catalog > Catalog.

Step 2:

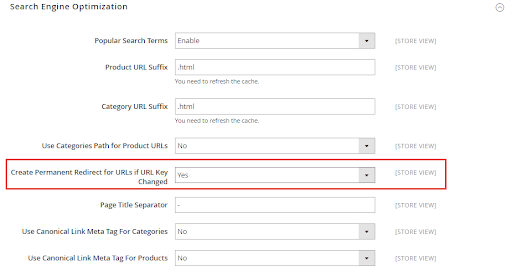
Expand the Search Engine Optimization section.

Set Create Permanent Redirect for URLs if URL Key Changed to “Yes.”  and save the config value.

Now to check the automatic redirection. Go to the product edit page from the admin section.

 In the URL Key field, perform the following steps:

  • Make sure that the Create Permanent Redirect for old URL checkbox is selected. 
  • Update the URL Key as needed, using all lowercase characters and hyphens. 
  • Save the product and test the product on the store frontend.
  • To view the redirect records, go to: Marketing > SEO & Search > URL Rewrites from the admin section. The most recent permanent redirects appear at the top of the list.

Using a Magento Extension

Managing URL rewrites can become tedious, especially when dealing with a large number of redirects. This is where the Bulk URL Redirection extension by Aureate Labs comes in.

The Bulk URL Redirection extension simplifies and streamlines the process of managing URL rewrites in your Magento 2 store.

Here’s how it streamlines your workflow:

  • Bulk Upload and Update: Effortlessly upload or copy-paste a large list of URLs for redirection. Update existing rewrites in bulk to save significant time and effort.
  • Simplified Management: Gain a centralized view of all your URL rewrites within a user-friendly interface.
  • Error Handling: The extension efficiently identifies and highlights potential errors in your URL configurations, preventing issues down the line.
  • Import/Export: Easily import and export URL rewrites in CSV format for seamless data migration and backup purposes.
  • Automation: Schedule automated tasks to keep your URL rewrites up-to-date, ensuring a smooth user experience for your customers.

By incorporating the Bulk URL Redirection extension, you’ll significantly reduce the time and effort required to manage URL rewrites in your Magento 2 store. This results in improved efficiency, better accuracy, and a more streamlined store management experience.

In this article, you will be learning how one can use curl in Magento 2 development.

At first, you need to create an instance of “\Magento\Framework\HTTP\Client\Curl” in the Constructor as shown below:

/**
* @var \Magento\Framework\HTTP\Client\Curl
*/
protected $_curl;

/**
* Data constructor.
*
* @param \Magento\Framework\App\Helper\Context $context
* @param \Magento\Framework\HTTP\Client\Curl $curl
*/
public function __construct(
   \Magento\Framework\App\Helper\Context $context,
   \Magento\Framework\HTTP\Client\Curl $curl
) {
   $this->_curl = $curl;
   parent::__construct($context);
}

Make GET request using curl

//get method
$this->_curl->get($url);

//response will contain the output of curl request
$response = $this->_curl->getBody();

In the snippet given above,

  • $url : Contain the endpoint url.
  • $response : It will contain the response of the curl request.

Make POST request using curl

//post method
$this->_curl->post($url, $params);

//response will contain the output of curl request
$response = $this->_curl->getBody();

In the code given above,

  • $url : Contain the endpoint url.
  • $params : it’s an array, if you want to attach extra parameters in url.
  • $response :  It will contain the response of the curl request.

You can also add headers, basic authorization, additional curl options and cookies in the curl request. All you need to do is just add these methods before using get or post method. 

The detailed description on how to add headers, basic authorization, additional curl options, and cookies in curl request is given below.

Set curl headers

The two methods used to set the curl headers are:

  • addHeader
  • setHeaders

Set curl header using addHeader method

The addheader method accepts two parameters. First is the curl header name and second is the curl header value.

$this->_curl->addHeader("Content-Type", "application/json");
$this->_curl->addHeader("Content-Length", 200);

Set curl header using setHeaders method

The setHeaders method accepts one parameter as an array.

$headers = ["Content-Type" => "application/json", "Content-Length" => "200"];
$this->_curl->setHeaders($headers);

Set basic authorization in Curl

We can set the basic authorization using the setCredentials method.

$userName = "UserName";
$password = "Password";
$this->_curl->setCredentials($userName, $password);

It will be equivalent to setting CURLOPT_HTTPHEADER value

“Authorization : “. “Basic “.base64_encode($userName.”:”.$password)

Set additional curl options

The two methods used to set the curl options are:

  • setOption
  • setOptions

Set curl option using setOption method

The setOption method accepts two parameters. First is the curl option name and second is the curl option value.

$this->_curl->setOption(CURLOPT_RETURNTRANSFER, true);
$this->_curl->setOption(CURLOPT_PORT, 8080);

Set curl option using setOptions method

The setOptions method accepts one parameter as an array.

$options = [CURLOPT_RETURNTRANSFER => true, CURLOPT_PORT => 8080];
$this->_curl->setOptions($options);

Set cookies in curl

The two methods used to set the curl cookies in curl are:

  • addCookie
  • setCookies

Set curl cookies using addCookie method

The addCookie method accepts two parameters. First is the cookie name and second is the cookie value.

$this->_curl->addCookie("cookie-name-1", "123");
$this->_curl->addCookie("cookie-name-2", "test-cookie-value");

Set curl cookies using setCookies method

The setCookies method accepts one parameters as an array.

$cookies = ["cookie-name-1" => "100", "cookie-name-2" => "name"];
$this->_curl->setCookies($cookies);

FAQs

What is cURL in Magento2?


cURL in Magento2 or client for URL is a command-line tool. It is used to interact with web pages through HTTP requests to external servers and getting responses. For example, cURL can send secure requests to third-party payment gateways. The cURL can be run by creating a command through the cURL command syntax.

What is curl vs HTTP?


cURL vs HTTP cannot be compared as cURL is a command line used to make different types of HTTP requests and receive responses. HTTP is a protocol for client and server communication. When cURL requires data, it sends an HTTP request through the command line, directing the servers to initiate HTTP data transfers.

Which is better curl or Postman?


cURL or Postman both can be better depending on the requirements. cURL is a simple tool that accelerates HTTP requests without any complicated configuration choices, making it quick and efficient. On the other hand, Postman is more flexible and versatile which allows developers to create custom APIs according to their requirements.

Is curl a REST API?


No, cURL is not a REST API. cURL is a command-line that is used to send requests and receive network responses. REST API, on the other hand, is an application program designed for the REST software architecture. You can use cURL to send REST requests, but it isn’t the API itself.

This article will help you to create a new custom router when developing a store on Magento 2. A router is a PHP class responsible for matching and processing of the URL request. In order to add custom router in lib/internal/Magento/Framework/App/RouterList.php we need to add our configuration for the new router in di.xml module.

Let’s take a real example, you have implemented a custom blog module without the URL Key field, then users and search engine crawlers visiting the blog post will see blog posts link like /blog/id/view/1, /blog/id/view/2 and so on… But this will highly impact your SEO ranking and visibility on the first page of Google search result.

So here the Router class will be helpful to add URL Key to your blog posts. Then it matches the requested url key with the blog post in your Router class and loads the blog page.

This way Google shows the blog link on the first page and your clients will be happy to see the improved SEO & visibility for the blog posts.

Let’s have a look at an example where we will see how to create a custom router. We will create a module with the name Aureatelabs_CustomRouter. And will setup the module with the default configuration in registration.php and module.xml. After that we will create the di.xml file in etc/frontend.

File: di.xml (etc/frontend)

<?xml version="1.0"?>
<config
	xmlns:xsi="http://www.w3.org/2001/XMLSchema-instance" xsi:noNamespaceSchemaLocation="urn:magento:framework:ObjectManager/etc/config.xsd">
	<type name="Magento\Framework\App\RouterList">
		<arguments>
			<argument name="routerList" xsi:type="array">
				<item name="aureatelabscustomrouter" xsi:type="array">
					<item name="class" xsi:type="string">Aureatelabs\CustomRouter\Controller\Router</item>
					<item name="disable" xsi:type="boolean">false</item>
					<item name="sortOrder" xsi:type="string">31</item>
				</item>
			</argument>
		</arguments>
	</type>
</config>

Next we will create Router.php in the Controller folder which contains the logic for the respective router.

<?php
namespace Aureatelabs\CustomRouter\Controller;

/**
 * Aureatelabs Custom router Controller Router
 */
class Router implements \Magento\Framework\App\RouterInterface
{
    /**
     * @var \Magento\Framework\App\ActionFactory
     */
    protected $actionFactory;

    /**
     * Response
     *
     * @var \Magento\Framework\App\ResponseInterface
     */
    protected $_response;

    /**
     * @param \Magento\Framework\App\ActionFactory $actionFactory
     * @param \Magento\Framework\App\ResponseInterface $response
     */
    public function __construct(\Magento\Framework\App\ActionFactory $actionFactory, \Magento\Framework\App\ResponseInterface $response)
    {
        $this->actionFactory = $actionFactory;
        $this->_response = $response;
    }

    /**
     * @param \Magento\Framework\App\RequestInterface $request
     * @return \Magento\Framework\App\ActionInterface|void
     */
    public function match(\Magento\Framework\App\RequestInterface $request)
    {
        $identifier = trim($request->getPathInfo() , '/');
        if (strpos($identifier, 'aureatelabsservice') !== false)
        {
            $request->setModuleName('cms')
                ->setControllerName('page')
                ->setActionName('view')
                ->setParam('page_id', 6);
        }
        else if (strpos($identifier, 'aureatelabsrouter') !== false)
        {
            $request->setModuleName('aureatelabsdemo')
                ->setControllerName('demo')
                ->setActionName('demo');
        }
        else
        {
            return;
        }

        return $this
            ->actionFactory
            ->create('Magento\Framework\App\Action\Forward', ['request' => $request]);
    }
}

In this example we will be searching for two terms ‘aureatelabsservice’ and ‘aureatelabsrouter’.

Now we will add routes.xml file in the frontend. routes.xml (etc/frontend)

<?xml version="1.0"?>
<config
	xmlns:xsi="http://www.w3.org/2001/XMLSchema-instance" xsi:noNamespaceSchemaLocation="urn:magento:framework:ObjectManager/etc/config.xsd">
	<router id="standard">
		<route id="aureatelabsdemo" frontName="aureatelabsdemo">
			<module name="Aureatelabs_CustomRouter" />
		</route>
	</router>
</config>

Create Demo.php (Controller/Demo/Demo.php).

<?php
namespace Aureatelabs\CustomRouter\Controller\Demo;

/**
 * Class Demo
 * @package Aureatelabs\CustomRouter\Controller\Demo
 */
class Demo extends \Magento\Framework\App\Action\Action
{
    protected $_request;

    /**
     * Demo constructor.
     * @param \Magento\Framework\App\Action\Context $context
     */
    public function __construct(\Magento\Framework\App\Action\Context $context)
    {
        parent::__construct($context);
    }

    /**
     * @return \Magento\Framework\App\ResponseInterface|\Magento\Framework\Controller\ResultInterface|void
     */
    public function execute()
    {
        echo (__METHOD__);
        exit();
    }
}

Now you can enable the module and check for the url with ‘storefronturl/aureatelabsservice’ and ‘storefronturl/aureatelabsrouter’.

The result for the first url will display you the customer service page and second URL will give you results with the name of the method. You can update the method name and test the other URLs as well with your magento setup.

Grow your online business like 2,471 subscribers

    * This site is protected by reCAPTCHA and the Google Privacy Policy and Terms of Service apply.
    envelope

    Thank You!

    We are reviewing your submission, and will be in touch shortly.