
Welcome, Today, we’re diving into the realm of Hyva themes and exploring a powerful new tool for crafting dazzling sliders: Splide.js. This library lets you build sliders beyond imagination, and integrating it into your Hyva theme is surprisingly straightforward.
Why Splide?
Magento 2 offers built-in slider options, but Splide brings a whole new level of creative freedom.
Apart from this, there are so many slider extensions available in the market. So what is the reason to use Splide? Just because Splide is a lightweight, flexible, and accessible slider/carousel written in TypeScript. Splide has No dependencies and no Lighthouse errors.
It helps you to create various kinds of sliders by just changing options, such as multiple slides, thumbnails, nested sliders, vertical direction, and more. Also, you can enhance the slider capability by using APIs or building extensions.
Features
Here are some magical features of Splide.
Lightweight: Say goodbye to bulky libraries! Splide packs a punch without weighing down your website.
Flexible: Want fade transitions, thumbnails, or even nested sliders? Slide your genie in a bottle, granting your slider wishes.
Accessible: Splide cares about everyone, ensuring your sliders are inclusive and usable for all.
Customizable: Dive into Splide’s extensive options and APIs to craft sliders that are uniquely yours.
To learn about more features of the Splide, then go to https://splidejs.com/ and check the About Splide section.
New to Hyvä?? Learn about the Hyvä Theme from basics!
Let’s Build
Let’s Build! Here’s a crash course on building a custom slider in your Hyva theme.
Follow the below steps to implement a slider in your Hyva theme.
1) Create a new XML file inside the layout directory of your child theme to add CSS and JS of the Splide.
Here we have created splide_js_css.xml in the child theme.
File Path: app/design/frontend/[Vendor]/[Theme]/Magento_Theme/layout/splide_js_css.xml
There are two ways to include CSS and JS in Magento. The first one is to add the CND of both files in the <head></head> tag of the XML file and the other way is to Download CSS and JS files, put them in your theme, and give a static path to CSS and JS. Both are valid ways to include custom CSS/JS in Magento 2.
To know more check this guide.
Here we are using the first way and below is the code for that.
     <?xml version="1.0"?>
     <page xmlns:xsi="http://www.w3.org/2001/XMLSchema-instance" xsi:noNamespaceSchemaLocation="urn:magento:framework:View/Layout/etc/page_configuration.xsd">
        <head>
            <css src="https://cdn.jsdelivr.net/npm/@splidejs/splide@4.1.4/dist/css/splide.min.css" src_type="url"  />
            <script src="https://cdn.jsdelivr.net/npm/@splidejs/splide@4.1.4/dist/js/splide.min.js" src_type="url"  />
        </head>
     </page>
2) Include a Layout for the page on which we are going to add our Splide slider.
Here we will include them in the default.xml so we can use the Splide slider globally.
File Path: app/design/frontend/[Vendor]/[Theme]/Magento_Theme/layout/default.xml
Here we will use an update handle. It will include a layout in the default head of the page.
To know more check this guide.
Now, add the below code before the <head> tag in the default.xml
<update handle="splide_js_css"In above code splide_js_css is the name of our XML file without extension.
3). Add HTML and <script> of the slider to the Page.
HTML: https://splidejs.com/guides/getting-started/#html
Script: https://splidejs.com/guides/getting-started/#applying-splide
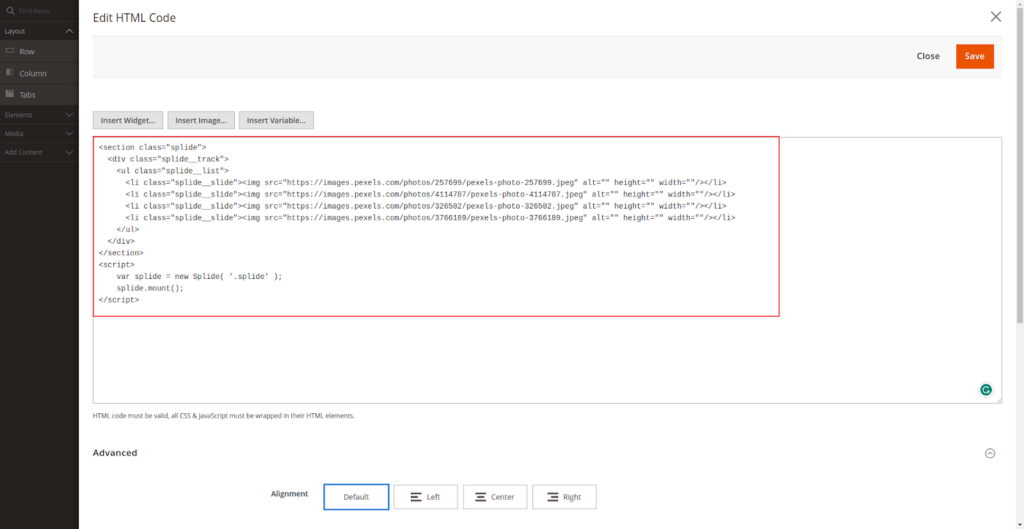
We can copy HTML and <script> from the above links of the Splide documentation. After that, we can add desired slider content like images, text, etc. to our HTML.
Check the below code In which I have added some Images to the slide content.
Code:
<section class="splide">
<div class="splide__track">
<ul class="splide__list">
<li class="splide__slide"><img src="https://images.pexels.com/photos/257699/pexels-photo-257699.jpeg" alt="" height="" width=""/></li>
<li class="splide__slide"><img src="https://images.pexels.com/photos/4114787/pexels-photo-4114787.jpeg" alt="" height="" width=""/></li>
<li class="splide__slide"><img src="https://images.pexels.com/photos/326502/pexels-photo-326502.jpeg" alt="" height="" width=""/></li>
<li class="splide__slide"><img src="https://images.pexels.com/photos/3766189/pexels-photo-3766189.jpeg" alt="" height="" width=""/></li>
</ul>
</div>
</section>
<script>
var splide = new Splide( '.splide' );
splide.mount();
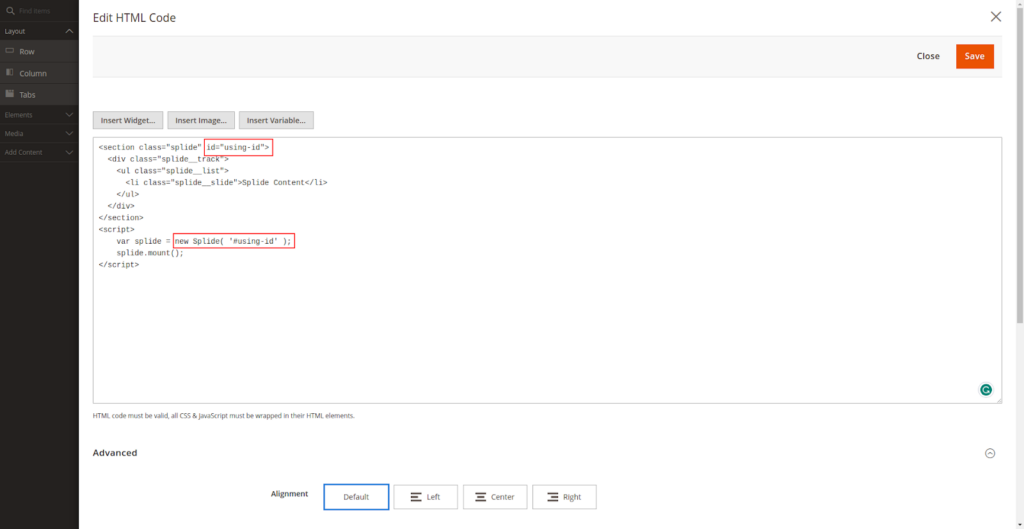
</script>We can also use different Classes or IDs instead of splide in the <script> as well as in HTML.
Using different Class

Using ID
Follow the below steps to add HTML and <script> to your page.
- Just go to the page on which you want to add the Splide slider or create a new page.
- Select the Content tab of the page.
- Add your HTML and <script> to the content.
- If you are using Page Builder, click on the Edit with Page Builder button. Drag the HTML Element from the left Bar. Click on the setting icon and add your HTML and <script>. (To know more about page builder check here)
- Save the page and check your page.
Code:
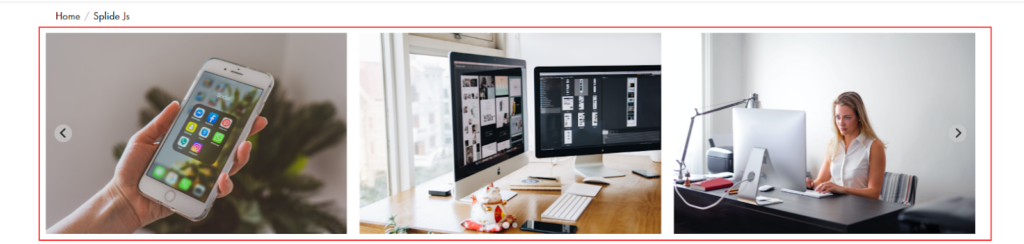
Output

Splide takes a lot of options that make it very flexible. We can simply apply to the <script>. In the below code, I have made the slider continuous using the loop, shown 3 slides, moved 1 slide at a time, and also added spacing of 20px between slides.
<script>
   var splide = new Splide( '.splide', {
     type   : 'loop',
     perPage: 3,
     perMove: 1,
     gap: '20px'
   });
   splide.mount();
 </script>
Output
If you want to make your slider more flexible or want to make more customization then visit this guide.
Note: We can also do this using CMS Block/Widgets. Simply create CMS Block/Widgets, add HTML and <script> inside it, and insert CMS Block/Widgets to the page.
Use on Particular page
Above, we have included CSS/JS layout in default.xml to use Splide globally. But in case we have only used Splide on particular pages like Home, Products, CMS, etc. Then this will impact the page performance of other pages.
For example, if we have only used Splide on the Home page and our Splide CSS/JS is called on every other page then that is not good for the page performance.
To overcome that we can include calling Splide CSS/JS on the particular page’s XML instead of default.xml.
Below is the list of XML file paths for the particular page. Just add the update handle code to the file before the <head> tag.
Homa Page File Path: app/design/frontend/[Vendor]/[Theme]/Magento_Theme/layout/cms_index_index.xml
Catgory Page File Path: app/design/frontend/[Vendor]/[Theme]/Magento_Catalog/layout/catalog_category_view.xml
Product Page File Path: app/design/frontend/[Vendor]/[Theme]/Magento_Catalog/layout/catalog_product_view.xml
CMS Pages File Path: app/design/frontend/[Vendor]/[Theme]/Magento_Cms/layout/cms_page_view.xml
Cart Page File Path: app/design/frontend/[Vendor]/[Theme]/Magento_Checkout/layout/checkout_cart_index.xml
Note: Apart from this, there are so many other XMLs available for different pages. These are the common files that are used for the content like slider.
Related Sources
Splide Docs: https://splidejs.com/documents/
That’s it!
With Splide.js and Hyva’s theme magic, crafting stunning, custom sliders is now within your grasp. So, unleash your creativity, experiment with Splide’s features, and let your sliders become the stars of your Hyva storefront! Remember, the possibilities are endless, so go forth with confidence!
Thanks for reading, I hope this blog will help you with frontend development. Don’t forget to share your Splide creations in the comments below!
Cheers 🙂
More resources on Hyva themes:
- Check out the InstaBuild for Hyvä Themes: Ready-made Hyva theme templates for faster storefront development!
- Hyva Themes Development – For Online Merchants
- Hyvä Theme Benefits that your store needs
- 10 Best Hyva Compatibility Extension Providers For Magento 2 Stores
- Hyvä VS PWA: Where to Invest?
- How a Slow Magento Website Can Cost You Advertising Dollars
- Mobile Commerce: How Hyva Themes Boost Mobile Conversions


Post a Comment
Got a question? Have a feedback? Please feel free to leave your ideas, opinions, and questions in the comments section of our post! ❤️