
In today’s article, I will guide you through the procdasess of integrating Google reCAPTCHA into custom forms with Hyva Theme.
I know you are all aware that the Hyva theme is a brand-new Magento frontend theme built from scratch. It is lightweight, flexible, and offers high-speed performance.
As you are all aware, Google reCAPTCHA plays a crucial role in securing online forms. In essence, reCAPTCHA is a free service offered by Google to safeguard websites from spam and abuse.
Preventing automated attacks has become paramount in ensuring the integrity of online interactions. This powerful tool serves as a guardian for custom forms on the web, enhancing their security.
In simple terms, ever wondered how websites confirm you’re a genuine person and not a sneaky robot? Well, that’s where reCAPTCHA steps in – acting as a superhero for online forms, ensuring the security of your information.
Let’s explore the process of integrating Google reCAPTCHA into custom forms using the Hyva theme.
Captcha support in Hyvä
Hyvä only supports the following reCaptcha versions:
- v3 invisible
- v2 invisible (since Hyvä 1.1.15)
- v2 checkbox (since Hyvä 1.1.15)
Pre-Requirements for Using Google reCAPTCHA
- Google Account: Ensure that you have a Google account. If you don’t have one, you’ll need to create it before proceeding.
- API Keys: Generate Google reCAPTCHA API keys from the reCAPTCHA website to authenticate your website’s interaction with Google’s reCAPTCHA service. You’ll get both a site key (used in your HTML) and a secret key (used for server-side verification).
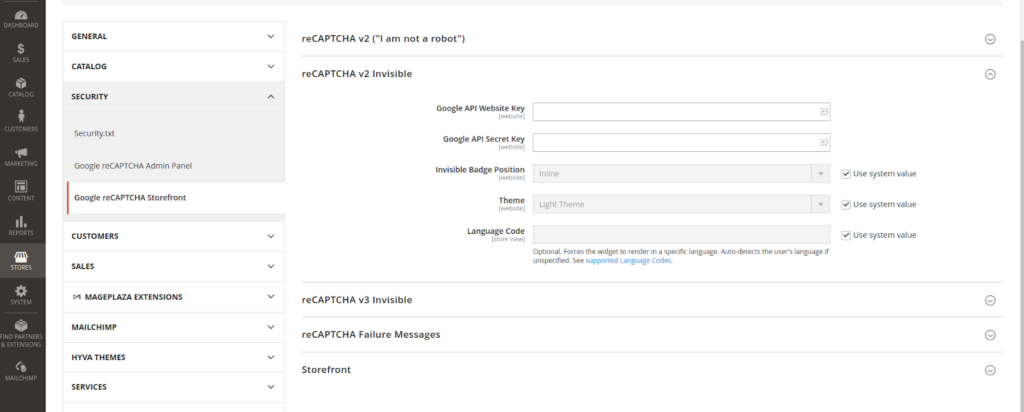
- Configuring Google reCAPTCHA keys in Magento 2: Lastly, let’s go through the steps to configure Google reCAPTCHA in Magento 2 through the Admin panel.
- On the Admin sidebar, go through the path Stores > Settings > Configuration.
- Next, expand the Security section and select Google reCAPTCHA Storefront.
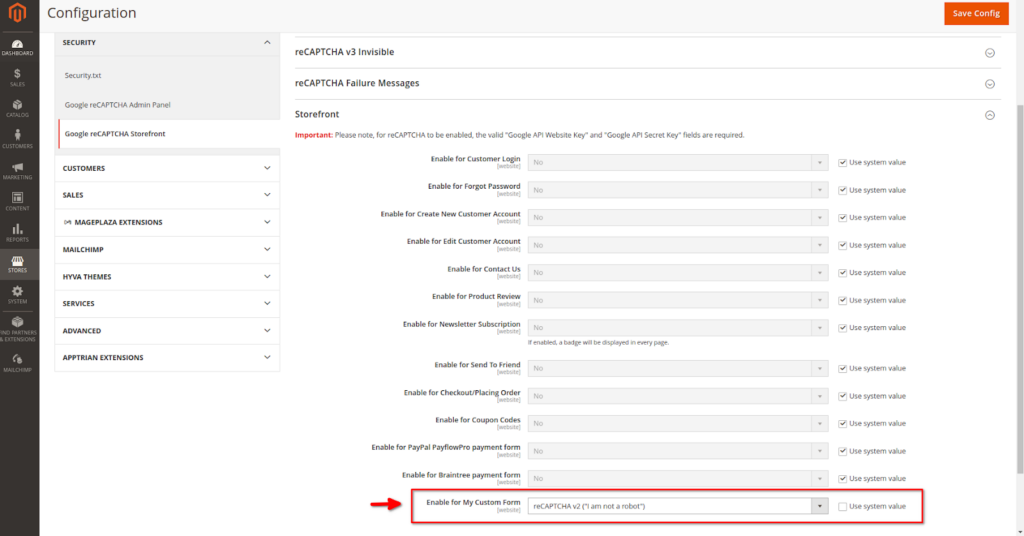
- Here, you will find three options to configure Google reCAPTCHA. You can select the Google reCAPTCHA type and configure it with the previously generated Google reCAPTCHA keys
- And finally, save the configuration. Please check the attached screenshot for the Magento configuration.
Now that we have everything we need, let’s begin implementing Google reCAPTCHA in the form. So, let’s get started!
In this example code, we are using the reCAPTCHA v2 (‘I am not a robot’) version provided by Google reCAPTCHA.
Steps to Create a Module with Render a Basic HTML Form
Follow the below steps to create a module with render a basic HTML form on the frontend.
1. Created a module with registration.php
Create a file in app/code/Aureatelabs/CustomForm/registration.php and add the
following code.
<?php
\Magento\Framework\Component\ComponentRegistrar::register(
   \Magento\Framework\Component\ComponentRegistrar::MODULE,
   'Aureatelabs_CustomForm',
   __DIR__
);
2. Create a module.xml
Create a file app/code/Aureatelabs/CustomForm/etc/module.xml and add the
following code
<?xml version="1.0" ?>
<config xmlns:xsi="http://www.w3.org/2001/XMLSchema-instance" xsi:noNamespaceSchemaLocation="urn:magento:framework:Module/etc/module.xsd">
   <module name="Aureatelabs_CustomForm" setup_version="1.0.0">
       <sequence>
           <module name="Magento_ReCaptchaFrontendUi"/>
       </sequence>
   </module>
</config>
3. Create a Router
Create a file in the app/code/Aureatelabs/CustomForm/etc/frontend/routes.xml and put the following code
<?xml version="1.0"?>
<config xmlns:xsi="http://www.w3.org/2001/XMLSchema-instance" xsi:noNamespaceSchemaLocation="urn:magento:framework:App/etc/routes.xsd">
   <router id="standard">
       <route id="aureatelabs_customform" frontName="customform">
           <module name="Aureatelabs_CustomForm" />
       </route>
   </router>
</config>
4. Create the controller for the view form on the frontend
Create a file app/code/Aureatelabs/CustomForm/Controller/Index/Index.php and put the following code
<?php
namespace Aureatelabs\CustomForm\Controller\Index;

use Magento\Framework\App\Action\Context;
use Magento\Framework\View\Result\PageFactory;

class Index extends \Magento\Framework\App\Action\Action
{
   /** @var  \Magento\Framework\View\Result\Page */
   protected $resultPageFactory;

   /**
    * @param Context $context
    * @param PageFactory $resultPageFactory
    */
   public function __construct(
       \Magento\Framework\App\Action\Context $context,
       \Magento\Framework\View\Result\PageFactory $resultPageFactory
   ) {
       $this->resultPageFactory = $resultPageFactory;
       parent::__construct($context);
   }

   /**
    * Custom Form Index
    *
    * @return \Magento\Framework\View\Result\PageFactory
    */
   public function execute()
   {
       $resultPage = $this->resultPageFactory->create();
       $resultPage->getConfig()
           ->getTitle()
           ->prepend(__('Custom Form View'));
       return $resultPage;
   }
}
5. Create a Layout file
Create a file app/code/Aureatelabs/CustomForm/view/frontend/layout/aureatelabs_customform_index_index.xml and put the following code
<?xml version="1.0"?>
<page xmlns:xsi="http://www.w3.org/2001/XMLSchema-instance" layout="1column" xsi:noNamespaceSchemaLocation="urn:magento:framework:View/Layout/etc/page_configuration.xsd">
   <body>
       <referenceContainer name="content">
          <block class="Magento\Framework\View\Element\Template" name="aureatelabs_customform" template="Aureatelabs_CustomForm::form.phtml" />
       </referenceContainer>
   </body>
</page>
6. Create a Basic form file form.phtml
Create a file app/code/Aureatelabs/CustomForm/view/frontend/templates/form.phtml and put the following code.
<?php
/**
* @var \Magento\Framework\View\Element\Template $block
* @var \Magento\Framework\Escaper $escaper
*/
?>
<form action="<?= $escaper->escapeUrl($block->getUrl('customform/action/post')) ?>"
method="post"
id="my_custom_form"
>
<?= $block->getBlockHtml('formkey') ?>
<div class="field field-reserved w-full required">
<label class="label" for="firstname">
<span>First Name</span>
</label>
<div class="control">
<input type="text" id="name" name="name" title="Your Name" class="form-input required-entry">
</div>
</div>
<div class="field field-reserved w-full">
<label class="label" for="note">
<span>Your Note</span>
</label>
<div class="control">
<textarea id="note" name="note" rows="4" cols="50"></textarea>
</div>
</div>
<div class="actions-toolbar">
<div class="primary">
<button type="submit" class="action submit primary">
<?= $escaper->escapeHtml(__('Submit')) ?>
</button>
</div>
</div>
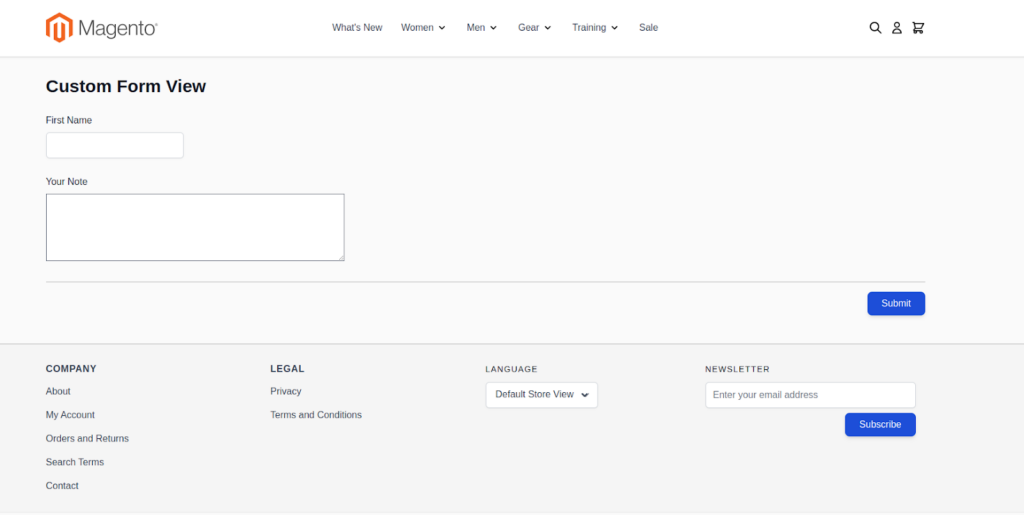
</form>Now that we have completed a minimal module with a basic form, you can access it using the following URLs:
http://<yourhost.com>/customform/index/index
Or
http://<yourhost.com>/customform/
Learn about the Hyvä Theme from scratch!
Steps to Add Google reCAPTCHA to the Form
Follow the steps below to add Google reCAPTCHA to the form that we have created in the previous steps.
1. Render the reCAPTCHA field
Please add the following line to the app/code/Aureatelabs/CustomForm/view/frontend/templates/form.phtml file for the form that we created in the previous steps.
<!-- Render the Google reCAPTCHA field  -->
   <?= $block->getBlockHtml(ReCaptcha::RECAPTCHA_INPUT_FIELD_BLOCK.'_recaptcha') ?>
Additionally, please declare the following class at the top of this file.
use Hyva\Theme\ViewModel\ReCaptcha;So, now this form code looks like the following:
<?php
use Hyva\Theme\ViewModel\ReCaptcha;

/**
* @var \Magento\Framework\View\Element\Template $block
* @var \Magento\Framework\Escaper $escaper
*/
?>
<form action="<?= $escaper->escapeUrl($block->getUrl('customform/action/post')) ?>"
     method="post"
     id="my_custom_form"
>
   <?= $block->getBlockHtml('formkey') ?>

   <div class="field field-reserved w-full required">
       <label class="label" for="firstname">
           <span>First Name</span>
       </label>
       <div class="control">
           <input type="text" id="name" name="name" title="Your Name" class="form-input required-entry">
       </div>
   </div>

   <div class="field field-reserved w-full">
       <label class="label" for="note">
           <span>Your Note</span>
       </label>
       <div class="control">
           <textarea id="note" name="note" rows="4" cols="50"></textarea>
       </div>
   </div>

   <!-- Render the Google reCAPTCHA field  -->
   <?= $block->getBlockHtml(ReCaptcha::RECAPTCHA_INPUT_FIELD_BLOCK.'_recaptcha') ?>

   <div class="actions-toolbar">
       <div class="primary">
           <button type="submit" class="action submit primary">
               <?= $escaper->escapeHtml(__('Submit')) ?>
           </button>
       </div>
   </div>
</form>
As mentioned at the beginning of the blog, Google reCAPTCHA provides three types of versions, as listed below:
- reCAPTCHA v2 (“I am not a robot”)
- reCAPTCHA v2 Invisible
- reCAPTCHA v3 Invisible
Considering the various version types, add the Google reCAPTCHA field in the following manner for each type.
- reCAPTCHA v2 (“I am not a robot”)
<!-- Render the Google reCAPTCHA field  -->
<?= $block->getBlockHtml(ReCaptcha::RECAPTCHA_INPUT_FIELD_BLOCK.'_recaptcha') ?>- reCAPTCHA v2 Invisible
<!-- Render the Google reCAPTCHA field  -->
<?= $block->getBlockHtml(ReCaptcha::RECAPTCHA_INPUT_FIELD_BLOCK.'_invisible') ?>- reCAPTCHA v3 Invisible
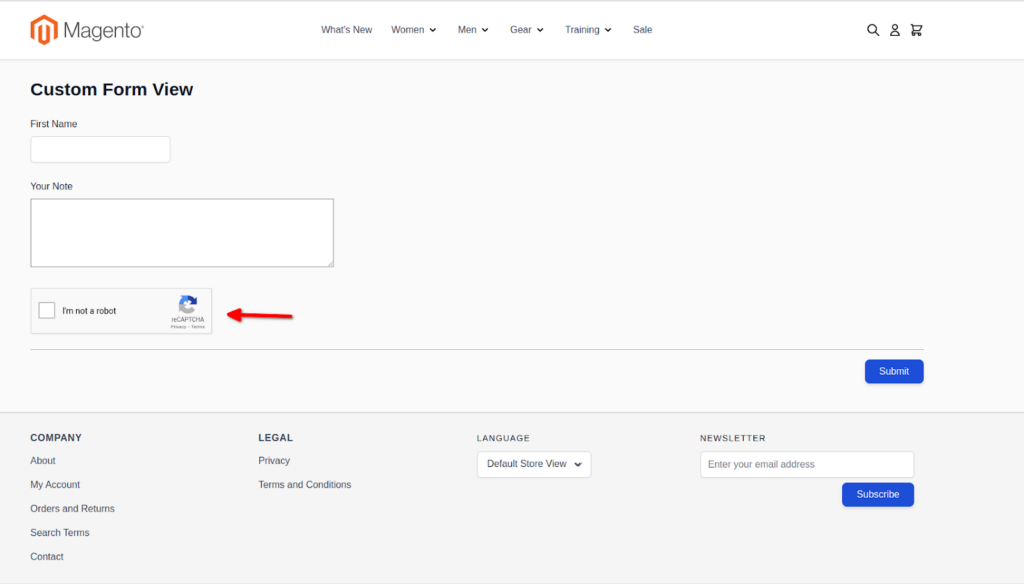
<!-- Render the Google reCAPTCHA field -->
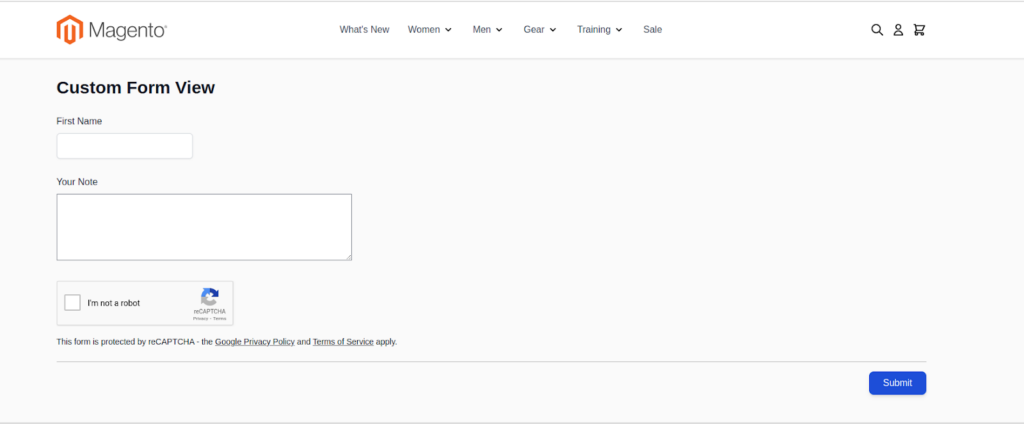
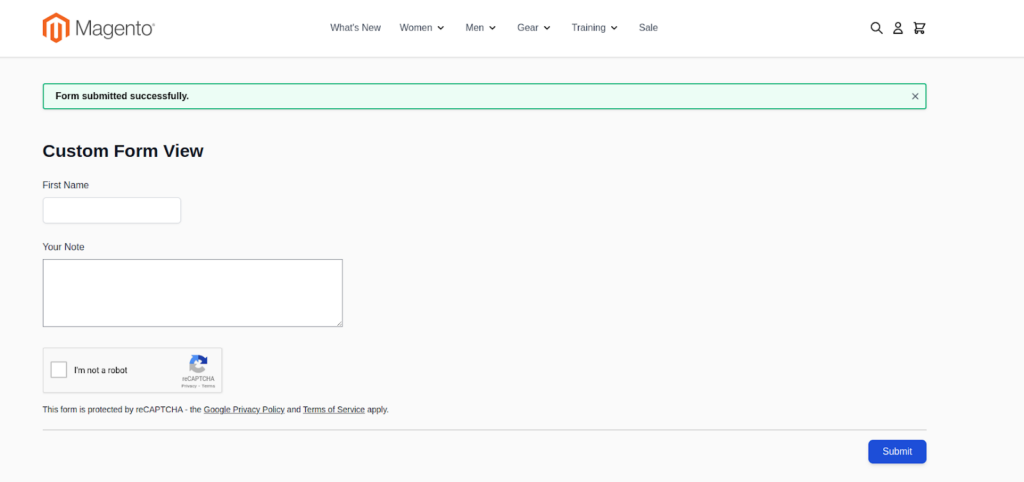
<?= $block->getBlockHtml(ReCaptcha::RECAPTCHA_INPUT_FIELD_BLOCK) ?>Now, the form in the frontend will be displayed as shown in the screenshot, including the rendering of the Google reCAPTCHA field.
2. Now let’s add the legal notice block (optional)
This is an optional step, but if you want to add the notice block in the form, please include the following code in the app/code/Aureatelabs/CustomForm/view/frontend/templates/form.phtml file.
<!-- Render the legal notice block -->
<div class="w-full grecaptcha-legal">
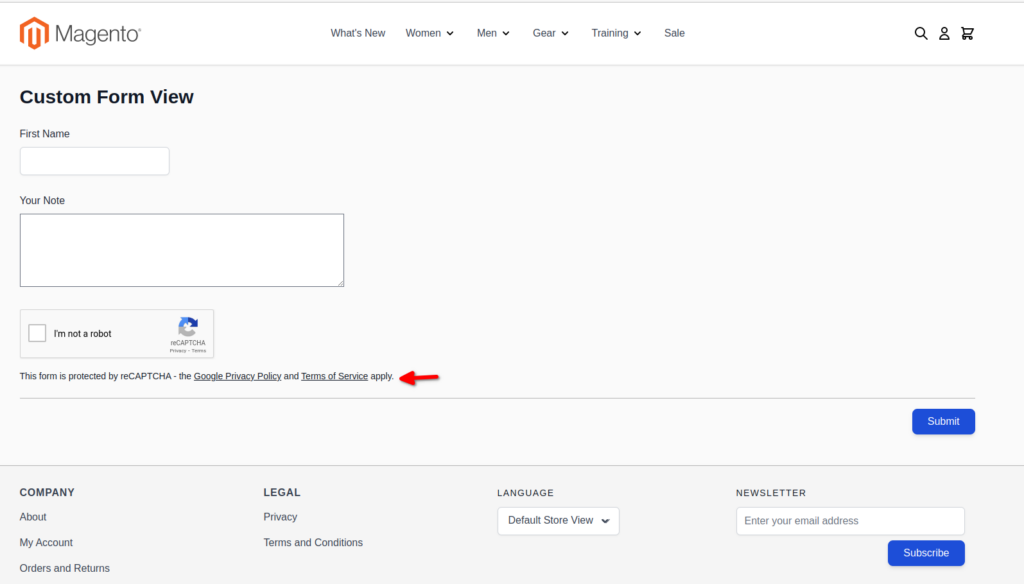
<?= $block->getBlockHtml(ReCaptcha::RECAPTCHA_LEGAL_NOTICE_BLOCK) ?>
</div>Now, this notice will be displayed as shown in the screenshot below.
3. Add client side reCAPTCHA validation
Please add the below code into the app/code/Aureatelabs/CustomForm/view/frontend/templates/form.phtml file.
And this code validates the Google reCAPTCHA on the client side.
- First, add the following code inside the <form> element. This Alpine.js code defines the Alpine component with a submit form event to validate Google reCAPTCHA before submitting the form.
x-data="initMyForm()"
@submit.prevent="submitForm()"- Secondly, add the following Alpine.js script. This script implements the validation of Google reCAPTCHA before submitting the form.
<script>
 function initMyForm() {
   return {
      errors: 0,
     submitForm() {
       // Do not rename $form!
       // In recaptcha_validation it is expected to be declared

       const $form = document.getElementById('my_custom_form');
       <?= $block->getBlockHtml(ReCaptcha::RECAPTCHA_SCRIPT_TOKEN_BLOCK.'_recaptcha'); ?>

       if (this.errors === 0) {
         $form.submit();
       }
     }
   }
 }
</script>
Here the form element must be assigned to a variable $form.
And any errors will be declared on the this.errors property of the component.
And then, render the recaptcha_validation child block. Please ensure to include this block based on the type of Google reCAPTCHA version you are using for the form. Depending on the version, add the validation block in the Alpine.js script. Please review the code below for different version types of Google reCAPTCHA.
- reCAPTCHA v2 (“I am not a robot”)
<?= $block->getBlockHtml(ReCaptcha::RECAPTCHA_SCRIPT_TOKEN_BLOCK.'_recaptcha'); ?>- reCAPTCHA v2 Invisible
<?= $block->getBlockHtml(ReCaptcha::RECAPTCHA_SCRIPT_TOKEN_BLOCK.'_invisible'); ?>- reCAPTCHA v3 Invisible
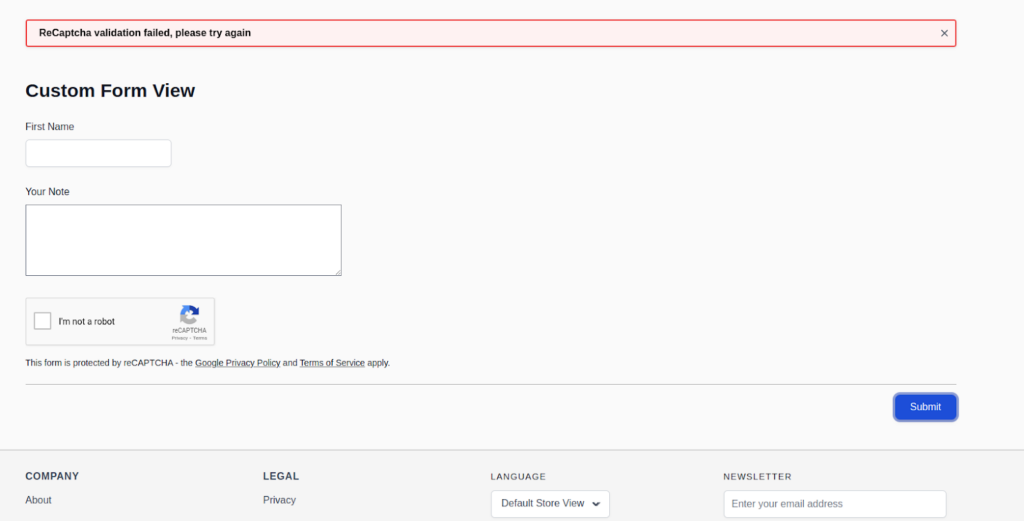
<?= $block->getBlockHtml(ReCaptcha::RECAPTCHA_SCRIPT_TOKEN_BLOCK); ?>- And finally, this validation message displays as shown in the screenshot below if the form does not pass with Google reCAPTCHA:
Google reCAPTCHA validation is now completed at the client side. Then finally the app/code/Aureatelabs/CustomForm/view/frontend/templates/form.phtml file. Code look like the below
<?php
use Hyva\Theme\ViewModel\ReCaptcha;

/**
* @var \Magento\Framework\View\Element\Template $block
* @var \Magento\Framework\Escaper $escaper
*/
?>
<form action="<?= $escaper->escapeUrl($block->getUrl('customform/action/post')) ?>"
     method="post"
     id="my_custom_form"
     x-data="initMyForm()"
     @submit.prevent="submitForm()"
>
   <?= $block->getBlockHtml('formkey') ?>

   <div class="field field-reserved w-full required">
       <label class="label" for="firstname">
           <span>First Name</span>
       </label>
       <div class="control">
           <input type="text" id="name" name="name" title="Your Name" class="form-input required-entry">
       </div>
   </div>

   <div class="field field-reserved w-full">
       <label class="label" for="note">
           <span>Your Note</span>
       </label>
       <div class="control">
           <textarea id="note" name="note" rows="4" cols="50"></textarea>
       </div>
   </div>

   <!-- Render the Google reCAPTCHA field  -->
   <?= $block->getBlockHtml(ReCaptcha::RECAPTCHA_INPUT_FIELD_BLOCK.'_recaptcha') ?>

   <!-- Render the legal notice block -->
   <div class="w-full grecaptcha-legal">
       <?= $block->getBlockHtml(ReCaptcha::RECAPTCHA_LEGAL_NOTICE_BLOCK) ?>
   </div>

   <div class="actions-toolbar">
       <div class="primary">
           <button type="submit" class="action submit primary">
               <?= $escaper->escapeHtml(__('Submit')) ?>
           </button>
       </div>
   </div>
</form>

<script>
 function initMyForm() {
   return {
      errors: 0,
     submitForm() {
       // Do not rename $form!
       // Here, it is necessary to declare the reCAPTCHA validation as per the version you are using. For V3, use recaptcha_validation, for V2 ('I am not a robot'), use recaptcha_validation_recaptcha, and for V2 Invisible, use recaptcha_validation_invisible

       const $form = document.getElementById('my_custom_form');
       <?= $block->getBlockHtml(ReCaptcha::RECAPTCHA_SCRIPT_TOKEN_BLOCK.'_recaptcha'); ?>

       if (this.errors === 0) {
         $form.submit();
       }
     }
   }
 }
</script>
Now that everything is completed, the last step is to add server-side validation for Google reCAPTCHA.
Steps to Add Server-side Validation for Google reCAPTCHA
Follow the steps to validation that validate the Google reCAPTCHA on the server side when the form is submitted and throws an error when the validation fails.
Let’s create a store configuration to enable Google reCAPTCHA for my custom form.
- Create a file at app/code/Aureatelabs/CustomForm/etc/adminhtml/system.xml and insert the following code into it.
<?xml version="1.0"?>
<config xmlns:xsi="http://www.w3.org/2001/XMLSchema-instance" xsi:noNamespaceSchemaLocation="urn:magento:module:Magento_Config:etc/system_file.xsd">
   <system>
       <section id="recaptcha_frontend">
           <group id="type_for">
               <field id="my_custom_form" translate="label" type="select" sortOrder="210" showInDefault="1"
                      showInWebsite="1" showInStore="0" canRestore="1">
                   <label>Enable for My Custom Form</label>
                   <source_model>Magento\ReCaptchaAdminUi\Model\OptionSource\Type</source_model>
               </field>
           </group>
       </section>
   </system>
</config>
Above code the new store config to the path Stores > Settings > Configuration > Security > Google reCAPTCHA Storefront > Storefront.
- Create a file at app/code/Aureatelabs/CustomForm/Controller/Action/Post.php and add the following code to this file.
<?php
namespace Aureatelabs\CustomForm\Controller\Action;

use Magento\Framework\App\Action\Context;
use Magento\Framework\App\Action\HttpPostActionInterface;
use Magento\ReCaptchaUi\Model\RequestHandlerInterface;
use Magento\Framework\App\Action\Action;

class Post extends Action implements HttpPostActionInterface
{
   /**
    * @var RequestHandlerInterface
    */
   private $requestHandler;

   /**
    * @param Context $context
    * @param RequestHandlerInterface $requestHandler
    */
   public function __construct(
       \Magento\Framework\App\Action\Context $context,
       RequestHandlerInterface $requestHandler
   ) {
       $this->requestHandler = $requestHandler;
       parent::__construct($context);
   }

   /**
    * Custom Form Index
    *
    * @return \Magento\Framework\View\Result\PageFactory
    */
   public function execute()
   {
      try {

            //Google reCAPTCHA Server Side Validation
            $key = "my_custom_form";
            $request = $this->getRequest();
            $response = $this->getResponse();

            $redirectOnFailureUrl = $this->_redirect->getRedirectUrl();
            $this->requestHandler->execute($key, $request, $response, $redirectOnFailureUrl);

            //Do your custom code after reCaptcha Server validation complete successfully

            //Redirect to Form
            return $this->resultRedirectFactory->create()->setPath('customform/index');

        } catch (\Exception $e) {

            // if there any issue in reCaptcha Server validation it will automatically redirect to the form page with error message
            return $this->resultRedirectFactory->create()->setPath('customform/index');

        }

   }
}
In the above file, we have added the below code that is responsible to validate the passed Google reCAPTCHA.
//Google reCAPTCHA Server Side Validation
 $key = "my_custom_form";
 $request = $this->getRequest();
       $response = $this->getResponse();
       $redirectOnFailureUrl =
$this->_redirect->getRedirectUrl();
       $this->requestHandler->execute($key, $request, $response, $redirectOnFailureUrl);
       //End
The $key value corresponds to the field ID we established in the store configuration during the previous step. In our example case, this is my_custom_form.
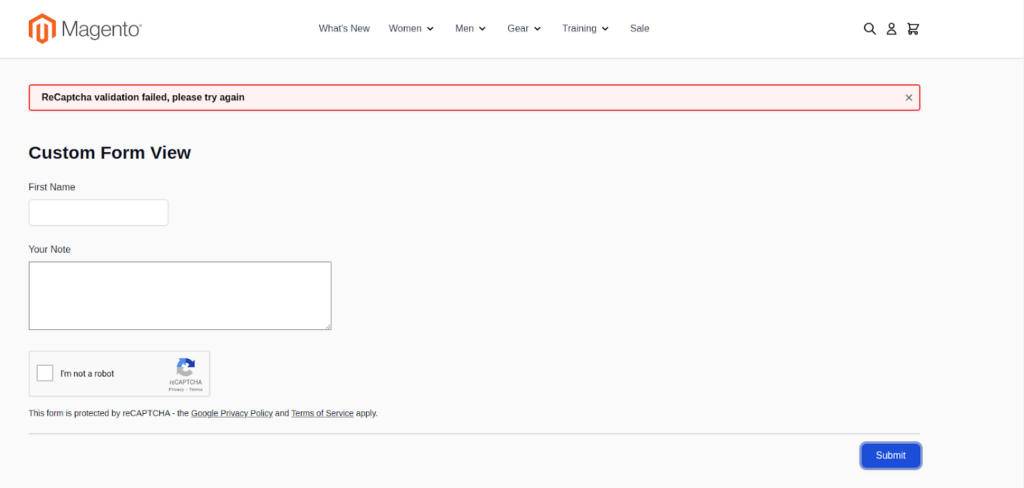
Finally, we have successfully integrated Google reCAPTCHA into the custom form using the Hyva theme. Please review the attached screenshot to see how it works.
Hopefully, this blog helps you easily add Google reCAPTCHA to your custom form. Google reCAPTCHA serves as the bodyguard for your website, preventing spam and bots, and ensuring a safe and seamless experience for genuine users online.
Read more resources on Hyva themes:
- Check out the InstaBuild for Hyvä Themes: Ready-made Hyva theme templates for faster storefront development!
- Hyva Themes Development – For Online Merchants
- Hyvä Theme Benefits that your store needs
- 10 Best Hyva Compatibility Extension Providers For Magento 2 Stores
- Hyvä VS PWA: Where to Invest?
- How a Slow Magento Website Can Cost You Advertising Dollars
- Mobile Commerce: How Hyva Themes Boost Mobile Conversions


Post a Comment
Got a question? Have a feedback? Please feel free to leave your ideas, opinions, and questions in the comments section of our post! ❤️