
In today’s article, I will explain to you how to create nested popups in Hyva Theme
Steps to Open Hyvä Nested Popup Dialog in Magento 2
Step 1: Setting up the Layout for Magento 2 Hyva Theme Popup Modal
Create the Module Directory:
Inside the app/code directory, create a directory for your module. Create Aureatelabs and HyvaNestedPopup
app/code/Aureatelabs/HyvaNestedPopupCreate Module Registration File:
Create a registration.php file in the module directory.
# app/code/Aureatelabs/HyvaNestedPopup/registration.php
<?php
\Magento\Framework\Component\ComponentRegistrar::register(
    \Magento\Framework\Component\ComponentRegistrar::MODULE,
    'Aureatelabs_HyvaNestedPopup',
    __DIR__
);
Create Module Configuration File:
Create a module.xml file in the etc directory of your module.
<!-- app/code/[VendorName]/[ModuleName]/etc/module.xml -->
<?xml version="1.0" ?>
<config xmlns:xsi="http://www.w3.org/2001/XMLSchema-instance" xsi:noNamespaceSchemaLocation="urn:magento:framework:Module/etc/module.xsd">
    <module name="Aureatelabs_HyvaNestedPopup" setup_version="1.0.0"/>
</config>
Inside the layout folder, create a default.xml file and add the following code And add the code as follows
app/code/Aureatelabs/HyvaNestedPopup/view/frontend/layout/default.xmlUse block default class (class=”Magento\Framework\View\Element\Template”)
<?xml version="1.0" encoding="UTF-8"?>
<page layout="3columns" xmlns:xsi="http://www.w3.org/2001/XMLSchema-instance"
   xsi:noNamespaceSchemaLocation="urn:magento:framework:View/Layout/etc/page_configuration.xsd">
   <body>
 <referenceContainer name="content">
       <block class="Magento\Framework\View\Element\Template" name="nested-popup"  after="-"
           template="Aureatelabs_HyvaNestedPopup::nested-popup.phtml" />
   </body>
</referenceContainer>
</page>
Step 2: Creating the Template for Magento 2 Hyva Theme Popup Modal
To generate a template for a Magento 2 popup modal within the Hyva Theme, proceed as follows:
1. Establish a template directory at the subsequent location: app/code/Aureatelabs/HyvaNestedPopup/view/frontend/templates/
2. Integrate nested-popup.phtml file into the templates directory and inject the provided code.
<?php
$heroicons = $viewModels->require(\Hyva\Theme\ViewModel\HeroiconsOutline::class);
$modal = $viewModels->require(\Hyva\Theme\ViewModel\Modal::class)
->createModal()
->withDialogRefName('popup-dialog')
->withContent('
<div class="w-2/3 h-px max-w-1xl md:h-auto">
<div class="absolute top-4 right-4 rounded-t dark:border-gray-600">
<button @click="hideModal" type="button" class="h-10 w-10 rounded-full bg-gray-200 p-2">' . $heroicons->renderHtml('x') . '</button>
</div>
<!-- Modal body -->
<div class="p-6 space-y-6">
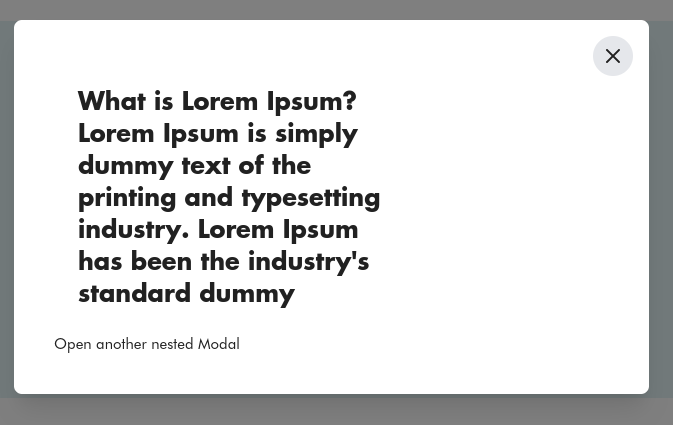
<h1>What is Lorem Ipsum?
Lorem Ipsum is simply dummy text of the printing and typesetting industry. Lorem Ipsum has been the industry\'s standard dummy </h1>
</div>
<button @click="nestedOpenModal">Open another nested Modal</button>
</div>'
)->addDialogClass('relative sm:w-1/2 md:w-1/2 lg:w-1/3 xl:1/3 2xl:1/3', 'm-2');
$nestedModal = $viewModels->require(\Hyva\Theme\ViewModel\Modal::class)
->createModal()
->withDialogRefName('popup-dialog')
->withContent('
<div class="w-2/3 h-px max-w-1xl md:h-auto">
<div class="absolute top-4 right-4 rounded-t dark:border-gray-600">
<button @click="nestedHideModal" type="button" class="h-10 w-10 rounded-full bg-gray-200 p-2">' . $heroicons->renderHtml('x') . '</button>
</div>
<!-- Modal body -->
<div class="p-6 space-y-6">
<h1>Why do we use it?
It is a long established fact that a reader will be distracted by the readable content of a page when looking at its layout.</h1>
</div>
</div>'
)->addDialogClass('relative sm:w-1/2 md:w-1/2 lg:w-1/3 xl:1/3 2xl:1/3', 'm-2');
?>
<div x-data="{
showModal: false,
nestedShowModal: false,
hideModal() {
this.showModal = false;
},
nestedHideModal() {
this.nestedShowModal = false;
},
openModal() {
this.showModal = true;
},
nestedOpenModal() {
this.nestedShowModal = true;
}
}" x-init="init()">
<button @click="openModal">Open nested Modal</button>
<template x-if="showModal">
<?= $modal ?>
</template>
<template x-if="nestedShowModal">
<?= $nestedModal ?>
</template>
</div>This code sets up a two-level nested modal system using the Hyva theme in Magento 2. It includes two modals with distinct content and uses Alpine.js for state management. Clicking buttons toggles the visibility of the main and nested modals, allowing for a nested modal experience.
bin/magento setup:upgrade
bin/magento setup:di:compile
bin/magento c:f
For apply CSS changes need to run (npm run build-prod) at (app/design/frontend/vendor/module/web/tailwind)
Please check its output. “Happy coding”
Output :
Hope this helps! Let us know if you have any questions in the comments below.
More resources on Hyva themes:
- InstaBuild—Hyvä Theme Accelerator: Best Alternative To Custom Hyvä Development
- Hyva Themes Development – For Online Merchants
- Hyvä Theme Benefits that your store needs
- 10 Best Hyva Compatibility Extension Providers For Magento 2 Stores
- Hyvä VS PWA: Where to Invest?
- How a Slow Magento Website Can Cost You Advertising Dollars
- Mobile Commerce: How Hyva Themes Boost Mobile Conversions


Post a Comment
Got a question? Have a feedback? Please feel free to leave your ideas, opinions, and questions in the comments section of our post! ❤️