With default Magento, we prioritize the use of view models over block classes whenever possible. This is because view models are more reusable and composable. In default Magento, you can add view models through the layout.xml file.
In a Hyvä theme, in every template, a variable $viewModels is automatically available, introduced by hyva-themes/magento2-theme-module, similar to the existing $block and $escaper variables. You can use it to fetch any view model (i.e. any class that implements ArgumentInterface).
Hyva is a Magento frontend development accelerator that utilizes View Models to manage the data and logic for rendering templates. To use View Models in Hyva, you typically follow these steps:
Here’s a general guide on how you might use View Models in the context of Hyva:
Create a View Model
Start by creating a PHP class for your View Model. This class should contain the data and logic needed for rendering a specific part of your frontend.
<?php
namespace Aureatelabs\Hyva\ViewModel;
use Magento\Framework\View\Element\Block\ArgumentInterface;
class YourViewModel implements ArgumentInterface
{
protected $someData;
public function __construct(
// Add dependencies or services needed here
) {
// Initialize data or inject necessary dependencies
$this->someData = $this->fetchSomeData();
}
public function getSomeData()
{
return $this->someData;
}
public function fetchSomeData() {
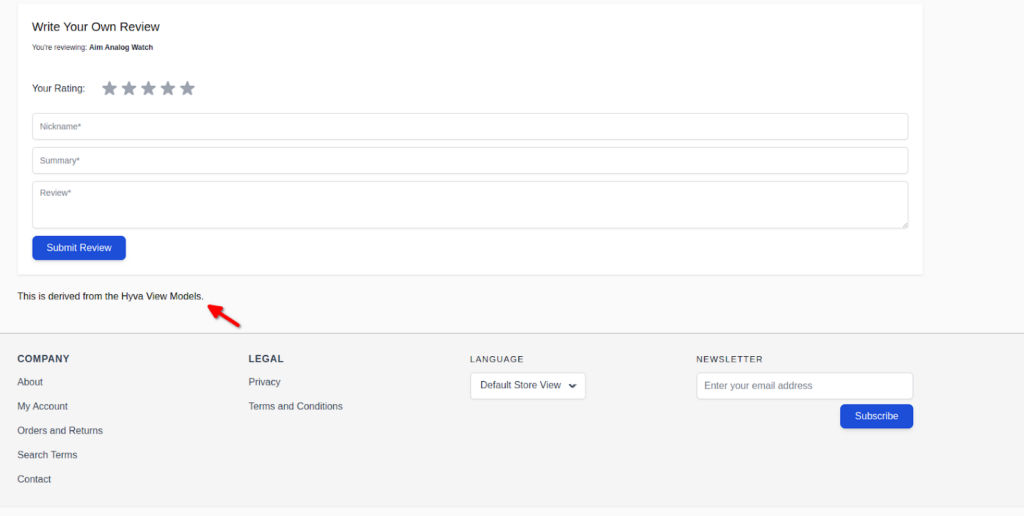
return $this->someData = "This is derived from the Hyva View Models.";
}
// Add other methods and logic as needed
}
After implementing the above code, the output will be displayed as shown in the screenshot on the frontend page where you place this code. In this example, I have placed this code on the Product view page.
Tip: It is no longer needed to declare view models in XML!
After fetching data from the View Model in your template file, you can use it for rendering HTML or performing other frontend tasks.
Another example of View Model
1. Predefined icons
To use the list of predefined icons, find a full list of options in vendor/hyva-themes/magento2-theme-module/src/ViewModel/Heroicons.php. In the template, include this:
The output of this custom icon looks like the screenshot below:
If you would like to put custom icons in the custom folder, for example, svg/icons/, you should create a new ViewModel for these icons.
Remember, this is a general guideline for using View Models in Hyva. Adjust the namespaces, class names, and file paths according to your module’s structure. Additionally, follow Hyva’s documentation or best practices for more specific or advanced usage.
Tailwind is a utility-based CSS framework. This means building modern websites rapidly without ever leaving your HTML. A utility-first CSS framework packed with classes like flex, pt-4, text-center, and rotate-90 that can be composed to build any design, directly in your markup.
We utilize the outstanding TailwindCSS framework to craft templates that are highly customizable, and visually appealing across various devices, and generate remarkably compact CSS stylesheets, minimizing the data load for your website visitors.
Exploring Tailwind CSS is strongly advised before delving into the setup of your Hyvä Theme.
PostCSS was launched as a method to use JavaScript for CSS processing.
PostCSS is a Node.js tool that transforms your styles using JavaScript plugins.
It generates more downloads per week on NPM than other CSS preprocessors like Sass, Less, and Stylus combined.
PostCSS has a rich ecosystem of plugins that can be used to perform various tasks such as linting, minification, prefixing vendor-specific styles, and more.
PostCSS is also used by other technologies like Vite and Next.js, as well as the CSS framework TailwindCSS which is a PostCSS plugin.
PostCSS in PHPStorm
If you want to remove errors in PHPStorm due to nesting in .css files, install the PostCSS plugin.
When the PostCSS plugin is installed and active, open the PHPStorm settings and navigate to:
Languages & Frameworks > Style Sheets > Dialects.
Select PostCSS from the dropdown, then add the paths to web/tailwind in your themes.
PurgeCSS is the main benefit of Hyva Theme. because it eliminates all styles that are not utilized, retaining only the essential styles. PurgeCSS decreases the number of classes in the final CSS.
“PurgeCSS examines your content and CSS files, comparing the selectors utilized in your files with those in your content files. It eliminates unused selectors from your CSS, leading to smaller CSS files.”
In Hyvä’s purging process, the script identifies all the Tailwind classes employed in the theme and extracts them from the comprehensive original Tailwind stylesheet.
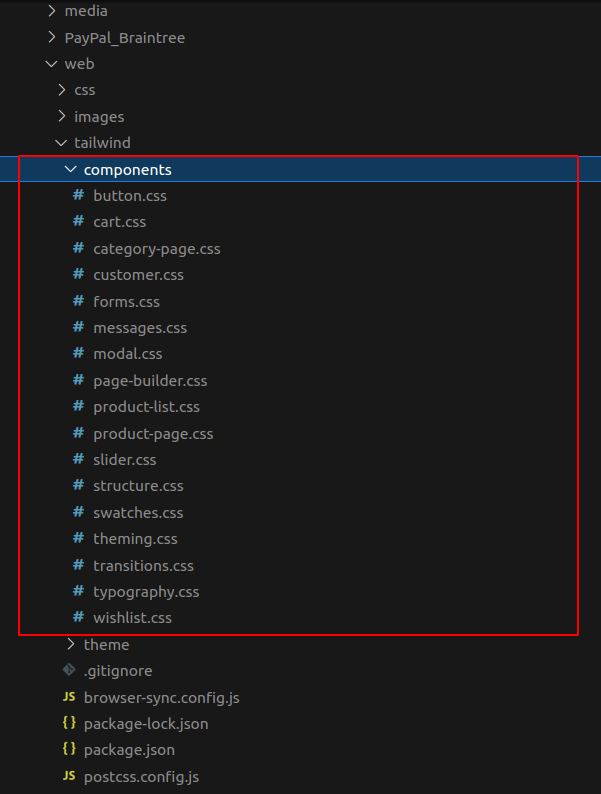
The tailwind/components directory is for reusable elements such as buttons, sliders, and inputs.
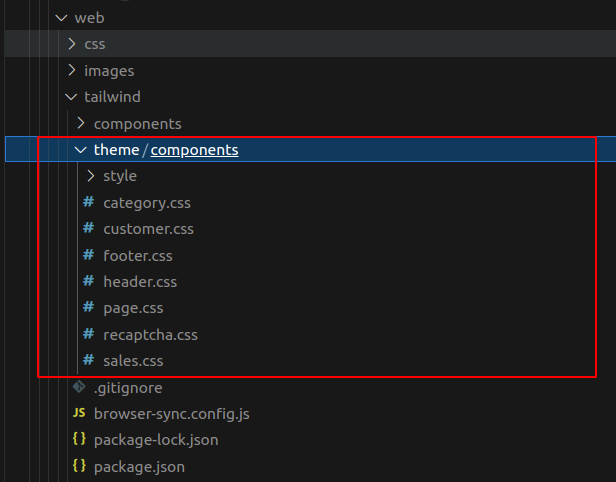
The tailwind/theme/components directory is intended for larger components or pages, such as the category page, account pages, the header, etc.
Nevertheless, this practice is not consistently adhered to. For instance, within tailwind/components, you will also find product-page.css and category-page.css.
cd /path/to/project/app/design/frontend/Aureatelabs/hyva/web/tailwind/ npm run build-prod
Generating CSS during development:
For Development mode, you can generate the styles using the command
cd /path/to/project/app/design/frontend/Aureatelabs/hyva/web/tailwind/ npm run watch
This will start running the tailwind compiler continuously and any CSS classes added to templates in the purge configuration will be added to the styles.css file immediately.
Conclusion
Tailwind CSS Resources
Check out this YouTube playlist for an outstanding crash course introduction to Tailwind CSS presented by its creators.
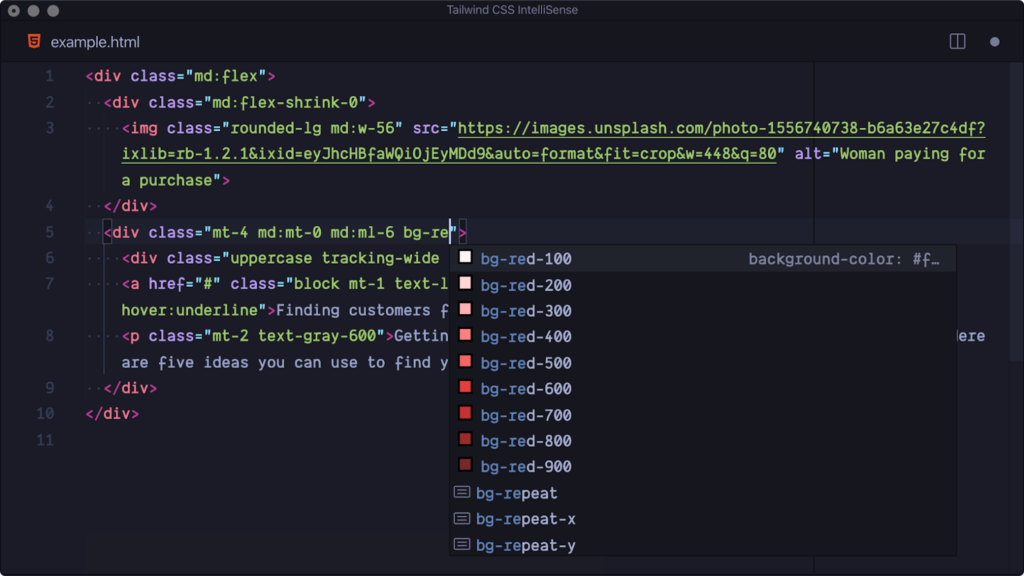
If you are using VS Code, you can utilize the Tailwind CSS IntelliSenseextension for suggestions of the class list. Your preview is as per the screenshot below.
There are two methods to develop your own theme with Hyva:
Creating a Child Theme, similar to the default Magento setup: As a beginner, this is the recommended approach. It involves establishing a child theme, allowing for customization while inheriting the core functionalities of the default Magento theme.
Duplicating the hyva-themes/magento2-default-theme and making modifications: For a more advanced approach, duplicating the hyva-themes/magento2-default-theme provides a robust foundation for customization. However, as a beginner, we’ll focus on the first method initially and reserve the second approach for a dedicated blog post.
In this blog, we will guide you through the process of creating a child theme in the Hyvä theme. While it closely aligns with the default Magento 2 method, there are a few additional steps unique to Hyvä, which we will explore in detail.
Duplicate the ‘web’ folder from vendor/hyva-themes/magento2-default-theme/web/ to app/design/frontend/Aureate/hyva. This step is crucial as, during later customization, when editing the CSS, you will need to ensure that the changes are incorporated into the purgeCSS configuration.
To set the parent theme path in your child theme’s web/tailwind/tailwind.config.js file, navigate to app/design/frontend/Aureate/hyva/web/tailwind/tailwind.config.js. Locate the commented line labeled ‘parent theme in Vendor,’ and simply uncomment the line below it. If this line is not present, add it to the code as demonstrated below.
module.exports = {

...

// keep the original settings from tailwind.config.js

// only add the path below to the purge > content settings

...

purge: {

content: [

            // this theme's phtml files

            '../../**/*.phtml',

            // The theme-module templates are included automatically in the purge config since Hyvä 1.1.15, but

            // for themes based on earlier releases, enable the appropriate path to the theme-module below:

            // hyva theme-module templates (if this is the default theme in vendor/hyva-themes/magento2-default-theme)

            '../../../magento2-theme-module/src/view/frontend/templates/**/*.phtml',

            // hyva theme-module templates (if this is a child theme)

            '../../../../../../../vendor/hyva-themes/magento2-theme-module/src/view/frontend/templates/**/*.phtml',

            // parent theme in Vendor (if this is a child-theme)

            '../../../../../../../vendor/hyva-themes/magento2-default-theme/**/*.phtml',

            // app/code phtml files (if need tailwind classes from app/code modules)

            '../../../../../../../app/code/**/*.phtml',

            // react app src files (if Hyvä Checkout is installed in app/code)

            //'../../../../../../../app/code/**/src/**/*.jsx',

            // react app src files in vendor (If Hyvä Checkout is installed in vendor)

            //'../../../../../../../vendor/hyva-themes/magento2-hyva-checkout/src/reactapp/src/**/*.jsx',

            //'../../../../../../../vendor/hyva-themes/magento2-hyva-checkout/src/view/frontend/templates/react-container.phtml',

            // widget block classes from app/code

            '../../../../../../../app/code/**/Block/Widget/**/*.php'

]

}

}

...
Step 7
After completing the above steps, please run the following command:
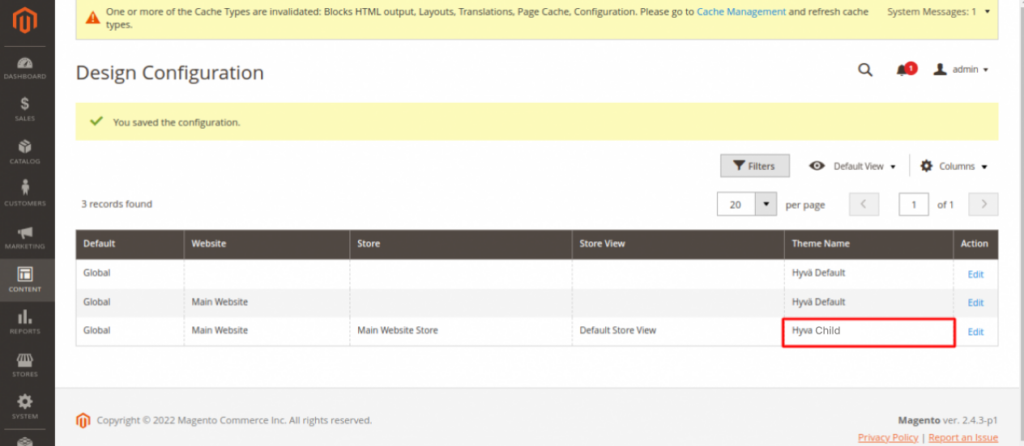
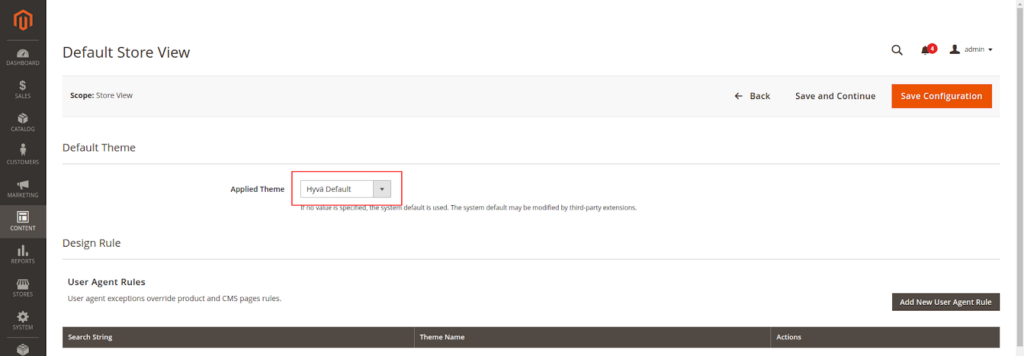
Navigate to the Admin Dashboard, then go to Content -> Design -> Configuration. Then, edit the theme. From the dropdown menu, select your child theme ‘Hyva Child,’ and proceed to save the configuration changes. Don’t forget to flush the cache after saving.
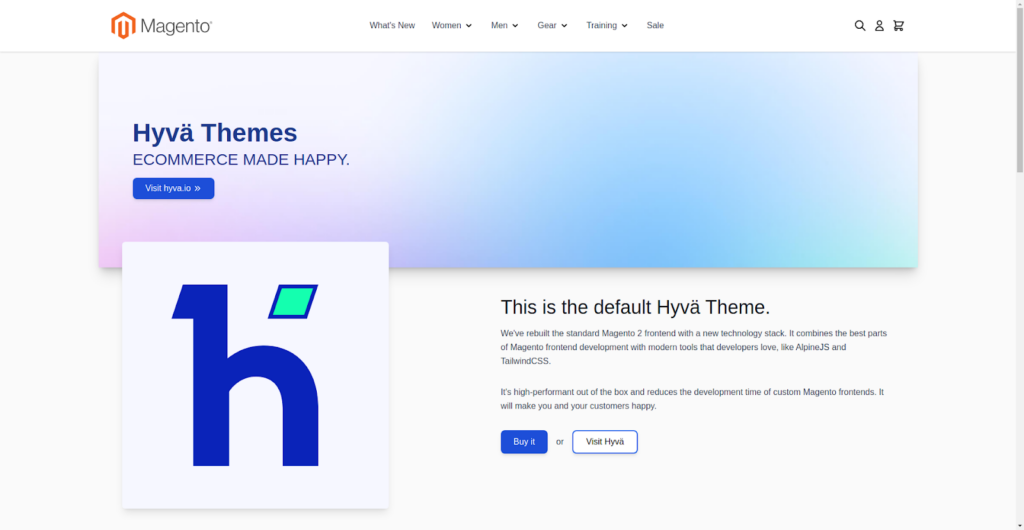
Then, check your front-end preview:
Extending your theme in Hyvä operates similarly to default Magento themes. You have the flexibility to override .phtml files and extend layout XML, following the same approach as you would with a default Magento theme based on Luma.
Magento 2, known for its robust e-commerce capabilities, becomes even more powerful with the implementation of the Hyva theme (what is Hyva theme?). This modern and responsive theme is crafted to provide an enhanced user experience, making your storefront visually appealing and intuitively navigable.
The Hyva theme is designed to provide a modern and responsive look for Magento 2 stores. Before you begin the installation, ensure that you have a backup of your Magento 2 store in case of any unforeseen issues.
This step-by-step guide will lead you through the process of installing the Hyva theme in Magento 2, ensuring a smooth and hassle-free experience. So, if you’re ready to enhance your Magento store’s performance and user experience, let’s get started with this comprehensive Hyva theme installation guide.
Requirements
Hyvä theme is compatible with Magento 2.4.3 or higher versions. Ensure your Magento version is older than 2.4.3, and we recommend upgrading first and then implementing the Hyvä theme.
# this command adds your key to your projects auth.json file

# replace yourLicenseAuthentificationKey with your own key

composer config --auth http-basic.hyva-themes.repo.packagist.com token yourLicenseAuthentificationKey

# replace yourProjectName with your project name

composer config repositories.private-packagist composer https://hyva-themes.repo.packagist.com/yourProjectName/
Step 2: Then, install the theme package and its dependencies:
Hyva Installation Process for Technology Partners and Contributions
To begin, ensure you have access to all Hyvä repositories at gitlab.hyva.io. If, for any reason, you don’t have access, please reach out to the Hyvä team for assistance.
Step 1: Run the following commands to install Hyvä directly from GitLab with composer:
Congratulations, you have successfully installed the Hyva theme in Magento 2.
Conclusion
Overall, this step-by-step guide serves as a valuable resource for those seeking to seamlessly integrate Hyva Themes into their Magento 2 environments. Its clarity, attention to detail, and user-centric approach contribute to making the theme installation process an accessible and positive experience for Magento users at various skill levels.
Thank you for joining us in this journey towards installing and optimizing Hyva themes in Magento 2 from a professional’s perspective. We hope you found this guide valuable and wish you success in your online store venture!
eCommerce is evolving, with new trends popping up every day, and old ones blowing out.
If your store isn’t updated with the latest eCommerce trends and is still stuck in the ’90s, it’s time for a change. Because staying updated with trends isn’t just an advantage — It’s a necessity.
Nowadays, people intensely follow trends even when they’re shopping. To match their preferences, eCommerce store owners need to embrace these changes. Because honestly, what was “great” yesterday, might not be so appealing today.
For those looking to keep up with customer expectations and competition, I’m adding the most important eCommerce trends in this blog.
And I know it includes you, so, let’s hang in together.
Latest eCommerce Trends to Watch For in 2024
1. Augmented Reality (AR) & Virtual Reality (VR)
2. Voice Search
3. Chatbots as Personal Assistance
4. Visual Search
5. Social Commerce
6. Mobile Commerce (Mobile Shopping)
7. Live Streaming Commerce
8. Localization
9. Personalized Shopping Experiences
10. Buy Now, Pay Later
11. Payment Through Digital Currency
12. Sustainable eCommerce
Now, let’s understand these trends in detail and see how they impact your customer’s shopping journey and purchase decisions. Along with that, we’ll explore examples of how other eCommerce businesses have implemented these trends.
1. Augmented Reality (AR) & Virtual Reality (VR)
Augmented reality is a technology that showcases the real and virtual worlds together, by overlaying 3D visuals in a real-world environment. Virtual reality is when internet users are completely taken to a virtual world that doesn’t exist, often using headsets or goggles.
As per Gartner, customers focus more on the value provided by your brand. Due to these pressures, the eCommerce industry has turned its head towards AR and VR, which helps it provide impressive and interactive online shopping experiences.
Let’s check what AR and VR brought to spark customers’ buying interest.
How Do AR and VR Impact Customers’ Purchase Decisions?
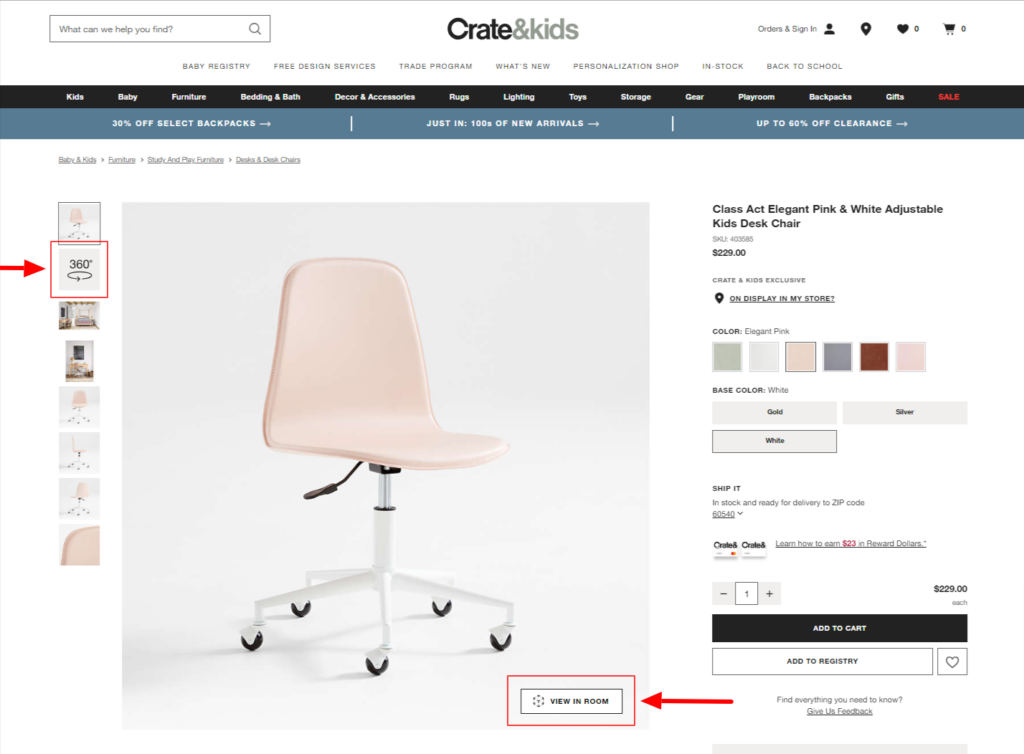
One of the major reasons people hesitate to buy online is that they’re skeptical if the product is genuine or not. And that’s where AR and VR help by providing customers with a 360° view of products.
With AR and VR, it is possible for your customers to;
Explore the products from all sides and angles
Try the product virtually
And make a better purchase decision
This often leads to a decrease in return rates and an increase in customer product knowledge.
Example of Augmented Reality (AR) & Virtual Reality (VR)
Here’s how Crate&Kids used AR and VR to enhance the online shopping experience on their site.
Here’s what this feature works like.
Here are some other examples of how eCommerce owners have started utilizing AR and VR technology.
A skincare brand carries out an AR filter on Instagram to let people try their products before purchasing.
A furniture-selling company uses AR to let customers measure sofa dimensions in their place (as shown above).
A travel agency uses VR to provide customers with a sneak peek of destinations they can visit.
AR and VR are great at providing your customers with a valuable store visit, which can spark their interest in purchasing from you. For 2023 and the upcoming years, augmented reality and virtual reality are going to be in trend and will be staple needs for eCommerce website owners.
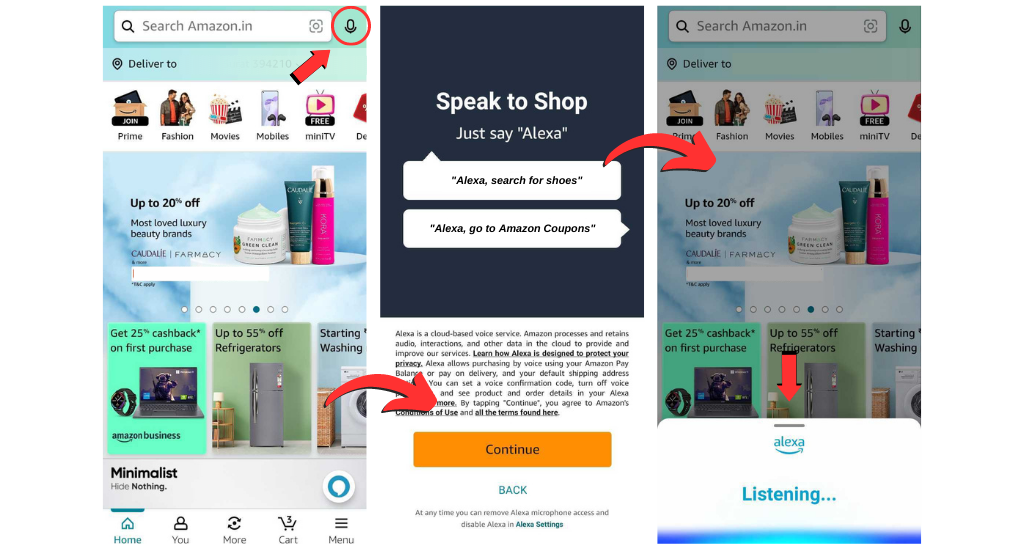
2. Voice Search
Instead of typing keywords, people now rely on voice assistants for internet searching.
Customers use this feature for exploring product collections, asking questions, ordering products, and completing the purchase process. As per Statista, the U.S. had 142 million voice assistant users in 2022, which is expected to increase by 157 million by 2026.
Let’s understand how implementing voice search can impact your customer’s buying decisions.
How Does Voice Search Impact Customers’ Purchase Decisions?
Customers find it easy to search through the voice search option, as they no longer need to type in long queries or keywords or deal with spelling errors. Voice search made customer journeys easy by allowing them to tap and speak their search queries simply.
So, if you have the voice search option on your eCommerce website, your customers will easily discover their desired products and services. The quick & accurate results through voice search will ultimately lead your customers to make a purchase.
Example of Voice Search in eCommerce
Here’s how Amazon implemented Alexa as a voice search assistant on its eCommerce website.
For implementing voice search on your website, here are some options to consider.
Voice assistants, such as Alexa and Google Assistant
Third-party voice search plug-ins
Develop a custom voice search feature
No matter which option you choose, you’ll require technical expertise to implement a voice search feature. And our eCommerce experts can help you with that.
3. Chatbots as Personal Assistance
People shop online around the clock. Chatbots can support every stage of the customer journey, from conversion to retention, by answering their queries 24/7.
There are 3 types of chatbots:
AI-driven: It is also known as conversational AI, where it captures human behavior and speech patterns and answers accordingly. For example, Myntra’s FashionGPT.
Rule-based: It offers answers to predefined questions that a user may ask. For example, regular chatbots on websites.
Hybrid chatbots: It is a blend of both AI and rules-based chatbots. For example, Sephora’s Virtual Artist, and H&M’s Ada.
If we compare chatbots with human sales assistants, chatbots are quick at serving solutions — faster than you blink. Gartner predicts that by 2027 chatbots will become a primary channel for customer service.
Let’s check how implementing a chatbot will bring your customer closer to the “checkout” button.
How Do Chatbots Impact Customers’ Purchase Decisions?
With chatbots, your customers can get answers in seconds, without waiting for a human to consider their query and respond to it.
Moreover, chatbots can work as personal shopping assistants for your customers, by providing product suggestions, comparing different options, and more.
This often has 2 results:
Increase in customer satisfaction and customer engagement, as their queries are answered quickly.
Increase in eCommerce sales numbers, as people are getting all the necessary information quickly to proceed with the purchase.
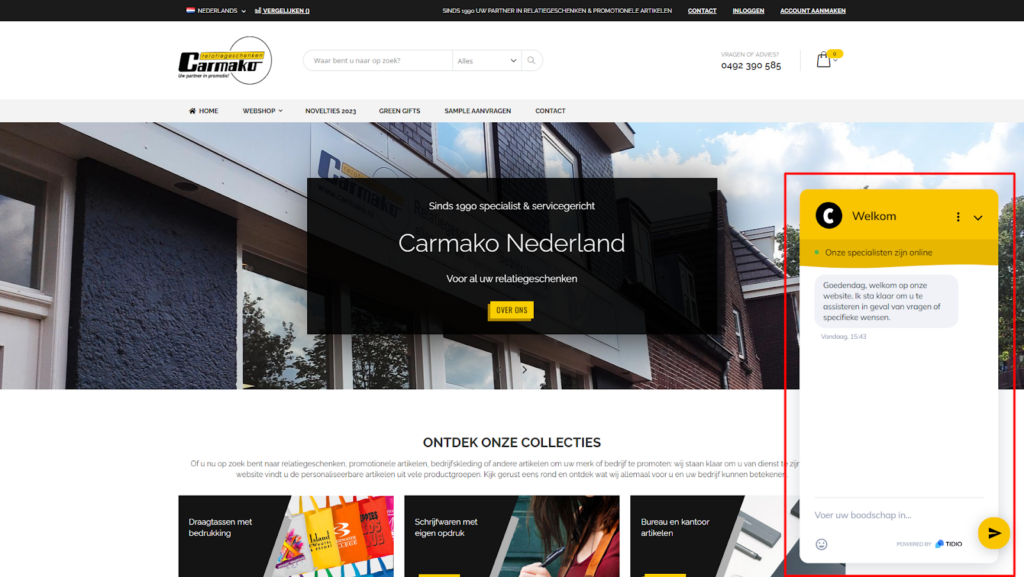
Examples of Chatbots in eCommerce
Here is an example of a chatbot’ from our client’s website.
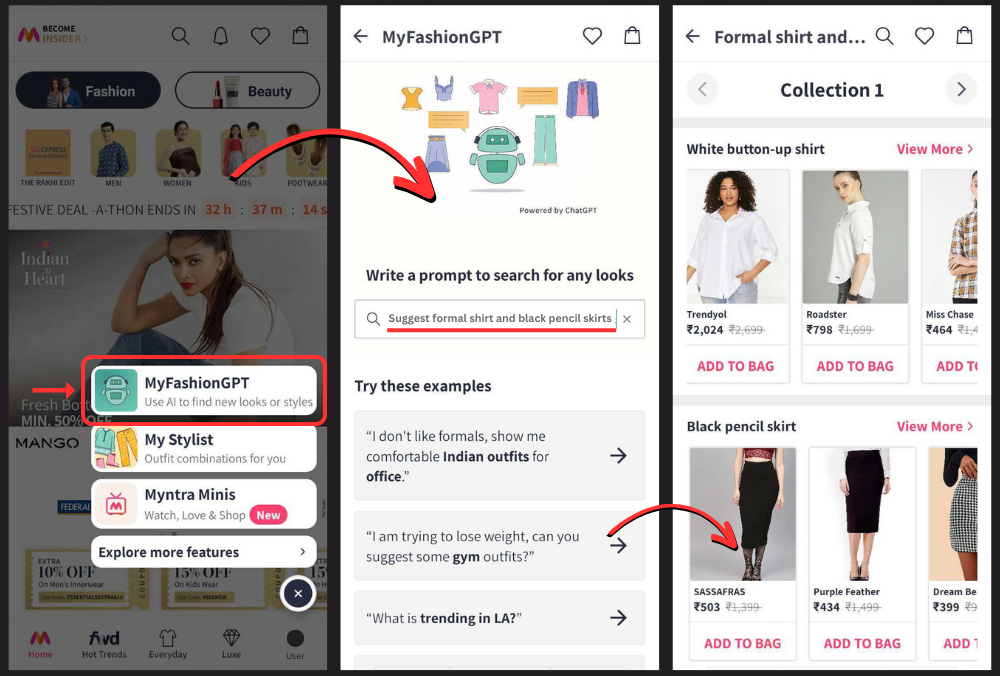
And here’s another example of an AI-based chatbot from Myntra, a fashion brand.
Myntra introduced an AI assistant named MyFashionGPT, powered by ChatGPT. This helps users find products that match their unique requirements.
You can also consider implementing this trending feature to your eCommerce site in a similar way.
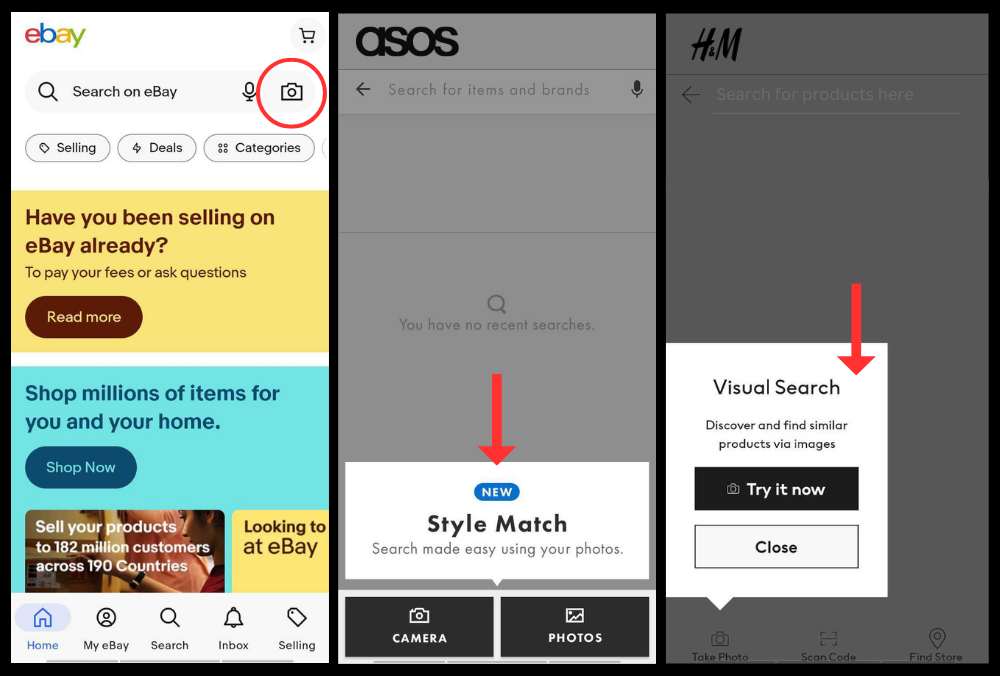
4. Visual Search
Visual search is the process of searching directly through images instead of text. For example, you click a photo or take a screenshot of a dress and upload it on Google Images to buy or find a similar one.
It’s no surprise that visual search is one of the fastest-growing eCommerce trends. 45% of eCommerce business owners have implemented visual search on their websites. This list includes Asos, Boohoo, M&S, eBay, and more.
How Does Visual Search Impacts Customers’ Purchase Decisions?
With the visual search option, people can find exact or similar products they saw others wearing without the hassle of describing product designs, textures, or anything.
Products found through visual search engines can amaze and impress your shoppers, and they’ll look at them more positively than usual. So, if you have a visual search option implemented on your website, it will be easy for you to convince your customers.
Examples of Visual Search in eCommerce
Here’s how eBay, Asos, and H&M implemented visual search options on their eCommerce websites.
This feature helps simplify your customer’s search process and helps your shoppers reach their desired product quickly.
5. Social Commerce
We can call social commerce a branch of eCommerce business, that operates on social media platforms. Shoppers use social commerce to:
Discover brands
Research products
Interact with customer support teams
Purchase items
Social commerce creates the most interactive and convenient shopping experience for your customers. This is the reason, why social commerce revenue in the U.S. grew by $53.1 billion, in 2022 alone.
Let’s check how social commerce helps you boost sales and convince your customers to make a purchase.
How Does Social Commerce Impacts Customers’ Purchase Decisions?
Social media has changed the way people shop, by making it all about authenticity. Now, before making a purchase, people explore social media to:
Know what’s trending
Check the brand popularity
Know stories/reviews from real people
And It’s true. Statista itself says that 28% of online shoppers take shopping inspiration from social commerce. This means you must consider social commerce to showcase your product collection, and invite your target audience to make a purchase.
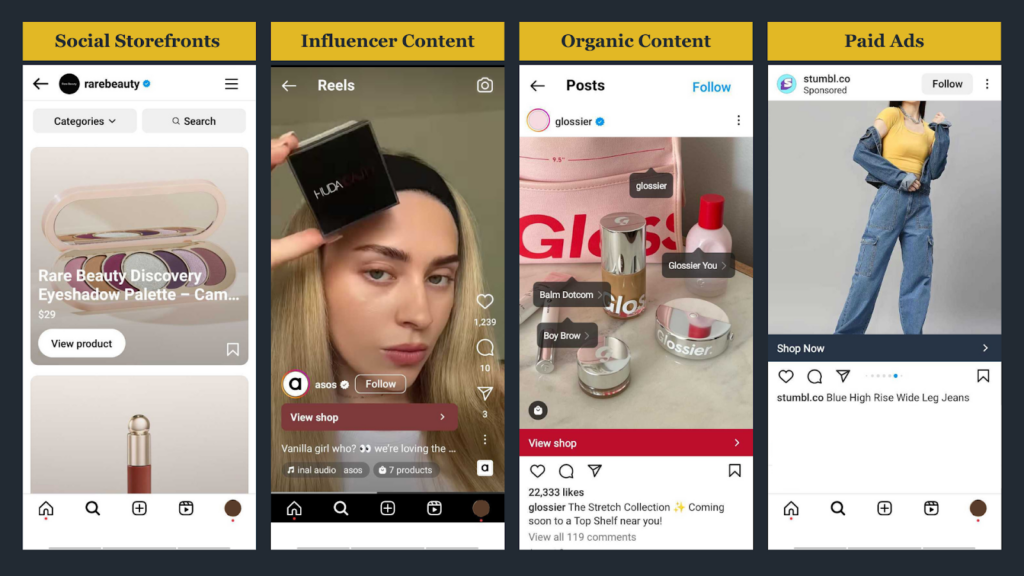
Examples of Social Commerce
There are a variety of ways you can get started with social commerce, and below are some of the most common ways for you to follow.
Storefronts or profiles on Social media
Influencer Content
Shoppable Organic Content
Paid Ads
Here I’m adding examples of how other brands are implementing these trends on their social media channels.
You can take inspiration from these and join this trend of social commerce. By doing so, you can reach a wider target audience and offer your customers a platform to get more familiar with your brand.
6. Mobile Commerce (Mobile Shopping)
Mobile Commerce is the online sale and purchase of products through wireless devices, such as smartphones and tablets — essentially, mobile shopping. It includes:
We live in an economy where people expect everything done within a few taps and swipes on their mobile devices. Right?
More than 60% of people in the world, prefer mobile devices to shop online in 2023. Now, this makes it your priority to jump into this booming trend of mobile commerce.
Let’s understand how holding hands with mobile commerce helps you convince your customers.
How Do Mobile Commerce Impact Customers’ Purchase Decisions?
Mobile commerce comes with many benefits for your customers and you. With mobile commerce, your customers:
Can shop from anywhere and anytime, even while standing on the bus
Can easily navigate, reach your social media handles, and gain more product information
Can compare prices quickly within a few taps
Can use the augmented reality (AR) features to shop in a better way
Can pay through online wallets, such as Google Pay and Apple Pay
In short, mobile commerce can help you make your customers’ purchase journey more convenient, resulting in more online purchases.
Examples of Mobile Commerce
All the eCommerce mobile websites/applications that allow customers to buy and pay online, can be considered as an example here.
Some of those mobile applications/websites are:
Amazon
Etsy
eBay
And more…
Moreover, adapting to mobile commerce trends can help acquire more customers, and provide them a better experience with your brand. So, it is always a good practice to make your eCommerce store mobile-friendly to get mobile shoppers.
7. Live Streaming Commerce
Live streaming commerce is when online retailers sell products online through live video while interacting with shoppers in real time.
It is in trend because it helps brands reach a wider audience, interact and engage with them in real time, to sell them products. Many companies say their conversion rates went 10x higher with live-streaming commerce.
So, what are some aspects of live-streaming commerce that convince your customers to buy more than usual? Let’s uncover.
How Does Live Streaming Commerce Impact Customers’ Purchase Decisions?
Live streaming is working well for eCommerce business owners, as it:
Enables real-time interactions, leading to increased trust in your brand.
Shows products in action, leading to improved product knowledge.
Shares attractive or limited-time offers, leading to immediate purchase decisions.
Includes social proof in the form of live chat and comments, leading to increased confidence to buy.
So, yes, all these were the reasons why live streaming is better at driving immediate purchase decisions.
Live streaming commerce attracts a huge list of new customers along with existing ones. This especially consists of youth, who are keen to understand and experiment with new formats of shopping online.
Example of Live Streaming Commerce
Here’s an example of live-streaming commerce from YouTube Live.
If you want to livestream your products, you can choose from various platforms like Instagram Live, YouTube Live, Amazon Live, Alibaba, or even become a TV channel creator to broadcast directly to your audience through dedicated TV channels.
8. Localization
eCommerce Localization aims at creating more personalized and relevant online shopping experiences for customers from different regions.
It includes all the aspects of your eCommerce stores, be it;
Content
UI/UX
Language
Marketing tactics
Currency
… And more. The simple idea behind localization is to do business in multiple markets without facing any cultural barriers. Let’s check how your customer’s purchase decision can be influenced if you localize your eCommerce store.
How Does Localization Impact Customers’ Purchase Decisions?
When your website addresses your customer’s needs and queries in their local language and cultural preferences, they feel more emotionally connected and understood.
This connection helps customers build trust in your brand, which often convinces them to make a purchase.
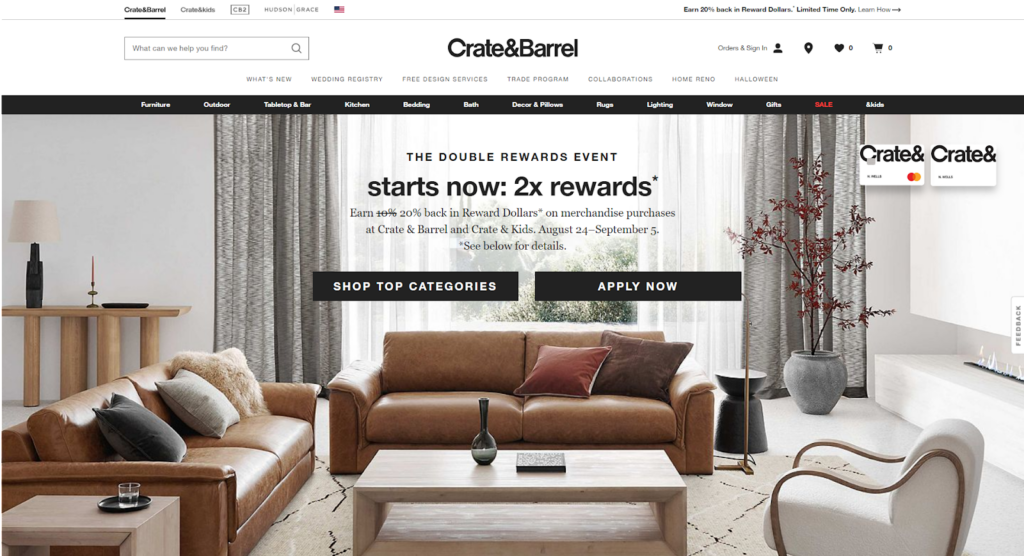
Example of Localization
Here’s an example of how Crate & Barrel localized their eCommerce site while entering the UAE market.
This is the original version of Crate & Barrel’s website.
This is how they localized content and language to match the cultural preferences of the people in UAE.
If you’re looking to enter different regions with your eCommerce business, do consider localization. It allows your customers to welcome your brand and lets you build a strong brand presence.
9. Personalized Shopping Experiences
A personalized shopping experience involves providing an experience that is unique to each customer, depending on their browsing behavior and user profile.
For example, if you purchased a t-shirt online, on your next visit, the store might suggest their denim jeans collection that perfectly matches your purchase.
… And more. A study also found that 71% of customers expect personalized shopping experiences.
So, why personalized shopping experiences are highly preferred by customers? Is this the thing that motivates them to buy? Let’s check.
How Does Personalized Shopping Experience Impact Customers’ Purchase Decisions?
The clothing store I often shop from knows my fashion preferences. Every time I visit them, they suggest products that match my interests.
What makes me a loyal customer — besides their amazing collection — is this personalized experience. Customers appreciate it when brands make an effort to understand individual choices and preferences, and then tailor offerings to meet those needs.
This results in higher customer loyalty, and satisfaction, which helps you boost eCommerce sales.
Example of Personalized Shopping Experience
Here’s an example of a personalized product suggestion from H&M that encourages customers to buy products that complement their current interests.
You can consider adapting this growing eCommerce trend to your store. Because personalization significantly helps improve customer experience.
10. Buy Now, Pay Later
Buy Now, Pay Later is a short-term loan, where customers can purchase a product and pay over time, usually for full amounts or installments (with no interest sometimes).
You’ve probably come across this trend, haven’t you? Initially, when I learned about it, I was skeptical. It seemed too convenient and advanced to be true. However, nowadays, I notice that a majority of eCommerce stores offer the option of buy now and pay later.
But why is this the case? Well, the reason is that more than 360 million people, worldwide, prefer the Buy Now Pay Later option. So, is it impactful for your customers?
How Does the Buy Now, Pay Later Option Impact Customers’ Purchase Decisions?
The name itself, “Buy Now, Pay Later”, is pretty convincing to customers. Shoppers are always mindful of prices, and they might hesitate to purchase;
If something doesn’t quite fit their budget,
Or if they’re trying to save up for emergencies.
But the “Buy Now, Pay Later” option comes in pretty handy. With this, your customers can get what they want without any immediate payment pressure. Moreover, customers prefer it over credit cards and personal loans since it’s easier to get approved and often comes without interest.
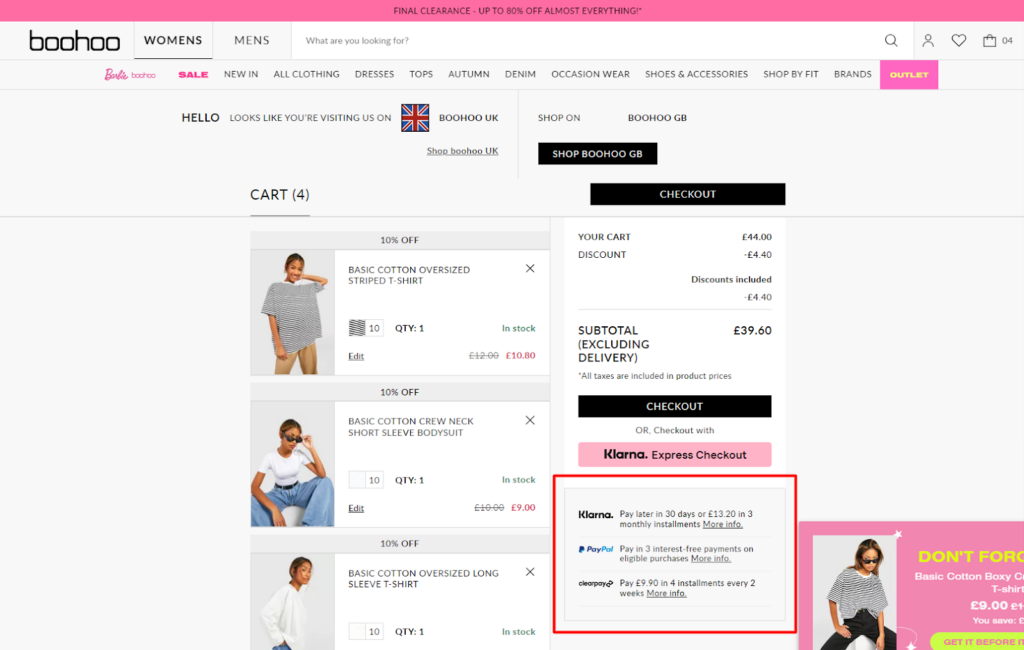
Examples of Buy Now, Pay Later
Here’s an example of Buy Now Pay Later, from a fashion brand Boohoo.
This new eCommerce trend of Buy Now Pay Later can turn out a win-win situation for both your customers and your business. So, consider this trend for your eCommerce growth.
11. Payment Through Digital Currency
Digital currency is a currency, money, or money-like asset that is managed, stored, and exchanged by computer-based devices, over the Internet.
There is a trend flying over eCommerce world — payment through digital currency — where eCommerce stores have started to accept digital currencies as a payment. This often works around cryptocurrency, which is a type of digital currency.
So, is customer purchase decision really influenced by the existence of digital currency as a payment method? Or have customers never required this? Let’s check.
How Accepting Digital Currency for Payment Can Impact Customers’ Purchase Decisions?
Usage of digital currencies is growing widely, people have slowly but steadily started to embrace digital currency, as a way of investment and transaction. The reasons why people are switching to using digital currency are:
It can be used globally
Transactions are quick and easy in comparison to traditional banking system
It’s highly secure and difficult to get hacked
Protects against traditional money devaluation
… And more.
People are so attracted to digital currency, that more than 15000 businesses, till now, accept it as a payment option. So, when you start accepting digital currency as a payment option on your eCommerce store, your customers will definitely appreciate it.
Examples of brands that accept Digital Currency
Here are some top brands that accept digital currency as an option of payment.
Tesla
YSL
Gucci
Microsoft
… And many more. You can also look forward to this trend of cryptocurrency and wow your customers.
12. Sustainable eCommerce
Environment awareness has long been a trend in eCommerce.
Most eCommerce brands realize their responsibility towards nature and are in a try to get environment conscious. There are many ways they’re following this trend of sustainability, including:
Launching sustainable and ethical product collections. For example, bamboo toothbrush, vegan leather wallet, and more.
Providing sustainable and ethical packaging. For example, reusable glass jars, metal tins, paper bags, fabric bags, and more.
Promoting second-hand products. For example, refurbished appliances, second-hand jewelry, used baby equipment, and more.
… And more. But do customers really care if an eCommerce brand labels itself as environment-conscious? Let’s check how customers are affected by this new trend of sustainability.
How Does the Sustainable Commerce Approach Impact Customers’ Purchase Decisions?
When brands make efforts to make and sell products in an ethical manner that are easy to recycle and cruelty-free, customers love to show support.
GenZ and millennials today understand how their choices impact the world, and that’s why they are always willing to choose sustainable products. This often helps brands build valuable connections with customers, making it a win-win situation for both customers and businesses.
Examples of the Sustainable Commerce Approach
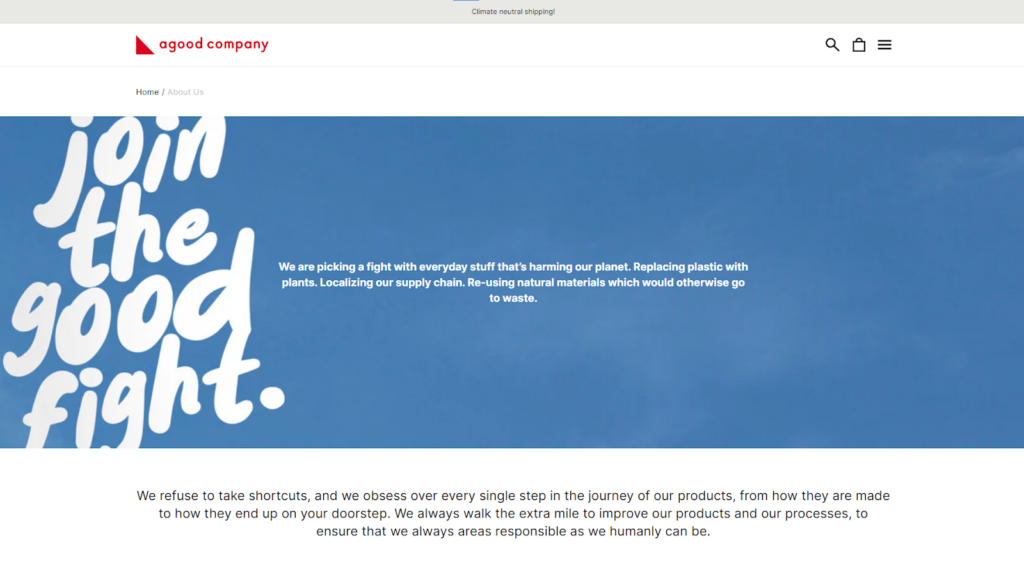
Here’s an example of an eCommerce brand, named “A Good Company”, which sells sustainable & environment-friendly products — Which is a great initiative.
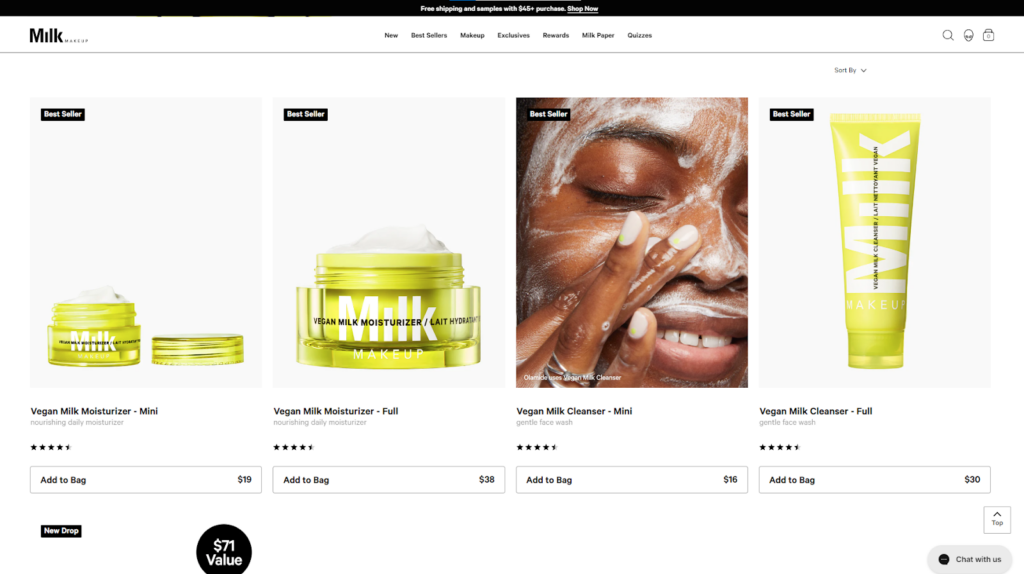
Some brands like Milk Makeup, also launch specific ethical product collections that are good for the environment and are cruelty-free. Here’s an example.
It’s great if you’re also looking to follow this trend of sustainability. Doing so will help you convince your customers better, and take a step for the future of our planet.
Here our list of the biggest eCommerce trends of 2024 ends. Now, let’s check the impact of not following these trends that your customers care most about.
Why Considering eCommerce Trends is Necessary?
In earlier times websites used to be a lot different than what is it today. There were issues such as:
Tacky designs and visuals
Improper product view
Slow loading times
Incompatibility with mobile devices
And a lot more, which resulted in poor customer experience, lower online sales and conversions, and a negative brand image. But slowly and steadily eCommerce websites have grown enough to provide the best kind of customer experience.
So, what helped make this progress? Is it all done overnight? NO.
It’s each and every eCommerce trend that catered to customer expectations and brought the eCommerce industry experience to what it is today.
As an eCommerce owner, you should focus on recent and upcoming trends that matter for your business. After all, following trends helps you match your customers’ preferences and provide them best experience with your brand. Ain’t it?
Another thing, you might be wondering is if you need to follow each of these eCommerce trends to watch your store’s success. So, let’s figure that out.
But many of those eCommerce trends, do matter. So, to figure out eCommerce trends you need to adapt, you can carry out research on stuff like;
Does your business need this?
Is it any way benefiting your customers?
If the answer is YES, go for it.
So, Joining the eCommerce Trend Evolution?
Well, you should.
Just look around — customer expectations are increasing every day and the eCommerce industry (including your competitors) is moving far enough to match them.
If you are not following these eCommerce trends that help improve customer experience with your brand, you may fall back on your success race.
So, why WAIT & RISK? Rather than getting started?
PS: We are a web development agency with a decade of experience (in eCommerce), that can help you get started with any of your web-related requirements. So, don’t hesitate to Contact Us today.