
In today’s article, I will be explaining the most Useful Hyva JavaScript Events that can be used while working with the Hyva theme.
private-content-loaded event
In contrast to how Default Magento luma works, Hyva loads all customer section data together. It is loaded as a single data structure, and then – when the data is available – the event private-content-loaded is dispatched.
We can get the private section data using both Native Javascript and Alpine.js.
Using Native Javascript:
<script>
window.addEventListener("private-content-loaded", function(event) {
    console.log(event.detail.data);
});
</script>
Using Alpine JS:
<div x-data="" @private-content-loaded.window="console.log($event.detail.data)">
</div>
Note: All section data are available in the event.detail.data object. The object keys are the section names.
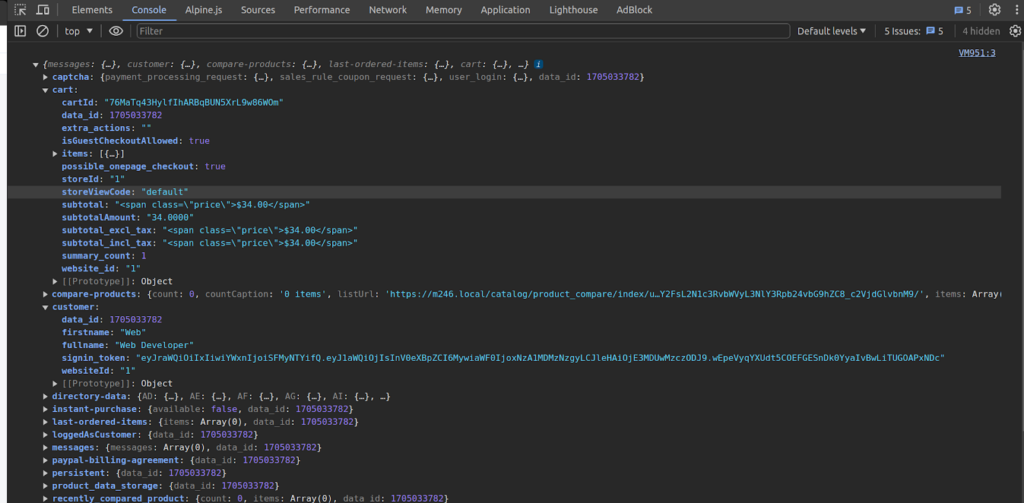
Output: You will get the below response in the browser console when private section data is loaded.
reload-customer-section-data event
Reloading/Invalidating Section Data on the client side can be done with the dispatching “reload-customer-section-data” event.
window.dispatchEvent(new CustomEvent("reload-customer-section-data"));Note:
- In contrast to Magento Luma themes, in Hyvä private content sections data are not invalidated/reloaded individually.
- The whole section data is only reloaded from the server if the current data is older than 1 hour, or the “private_content_version” cookie is changed.
- This can be either after a POST-request, or when the data is more than 1 hour old.
When we dispatch the “reload-customer-section-data” event, it will cause the Section Data to be reloaded if it is expired or the “private_content_version” cookie is changed, then the private-content-loaded event will be triggered again.
If you want to force-reload the Section Data, we can do this by removing the “mage-cache-sessid cookie” before dispatching the “reload-customer-section-data” event.
// remove the mage-cache-sessid cookie
hyva.setCookie('mage-cache-sessid', '', -1, true);
// reload the section data
window.dispatchEvent(new CustomEvent("reload-customer-section-data"));
The private-content-loaded event will always be triggered after reloading the section data, regardless if it was requested from the server or read from local storage.
New to Hyvä?? Learn about the Hyvä Theme from basics!
toggle-authentication event
The “toggle-authentication” event triggers the Hyva authentication popup. You can trigger the event using the below code.
window.dispatchEvent(new CustomEvent("toggle-authentication"));The effect of this event depends on the below two things.
- Whether the customer is logged in or not.
- If guest checkout is enabled or not from the configuration.
If the customer is not logged in and Guest checkout is disabled, the toggle-authentication event trigger will open the Hyva authentication popup and the customer can able to login. After the customer login, it redirects the customer to the checkout page.
Note: If the authentication popup already is open, further toggle-authentication events do not hide the authentication popup again.
If the customer is not logged in and guest checkout is enabled, the toggle-authentication event trigger will redirect the customer to the checkout page.
If the customer is already logged in and toggle-authentication event trigger will redirect the customer to the checkout page.
By default customer is redirected to the checkout page when the customer logged in using an authentic popup, but you can give an alternate URL as the redirect target by setting detail.url on the event argument.
window.dispatchEvent(new CustomEvent("toggle-authentication", {detail: {url: "/"}}));toggle-cart event
You can use the toggle-cart event to open the mini-cart popup. You can trigger the event using the below code.
window.dispatchEvent(new CustomEvent("toggle-cart")); // open mini-cart PopupOnce the mini-cart popup is visible, consecutive triggering toggle-cart events will not hide the mini-cart again.
Since Hyvä 1.3.0, it’s possible to close the mini cart popup by adding the {isOpen: false} in the event detail parameter.
window.dispatchEvent(new CustomEvent("toggle-cart", {detail: {isOpen: false}}));Note: this event would still open the mini-cart in earlier versions of Hyvä.
configurable-selection-changed event
This event is dispatched when selecting/updating the configurable option or swatches on the product detail page.
The event payload is
{
 productId: (string) the configurable productId,
 optionId: (string) the newly selected optionId,
 value: (string) the newly selected option value,
 productIndex: (string) productId of the simple product used to display the image,
 selectedValues: (array) map of selected optionIds to option values,
 candidates: (array) productIds matching the current selection,
}
If there is only one product ID in the candidate’s array, all required options have been selected.
If there are multiple candidates, the selection is incomplete.
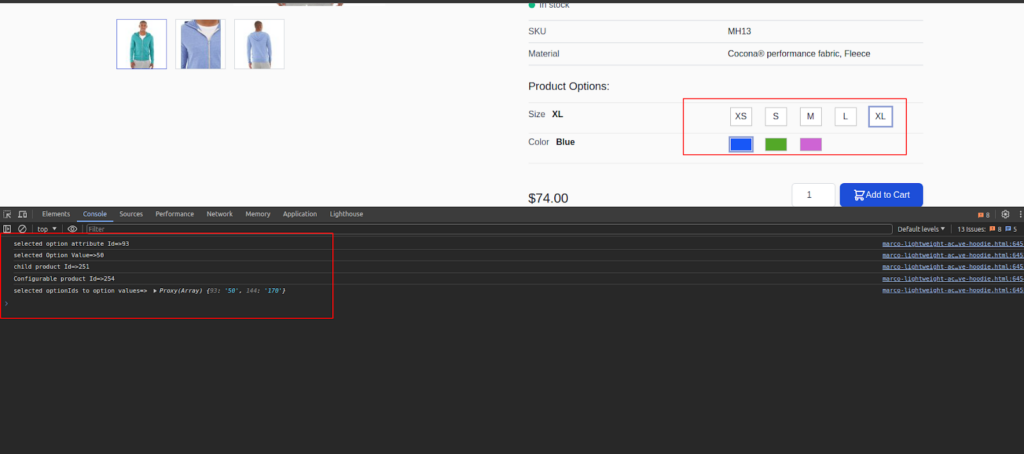
You can use this event to make some changes after the configurable option or swatches updates. You can use the below code to observe the configurable-selection-changed event.
<script>
window.addEventListener('configurable-selection-changed', function(event) {

   var eventData = event.detail;

   if (eventData) {
       console.log("selected option attribute Id=>"+eventData.optionId);
       console.log("selected Option Value=>"+eventData.value);
       console.log("child product Id=>"+eventData.productIndex);
       console.log("Configurable product Id=>"+eventData.productId);
       console.log("selected optionIds to option values=>", eventData.selectedValues);
   }
});
</script>
Output:
listing-configurable-selection-changed event
This event is dispatched whenever a configurable product option or swatches is selected on the product listing page.
The event payload is
{
 productId: (string) the configurable productId,
 optionId: (string) the newly selected optionId,
 value: (string) the newly selected option value,
 productIndex: (string) productId of the simple product used to display the image,
 selectedValues: (array) map of selected optionIds to option values,
 candidates: (array) productIds matching the current selection,
}
If there is only one product ID in the candidates array, all required configurable products options or swatches have been selected.
If there are multiple candidates, the selection is incomplete.
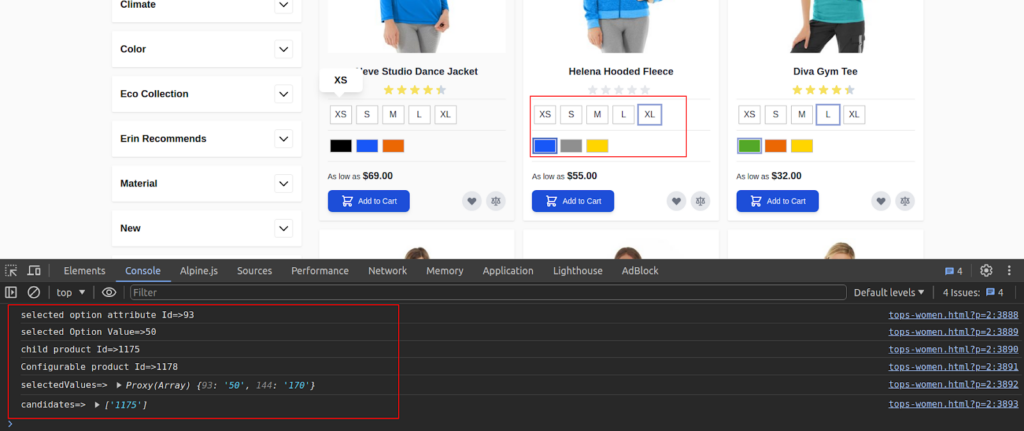
This event can be observed to update parts of the page whenever a configurable product option or swatches are selected. You can use the below code to observe the listing-configurable-selection-changed event.
<script>
   window.addEventListener('listing-configurable-selection-changed', function(event) {

       var eventData = event.detail;

       if (eventData) {
           console.log("selected option attribute Id=>"+eventData.optionId);
           console.log("selected Option Value=>"+eventData.value);
           console.log("child product Id=>"+eventData.productIndex);
           console.log("Configurable product Id=>"+eventData.productId);
           console.log("selectedValues=>", eventData.selectedValues);
           console.log("candidates=>", eventData.candidates);
       }
   });
</script>
Output:
update-product-final-price event
This event is only relevant on the product detail page. This event is dispatched when a customer selects product options that influence the product price.
The product options component observes the event and recalculates option price changes accordingly. Some components that need access to the current final price can also observe this event.
<input @update-product-final-price.window="recalculateWithFinalPrice(event.detail)" />update-prices-<?= (int)$product->getId() ?> event
This event is only relevant on the product detail page and product listing page.
This event is dispatched when the customer selects the options that select the different associated simple products.
On product detail pages the values are given using the keys oldPrice and finalPrice if the price is including tax, and baseOldPrice and basePrice if the price is displayed excluding tax.
On product listing pages such as categories, the keys always are finalPrice and oldPrice.
update-qty-<?= (int)$product->getId() ?> event
This event is only relevant on product detail pages.
This event is dispatched, whenever the product quantity for the add-to-cart input changes. The new quantity is passed in event.detail.
Components that need the quantity field value can observe this event.
<script>
   const updateQtyEventName = 'update-qty-<?= (int)$product->getId() ?>';
   window.addEventListener(updateQtyEventName, function(event) {
       console.log("current product Qty=>", event.detail);
   });
</script>
update-gallery event
This event is only relevant on product detail pages. It is dispatched to change the images in the product gallery.
The event payload contains an array of objects describing the new images to display. Those image objects in the event.detail array has the following structure:
{
   thumb: "https://...small image url",
   img: "https://...medium image url",
   full: "https://...large image url",
   caption: "the image label",
   position: 1,
   isMain: false,
   type: "image",    // or 'video',
   videoUrl: null    // or 'https://...youtube or vimeo video url'
}
We can dispatch the update-gallery event to update the visible product images or observe the event to be able to do some custom changes after image changes happen.
// It will update the visible product image in the gallery
window.dispatchEvent(new CustomEvent('update-gallery', {detail: [{
   thumb: "https://m246.local/media/catalog/product/w/t/wt09-yellow_main_1.jpg",
   img: "https://m246.local/media/catalog/product/w/t/wt09-yellow_main_1.jpg",
   full: "https://m246.local/media/catalog/product/w/t/wt09-yellow_main_1.jpg",
   caption: "image Label",
   position: 1,
   isMain: false,
   type: "image",
   videoUrl: null
}]}));
To revert the gallery to the initial image, dispatch the update-gallery event with an empty image array in event.detail.
window.dispatchEvent(new CustomEvent('update-gallery', {detail: []}));More resources on Hyva themes:
- InstaBuild—Hyvä Theme Accelerator: Best Alternative To Custom Hyvä Development
- Hyva Themes Development – For Online Merchants
- Hyvä Theme Benefits that your store needs
- 10 Best Hyva Compatibility Extension Providers For Magento 2 Stores
- Hyvä VS PWA: Where to Invest?
- How a Slow Magento Website Can Cost You Advertising Dollars
- Mobile Commerce: How Hyva Themes Boost Mobile Conversions


Post a Comment
Got a question? Have a feedback? Please feel free to leave your ideas, opinions, and questions in the comments section of our post! ❤️